Houdini 20.0 Nodes LOP nodes

Layout

Provides tools for populating a scene with instanced USD assets. You can place individual components, paint/scatter components in different ways using customizable brushes, and edit existing instances.

On this page
Since 19.0

Overview

The layout node provides a user interface and viewer state for placing/scattering/painting USD assets as point instances.

This node creates a USD point instancer in the scene tree. When you place, paint, scatter, delete (and so on) assets, the node is actually working with points, and instancing USD assets onto them.

Interactions in the viewer are implemented by interchangable brushes. A brush is essentially a SOP network HDA that processes instancing points and user interactions, and you can create your own custom brushes.

The Layout node also lets you switch to Edit mode, which provides the same tools as the Edit node, for positioning assets using handles and/or physics simulations.
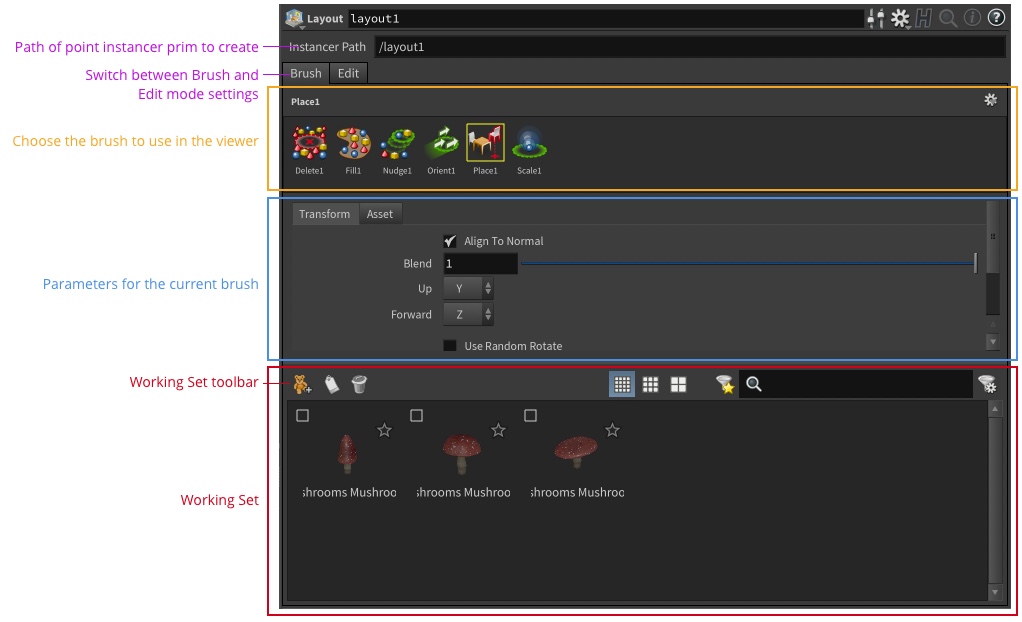
The layout has a custom UI in the parameter that is divided into distinct vertical areas:

  • The Instancer path parameter controls where in the scene graph tree the node creates the USD point instancer prim it uses to instance assets onto points.

  • You can press ⇧ Shift + B in the viewer to switch between brush mode and edit mode. In the parameters, the settings for the two modes are on separate tabs.

  • At the top of the Brush tab, the node shows all the available layout brushes.

  • Below the brush gallery, the node shows the parameters of the currently selected brush.

  • Below the brush parameters is the working set area, with its own toolbar.

Working set

The working set is a list of assets (from the asset gallery) you set up to tell the current brush what assets it should instance into the scene. How the brush uses the contents of the working set is specific to each brush.

To...Do this

Add assets to the working set

  1. In the Layout node parameter UI, click the button above the working set area to show the Asset Gallery.

  2. Press the “Add to” button at the bottom of the asset gallery or drag assets directly into the working set.

Temporarily have the brush use a subset of the assets in the working set

  • If no assets in the working set are selected or checked, the brush uses all assets.

  • If some assets are selected (but no assets are checked), the brush uses only the selected assets. This lets you easily switch between subsets (for example, plant assets vs. rock assets) by selecting.

  • If any assets are checked (the checkbox in the top left corner of the asset thumbnail is turned on), the brush uses only the checked assets. This lets you “lock” a subset without having to worry about accidentally changing the selection.

Remove an asset from the working set

  • Right click the asset and choose Delete.

    or

  • Select the asset (or multiple assets) and press ⌦ Del.

Organize, filter, and search the working set

The working set has the same metadata tagging, filtering, and search features as the asset gallery pane. See organizing, filtering, and searching assets in the asset gallery help.

Brush mode

In the viewer, press ⇧ Shift + B to switch between Brush mode and Edit mode.

In Brush mode, the current brush asset interprets user interactions in the viewer and translates them into additions/deletions/edits of the points in the point instancer created by this node.

How the brush uses the assets in the working set is up to each brush. Some brushes might pick assets from the working set at random. One brush might use the order of the working set, and another brush might ignore it. A brush such as Delete will even ignore the working set entirely.

Houdini comes with the following predefined brush assets. See the help for each individual brush for how to use it and its parameters.

Comb

Comb assets so that their orientations match the direction of the stroke.

Delete

Deletes instances as you brush over them.

Fill

Lets you draw a shape and fill it with instances.

Line

Places assets along a straight of free-form line.

Nudge

Picks up and moves assets under the brush.

Orient

Turns instances in a certain direction as you brush over them.

Paint

Lets you paint instances following a distribution profile inside a world space radius.

Place

Click to place an individual instance. Drag to set an instance’s size and orientation while placing it.

Scale

Scale instances by a certain amount as you brush over them.

Stack

Allows stacking of assets along the surface normal.

To...Do this

Switch brushes

Click a brush in the Brush tab of the parameter UI, or press C in the viewer to choose from a radial menu of the available brushes.

Create a brush preset

  1. Right click the brush you want ot make a preset for and choose Duplicate to create a new copy of the underlying brush asset, with its own parameter values.

  2. Set up the parameters for the new copy.

  3. Double-click the name under the duplicate brush and give it a meaningful label that will help you remember how the parameters are set up on this copy.

Create a custom Layout brush asset

A brush is mostly just a SOP network that reacts to user events and creates, deletes, or changes the attributes on points. See how to make a custom Layout brush.

Edit last stroke

A brush “stroke” is a mouse click or drag. Some brushes accept multiple clicks/drags in a single “stroke” (like the Fill brush in Grid mode, where it takes multiple drags to define rectangular fill shape). However, the user can end the current stroke any time by pressing Enter.

The Edit last stroke checkbox in the operation toolbar for the Layout node (above the viewer) controls whether the brush parameters continue to affect the previous stroke, or only affect the next stroke.

When the checkbox is on, if you change brush parameters, the node will recompute the outcome of the previous stroke with the new parameters. This allows you to interactively see the effect of the parameter changes.

Tip

If you want to change parameters in anticipation of the next stroke, without affecting the previous stroke, turn Edit last stroke off, then edit the parameters, then make a new stroke in the viewer. You can then turn the checkbox back on.

  • By default brushes will collide against the input stage and the assets placed by the current Layout node. If you only want to collide against one of these groups then the Brush Intersection dropdown in the viewer toolbar controls this.

Edit mode

In the viewer, press ⇧ Shift + B to switch between Edit mode and Brush mode. If there is a selection in Brush mode, and you manipulate the handle it automatically puts you in Edit mode.

Edit mode gives you the viewer state of the Edit LOP within the Layout node. You can use the edit handle to move, resize, and rotate assets.

Tip

In Edit mode, in the operation toolbar (above the viewer), set Pivot Mode to Transform so the handle appears centered on the selected asset.

To...Do this

Select assets to edit

  1. Switch to edit mode.

  2. Hold S to enter Selection mode.

  3. In the operation toolbar above the viewer, set Kind to Leaf Instances.

  4. Click an instanced asset to select it.

Use the Edit handle/parameters to edit assets

See the help for the Edit LOP for how to use it to edit assets.

Duplicate assets

  1. Select an asset to show its transform handle.

  2. Hold Z and use the handle to “drag out” a copy of the asset.

Note

This only works with instances created by this Layout node.

Instancing method

In the Options tab, in the parameter interface, there is a menu to choose the instancing method. The default, Point Instancer, is the fastest option. However, Point Instancer does not allow you to use physics-based tools in Edit mode (for example, piling up objects using simulated gravity and collisions).

If you want to use the physics-based tools in Edit mode, change the menu from Point Instancer to Instanceable Reference.

Tips and notes

  • If possible, you should work with low-polygon display proxies for the models (if you create your assets with the component builder tool, it is easy to build a display proxy for each asset). Laying out large numbers of full-geometry models can be slow.

  • For optimal performance make sure the instancer method is Point Instancer, the only caveat being that physics in Edit mode as it does not support point instances at this time.

Parameters

Operation toolbar

Edit Last Stroke

Changes you make to the parameters change the outcome of the previous stroke. Turn this off to set up different values for the next stroke without affecting the last stroke.

Show Instance Points

Show orange square rings representing the points the assets are instanced onto.

Brush Intersection

All

Paint on both the input geometry and any assets added by this node.

Assets

Paint on existing assets added by this node, but not on the input geometry.

Input

Paint on the input geometry, but not on existing assets added by this node.

Reset Changes

Delete all points/instances added in this node.

Debug Brush

Enter Debug mode, in this mode you can draw a stroke in the viewport and the layout state will generate a SOP network emulation of the layout state containing the current brush. This allows you to step through the stroke which is useful for both debugging brush failures and for building new brushes.

Asset Scale

Post brush application scale factor that allows scaling of all assets independent of what the current brush is.

See also

LOP nodes

  • Add Variant

    Adds one or more variants to a variant set on a primitive. This node creates the primitive if it doesn’t exist.

  • Additional Render Vars

    Create multiple render vars.

  • Asset Reference

    Reference, Transform, and select variants of a USD Asset.

  • Assign Material

    Assigns a material to one or more USD primitives. You can use also programmatically assign materials using VEX, programmatically override material settings for each assignment, and programmatically assign materials to geometry subsets.

  • Assign Prototypes

    Switch point instances or USD instanceable prims to instance a different prototype.

  • Attribute VOP

    Create/edit USD attribute values using a VOP network.

  • Attribute Wrangle

    Create/edit USD primitive attributes using a VEX snippet.

  • Auto Select LOD

    Automatically selects a level-of-detail variant based on the primitive’s distance from the camera.

  • Background Plate

    Sets up hold-out or matte objects that leave holes in the scene through which the background is visible. These prims still take shadows and contribute to reflections as if they were the background.

  • Bake Skinning

    Bakes animation driven by a UsdSkel into transforms and point positions.

  • Basis Curves

    Creates or edits a basis curves shape primitive.

  • Begin Context Options Block

    This node begins a block of LOP nodes, within which certain context options have certain values.

  • Blend

    Partially applies edits to a layer’s attributes based on a fractional weight.

  • Blend Constraint

    Blends transforms according to a list of weights specified as parameters.

  • Cache

    Caches the results of cooking the network at different times, increasing playback speed.

  • Camera

    Adds a USD camera to the scene.

  • Capsule

    Creates or edits a capsule (tube with hemispherical ends) shape primitive.

  • Collection

    Creates/edits collections using primitive patterns.

  • Component Geometry

    Geometry container or import source, in a network created by the Component Builder tool.

  • Component Geometry Variants

    Sets up geometry variants, in a network created by the Component Builder tool.

  • Component Material

    Assigns materials to geometry in a network created by the Component Builder tool.

  • Component Output

    Assembles the final Component prim, in a network created by the Component Builder tool.

  • Cone

    Creates or edits a cone shape primitive.

  • Configure Layer

    Edits metadata on a layer.

  • Configure Primitives

    Edits various metadata on one or more primitives.

  • Configure Properties

    Configures metadata on properties (relationships and attributes).

  • Configure Stage

    Configures metadata for how to load layers into the stage and asset resolution.

  • Coordinate System

    Define named coordinate systems used in shaders.

  • Copy Property

    Copy properties from one primitive to another, or renames properties on a primitive.

  • Create LOD

    Uses the PolyReduce SOP to automatically generate multiple levels of detail from a high-res model, and stores them as USD variants.

  • Cube

    Creates or edits a cube shape primitive.

  • Cylinder

    Creates or edits a cylinder shape primitive.

  • Distant Light

    Creates or edits a USD Distant Light, representing a far-off light source such as the sun. Adds some useful Karma-specific attributes.

  • Dome Light

    Creates or edits a USD Dome Light prim. A dome light emits light inward, simulating light coming from the sky/environment surrounding the scene.

  • Drop

    Runs a simulation to drop primitives under gravity.

  • Duplicate

    Creates copies of a prim (and its descendants).

  • Edit

    Interactively transforms prims in the viewer. Can use physics collisions to position props realistically.

  • Edit Context Options

  • Edit Material

    Allows you to edit an existing USD material by modifying parameters and shader connections. This can be useful if the existing material is on a non-editable layer.

  • Edit Material Properties

    Lets you build a spare parameter interface that reflects material or shader input attributes to directly edit their values.

  • Edit Properties

    Lets you build a spare parameter interface to directly edit attribute and relationship values.

  • Edit Properties From Node

    Lets you refer to the parameter on another node to directly edit attribute and relationship values.

  • Edit Prototypes

    Modify the prototypes of native or point instances in-place, without disturbing the instancing setup.

  • Edit Target Layer

    Allows you to apply edits directly in a lower layer, instead of overriding prims and attributes in the active layer.

  • Error

    Generates a message, warning, or error, which can show up on a parent asset.

  • Explore Variants

    Visualize, set, or extract variants on primitives.

  • Extract Instances

    Converts (heroes) an instance into a real editable prim.

  • Fetch

    Grabs the output of another LOP, potentially in another LOP network.

  • File Cache

    Caches (writes out once and then reads from) USD layers (possibly animated) to disk.

  • Follow Path Constraint

    Constrains a prim to follow a path curve.

  • For Each

    The end node of a For-Each loop block.

  • Geometry Clip Sequence

  • Geometry Sequence

    Imports a sequence of geometry files into LOPs as animated geometry.

  • Geometry Subset VOP

    Creates USD geometry subsets within geometry prims (similar to groups in SOPs) based on evaluating a VEXpression or VOP network.

  • Graft Branches

    Takes prims/branches from the second input and attaches them onto branches of the scene graph tree in the first input.

  • Graft Stages

    Takes scene graph trees from other inputs and attaches them onto branches of the scene graph tree in the first input.

  • HDA Dynamic Payload

    Cooks a OBJ or SOP asset on disk and imports the animated geometry output as a USD payload.

  • Hermite Curves

    Creates or edits a hermite curves shape primitive.

  • Houdini Feather Procedural

    Generates feathers for rendering.

  • Houdini Preview Procedurals

    Invokes Houdini Procedurals while working interactively.

  • Houdini Procedural: Hair

    Houdini Hair Procedural for Solaris.

  • Houdini Procedural: Ocean

    Houdini Ocean Procedural for Solaris.

  • Inline USD

    Parses usda code representing a layer and adds it to the layer stack.

  • Insertion Point

    Represents a point in the node graph where nodes can be inserted.

  • Instancer

    Instances or copies primitives onto points.

  • Instancer

    Create multiple render products sharing common settings.

  • Isolate Scene

    Work in masked areas of the stage.

  • Karma

    Renders the USD scene using Houdini’s Karma renderer.

  • Karma Cryptomatte

    Setup Cryptomatte AOVs for Karma.

  • Karma Fog Box

    Creates a constant volume within a box.

  • Karma Physical Sky

    Creates a Karma Sky Dome and Sun Light rig.

  • Karma Render Properties

    Configure Render Properties for Karma.

  • Karma Sky Dome Light

    Creates or edits a Karma Sky Dome Light.

  • Karma Standard Render Vars

    Create standard karma render vars (AOVs/Image Planes).

  • LPE Tag

    Manage Lights' LPE Tags.

  • Labs Karma AOVs for RenderMan Denoiser

    Generates AOVs for the Pixar RerderMan denoiser.

  • Labs RizomUV Optimize

  • Labs RizomUV Rectangularize

  • Labs RizomUV Unwrap

  • Layer Break

    Starts a new active sublayer that subsequent nodes will edit, and indicates all previous layers will be discarded when saving to disk.

  • Layer Replace

    Replaces all uses of a certain layer with a substitute layer from its second input.

  • Layout

    Provides tools for populating a scene with instanced USD assets. You can place individual components, paint/scatter components in different ways using customizable brushes, and edit existing instances.

  • Light

    Creates or edits a USD Light prim. This node also adds some useful Karma-specific attributes.

  • Light Filter Library

    Authors USD light filter primitives from VOP nodes.

  • Light Linker

    Creates USD light link properties based on rules.

  • Light Mixer

    Lets you interactively edit USD properties for multiple lights.

  • Load Layer for Editing

  • Loft Payload Info

    Adds basic information from inside a payload to the primitive that loads the payload.

  • Look At Constraint

    Constrains a prim to always point toward a target.

  • Mask from Bounds

    Sets a primvar based on whether/by how much selected prims are inside a bounding shape.

  • Match Size

    Resizes and recenters the input geometry to match a reference bounding box.

  • Material Library

    Authors USD material primitives from shader VOP nodes.

  • Material Linker

    Creates material assignments based on rules.

  • Material Variation

    Creates attributes/primvars to override material parameters per-prim/instance.

  • Merge LOP

    Merges the layers from incoming stages into a unified layer stack.

  • Merge Point Instancers

    Merges point instancers into a single consolidated point instancer.

  • Mesh

    Creates or edits a mesh shape primitive.

  • Modify Paths

    Modify asset path attribute values.

  • Modify Point Instances

    Modifies point transforms and property values for individual point instances.

  • Motion Blur

    Adds time samples to allow motion blur when rendering.

  • Null

    This node does nothing. It can be useful to insert a Null into a network as a fixed point in the network that you can refer to by name in expressions/scripts.

  • Output

    Represents the output of a subnetwork. Allows you to design a node asset with multiple outputs.

  • Parent Constraint

    Makes a primitive appear to inherit the transform hierarchy of another prim somewhere else in the tree.

  • Points

    Creates or edits a Points shape primitive.

  • Points Constraint

    Position and Orient primitives using point positions from a geometry.

  • Primitive

    Bulk-creates one or more attributes of a certain type.

  • Prune

    Hides or deactivates primitives and point instances.

  • Python Script

    Lets you write Python code in the node to use the USD API to directly manipulate the stage.

  • RBD Destruction

    An example for a fracturing simulation in USD, also useful as a canned effect.

  • Reference

    References the contents of a external USD files and/or layers created by other LOP nodes into a branch of the existing scene graph tree. Can also remove or replace existing references.

  • Render Geometry Settings

    Applies renderer-specific geometry settings to geometry in the scene graph.

  • Render Product

    Creates or edits a UsdRenderProduct prim, which represents an output of a renderer (such as a rendered image file or other file-like artifact produced by a renderer), with attributes configuring how to generate the product.

  • Render Settings

    Creates or edits a UsdRenderSettings prim, which holds the general settings for rendering the scene.

  • Render Var

    Specifies a custom variable computed by the renderer and/or shaders, either a shader output or a light path expression (LPE).

  • Resample Transforms

    Generates interpolated transform time samples from existing time samples on USD prims.

  • Restructure Scene Graph

    This node has various operations for editing prim paths, variant sets, and composition arcs.

  • Retime Instances

    Offsets and/or scales the timing of animation on selected instances.

  • SOP Character Import

    Imports a character or animation from a SOP network into the USD scene graph.

  • SOP Create

    Lets you create geometry in a SOP subnetwork inside this node, so you can create geometry in-place in the LOP network instead of needing a separate SOP network.

  • SOP Crowd Import

    Imports a crowd from a SOP network into the USD scene graph.

  • SOP Import

    Imports geometry from a SOP network into the USD scene graph.

  • SOP Modify

    Converts USD geometry into SOP geometry, runs the SOP subnet inside this node on the geometry, and converts the changes back to USD overrides.

  • Scene Doctor

    Validates primitives on a USD stage.

  • Scene Import

    Imports models, materials, and lights from the Object level into the LOP network.

  • Scope

    Creates a scope primitive. Scope is the simplest form of grouping, and does not have a transform. Scopes can be useful for organizing the scene tree.

  • Set Extents

    Sets the bounding box metadata of selected primitives.

  • Set Variant

    Selects (switches to) one of the variants stored in a variant set on a primitive.

  • Simulation Proxy

    Generates low-poly collison geometry suitable for physical simulation and creates a proxy relationship to the original model.

  • Sphere

    Creates or edits a sphere shape primitive.

  • Split Point Instancers

    Splits a point instancer into two or more instances, which divide up the original instances.

  • Split Primitive

    Splits USD geometry prims into child primitives based on geometry subsets or primvar values.

  • Split Scene

    This node splits a scene graph into two disjoint sets of primitives.

  • Stage Manager

    Provides a convenient interface to reference in many files at once and place them in the scene graph tree.

  • Store Parameter Values

    Lets you store temporary (unsaved) data in the stage.

  • Sublayer

    Imports from USD files or other LOP node chains into as sublayers, or removes/replaces/reorders existing sublayers.

  • Subnet

    Encapsulates a LOP subnetwork, allowing you to organize and hide parts of the network.

  • Surface Constraint

    Constrain a prim to stick to a surface.

  • Switch

    Passes through one of several inputs, based on a parameter choice or expression.

  • TimeShift

    Outputs the stage as it is at a different point in the timeline.

  • Transform

    Edits the transforms of selected USD primitives.

  • Transform UV

    Moves, rotates, and scales texture coordinates on USD primitives.

  • USD ROP

  • USD Render ROP

  • Unassign Material

    Unbinds a material from one or more USD primitives.

  • Value Clip

  • Vary Material Assignment

    Assign different materials across a number of prims to create variation.

  • Volume

    References volume data on disk into a volume prim containing field prims.

  • Xform

    Creates or edits an Xform prim. Xform (and its sub-classes) represents a transform in the scene tree.