| On this page | |
| Since | 19.0 |
Overview 
This node sets up various render settings needed to render holdout (also known as “matte”) objects, as well as to render with a background image.
Note
The Background Plate LOP assumes that the elements will be rendered separately for tweaking them in compositing. To include the background image to the final render, follow the steps from Add background plate to the final render below.
Behind the scenes, this node sets the matte object’s ![]() Render Geometry Settings LOP’s Holdout Mode to Background. It also sets the matte objects for phantom shadow capture, and sets a render background image.
Render Geometry Settings LOP’s Holdout Mode to Background. It also sets the matte objects for phantom shadow capture, and sets a render background image.
How to 
-
Create the model(s) you want to be holdouts.
-
Create a Background Plate LOP node in your LOP network.
-
In the Background Plate LOP node’s parameters:
-
Set the Primitives to a space separated list of prim paths of the objects you want to be hold-outs.
-
Set Plate to the file path of the background image to use. (You can use the Scale and Translate parameters to position the background image relative to the camera view.)
If you're using frame-by-frame background images in an animation, you can use a filename expression for the plate path, for example
$HIP/Footage/Images/Frame_$F.exr. -
-
After the Background Plate, add a
 Karma Render Settings node if your network doesn’t already have one.
 -
Wire the Background Plate’s second output (which contains AOV settings) to the Karma Render Properties node’s second input (which accepts extra AOV settings).
-
On the Karma Render Properties node’s parameters, click the Image Output tab, then click the AOVs (Render Vars) sub-tab, then turn on Import Render Vars From Second Input.
Tip
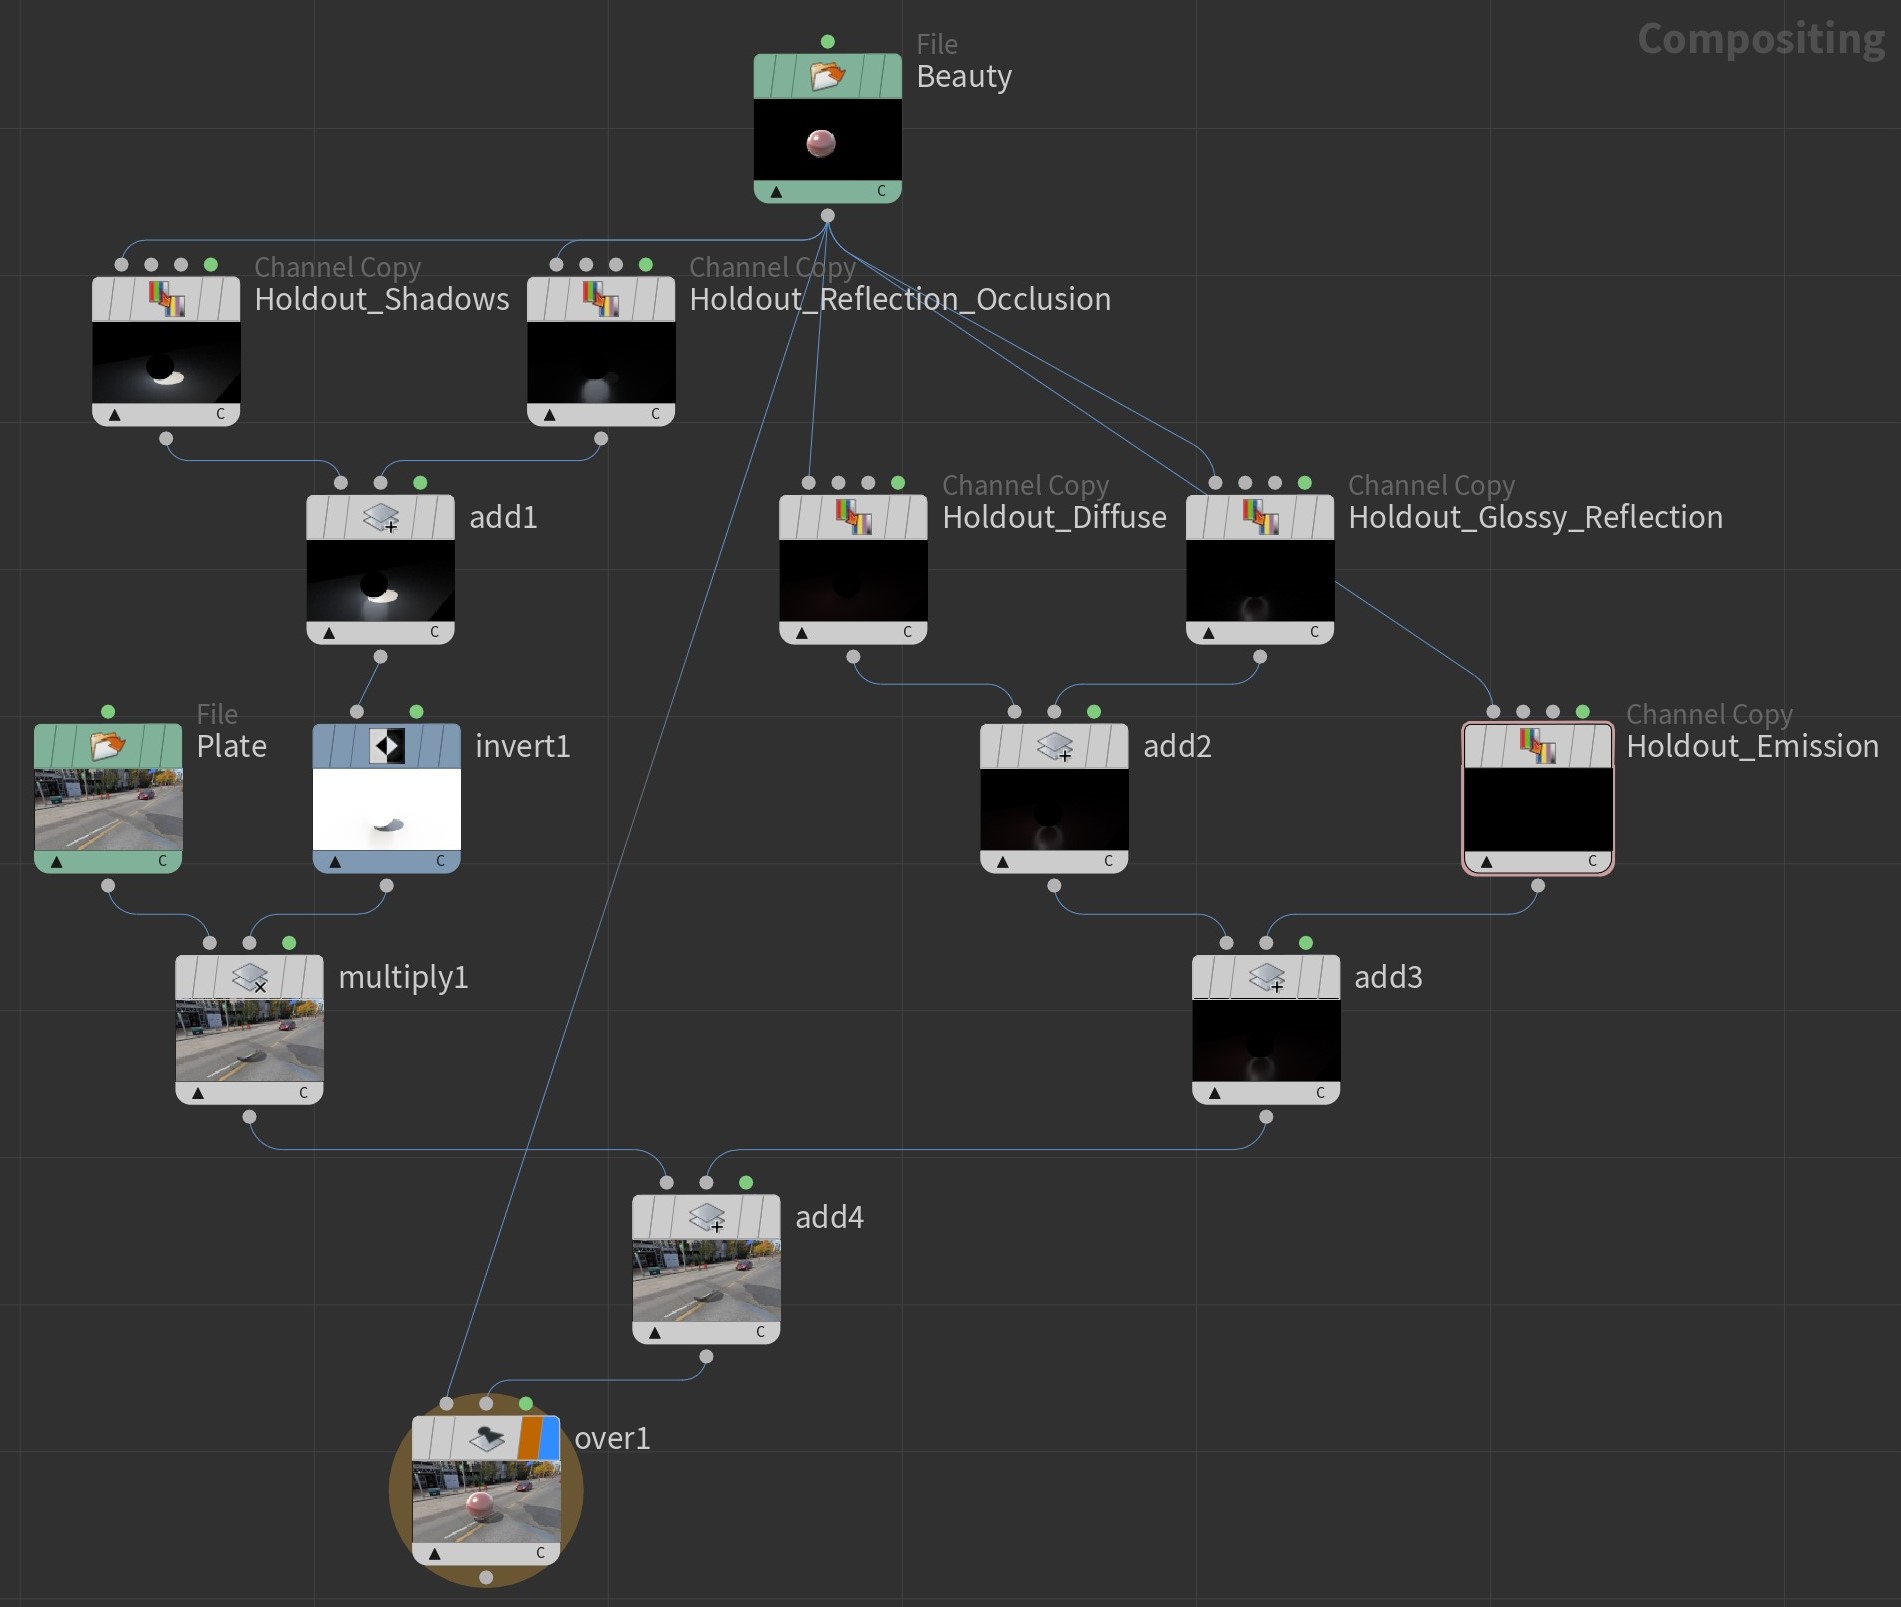
By default, the node creates AOVs for diffuse bounces on holdout objects. You can use these in compositing to better integrate the CG elements with the background.
Note
In order to match the viewport render, the compositing should be done such as “Beauty” over (Plate * invert("Holdout Shadows" + "Holdout Reflection Occlusion") + "Holdout Diffuse" + "Holdout Emission" + "Holdout Glossy Reflection")
Add background plate to the final render 
The background plate is only displayed in IPR (= Interactive Photorealistic Rendering) for preview purposes, but not included to the final render. We assume that you want to have the plate as a separate compositing layer. However, you can render image and background together.
-
After the Karma Render Settings LOP, add a
 Karma Render Settings Edit LOP and connect it.
 -
Open the Karma tab’s Global section and scroll down to Image.
-
Click the ring-shaped button next to Use Background and choose Set or Create to make the parameter accessible.
-
From the dropdown menu, choose On.
Outputs 
Output stage
Contains the USD stage, modified by this node. This is the standard output of a LOP node.
Output render vars
Contains the AOV (render var) settings specified in this node. If you are using the Karma node for rendering, you should connect this output to the Karma node’s second input to have them override the Karma node’s default settings.
Parameters 
Primitives
A space-separated list of prim paths for the objects you want to act as hold-outs.
Quick Setups
Add example COP graph to composite output AOVs.
Rendersettings Primitive Path
The prim path of a USD Render Settings prim to use to set up the background and matte settings. The default is /Render/rendersettings, which is the default for where the Karma render node looks for render settings. If this prim doesn’t already exist in the incoming stage, this node will create it.
Allow Shader Parameter Animation
When it is turned off, all USD values are assumed non-animatable and will be authored at a default time code. And, with this option turned on, shader node parameters that are time-dependent will get translated to USD values at non-default time codes, while time-independent parameters will still author a value at a default time code.
Note, checking parameter time dependency can be costly and may add up to a large portion of the shader translation time. Since the vast majority of shader nodes don’t have animated parameters, this toggle is off by default to save the work involved in checking it.
Plate
The file path of the background image to use.
Scale
Horizontal and vertical scaling factors for the background image. These are normalized relative to the rendered image size, so for example a horizontal scale of 1 is the width of the rendered image.
Translate
Horizontal and vertical offsets for the background image. These are normalized relative to the rendered images size, so for example a horizontal offset of 0.25 moves the background image to the right 1/4 of the width of the rendered image.
Use Offscreen Texture
If the background plate does not perfectly cover the camera view, the “real” background (empty space) will show through. Use this to replace empty space with a texture. If you leave this off, the node will fill empty space with the Offscreen Color instead.
Offscreen Texture
When Use Offscreen Texture is on, the file path of the texture image to use to cover empty space.
Offscreen Color
When Use Offscreen Texture is off, the color to use for any “empty space” if the background plate does not fully cover the camera view.
Rotate
When Use Offscreen Texture is on, this sets the rotation of the offscreen texture in 3D space.
Metallic
Values closer to 1 give the shader a more metallic appearance.
This is done by fading out the diffuse component and driving reflectivity by Base Color. This makes it easy to create the colored reflections typical of metallic materials.
Reflectivity
Controls the reflectivity of surfaces facing the viewer. This is also affected by the Index of Refraction.
When a surface is rotated away from the viewer, more and more light is reflected regardless of this parameter’s value. At 90 degrees away from the viewer, 100% of the light is reflected, as in the real world.
Tip
How shiny an object appears mostly depends on its Roughness rather than its Reflect value. When you intend to vary shininess using a texture, Roughness is usually the better parameter to use.
Note
For additional artistic control, you can disable reflections completely by setting Reflect exactly to 0.0. When using a texture, this effect also occurs in completely black areas of the texture.
Note
The effect of this parameter diminishes with increasing Metallic values, since metallic reflectivity is tied to Base Color.
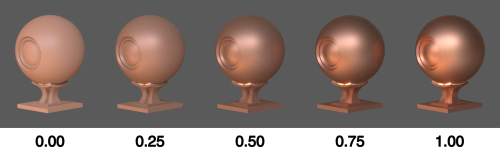
Roughness
Controls how dull a surface appears. A value of 0.0 results in a smooth surface with perfectly sharp reflections. A value of 1.0 produces a completely dull surface.
This simulates microscopic bumps which become more pronounced the higher the Roughness, causing reflected light to be scattered more.
The effect of Roughness on a material with Metallic set to 1.0:
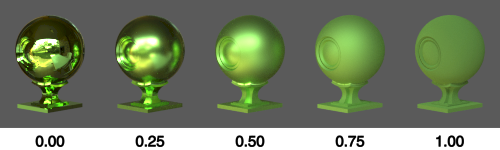
The effect of Roughness on a material with Metallic set to 0.0:
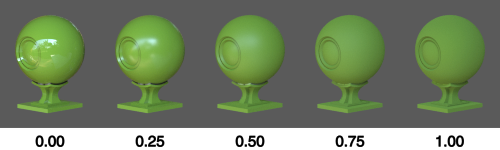
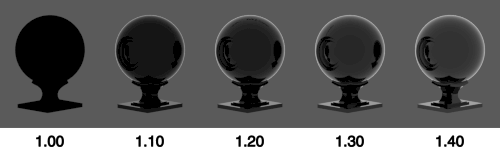
IOR
Higher values reflect more light and bend refraction rays more.
The impact on reflectivity is strongest on surfaces facing directly towards the viewer. Surfaces facing less directly towards the viewer generally reflect more light, regardless of this parameter’s value.
Note
The shininess of a surface also depends greatly on its Roughness.
Tip
To disable reflections completely, set this parameter to 1.0. This can speed up rendering where reflections are not needed. When using a texture, this effect also occurs in completely black areas of the texture.
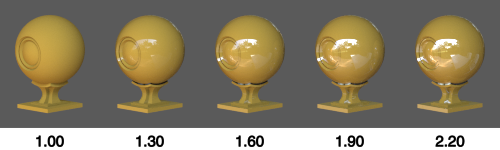
![]()
The effect on a shiny black object in a white environment. Note how reflections at the edges are not affected, apart from the special value 1.0:
Note
The effect of this parameter diminishes with increasing Metallic values, since metallic reflectivity is tied to Base Color.
Shadows
Whether to record all holdout shadows in a single AOV, or generate a separate AOV for each light LPE tag.
Diffuse
Generate an AOV for diffuse bounces on holdout objects.
Emission
Generate an AOV for light emissions on holdout objects.
Glossy Reflection
Generate an AOV for glossy reflections on holdout objects. When disabled, the background shader will become diffuse only, reflectivity and metallic shader parameters will be set to 0.
Reflection Occlusion
When Glossy Reflection is enabled, whether to record all holdout reflection occlusion in a single AOV, or generate a separate AOV for each light LPE tag.
| See also |