| On this page |
AOVs (“Arbitrary Output Variables”), also known as extra image planes, record additional per-pixel data in rendered image formats that support “deep” (multi-plane) images, such as OpenEXR.
Material-based AOVs 
In previous versions of Houdini, you had to follow a rather cumbersome way to write out material-based AOVs. The Karma AOV was not connected to the MtlX Standard Surface VOP, but to a MtlX Switch VOP instead. After switching on the AOV, you had to go to the Karma Render Settings LOP and create an extra RenderVar, set a name and specify the AOVs signature. Then, the AOV was visible. This workflow is still available for compatibility reasons, but shouldn’t be used anymore.
In Houdini 20, the workflow for setting up custom AOVs was greatly improved and is now the recommended way. However, material-based AOVs are not yet a USD concept and you still have to go a short detour.
Defining the AOV 
The first step is to define the AOV and create the shader network shown below.

-
In the
 Material Library LOP, press ⇥ Tab to open the tab menu. From there choose the
 Karma Material Buildertool. This tool sets up a Subnetwork VOP. Double-click the node to dive inside.
 -
The subnetwork already contains several nodes. Add a
 MtlX Image VOP.
 -
On the Filename parameter, click the
 Open floating file chooser… button to load a texture.
The goal is to export this texture as a custom material-based AOV. If you want to write out several AOVs, note that you need one Karma AOV VOP per texture/shader.
-
Add a Karma AOV VOP. When you look at the new node’s parameters, you can that Create Render Var is turned on. This option creates an AOV with name entered under AOV Name. The default entry,
$OS, uses the node’s name. Here, the name will bebarrel_diffuse -
Connect the output of the MtlX Image VOP with the input of the Karma AOV VOP.
-
Connect the output of the Karma AOV with the
nextinput of theMaterial_Outputs_and_AOVsnode. You will notice that the input’s name changes to the name of the connect Karma AOV.
This network creates the AOV and automatically makes it available for USD/Karma. When you look at the Scene Graph Tree, you can see the barrel_diffuse AOV.

Using the AOV 
To make the AOV work, you only have to connect a ![]() Karma Render Settings LOP. The nodes recognizes the AOV and you can turn it on in the viewport.
Karma Render Settings LOP. The nodes recognizes the AOV and you can turn it on in the viewport.
-
On the Display options bar, click the
 Viewing output button.
 -
From the dropdown menu, choose the
barrel_diffuseAOV to show it in the viewport.
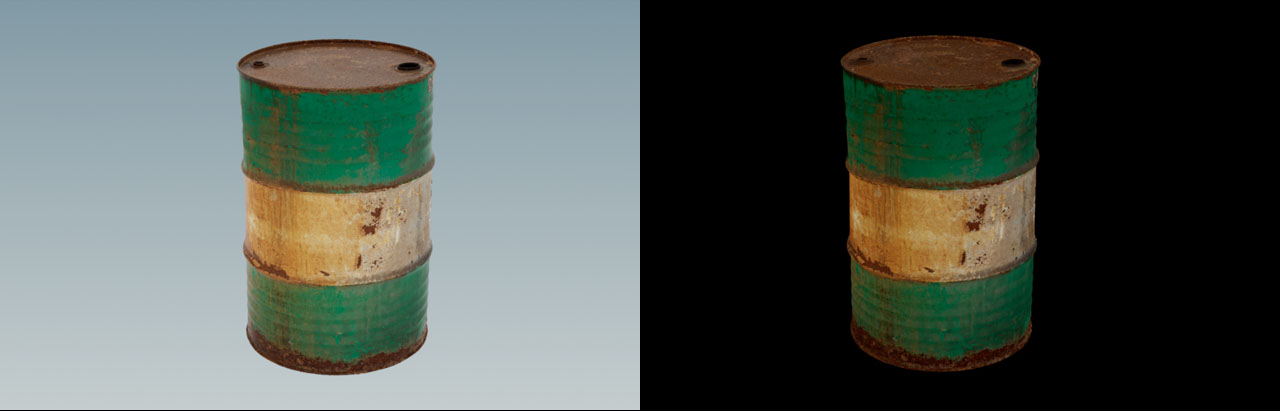
The left image shows the rendered result in the viewport; the right image shows the barrel_diffuse AOV.
Now you can also replace the Karma AOV’s input with a different node, for example a ![]() MtlX Unified Noise 3D VOP or any other valid node. The new workflow updates the AOV automatically and you don’t have to do anything manually.
MtlX Unified Noise 3D VOP or any other valid node. The new workflow updates the AOV automatically and you don’t have to do anything manually.
Cryptomatte 
Karma supports Cryptomatte AOVs and you create Cryptomatte IDs using the following data sources.
-
Primitives
-
Materials bound to prims
-
Constant or uniform
string/integerPrimVars
When you generate unique IDs for each instance, you don’t need to use material stylesheets. All you need to do is assign unique values of a string PrimVar to each instance.
Tip
See the Cryptomatte guide for additional information.
How to 
| To... | Do this |
|---|---|
|
Output a Cryptomatte AOV from Karma manually |
|
|
Output an AOV with Cryptomatte |
|
| See also |