| On this page |
Overview 
Motion blur simulates the effect where fast-moving objects look blurry or streaky on film because an object noticeably changes position while the camera shutter is open.
Mantra supports three types of simulated motion blur. The type you use depends on what type of animated geometry you want to blur.
-
Transform motion blur simulates blur by interpolating an object’s transform between frames. This is the default type of blur applied to all objects when you turn on motion blur. It is cheap to compute, but it doesn’t blur deformations, that is the object’s geometry changing shape over time.
-
Deformation motion blur simulates blur by re-cooking an object’s geometry between frames. You control it with the geometry motion samples setting. This is necessary to properly blur deforming geometry. This is relatively expensive to compute, since Houdini must cook the geometry and send it to Mantra for each additional segment of blur you want.
Deformation blur also lets you blur attribute change over the shutter time. For example, if point colors are changing rapidly as the object moves, you can blur the
Cdattribute. You must explicitly specify which attributes to blur using the vm_segmentattrs property. -
Velocity motion blur simulates blur by interpolating point positions based on velocity (
v) and possibly acceleration (accel) and/or angular velocity (w) point attributes. This type of motion blur is necessary when the number of points in the geometry changes over time, such as in a particle or fluid simulation. See velocity motion blur below for more information.
Render settings 
On the Mantra node, turn on Allow motion blur on the Rendering tab. This will reveal three additional parameters: Xform time samples, Geo time samples, and Shutter offset.
Allow motion blur
This is the “master switch” for simulated motion blur when rendering. Turning it on enables transformation motion blur (blurring by interpolating each object’s transforms between frames). You can set the number of transform blur samples using xform_motionsamples. To enable deformation motion blur, increase geo_motionsamples.
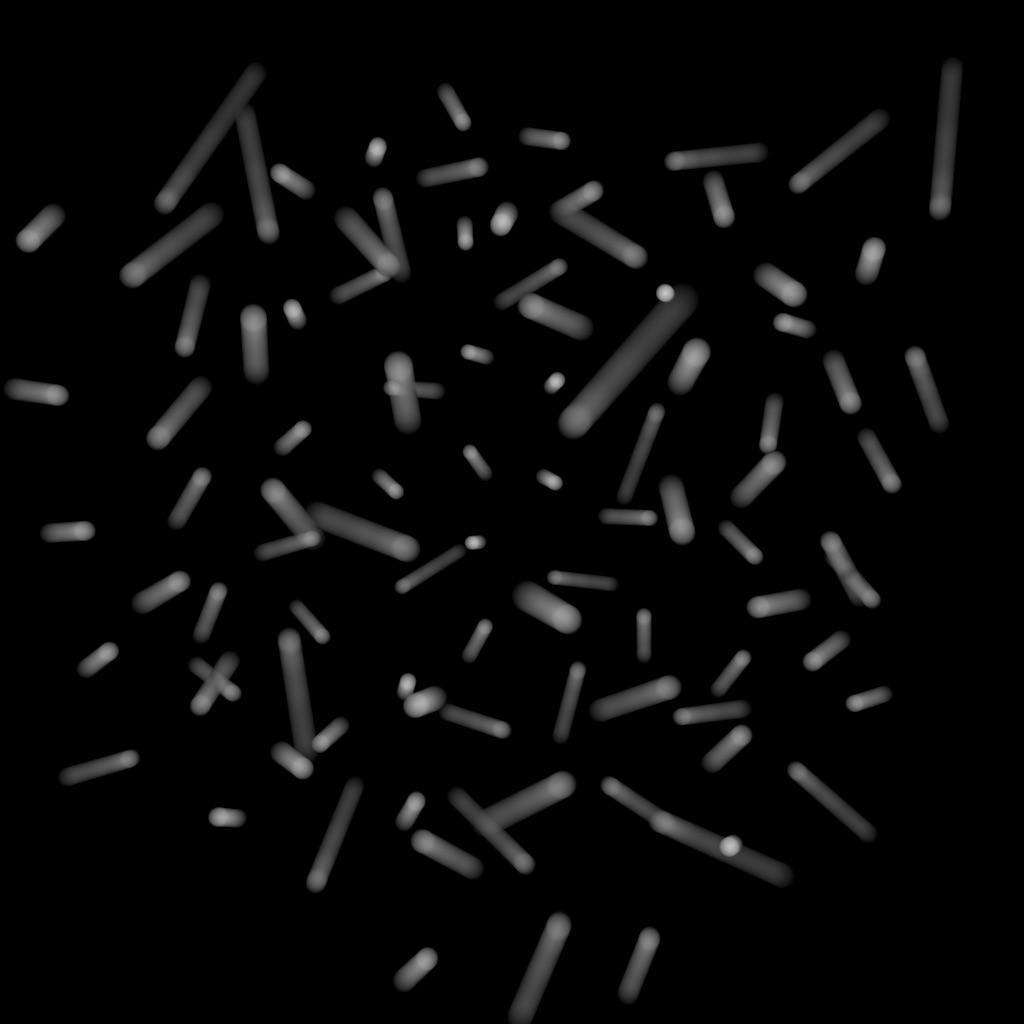
Xform time samples
The number of samples to compute when rendering transformation motion blur over the shutter open time. The default is 2 samples (at the start and end of the shutter time), giving one blurred segment.

If you have object moving and changing direction extremely quickly, you might want to increase the number of samples to capture the sub-frame direction changes.

In the above example, it requires 40 transformation samples to correctly render the complex motion that occurs within one frame. (This amount of change within a single frame is very unusual and only used as a demonstration.)
Transformation blur simulates blur by interpolating each object’s transformation between frames, so it’s cheap to compute but does not capture surface deformation. To enable blurring deforming geometry, increase geo_motionsamples.
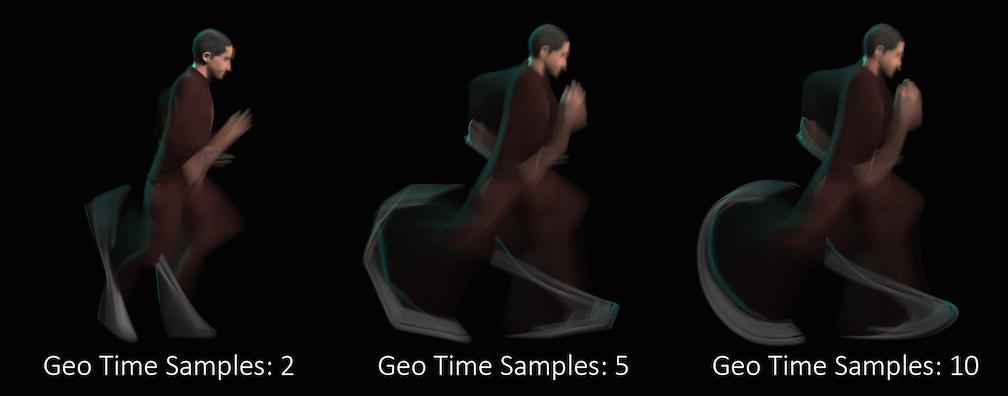
Geo time samples
The number of sub-frame samples to compute when rendering deformation motion blur over the shutter open time. The default is 1 (sample only at the start of the shutter time), giving no deformation blur by default. If you want rapidly deforming geometry to blur properly, you must increase this value to 2 or more. Increasing the number of geometry time samples is relatively expensive because Houdini must cook the sub-frame geometry and send it to Mantra.
“Deformation” may refer to simple transformations at the Geometry (SOP) level, or actual surface deformation, such as a character or object which changes shape rapidly over the course of a frame.
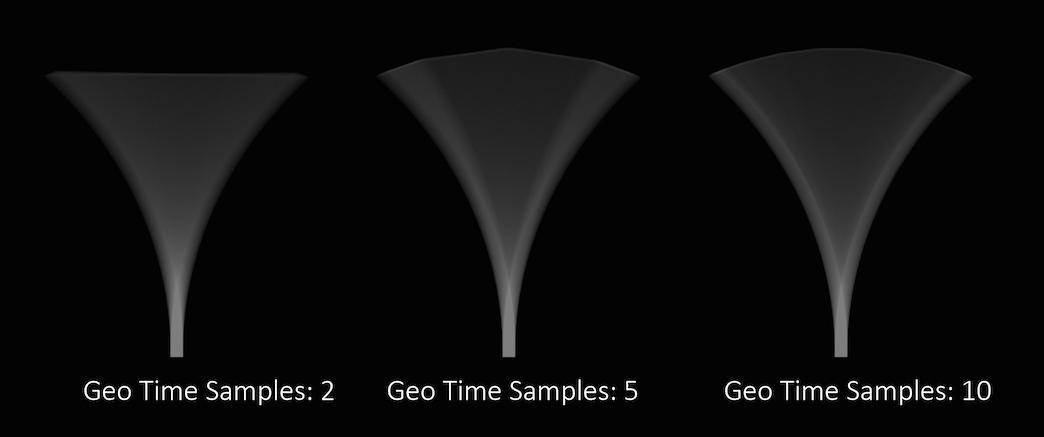
Objects whose deformations are quite complex within a single frame will require a higher number of Geo Time Samples.
Deformation blur also lets you blur attribute change over the shutter time. For example, if point colors are changing rapidly as the object moves, you can blur the Cd attribute. You must explicitly specify which attributes to blur using the vm_segmentattrs property.
Increasing the number of Geo Time Samples can have an impact on the amount of memory Mantra uses. For each additional Sample, Mantra must retain a copy of the geometry in memory while it samples across the shutter time. When optimizing your renders, it is a good idea to find the minimum number of Geo Time Samples necessary to create a smooth motion trail.
Deformation blur is ignored for objects that have Velocity motion blur turned on.
Shutter offset

This parameter controls which segment of time will be considered when generating motion blur. A value of 1 will use the current position of the object and the position of the object on the next frame as the time interval to use for motion blur. A value of -1 will use the position of the object on the previous frame and the current position of the object as the time. A value of 0 will generate an interval which lasts halfway through the previous frame and half way into the next frame.
Adjusting this parameter is usually unnecessary unless you are attempting to match motion- blur which has been generated outside of Mantra (for example a photographic background plate).
Controls where the blur occurs in the image relative to the position of the object at the current frame. A value of -1 blurs from the position at the previous frame to the position in the current frame. A value of 0 blurs from halfway to the previous frame to halfway to the next frame. A value of 1 blurs from the current position to the position at the next frame. You can use fractional frame values and values greater than -1 or 1 to move the blur less or more.
To change the size of the blur, change the Shutter time (shutter property).
This parameter replaces the old Motion blur style (motionstyle) parameter, which only allows values of “before” (shutter offset=-1), “center” (shutter offset=0), and “after” (shutter offset=1).
Allow image motion blur
Occasionally, when motion blur is going to be added to an image as a post-process or for other compositing operations, it is necessary to calculate the motion blur but not include it in the final rendered image. In these cases, Allow Image Motion Blur should be disabled.
This means that the blurred positions necessary for Motion Blur can be exported as a custom Motion Vector Image Plane from within a shader using the GetBlurP() function without the small overhead of doing the actual shading in the render.
This parameter is related to the motion blur parameters which are available only when Motion Blur is enabled. Disabling this option will cause motion blur to be removed from the final rendered image, however the blurred Position will still be calculated, allowing for custom motion vector image planes to be created.
The Motion Factor parameter is on the Dicing tab.
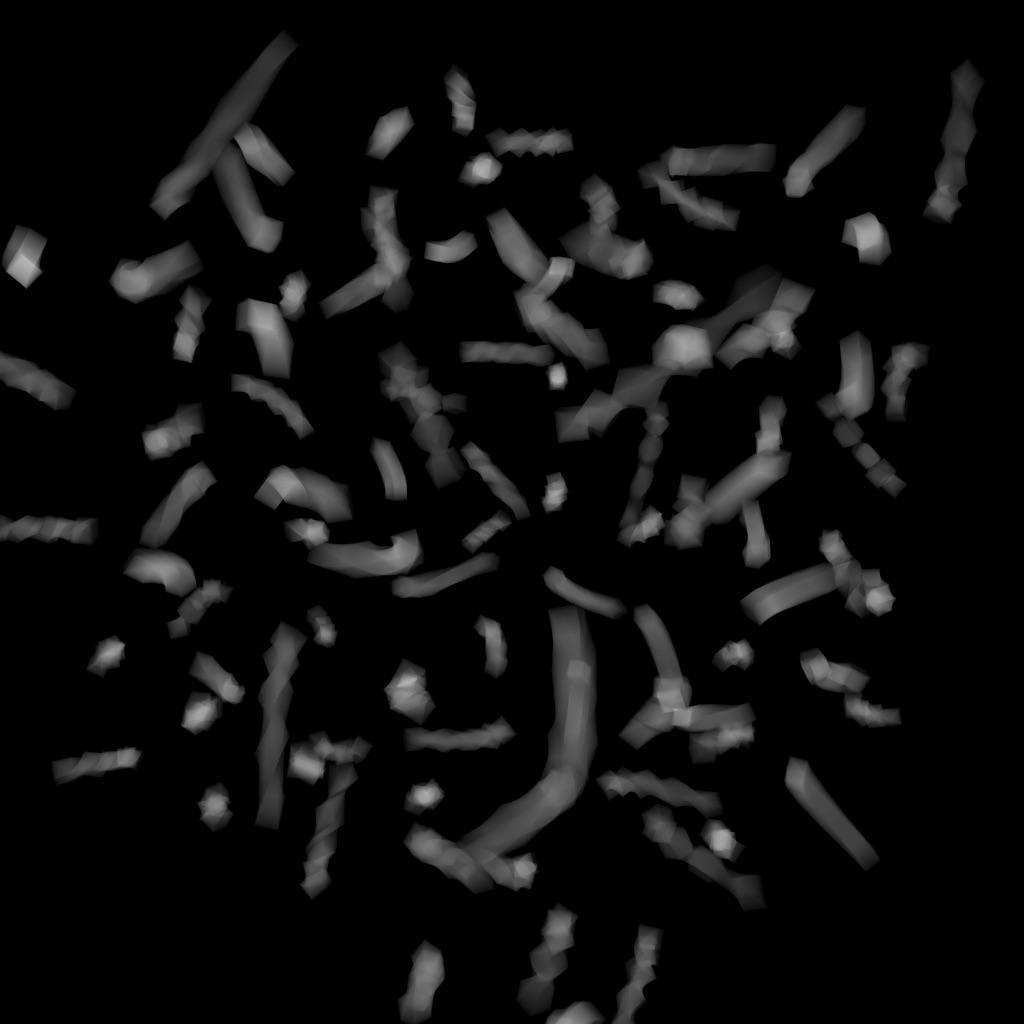
Motion factor
Fast moving objects which have significant amounts of motion blur are rendered with the same sampling quality as slow moving or static objects. However, in cases where objects are very blurry, small details are usually lost. In these cases, it is a useful optimization to reduce the shading quality on those objects which are moving quickly since the loss in detail is hidden in the motion blur.
Increasing the Motion Factor will dynamically reduce the shading quality of an object based on the rate of motion. This optimization is primarily useful for objects which are refined at render time like subdivision surfaces or objects with displacement-based shading.
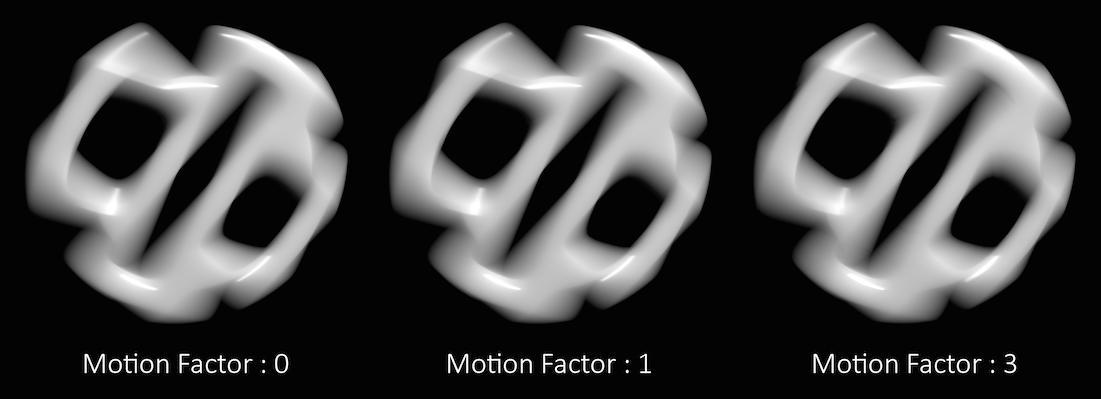
In the above example, you can see that the motion factor does not have a large impact on the quality of the final render.
However, sometimes too much detail can be lost, especially in cases where much of the surface detail is generated by the shader. Objects whose shape is derived through significant amounts of displacement, for example.
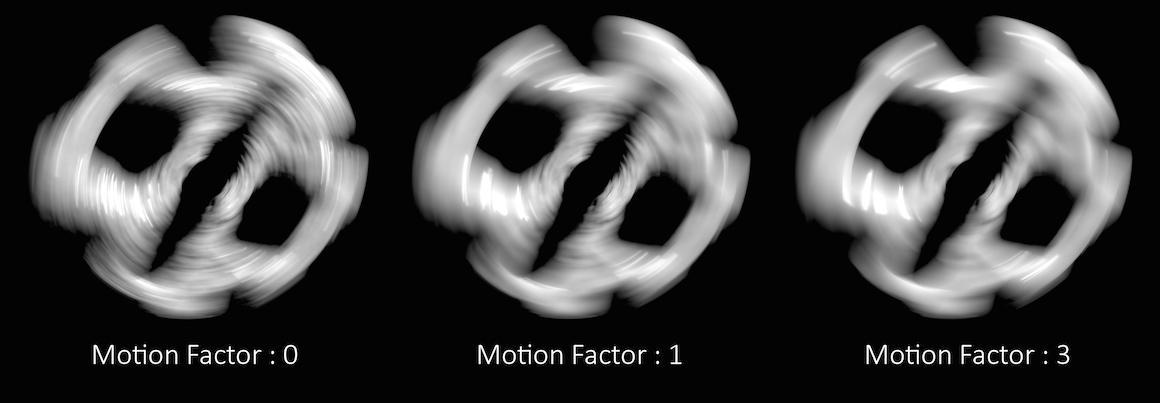
In these cases, the Motion Factor value must be adjusted carefully to retain a believable amount of surface detail.
Note
The exact motion factor used will depend on the degree of motion in your scene. For more information, see Motion factor on the mantra rendering properties page.
Automatically adjusts the shading quality for objects which are significantly blurred. Increasing the motion factor of an object will dynamically decrease the shading quality based on the rate of motion. This can significantly speed up renderings of rapid moving objects. It also affects depth of field and may improve speed of scenes with deep depth of focus.
Motion factor reduces shading quality using the following formula:
new_shading_quality = shading_quality / max(motion_factor * pixels_of_motion/16, 1)
This is only true if motion_factor > 0.
Objects traveling more than 16 pixels within the frame will have their shading quality reduced by the above factor. For example, an object blurred over 32 pixels with a shading quality of 1 will have the quality reduced to 0.5. You should not use very large values for this parameter. Values between 0 and 1 are reasonable.
When using the Ray Tracing or Physically Based Rendering rendering engine, motion factor will only affect the geometric subdivision for subdivision surfaces, NURBS/Beziers, or displacements and will not change the amount of shading.
The Camera object has a Sampling tab which contains parameters related to shutter speed as well as depth of field. For Motion Blur, the relevant parameter is Shutter Time.
Shutter time
The shutter time refers to the portion of a frame the shutter is actually open. On a physical camera, this if often referred to as Shutter Speed. The renderer uses this determine motion blur. The value should be in the range [0,1].
A value of 0 for the shutter time would mean that there is no motion blur at all, as the shutter is only “Open” for an instant. A value of 1 on the other hand would mean that the shutter is open for the entire length of the frame.
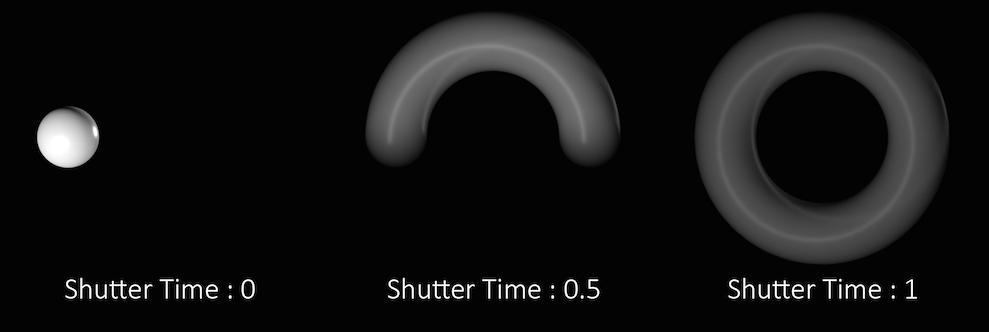
In the above example the sphere is rotating a full 360 degrees over the course of a single frame. You can see how the length of the “motion trail” or “blur” changes based on the shutter time. In most cases, the default value of .5 is appropriate for animated sequences and a good match for real world settings.
Keep in mind that this parameter controls the amount of time within a single frame, that the shutter is open. It does not refer to how long an individual frame is. To adjust the frame rate, change the Frames per Second parameter in the Global Animation Options.
Velocity motion blur 
Velocity motion blur blurs based on motion information encoded in point attributes. It is the only blur type that can handle the number of points/primitives in the object changing over time. (Deformation motion blur can’t handle changing point/primitive numbers because it can’t know which components from one sample correspond to which components in the next sample.)
This type of blur is most useful for point-based simulations, such as particles and fluids, where the number of points changes as the simulation runs, and the solvers often automatically create the appropriate attributes for you.
Another useful case for geometry motion blur is when you have large amounts of geometry whose animation is derived from Geometry (SOP)-level transformations or deformations. In these cases, using more deformation samples is not recommended because Mantra will have to store multiple copies of the geometry in memory. Instead, using motion blur is more efficient and uses less memory.
This blur type is enabled per-object. To enable this capability, you must set the Geometry velocity blur menu on an object’s Sampling tab to “Velocity” or “Acceleration”.
Geometry velocity blur
This menu lets you choose what type of geometry velocity blur to do on an object, if any. Separate from transform blur and deformation blur, you can render motion blur based on point movement, using attributes stored on the points that record change over time. You should use this type of blur if the number points in the geometry changes over time (for example, a particle simulation where points are born and die).
If your geometry changes topology frame-to-frame, Mantra will not be able to interpolate the geometry to correctly calculate Motion Blur. In these cases, motion blur can use a v and/or accel attribute which is consistent even while the underlying geometry is changing. The surface of a fluid simulation is a good example of this. In this case, and other types of simulation data, the solvers will automatically create the velocity attribute.
No Velocity Blur
Do not render motion blur on this object, even if the renderer is set to allow motion blur.
Velocity Blur
To use velocity blur, you must compute and store point velocities in a point attribute v. The renderer uses this attribute, if it exists, to render velocity motion blur (assuming the renderer is set to allow motion blur). The v attribute may be created automatically by simulation nodes (such as particle DOPs), or you can compute and add it using the ![]() Point velocity SOP.
Point velocity SOP.
The v attribute value is measured in Houdini units per second.
Acceleration Blur
To use acceleration blur, you must compute and store point acceleration in a point attribute accel (you can change the acceleration attribute name using the geo_accelattribute property). The renderer uses this attribute, if it exists, to render multi-segment acceleration motion blur (assuming the renderer is set to allow motion blur). The accel attribute may be created automatically by simulation nodes, or you can compute and add it using the ![]() Point velocity SOP.
Point velocity SOP.
When Acceleration Blur is on, if the geometry has a angular velocity attribute (w), rapid rotation will also be blurred. This should be a vector attribute, where the components represent rotation speeds in radians per second around X, Y, and Z.
When this is set to “Velocity Blur” or “Acceleration Blur”, deformation blur is not applied to the object. When this is set to “Acceleration Blur”, you can use the geo_motionsamples property to set the number of acceleration samples.
v) to do linear motion blur.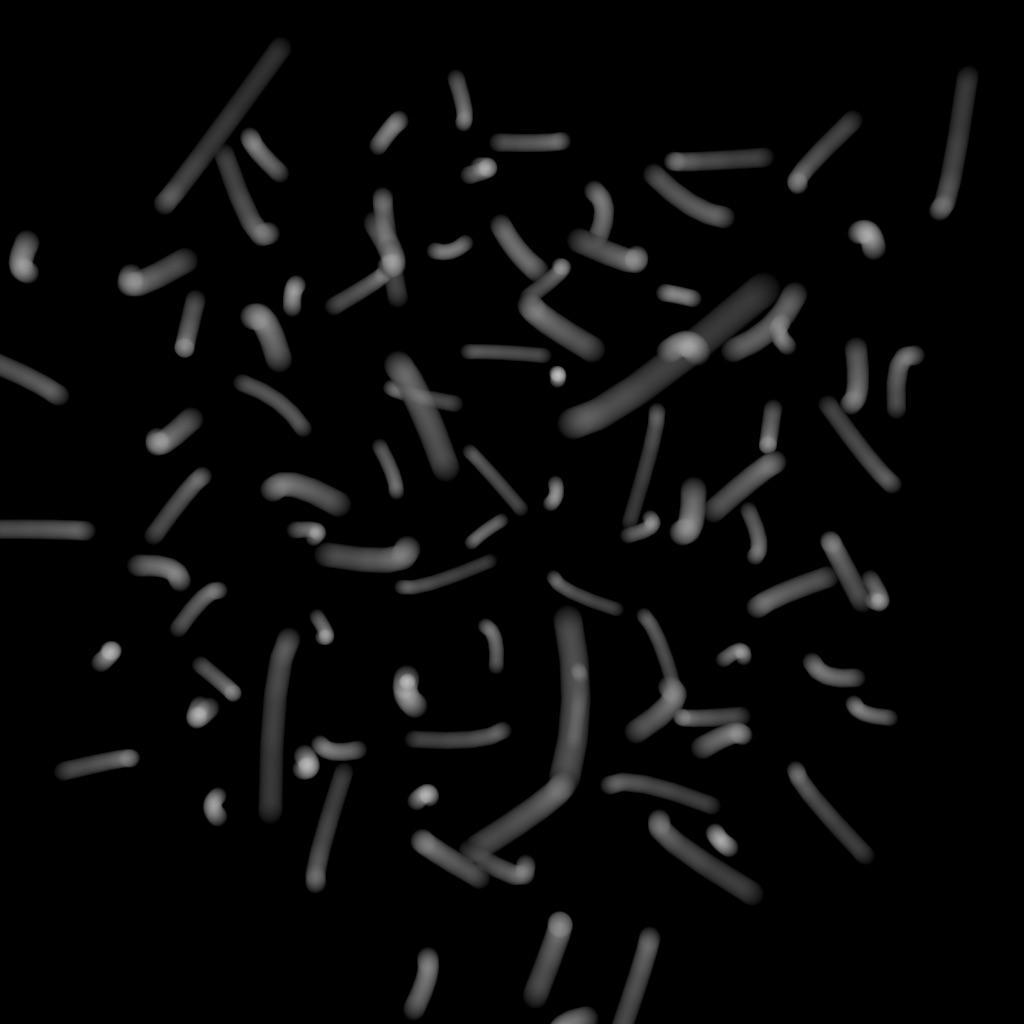
Tip
If your geometry doesn’t already have v or accel attributes, you can measure and add them using the ![]() Point Velocity SOP.
Point Velocity SOP.
Object specific sampling 
Since all of the objects in your scene can be moving at different rates or have drastically different amounts of sub-frame motion, it can be useful to sample specific objects at different rates than others. This can be especially important for deforming objects which may require high Geo Time Samples - isolating the most important objects can reduce memory overhead.
Add the following properties (how?) to your object:
Enabling Motion blur is a global setting on the Mantra node and can’t be set per object, however, reducing Xform and Geo Time samples to a value of 1 will essentially disable motion blur for those objects.
Keep in mind that the motion of the Camera can also contribute to motion blur and can also have its own sampling rates applied.