| On this page |
Overview 
Working with “linear color” means lighting and rendering in a color space where the mapping between numeric color values and “absolute color” is a straight line. This is the standard in digital cinema and is the best way to produce realistic lighting. Houdini does all internal color calculations in a linear color space.
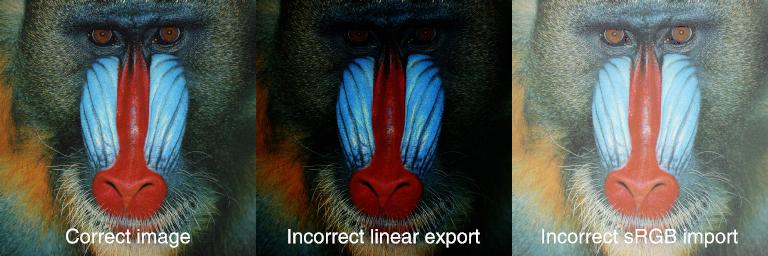
However, many image formats, monitors, and some older video production workflows use a non-linear color space. Outputting linear color data in a format that expects non-linear color (that is, that expects gamma to be “baked in”) produces a dark and overly contrasted image. Conversely, loading a non-linear image data (such as sRGB) into a linear pipeline without correction produces an image that is overly bright and washed out.
To avoid this, Houdini converts to/from linear color space when images are loaded and saved/displayed. Houdini applies a default gamma correction of 2.2 to its display, on the assumption the monitor expects image data with pre-baked gamma. When saving images to formats that assume non-linear color space, Houdini converts the data to the image format’s color space or saves the original color space as meta-data (depending on the features of the format).
Why does Houdini work in a linear color space even if the inputs and outputs use non-linear color? Working with linear color gives more accurate arithmetical results, and makes color faster and easier for the computer to deal with. Doubling the numeric values of a color in linear color space doubles the intensity and has no loss of precision. Doubling values in non-linear color space will result in more or less than double the intensity, and may give a loss of precision. In a non-linear color space, summing color contributions from various lights and transparent surfaces would have this problem, giving an unrealistic rendered result.
Background 
Gamma correction is rooted in cathode ray tube (CRT) displays. In a CRT, an electron beam excites phosphors on the screen non-linearly: doubling the beam power did not double the brightness of the phosphor. Instead, it responding according to a curve very close to x2.2.
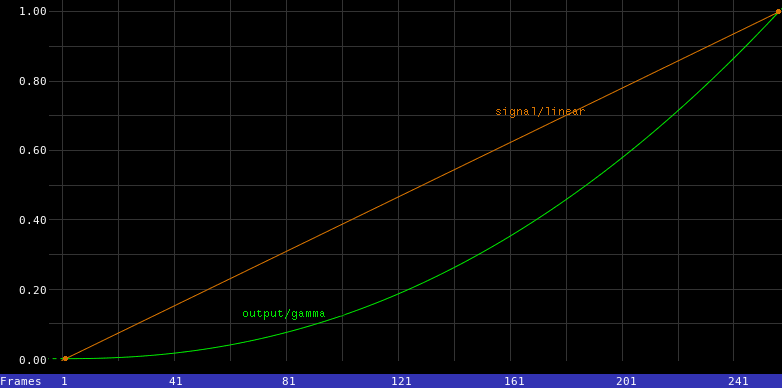
As a result, manufacturers calibrated recording equipment to produce signals with an x1/2.2 response to cancel out the CRT’s non-linear response. This is became known as a “gamma correction of 2.2”.
Even though today CRTS are mostly replaced by film, LCD, and digital technologies and technically it’s no longer really necessary, the 2.2 gamma correction had become a standard. Image formats such as JPEG bake the gamma correction into the pixels to avoid any pre-display correction. Houdini must convert these image formats to linear color when it loads them.
The most common non-linear color spaces are sRGB and REC709, which have minor variations from the gamma 2.2 curve.
Display settings 
-
To change the global gamma settings, choose Edit ▸ Color Settings and click the Color correction tab.
-
Houdini allows display gamma correction to color in a variety of places:
MPlay
Both foreground and background images. Use the color correction toolbar along the bottom.
Scene View
All user generated geometry and background images.
Open the
 display options and click the Viewport tab.
To show the color correction toolbar with more color controls, open the viewport options menu and turn on “Corrections toolbar”.
Render View
Foreground and background images. Use the color correction toolbar along the bottom (it is collapsed by default).
Composite View
Foreground and background images. Use the color correction toolbar along the bottom.
Image file browser
Image previews.
Color swatches
Color rectangle shown in Color Editors and color parameters.
All of these places can also have a look-up table (LUT) applied along with the gamma correction.
-
It is possible to disable color correction for specific areas of Houdini, though this is not recommended.
Using OpenColorIO for display 
Importing and exporting linear images 
When you import images as textures or compositing layers, Houdini can detect the color space automatically, or assume it to be linear.
-
The File COP has a Linearize Non-Linear Images parameter. Turn this off to assume the image is in linear color space. There is also an Image Color Space parameter which can override the colorspace inferred from the format or stored in the image file before the image is linearized.
-
The
 Texture VOP has a Source Color Space parameter. Set this to “Linear” to assume the image is in linear color space.
 -
Houdini automatically converts images imported as textures or as viewport background images. To avoid this conversion, first load them using a File COP, and then get the texture from the COP using
op:syntax.
When saving images, you can output linear images or set an output gamma (assuming the image format supports it).
-
The
 Composite render node has a Convert to image format’s colorspace parameter. If this parameter is on, the node uses the Output gamma parameter to set the gamma to bake in. If conversion is off, the image data is written without correction.
 -
The Image Save file dialog (available when you right click a compositing node and choose Save image) works the same as the
Composite render node.
Image Formats 
Format |
Color space |
|---|---|
Houdini |
Stores the color space as per-plane meta-data. |
Houdini |
2.2 gamma for 8 bit planes, linear for other plane formats |
OpenEXR |
Linear |
PNG, JPEG, TIFF, Targa |
|
Other |
If the data is stored in 8 bit fixed format, it is assumed to be |
Note
Custom image formats implemented using plugins can specify their color spaces using IMG_Format virtual methods. See the HDK documentation for more information.
MPlay 
MPlay is the image preview/display program included with Houdini.
By default, MPlay applies a 2.2 gamma correction. This indicates the color space to view the image in. For example, if you load a JPEG (which is pre-corrected to sRGB, very close to 2.2 gamma), the viewer does not alter the image. However, if you load a linear image (for example, a floating point .rat texture), the viewer will correct it to 2.2 gamma. (While if you set the display gamma to 1.0, the JPEG would be corrected and the RAT not corrected.)
In other words, it is not a gamma that is unconditionally applied to image, but rather a “target” gamma that the viewer may have to alter the data to achieve.
-
You can set the display gamma in the
display options, on the Corrections tab. -
You can start it with the
-g ‹gamma›option to set the viewer gamma correction on launch. -
By default, MPlay does not gamma correct image planes it knows to contain geometric data, such as
P,Pz,N,B,V,M, andAf. -
When you render and image or flipbook to MPlay (using the
ipspecial file), the color space is passed along with the image data (usually linear), so color correction is applied when needed. -
Flipbooking only the “beauty pass” will send linear color to MPlay, while flipbooking the entire viewport (with handles and other UI) uses the same color space as the viewport (2.2 gamma by default).
Tips 
-
Set your monitor to
sRGBcolor mode, or calibrate it to a 2.2 gamma. Many monitors without calibration have display gammas between 2.1 and 2.4, which can subtly change the image. -
The Gamma COP does not change color spaces. It bakes a correction into the pixels of the image, but the resulting data is still in the linear color space. You can use it to apply or undo gamma correction, or as a way to control image contrast.
-
Visit opencolorio.org for information on color spaces and for tools to generate Houdini LUT files.
-
To globally disable linear workflow, set
HOUDINI_IMAGE_DISPLAY_GAMMAto 1.0 andHOUDINI_AUTOCONVERT_IMAGE_FILESto 0 (defaults of 2.2 and 1, respectively).
| See also |