Mantra user guide
These controls are on the Sampling tab of the ![]() Mantra render node. See the
Mantra render node. See the ![]() help for the Mantra node for more information.
help for the Mantra node for more information.
Pixel samples
Controls the number of primary rays Mantra will use to sample your scene per pixel. The two numbers represent an arrangement of samples in the X and Y axis and are generally the same number. However, for non-square pixels it may be necessary to use different values in X and Y. Multiplying these two values together will give you the number of primary rays per pixel.
Increasing Pixel Samples will result in a cleaner, higher quality image. However, since all other sampling values are multiplied by the number of Pixel Samples, they should only be increased when necessary. For more details on when to increase Pixel Samples, see the “Removing Noise” section.
Variance color space
Sampling color space for variance antialiasing. Setting this to Gamma 2.2 will cause darker parts of the image to receive more samples.
Ray variance anti-aliasing
When enabled, this parameter will cause Mantra to use ray variance antialiasing when determining the number of Secondary Rays to send for every Primary Ray.
This means that rather than using a specific number of rays, Mantra will first send out a small number of rays and use this sample set to evaluate the Variance. Depending on the amount of variance, Mantra will continue to send more rays up to the Max Ray Samples value. Ray Variance Antialiasing is useful for optimizing your render by sending more rays only in the areas they are needed.
In cases where the minimum number of rays to remove noise is equal to the maximum number of rays, you may save a small amount of render time by disabling Ray Variance Antialiasing.
Min Ray Samples
This value is the minimum number of secondary rays to use for each BSDF type when generating an image. When Ray Variance anti-aliasing is disabled, this number represents the number of secondary rays to send regardless of the Noise Level.
Remember, this number is multiplied by the current number of Pixel Samples and the number of BSDF types on the material being evaluated.
Max Ray Samples
When Ray Variance anti-aliasing is enabled, this parameter represents the maximum number of secondary rays allowed for each BSDF type even if the Noise Level is never reached. This parameter, along with Min Ray Samples, essentially allows you to create a range of acceptable sampling for your image. Carefully controlling the total number of potential rays is the best way to optimize your renders.
Remember, this number is multiplied by the current number of Pixel Samples and the number of BSDF types on the material being evaluated. For example, if it’s a purely diffuse material, and Pixel Samples are set to 3×3, and the Max Ray Samples is set to 1, then it will cast up to 9 secondary rays (9 diffuse rays). If the material is both reflective and refractive, then it will cast up to 18 secondary rays (9 reflection and 9 refraction rays).
For more details on when to increase Max Ray Samples, see removing noise.
Noise Level
Represents a threshold in the amount of variance allowed before mantra will send more secondary rays. Variance essentially represents how “spread out” the values in a set of samples are. For instance, a set of samples that were all the same would have a variance of 0. It is generally a good idea to keep this value as high as possible so that rays are sent only into those areas where an unacceptable amount of noise is present.
Adding “direct samples” and “indirect samples” image planes can help you track how many samples are being sent and to which parts of the image. For more information about sampling, see the “Sampling and Noise” section.
If you find that certain objects in your scene require substantially more samples than other parts of your image and you are unable to “target” those objects using the Noise Level parameter, it may be a better idea to add per-object sampling parameters to the problem areas. See removing noise for more details.
Diffuse Quality
Controls the quality of indirect diffuse sampling (for information on the difference between direct and indirect rays, see sampling and noise). Often, indirect sources of light (such as the surfaces of other objects, and light scattered inside of a volume) will be a significant cause of noise in your renders. Turning this up should decrease this type of noise, at the cost of slowing down rendering.
This parameter acts as a multiplier on Min Ray Samples and Max Ray Samples and also as a divisor for Noise Level. For example, if you have Min Ray Samples set to 1, Max Ray Samples set to 8 and your Noise Level to 0.1, then set Diffuse Quality to 2, Mantra will send between 2 and 16 secondary diffuse ray samples based on a Noise Level of 0.05. Remember these numbers apply only to the indirect samples. Mantra uses the original values for all direct sampling.
To find how much noise is in your indirect diffuse component, add the “Indirect Lighting (per-component)” image plane in the Extra Image Planes tab. This lets you check each indirect component individually. For this parameter, you should check the Indirect Diffuse component.
Reflection Quality
Controls the quality of indirect reflection sampling (for information on the difference between direct and indirect rays, see sampling and noise). Indirect reflections (reflections of other objects in the scene) can sometimes add noise to the render. Turning this up should decrease this type of noise, at the cost of slowing down rendering.
This parameter acts as a multiplier on Min Ray Samples and Max Ray Samples and also as a divisor for Noise Level. For example, if you have Min Ray Samples set to 1, May Ray Samples set to 8 and your Noise Level to 0.1, then set Reflect Quality to 2, Mantra will send between 2 and 16 secondary reflection ray samples based on a Noise Level of 0.05. Remember these numbers apply only to the indirect samples. Mantra uses the original values for all direct sampling.
To find how much noise is in your indirect reflection component, add the “Indirect Lighting (per-component)” image plane in the Extra Image Planes tab. This lets you check each indirect component individually. For this parameter, you should check the Indirect Reflection component.
Refraction Quality
Controls the quality of indirect refraction sampling (for information on the difference between direct and indirect rays, see sampling and noise). Indirect refractions (refracted light from of other objects in the scene, such as when viewing an object through glass) can sometimes add noise to the render. Turning this up should decrease this type of noise, at the cost of slowing down rendering.
This parameter acts as a multiplier on Min Ray Samples and Max Ray Samples and also as a divisor for Noise Level. For example, if you have Min Ray Samples set to 1, May Ray Samples set to 8 and your Noise Level to 0.1, then set Refract Quality to 2, Mantra will send between 2 and 16 secondary refraction ray samples based on a Noise Level of 0.05. Remember these numbers apply only to the indirect samples. Mantra uses the original values for all direct sampling.
To find how much noise is in your indirect refraction component, add the “Indirect Lighting (per-component)” image plane in the Extra Image Planes tab. This lets you check each indirect component individually. For this parameter, you should check the Indirect Refraction component.
Enable Indirect Sample Limits
Decouples the Direct from Indirect Rays, allowing for different sampling rates as well as separate noise levels. Generally speaking, it will only be necessary to enable this parameter if you find that too many samples are being sent as Direct Rays.
Adding “direct samples” and “indirect samples” image planes can help you track how many samples are being sent and to which parts of the image. For more information about sampling, see the “Sampling and Noise” section.
This parameter will enable three new parameters: Min Indirect Ray Samples, Max Indirect Ray Samples, and Indirect Noise Level.
To understand the difference between Direct and Indirect rays, see sampling and noise.
Volume step rate
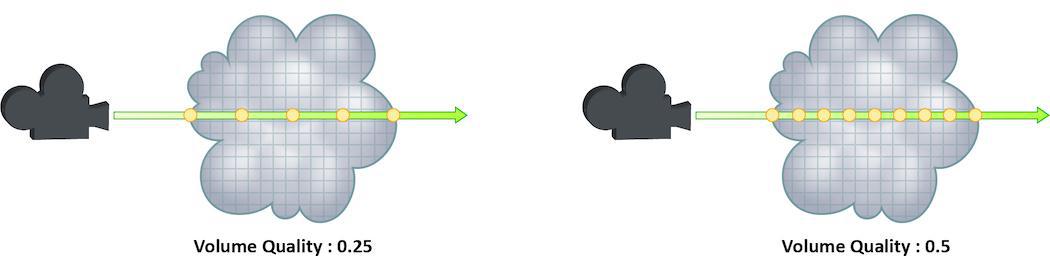
How finely or coarsely a volume is sampled as a ray travels through it. Volumetric objects are made up of 3d structures called Voxels, the value of this parameter represents the number of voxels a ray will travel through before performing another sample.
The default value is 0.25, which means that every one of every four voxels will be sampled. A value of 1 would mean that all voxels are sampled and a value of 2 would mean that all voxels are sampled twice. This means that the volume step rate value behaves in a similar way to pixel samples, acting as a multiplier on the total number of samples for volumetric objects.
For volumes that aren’t voxel based, like CVEX procedural volumes, Mantra will divide the bounding box of the volume into roughly 100 “virtual” voxels. In these cases, setting the Volume Step Rate correctly is essential to maintaining the correct level of detail.
Keep in mind that increasing the volume step rate can dramatically increase render times, so it should only be adjusted when necessary. Also, while increasing the default from 0.25 can reduce volumetric noise, increasing the value beyond 1 will rarely see similar results.
For more information about volume sampling, see sampling and noise.
Volume shadow step rate
A factor to proportionally decrease the volume step rate only for shadows, relative to the volume step rate. Smaller values will cause mantra to use a larger ray march step size for shadow rays than other shading rays. A value of 1 will produce equal quality for shadow rays and shading rays.
Stochastic transparency
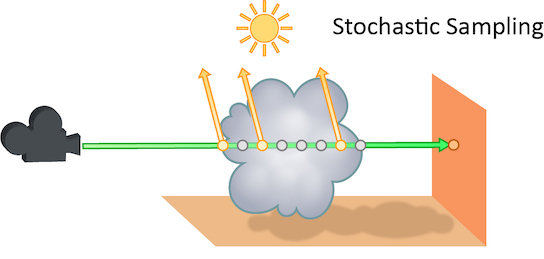
The number of transparent samples to be shaded as a ray travels through translucent objects. Increasing this value will result in less noise in translucent objects and is generally less costly than increasing Pixel samples, Volume Step Rate, or Min and Max ray samples. Stochastic Sampling will not have any effect on noise from Indirect Sources however.
This may make the image noisier than without stochastic transparency, so you may need to compensate by, for example, increasing the pixel samples. You should generally leave this option on.
The renderer ignores this option for micropolygon rendering (except for secondary ray tracing) and for renders that only generate opacity (such as deep shadow maps). In those cases it is more efficient to composite all the transparent shading results.
Added in Houdini 12.
Stochastic samples
The number of transparent samples to shade when Stochastic Transparency is on. Higher values improve shading quality for volumes and transparent surfaces, but are slower to render.
Sample lock
Sampling generally occurs in random patterns which change on every frame of an animation. This can cause a distracting “buzz” when there is a significant amount of noise in your images which can make evaluation of other aspects of the scene difficult. Enabling this parameter will “lock” the sampling patterns so that the noise remains the same on every frame.
Also, in some cases where the final rendered images will be sent through a post-render de- noise process, it can be useful to have the noise remain constant frame to frame. Consistent sampling patterns can help when analyzing the noise.
It defaults to “off” because it is generally unacceptable to have a locked sampling pattern for final sequences.
Random seed
Adjusting this parameter will cause the pixel sampling patterns used by Mantra to be regenerated in different configurations. By default, the patterns change on every frame, so manually changing this value is not necessary.
Allow image motion blur
Occasionally, when motion blur is going to be added to an image as a post-process or for other compositing operations, it is necessary to calculate the motion blur but not include it in the final rendered image. In these cases, Allow Image Motion Blur should be disabled.
This means that the blurred positions necessary for Motion Blur can be exported as a custom Motion Vector Image Plane from within a shader using the GetBlurP() function without the small overhead of doing the actual shading in the render.
This parameter is related to the motion blur parameters which are available only when Motion Blur is enabled. Disabling this option will cause motion blur to be removed from the final rendered image, however the blurred Position will still be calculated, allowing for custom motion vector image planes to be created.
Mantra user guide