| On this page |
Overview 
You can include extra image planes (also called deep rasters) containing image representations of VEX (the mantra shading language) global variables, or exported variables/parameters from any surface or fog shader.
You can even output extra planes per light if you assign the exported variable inside an illuminance loop.
When rendering to a .pic (Houdini image format) or .exr (OpenEXR) format image (or the special ip name, which outputs to MPlay instead of a file) you can include the extra planes in the same multi-plane image as the main render. You can also specify that extra planes go into multiple separate files (or put multiple extra planes in a separate multi-plane file from the main render).
Examples 
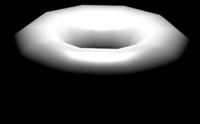
For example, you can export the value of the global variable N (surface normal) for each pixel to an image.
The rendered color plane: a torus lit from above |
|
The |
|
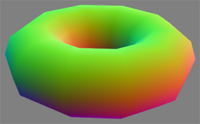
(You can view the extra plane(s) in MPlay using the popup menu in the top left under the toolbar.)
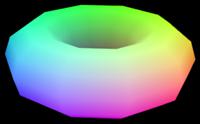
Another example: Houdini’s basic surface shader exports a variable named diffuse_color_noshading, containing the shader’s diffuse color contribution before lighting. This can be very useful information to have during compositing.
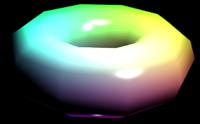
The color plane: a torus lit from various angles, with point colors |
|
The |
|
How to 
| To... | Do this |
|---|---|
|
Set up a render node to export an extra plane |
|
|
Output a global or export variable |
|
|
Output a shader variable |
|
|
Output a variable per-light |
Set Light Exports to Export variable for each light on the render node and it will create the proper per light outputs. If you only want one light, you can set Solo Light to the desired light in the Objects tab of the |
Tips 
-
Mantra doesn’t export planes for lights that have zero intensity (because they're not sent to Mantra in the first place). This can cause problems if you're animating the intensity because it will cause a missing frame when the intensity is
0.You can add the light to Force lights (or even put a
*in that field) on the Mantra render node’s Objects tab to force Mantra to render the light even at zero intensity.
Parameters 
Extra Image Planes
Any number of extra image planes may be generated simultaneously. If the primary output image format supports multiple image planes, the plane name will be used to define the name of the deep raster plane. If the primary output device does not support multiple image planes, each image plane will be output to an individual file, with the name of the plane defining the file name. The formats that support multiple image planes are OpenEXR and Houdini .pic (including the “ip” device).
Image Plane
The name of the plane.
VEX Variable
The VEX variable to be output to the image plane. The variable must be either a global variable, or an exported parameter.
When the N variable is output, its value may not be normalized resulting in either very small or very large values.
VEX Type
The correct type of the variable must also be specified.
Channel Name
Name of the channel to write the variable data to in the output file (if the file format supports multiple named channels). Leave this field blank to use the VEX variable name as the channel name.
Different File
Turn on the checkbox next to this field to write the variable data to an output file other than the rendered image.
Note
You can specify the same “Different file” for multiple extra image planes with different channel names (if the file format supports multiple named channels).
Quantize
The storage type for the output.
Sample Filter
Opacity Filtering
Transparent surfaces will be composited using Of.
Closest Surface
Only the value of the closest surface will be output, regardless of the opacity of the surface.
Pixel Filter
Specifies the pixel filter used to combine sub-pixel samples to generate the value for the single pixel.
Gamma
Specifies the gamma correction for the image.
Gain
Each color value is multiplied by the gain prior to being quantized.
Dither
The dither amount to be applied. The dither is specified as a fraction of the quantization step (i.e. 0.5 will be one half of a quantization step). The option is ignored for floating point output.
White Point
The white-point of the image used during quantization.
Export variable for each component
Enable per-component export planes for variables that support this feature. When enabled, multiple export planes will be produced - one for each of the vm_components specified on the ROP. Per-component exports may be combined with per-light exports to split up lighting components on a per-component and per-light basis.
Light Exports
Controls whether light exports are produced.
Export variable for each light
Creates a separate deep raster plane for each light that matches the criteria defined by the Light Mask and the Light Selection.
Merge all lights into single channel
Creates a single deep raster plane storing the sum of the export variable for all lights that match the criteria defined by the Light Mask and the Light Selection.
Light Mask
A list of light objects by name/bundle.
Light Selection
A list of light objects by category tags (see the Categories parameter on the light).
Note
For each light the deep raster plane name is prefixed with a mangled version of the path to the light. This can be specified manually by adding the rendering parameter Export Plane Prefix to the light sources. You can set the export prefix to an empty string on the output driver if you are generating deep rasters for a single light source in all cases. This will eliminate the prefix for all light sources.
Exporting components as separate image planes 
The ![]() Mantra node's Output tab has a Export components parameter. This is a space-separated list of component names. Components are named in the shader using the Label parameter on VOPs that generate BSDFs. The shaders included with Houdini use component names such as
Mantra node's Output tab has a Export components parameter. This is a space-separated list of component names. Components are named in the shader using the Label parameter on VOPs that generate BSDFs. The shaders included with Houdini use component names such as diffuse, reflect, coat, refract, and volume.
When you add Extra image planes, in the pop-up menu next to VEX variable you can choose a type of lighting with “(per component)”. This exports separate planes for each of the components listed in the Export components parameter.
If you set Light exports to “Export variable for each light”, you can get separate image planes per light, per component for maximum compositing flexibility.
Intrinsic exports 
The following are deep raster planes that you can specify to get additional intrinsic information. They are in the defaults menu for deep raster planes, along with the PBR planes.
Name |
Type |
Description |
|---|---|---|
Render_Time |
Float |
Outputs the number of seconds spent rendering the tile as a floating point value. |
Op_Id |
Float |
Output the object identifier as a floating point value. This plane will store the value specified by the “object:id” object-level setting, or if this setting was not specified, it will store a unique identifier for the object covered by the pixel. Pixels with a value of -1 are not covered by any objects. |
Prim_Id |
Float |
Output the primitive identifier as a floating point value. This plane will store the geometry primitive number as can be queried in SOPs. Pixels with a value of -1 are not covered by any primitives. For packed primitives, Prim_Id will be set to the primitive id of the packed primitive, not the primitives inside it. |
Shading_Samples |
Float |
Output the number of transparent samples shaded per pixel sample. This value is useful for debugging volume and sprite renders to determine how much processing time is spent shading transparent samples. |
Opacity_Samples |
Float |
Output the number of opacity samples shaded per pixel sample. This deep raster is only non-zero for renders using stochastic transparency, and is useful to debug the amount of processing time that is spend evaluating opacities before allocating shading samples. Using a larger volume step size in volume renders will decrease the number of opacity samples, improving performance. |
Pixel_Samples |
Float |
Output the number of pixel samples that have been computed for each pixel. This is useful in IPR to examine completion in different parts of the image. |
ray:nts |
Float |
Output the number of ray tracing traversal steps for primary rays. This plane can be used for low-level debugging of ray tracing performance. |
ray:nets |
Float |
Output the number of ray tracing leaf node traversal steps for primary rays. This plane can be used for low-level debugging of ray tracing performance. |
ray:nobjs |
Float |
Output the number of instance object intersections that were performed for the primary ray. This plane can be used for low-level debugging of ray tracing performance. |
ray:nprims |
Float |
Output the number of primitive intersections that were performed for the primary ray. This plane can be used for low-level debugging of ray tracing performance. |
Compositing 
In compositing, you should be able to reproduce the Cf beauty plane by summing together all the direct_, indirect_, and sss_ planes using a Layer COP with the Global Operation set to Add.
The shadow matte planes can be combined by multiplying the unshadowed plane by the complement (Invert COP) of the shadow matte.
Tip
When dealing with multi-channel .pic or .exr images, use the Channel Copy COP to extract a named plane into C so that COPs that operate only on C operate on that plane. Set the Target to C and the Source to the plane you want to copy.