| On this page |
Overview 
In Houdini, if you don’t have any lights in the scene, To be able to see anything in a render, you need to light the scene.
Physically based rendering (PBR) realistically simulates light bouncing around the scene. Because it only lights surfaces that get hit by the bouncing light, it renders shadows “automatically”. That is, you don’t have to do anything to enable shadows – they are a “free” byproduct of physically based rendering.
With the older rendering engines (ray tracing and micropolygon rendering), shadows must be simulated as “extra work” by the renderer. With these engines you speed up rendering by turning off shadows wherever possible, and use “tricks” such as shadow maps.
See how to use the light bank to control which objects cast shadows from various lights.
While PBR rendering gives you shadows, reflections, irradiance, and so on “for free”, the drawback of its stochastic nature is noise. See the quality settings page for how to decrease/mitigate noise in PBR renders.
Lights 
| To... | Do this |
|---|---|
|
Place lights in a specific location in the scene view |
|
|
Create a light based on the current view |
|
|
Add environment lighting |
On the Lights and cameras shelf tab, click the You can use the See environmental lighting for more information. |
|
Change light position and orientation |
You can select lights using the |
|
Make a light follow an object |
You can also make a light look at an object by setting it on the Lookat Options tab on the Transform tab of the parameter editor. |
|
Edit a spotlight’s light cone |
Use the The cone handle changes the angle and spread of a spotlight’s light cone. |
|
Use the view keys to quickly edit a light’s viewpoint |
|
|
Emit light from objects |
Use Geometry lights and Volume lights or materials with emission to make objects in the scene seem to emit light. |

Enabling and disabling shadows 
| To... | Do this |
|---|---|
|
Make an object not cast shadows |
Use shadow linking to control which objects cast shadows from which lights. |
|
Make an object cast shadows but not appear in the render (phantom object) |
Turn on the Phantom checkbox on the object’s Render tab. |
|
Show shadow previews in the viewport |
Turn on the
Shadow previews will introduce delays as Houdini calculates shadow maps for each light behind the scenes. You can also turn on Projected Textures in the display options for better quality. You can also use the |

Tips 
-
Area lights (such as rectangles and spheres) and environment lights are very efficient to use with physically based rendering.
-
A typical lighting setup will have a key area light, a bounce area light, a fill light, and an environment light for reflections.
-
Area lights are the workhorses.
-
Because the renderer is simulating light physics, it’s possible to set up intuitive interactions of light and geometry, reusing many techniques from real-world film lighting, such as colored light gels, cucoloris or gobo geometry, and bounce cards (though it’s easier to just set up another area light), rather than trying to “trick” the renderer.
-
In ye olden tymes one might have tried to fake a street light through fog or God rays using shader tricks. However, with PBR it’s much easier to actually set up a very powerful light and blast it through a very low resolution, very low density, brightly colored volume.
-
You may want to decide whether you're lighting for physically correct light conservation, or using linear “artistic” light. For absolutely physically correct light, you should turn Normalize light intensity off, and set Attenuation to “Physically correct”.
-
You can also add texture maps to shape or color lights.
-
To get global illumination/irradiance, add an
 Indirect light and increase increase Properties ▸ Shading ▸ Diffuse limit on the mantra node to let more light bounce into dark areas.
 -
Secondary lighting can make a big difference to the appearance of a scene.
The following image was rendered only using direct lighting:

The following image was rendered using direct and indirect lighting:
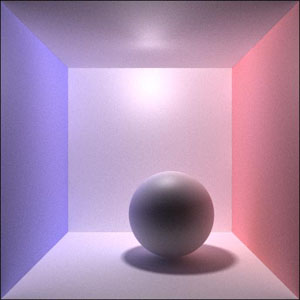
There are two approaches to achieve indirect lighting using physically based rendering. You can either render long light paths using path tracing or cache indirect light to a photon map and then perform a final gather from the map.
-
If contact shadows are very problematic (too dark/noisy), you can try cheating by placing a dim area light under the object.
-
Always use the
.ratformat for Z-depth shadows and deep shadows generated for mantra. The
 .ratformat supports higher quality texture filtering and more efficient memory management than.picfiles. -
If you want a surface to avoid having shadows cast upon it (“catching” shadows), you must write its surface shader with this in mind. Use the isShadowRay VEX function in the shader to tell when the renderer is calculating shadows.
-
There are a few ways you can make opaque objects cast colored shadows:
-
Create two light sources parented to each other. Make one light cast shadows and other cast no shadows. Set the non-shadowing light to the shadow color, and the shadowing light to the shadow color’s complement.
For example, to make a green shadow, set the non-shading light color to
0, 1, 0, and the shadowing light color to1, 0, 1. The non-shadowing light will pass through the object. -
Create a custom shadow shader in VEX. You can query the color of the light before shadows are cast, compute the shadows, then blend between the original color and the shadow color.
-
Modify the surface shader so the object becomes transparent only for shadows. This means the light passing through the surface will be added to the shadow. So, it will appear the object is transmitting light.
-
Light types 
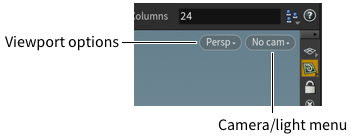
The following are brief descriptions of the different buttons on the Lights and Cameras tab. Each light tool puts down the same ![]() light node, but with different specifications. However, the Ambient Light puts down an
light node, but with different specifications. However, the Ambient Light puts down an ![]()
![]() Ambient Light node since its unique from the other five.
Ambient Light node since its unique from the other five.
|
Point Light |
Emits light from a point in all directions and is similar to a light bulb. |
|
Spot Light |
Radiates a cone shaped beam of light from a point in a certain direction. |
|
Area Light |
Automatically distributes a number of light sources over a specified area. There are five area light shapes to choose from. Line/Tube Lights are distributed along the length of a straight line.
Grid Lights are distributed over the area of a plane. This is the default shape created by the area light.
Disk Lights are distributed over the area of a disk.
Sphere Lights are distributed along the outside surface of a sphere. You can put objects inside this shape for an overall soft shadow look that is similar to global illumination irradiance.
|
|
Distant Light |
Emits parallel rays of light, which are similar to the rays of the sun. |
|
Environment Light |
Casts light into the scene as if from a surrounding hemisphere or sphere. The default environment light is a hemisphere; however, you can make it a full sphere by turning on the Use full sphere for environment checkbox on the Area Light Options sub-tab of the Light tab in the parameter editor. You can also change the sampling density in the Area Samples parameter on the Area Light Options sub-tab of the Light tab in the parameter editor. The position of the light does not matter. You can rotate the light object to orient the light source. With no rotation, hemisphere lights are oriented to cover the region above the XZ plane. An environment light may use a texture map to provide illumination from an environment map. With no rotation, the environment map is oriented so that the top face aligns with the positive Y axis. |
|
Ambient Light |
Emits light from all directions to illuminate the scene (source-less light). For specific parameter information, see the |


For specific parameter help see the ![]()
![]() light node help.
light node help.
Light categories 
Categories and masks both provide ways to specify a set of objects or lights.
Masks use the object name to determine membership and use the same semantics as object globbing in Houdini, for example /obj/geo*,^/obj/geo1. The light linker works by modifying masks in object parameters.
For very large scenes and when instancing, tagging things with categories can be easier and more efficient.
You can specify categories on an object using the parameter editor (Render tab, Shading sub-tab, Categories parameter). Objects can belong to more than one category – separate multiple categories with commas and/or spaces. Categories are similar to tags in Web applications; you can “tag” lights and objects, and use the unions and intersections of tags to control light linking.
(If you specify both a mask and categories, mantra uses the intersection – the objects which are in both sets.)
For example, a light might have Categories set to keylight, shadower, distant. This makes the light part of the keylight set, the shadower set, and the distant set. You can then use these categories.
Note
Categories will probably supplant masks as the preferred method for light/shadow/reflection linking in a future version of Houdini, but support for categories in the UI is currently limited.
You must manually add the Mantra/Shading/Light selection, Mantra/Shading/Shadow selection, and/or Mantra/Shading/Reflection selection properties to an object to use categories for linking.
You can also use categories as an optional argument in an illuminance loop in VEX to loop over the lights based on categories.
Category expressions are one or more category names. When specifying multiple name, join them with the & (and) or | (or) symbols. For example, keylight|distant would specify all objects which have either the keylight or distant categories, while keylight&distant would specify only objects that have both keylight and distant categories.
Category expressions currently do not support grouping with parentheses. Category expressions are processed left to right with & (and) at a higher precedence than | (or). So:
a & b & c | d & e | f | g & h
…is equivalent to:
(a & b & c) | (d & e) | f | (g & h)
Symbol |
Meaning |
|---|---|
|
Matches objects tagged with the ‹name› category. |
|
Matches objects which are not tagged with the ‹name› category. |
|
Matches all objects. |
|
Matches no objects. |
|
Matches objects which have any categories defined. |
|
Matches objects which don’t have any categories defined. |
|
Matches objects which match |
|
Matches objects which match |
For example, the category pattern - | foo will match any objects tagged with category foo, or any uncategorized objects.
Light contributions 
![]() Light and
Light and ![]() Environment light objects have a Lighting contribution parameter. This is a space-separated list of component names.
Environment light objects have a Lighting contribution parameter. This is a space-separated list of component names.
-
Components are named in the shader using the Label parameter on VOPs that generate BSDFs. The shaders included with Houdini use component names such as
diffuse,reflect,coat,refract, andvolume. -
You can also use the virtual labels
directandindirectto control the light’s contribution based on whether a sample is from a direct or indirect ray.
This can be useful in non-realistic lighting setups, for example if you have a large number of fill lights in the scene and don’t want them to show up as highlights on shiny objects, you can set them to not contribute to reflectance.
The parameter can use category syntax to match, combine, and remove names, for example diffuse|volume or -diffuse & -volume.
Light portals 
The ![]() environment light lets you specify certain scene geometry as “light portals”, treating them as windows streaming in outside light.
environment light lets you specify certain scene geometry as “light portals”, treating them as windows streaming in outside light.
The portal light tool lets you select geometry and creates an environment light with the geometry set as a portal.
Advanced: light shaders 
Instead of the standard cone and point lights you can use a light shader, a custom coded light. Houdini ships with several special lights, most of them coded in VEX.
-
Create a light shader in the network editor at the Shader level using the tab menu.
Shaders, including light shaders, are specific to the renderer you will use. Shaders whose names start with
VEXwill render in the Houdini’s standardmantra renderer. Other shaders work
in other renderers. For example, RenderMan shaders start with RMan. -
Create a
 Light Template in the network editor at the Object level using the tab menu.
 -
In the parameter editor of the Light Template, enter the path of the light shader you just created in the Render ▸ Shaders ▸ Light Shader parameter.
| See also |