| On this page |
Overview 
Cryptomatte is a set of open-source tools for generating and working with images that associate individual pixels with object IDs. More generally, a “cryptomatte” is the type of image generated by the tools, or equivalent features in other software such as Houdini. This is a deep EXR image which stores object names/materials per-pixel, with special filtering to properly support anti-aliasing and transparency.
You can use the image to mask compositing effects to only the pixels associated with certain 3D source objects, or certain materials, without having to re-render the scene.
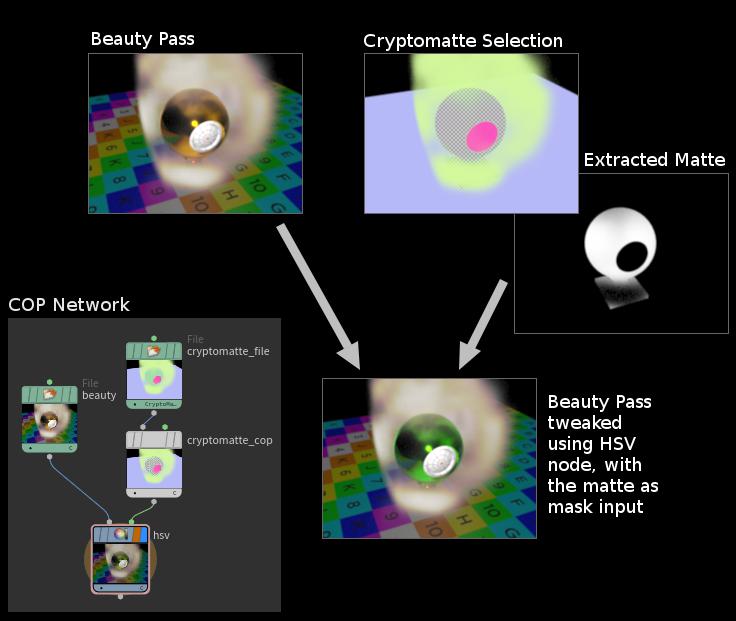
The following example shows how you can use a cryptomatte image to isolate a specific material in a Houdini compositor network.
See Cryptomatte’s official site for specifications and plugins for popular compositing applications.
Note
Cryptomatte is supported by Karma CPU and Karma XPU.
Tips and notes 
-
Cryptomatte uses the primary plane’s pixel filter. Custom pixel filter plugins can be used as well, but a filter that reads data from additional image planes (for example,
minmaxfilter reads data fromZplane) are not allowed. -
You cannot generate cryptomatte in micropolygon rendering mode.
-
Keep in mind that opacity and transparency are two separate things: Partially opaque materials let camera rays through, while transparent materials obstruct camera rays and cast secondary (refraction) rays. The pixel coverage is computed based on opacity, so you won’t be able to generate matte for objects behind refractive materials.
How to 
| To... | Do this |
|---|---|
|
Render a USD scene to a cryptomatte image using Karma |
See Cryptomatte in Karma. |
|
Render a traditional Houdini object-level scene to a cryptomatte using Mantra |
The Mantra ROP lets you generate a cryptomatte image as an AOV plane in the main rendered image, or in an extra generated file.
|
|
Generate masks in the compositor from a cryptomatte |
See the help for the Cryptomatte COP. |
Instancing and unique IDs 
In order to matte a particular instance among other instances, you need to generate Cryptomatte using a user string property whose value is unique to each instance.
Here’s an example method using Material Stylesheets:
-
Set up
 instancing.
 -
Make sure you're using fast point instancing.
-
Using
 Attribute Expression (or any method you prefer), give each point inside
 Instancenode a unique integer. -
Add a user string property to the
Instancenode. -
Add a root level stylesheet, target Point Instances, override script Render Property using Inline Script, and set up appropriate bindings:
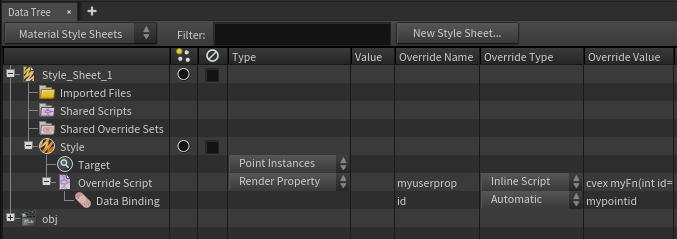
Example inline script:
cvex myFn(int id=0; export string myuserprop="")
{
    myuserprop = sprintf("foo%d", id);
}
In this example, the name of the user property is myuserprop. The name of the
point integer attribute is mypointid. The unique property values that are
generated are foo0, foo1, foo2 etc (the # comes from mypointid attribute).
Note that, in this example, Inline Script was only necessary to convert integer attribute to string property. If you're using a string attribute then you could simply use Attribute Binding and skip the script and data binding altogether.
See Material Stylesheets for more information on how to use stylesheets.