| On this page |
Overview 
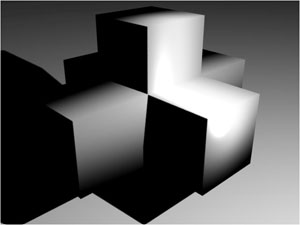
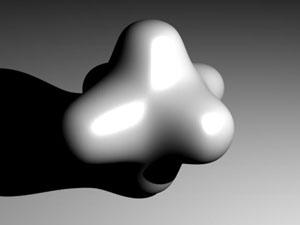
Subdivision smooths and adds extra resolution to curves and surfaces at display and/or render time. The renderer subdivides the surface until it’s smooth down to the pixel level.
This lets you work with efficient low-polygon models and only add the smoothing “on demand” on the graphics card (for display) or in the renderer. The tradeoff is that subdivision curves/surfaces take slightly longer to render. However, smoothing low-resolution polylines using curve subdivision is still much faster than working with inherently smooth primitives such as NURBS curves.
You can turn on display subdivion and render subdivision separately at the object level.
Geometry 
You can “bake” subdivisions into geometry (that is, actually create new polygons in the scene instead of just smoothing at display/render time) using the ![]()
![]() Subdivide SOP. You must manually specify the number of subdivision levels in the geometry. Each level will add 4× the number of polygons.
Subdivide SOP. You must manually specify the number of subdivision levels in the geometry. Each level will add 4× the number of polygons.
Subdividing by material 
You can add the Render polygons as subdivision render property to a material to have any surfaces with that material render as subdivided. This can be useful to subdivide certain parts of the model and not others, based on materials.
You can also change the property using material stylesheets.
Creasing 
You can specify that certain edges should be sharp using crease attributes.

Subdivision styles 
Houdini can use two subdivision styles: “Mantra Catmull-Clark” uses the algorithm included with previous versions of Houdini. “OpenSubdiv Catmull-Clark” uses the algorithm from the OpenSubdiv library. You can choose one or the other if you need to match the look of existing Houdini files or output from packages using OpenSubdiv.
How to 
| To... | Do this |
|---|---|
|
Set an object to render subdivided |
An object that is rendered as subdivision does not automatically display as subdivided in the 3D view. If you want to see the object as subdivided in the view, you need to also set Display as. |
|
Set an object to display subdivided |
The subdivision occurs on the graphics card so it should be fast and efficient. |
|
Only apply subdivision to certain geometry groups in the object |
See also how to apply subdivision by material above. |
|
Crease certain edges |
Use the This image was rendered with a crease weight of 3 on the end caps:
|