| On this page |
|
Mantra user guide
As described in sampling and noise, under-sampling is almost always the cause of noise in your renders. Simply increasing the overall amount of sampling will reduce the amount of noise, but it will also cause many parts of your image to be over-sampled and your render times to increase. Targeting the various types of rays to the correct part of your image is critical for optimization, sending more of the wrong kind of ray will not increase the quality of your render. The goal, when setting your sampling parameters, is to balance Speed with Quality. For more information about the specific parameters described below, see The Sampling Tab and the Extra Image Planes Tab.
In general, when attempting to remove the noise in your render, it is good practice to start by adding the following image planes:
-
Direct Lighting (per component)
-
Indirect Lighting (per component)
-
SSS (Subsurface Scattering)
-
Direct Samples
-
Indirect Samples
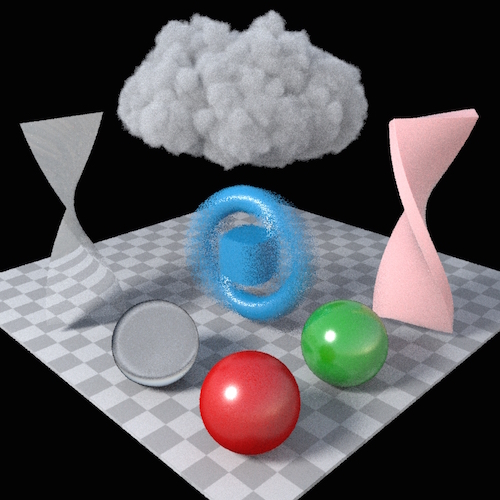
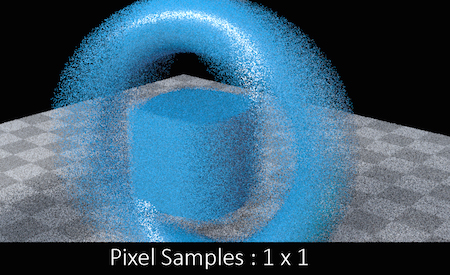
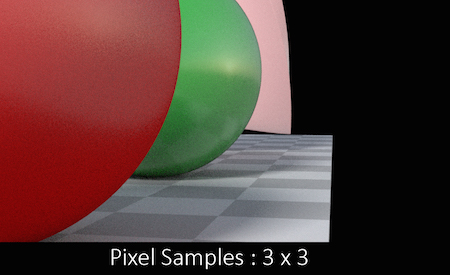
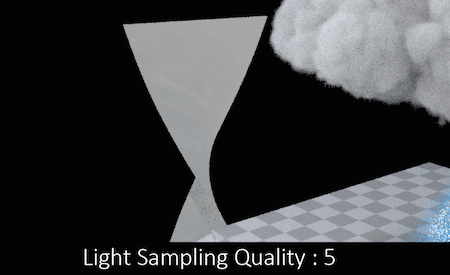
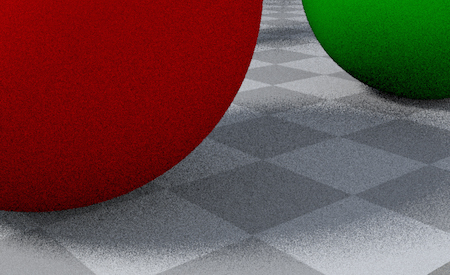
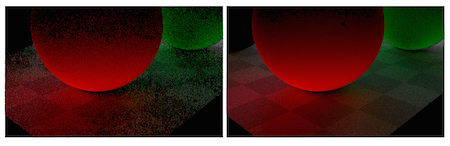
These will allow you to analyze different parts of your scene one at a time. Here is an example of a scene with multiple material types and motion blur. All values on the Mantra Node are set to default, except for Pixel Samples, which are 1×1.
For each Example below, we will adjust only the parameters that are mentioned in the descriptions accompanying each noise type.
Motion blur 
Fast moving objects, when “Allow Motion Blur” is enabled on the Mantra node, can cause your image to become noisy. This noise is similar to the aliasing you get around static objects, where detail is lost between samples. This problem is exacerbated when then object must be sampled across time as well as space.
Increasing Pixel Samples, also described as Primary Rays, is the only way to remove this type of noise.
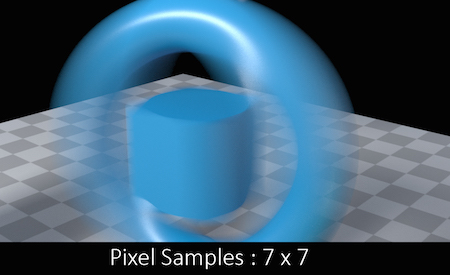
Increasing Pixel Samples will act as a multiplier for all other types of rays (see Sampling Tab). So, if it is necessary to increase Pixel Samples to reduce noise caused by Motion Blur, remember that you may be able to reduce the number of secondary rays at the same time.
To identify this type of noise, it can be useful to check the Alpha Channel for noise at the ends of objects. If overlapping objects make this impossible, turn off “Allow Motion Blur” and check the noise levels versus the non-motion blurred scene.
Depth of field 

Objects which are distant from the camera’s “Focus Distance” when “Enable Depth of Field” is checked on the Mantra Node, can become noisy. This is especially evident in bright highlights and the edges of objects.
Increasing Pixel Samples is the only way to remove this type of noise.
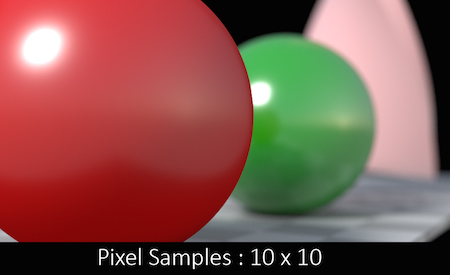
However, in areas that are in focus, you may notice other types of noise. Combining methods to remove those types of noise with Pixel samples can get you to a cleaner image faster. Once again, remember that Pixel Samples will act as a multiplier for all other types of rays, so you will not need as many secondary rays as you would with Depth of Field disabled.
To identify this type of noise, it can be useful to check the Alpha Channel for noise at the edges of objects or along the motion path. If overlapping objects make this impossible, turn off “Enable Depth of Field” and check the amount of noise in the image without Depth of Field blurring.
Edge aliasing 

Without enough Primary Rays, the edges of objects can appear jagged and rough. This can be especially evident in high-contrast areas or within high-frequency patterns.
Increasing Pixel Samples is the only way to remove this type of noise.
Increasing Pixel Samples will act as a multiplier for all other types of rays. So, if it is necessary to increase Pixel Samples to reduce noise caused by Edge Aliasing, remember that you may be able to reduce the number of secondary rays at the same time.
To identify this type of noise, it can be useful to check the Alpha Channel for noise at the edges of objects or along the motion path.
Direct Illumination 
Direct reflections 
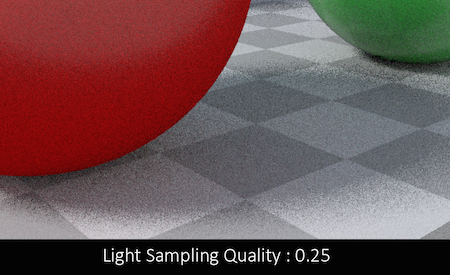
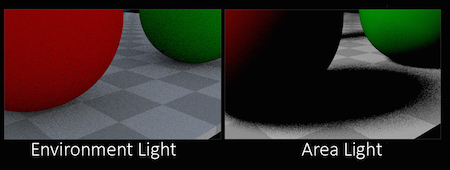
Direct Reflections, which are caused by reflections of light sources directly from the surface of an object, can exhibit a speckled noise pattern. This is especially evident in materials with small amounts of roughness (In the 0.1 – 0.3 range) in combination with Area Lights.
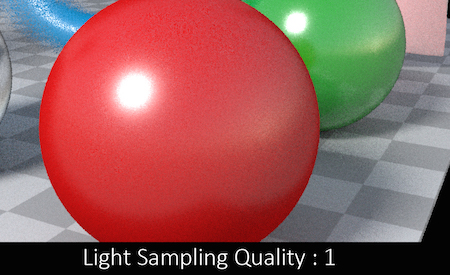
The best way to remove this type of noise is to increase the Sampling amount on the Light which is causing the noise. Increasing Pixel samples will also help remove the noise, but will cause an increase in all other types of rays, causing areas of the image without noise to become over-sampled.

Increasing light samples will act like a multiplier on the number of Diffuse Rays in your scene so it is not a good idea to simply increase samples to extremely high values for all lights. Also, increasing Direct rays will also help clean up this type of noise. This means that you must balance the need to clean up noise from a specific light, against cleaning up Direct Sources of noise throughout your image.
To identify this type of noise, enable the “Direct Reflect” image layer, this will allow you to examine the contributions to Direct Reflections without interference from other sources of noise or Indirect Reflections.
For complex scenes with many lights, it can be useful to export the “Direct Reflect” layer using the “Per Light” option. This will allow you isolate the specific lights that are causing noise in your scene, allowing you to increase sampling only on the offending light sources.
Direct refractions 

Direct Refractions, which are caused by refractions of light sources through a Single surface (A grid for instance), can exhibit a speckled noise pattern. This is especially evident in materials with small amounts of roughness (In the 0.1 – 0.3 range) in combination with Area Lights or Environment Lights.
(Remember that any refractions through more than one surface will be considered an Indirect Refraction.)
The best way to remove this type of noise is to increase the Sampling amount on the Light which is causing the noise. Increasing Pixel samples will also help remove the noise, but will cause an increase in all other types of rays, causing areas of the image without noise to become over-sampled.
Increasing light samples will act like a multiplier on the number of Diffuse Rays in your scene so it is not a good idea to simply increase samples to extremely high values for all lights. Also, increasing Direct rays will also help clean up this type of noise. This means that you must balance the need to clean up noise from a specific light, against cleaning up Direct Sources of noise throughout your image.
To identify this type of noise, enable the “Direct Refract” image layer, this will allow you to examine the contributions to Direct Refractions without interference from other sources of noise or indirect refractions.
For complex scenes with many lights, it can be useful to export the “Direct Refract” layer using the “Per Light” option. This will allow you isolate the specific lights that are causing noise in your scene, allowing you to increase sampling only on the offending light sources.
Direct shadows 
Direct Shadows, which occur when a point in your scene does not have a direct path to a light source, can exhibit a speckled or rough noise pattern on their edges. This is especially evident in soft shadows cast from large area lights.

Similarly to Direct Reflection noise, the best way to remove this type of noise is to increase the Sampling amount on the light which is causing the noise. Increasing Pixel samples will also help remove the noise, but will cause an increase in all other types of rays, causing areas of the image without noise to become over-sampled.

Increasing light samples will act like a multiplier on the number of Diffuse Rays in your scene so it is not a good idea to simply increase samples to extremely high values for all lights. Also, increasing Direct rays will also help clean up this type of noise. This means that you must balance the need to clean up noise from a specific light, against cleaning up Direct Sources of noise throughout your image.
To identify this type of noise, enable the “Direct Diffuse” image layer, this will allow you to examine the shadows caused by direct lighting without interference from indirect sources of shadow.
For complex scenes with many lights, it can be useful to export the “Direct Diffuse” layer using the “Per Light” option. This will allow you isolate the specific lights that are causing noise in your scene, allowing you to increase sampling only on the offending light sources.
Indirect illumination 
Indirect diffuse 
(For clarity, the Environment Light is disabled in this example.)

Indirect diffuse, which is the light contribution in a scene from other objects rather than lights, can be a large contributor to noise. This can be especially evident in scenes with physically accurate light sources which are also very near other objects (light sconces, or inset lights, for instance) and only contribute a small amount to direct lighting.
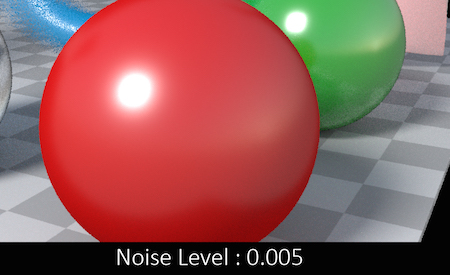
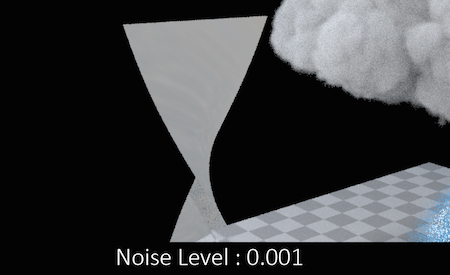
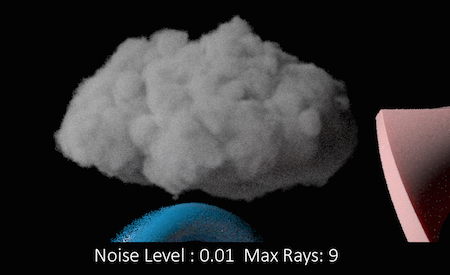
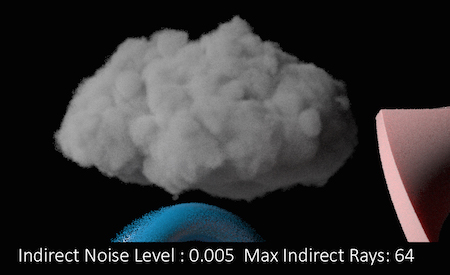
The best way to remove this type of noise is to increase the number of Indirect Samples that are being sent. You can achieve this by adjusting the Diffuse Quality parameter on the Mantra node. Increasing Pixel samples will also help remove the noise, but will cause an increase in all other types of rays, causing areas of the image without noise to become over-sampled.
Adjusting the Noise Level can help keep the number of samples low in areas with small amounts of noise. It is best to adjust this parameter in small amounts until you see some of the Indirect Diffuse noise being affected then use the Diffuse Quality parameter to adjust the amount of sampling done.
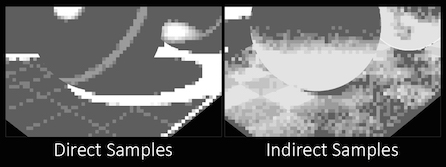
To help keep track of the number of Direct and Indirect samples in your render, add the “Direct Samples” and “Indirect Samples” image planes.
To identify this type of noise, enable the “Indirect Diffuse” image layer, this will allow you to examine the light contributions to this layer without interference from other types of noise.
For scenes with many light sources, it can be useful to evaluate the contribution of each light individually. Enable the “Export per Light” option on the Image Layer to generate the extra layers.
Keep in mind that you do not have to completely remove noise from this component in order to have a clean image, often times indirect noise is invisible when it has been combined with direct lighting information. Always refer to the Combined Color image plane to see how your sampling is affecting the fidelity of the final image.
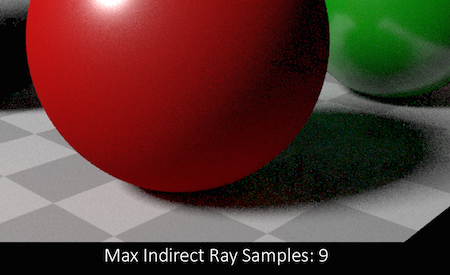
For more difficult cases, where your noise threshold must be set very low in order to get enough indirect samples into the noisy parts of your image, it might be make sense to increase the Minimum number of ray samples. If noise still persists, increasing Pixel Samples may be the best course of action. When increasing Pixel Samples in these cases, you will generally get a better evaluation of the noise, which may mean re-adjusting the Noise Level as well as the Min and Max Ray Sample parameters.
Indirect reflections 

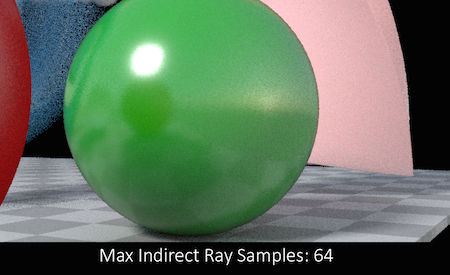
Indirect Reflections, which are the reflections of other objects and their surface properties, can be a large contributor of noise in your scene. This can be particularly evident in scenes with very bright glossy reflections in combination with other objects with rough reflections. Also, because Indirect Reflections can contribute more to the resulting color of a pixel, they can often be the cause of a particular type of noise referred to as “fireflies”. (For information on dealing with this particular problem, see the section on Fireflies).
The best way to remove this type of noise is to increase the number of Indirect Samples that are being sent. You can achieve this by adjusting the Reflection Quality parameters on the Mantra node. Increasing Pixel samples will also help remove the noise, but will cause an increase in all other types of rays, causing areas of the image without noise to become over-sampled.
Adjusting the Noise Level can help keep the number of samples low in areas with small amounts of noise. It is best to adjust this parameter in small amounts until you see some of the Indirect Reflection noise being affected then use the Reflection Quality parameter to adjust the amount of sampling done.
To help keep track of the number of Direct and Indirect samples in your render, add the “Direct Samples” and “Indirect Samples” image planes.
To identify this type of noise, enable the “Indirect Reflect” image layer, this will allow you to examine the amount of noise caused by indirect reflections without interference from other types of noise.
Keep in mind that you do not have to completely remove noise from this component in order to have a clean image, often times indirect noise is invisible when it has been combined with direct lighting information. Always refer to the Combined Color image plane to see how your sampling is affecting the fidelity of the final image.
For more difficult cases, where your noise threshold must be set very low in order to get enough indirect samples into the noisy parts of your image, it might be make sense to increase the Minimum number of ray samples. If noise still persists, increasing Pixel Samples may be the best course of action. When increasing Pixel Samples in these cases, you will generally get a better evaluation of the noise, which may mean re-adjusting the Noise Threshold as well as the Min and Max Ray Samples parameters.
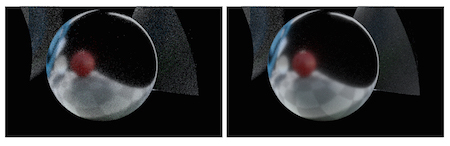
Indirect refractions 

Indirect Refractions, which are the refractions of other objects and surfaces in your scene, can be large sources of noise in your scene. This is especially true when there are many refractive objects and a high Refract Limit setting.
The best way to remove this type of noise is to increase the number of Indirect Samples that are being sent. You can achieve this by adjusting the Refraction Quality parameter on the Mantra node. Increasing Pixel samples will also help remove the noise, but will cause an increase in all other types of rays, causing areas of the image without noise to become over-sampled.
Adjusting the Noise Level can help keep the number of samples low in areas with small amounts of noise. It is best to adjust this parameter in small amounts until you see some of the Indirect Refraction noise being affected then use the Refraction Quality parameter to adjust the amount of sampling done.
Adding the “Direct Samples” and “Indirect Samples” planes can help you see where the most samples are being sent in your image.
To identify this type of noise, enable the “Indirect Refract” image layer, this will allow you to examine the amount of noise caused by indirect refractions without interference from other types of noise.
For scenes with many light sources, it can be useful to evaluate the contribution of each light individually. Enable the “Export per Light” option on the Image Layer to generate the extra layers.
Keep in mind that you do not have to completely remove noise from this component in order to have a clean image, often times indirect noise is invisible when it has been combined with direct lighting information. Always refer to the Combined Color image plane to see how your sampling is affecting the fidelity of the final image.
For more difficult cases, where your noise threshold must be set very low in order to get enough indirect samples into the noisy parts of your image, it might be make sense to increase the Minimum number of ray samples. If noise still persists, increasing Pixel Samples may be the best course of action. When increasing Pixel Samples in these cases, you will generally get a better evaluation of the noise, which means re-adjusting the Noise Threshold as well as the Min and Max indirect samples.
Volumes 
Direct volumetric lighting 
(For clarity, the Environment Light is disabled in this example.)
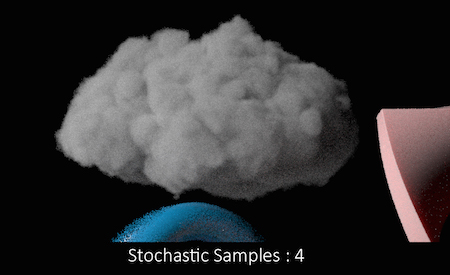
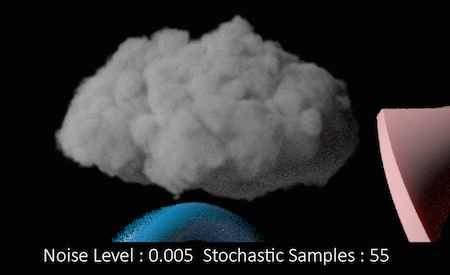
Direct Volumetric Lighting, which involves volumes which have been directly illuminated by a light source, can create noise in your image, but because volumes are sampled differently than surfaces, the noise is usually isolated to the volumetric object itself.
The best way to remove this type of noise is to enable Stochastic Transparency and the increase Transparent Samples on the mantra node. For volumetric rendering, increasing Pixel Samples is usually not a good idea because it will cause all samples in your scene to be increased. Instead, to improve the accuracy and quality of your volume, increase the Volume Step Rate parameter. Keep in mind that Volume Step Rate behaves in a similar way to Pixel Samples, causing an overall increase in volumetric sampling.( For more information about how volumes are sampled, see Sampling.)
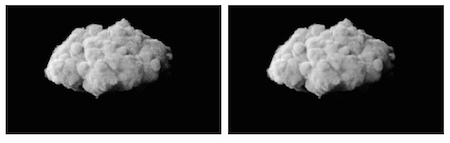
To identify this type of noise, enable the “Direct Volume” image layer, this will allow you to examine the amount of noise caused by direct volumetric lighting without interference from types of noise.
Sometimes you may see what appears to be noise in the very transparent edges of a volume, increasing Transparent Samples will eventually remove this type of noise. However, remember to check the appearance of the volume in the Combined Color image plane as well because this type of noise may be irrelevant when composited against a background element.
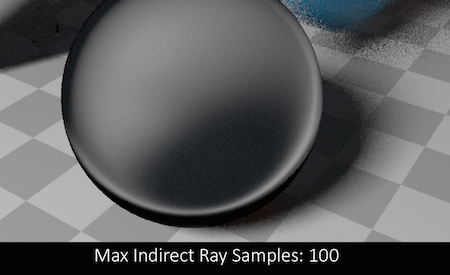
Indirect volumetric lighting 
Indirect Volumetric Lighting, which involves volumes which receive lighting from indirect sources such as other objects in the scene or through the scattering of light within the volume itself, can create noise in your images. Indirect volumetric noise is most often seen in the shadowed areas of volumetric objects.
The best way to remove this type of noise is to increase the number of Indirect Samples that are being sent. You can achieve this by adjusting the Diffuse Quality parameters on the Mantra node. For volumetric rendering, increasing Pixel Samples is usually not a good idea because it will cause all samples in your scene to be increased. Instead, to improve the accuracy and quality of your volume, increase the Volume Step Rate parameter. Keep in mind that Volume Step Rate behaves in a similar way to Pixel Samples, causing an overall increase in volumetric sampling.
Adjusting the Noise Level can help keep the number of samples low in areas with small amounts of noise. It is best to adjust this parameter in small amounts until you see some of the Indirect Volumetric noise being affected then use the Diffuse Quality parameter to adjust the amount of sampling done.
To identify this type of noise, enable the “Indirect Volume” image layer, this will allow you to examine the amount of noise caused by indirect volumetric lighting without interference from types of noise.
Keep in mind that you do not have to completely remove noise from this component in order to have a clean image, often times indirect noise is invisible when it has been combined with direct lighting information. Always refer to the Combined Color image plane to see how your sampling is affecting the fidelity of the final image.
Subsurface scattering 
Subsurface Scattering (SSS) is a special case because the sampling settings are actually found on the shader itself. Also, because SSS currently does not receive lighting information from Indirect Sources, it can be treated separately from the rest of your scene.
Single scattering 

Single Scattering, which is when the contribution from a light source scatters exactly once inside of a surface, can contribute to noise in your images. This type of noise is especially evident in the shadows of an object as light from the illuminated side is scattered throughout the surface.

The best way to remove this type of noise is to increase the Single Scattering Quality parameter located on the shader attached to the object. Increasing Pixel samples will also help remove the noise, but will cause an increase in all other types of rays, causing areas of the image without noise to become over- sampled.
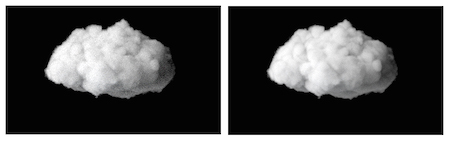
As can be seen in the above example, the effect of Single Scattering can be very subtle when viewing the Combined Color layer. Also, because the contribution of Subsurface Scattering is very dependent on the viewing angle, noise may only be evident during animated sequences.

To identify this type of noise, enable the “SSS_single” image layer, this will allow you to examine the amount of noise caused by Single Scattering without the distraction of all other types of illumination.
Keep in mind that you do not have to completely remove noise from this component in order to have a clean image, often times Single Scattering noise is invisible when it has been combined with the other components in an image. Always refer to the Combined Color image plane to evaluate how much noise this layer contributes to the final image.
Multiple scattering 
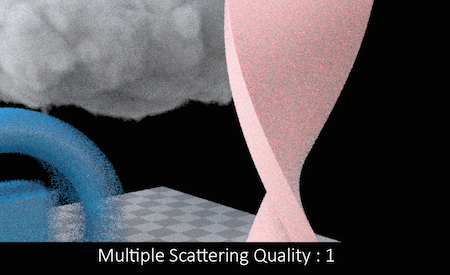
Multiple Scattering, which is when the contribution from a light source scatters multiple times within a surface, can contribute to noise in your images. This type of noise is especially evident in the shadows of an object as light from the illuminated side is scattered throughout the surface.
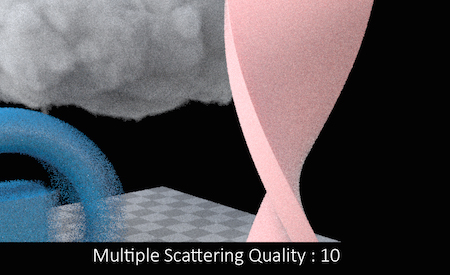
The best way to remove this type of noise is to increase the Multiple Scattering Quality parameter located on the shader attached to the object. Increasing Pixel samples will also help remove the noise, but will cause an increase in all other types of rays, causing areas of the image without noise to become over-sampled.
Sometimes, the effect of Multiple Scattering can be very subtle when viewing the Combined Color layer. Also, because the contribution of Subsurface Scattering is very dependent on the viewing angle, noise may only be evident during animated sequences.

To identify this type of noise, enable the “SSS_multi” image layer, this will allow you to examine the amount of noise caused by Multiple Scattering without the distraction of all other types of illumination.
Keep in mind that you do not have to completely remove noise from this component in order to have a clean image, often times Multiple Scattering noise is invisible when it has been combined with the other components in an image. Always refer to the Combined Color image plane to evaluate how much noise this layer contributes to the final image.
Absorption and dispersion 
See the absorption and dispersion page for information on reducing noise.
Special cases 
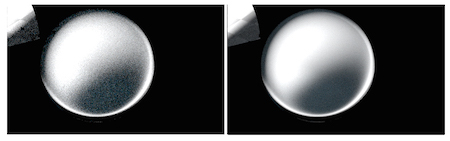
In some cases, there may be specific objects in your scene that are especially noisy in comparison to other objects. You may find that in order to get enough samples onto these objects you will end up over- sampling the rest of your scene. This can occur in many different circumstances, but a common cause would be a refractive or reflective shader with high roughness values.
To avoid this over-sampling problem, you can add the sampling properties onto the object itself. This will mean that only the problem-case will receive more samples. Select the object and in the parameters editor, click ▸ Edit Rendering Parameters.
Add the following properties (how?) from the Mantra ▸ Sampling and Shading folders to your object:
These properties will give you the same control over sampling that you have on the Mantra node, but isolated to this specific object. Note that Pixel Samples cannot be altered per object, it is a global setting.
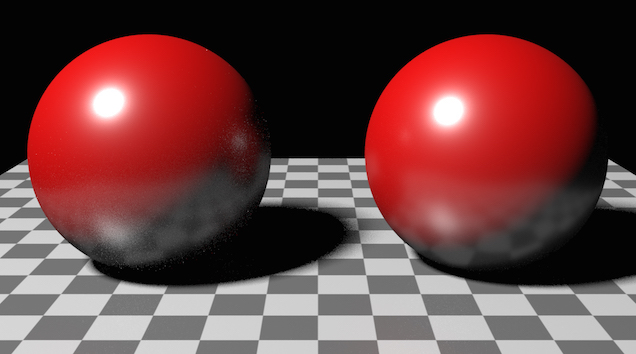
The sphere on the right has had the Sampling parameters added and the values adjusted to remove any noise. The rest of the objects in the scene use the sampling values set on the Mantra node. (For the purposes of this example, Noise Level: 0.01, Min Rays 1, Max Rays 2).

You can see that mantra samples the objects in the scenes at different rates, allowing you to optimize the rendering of specific objects in your scene without negatively affecting the overall sampling of your image.
Workflow 
| If you have... | Do this | |
|---|---|---|
| Noisy default render |
|
|
| Noisy motion blur, noisy depth of field, and/or edge aliasing |
|
|
| Noisy direct illumination | Noisy direct reflections |
|
| Noisy direct refractions |
|
|
| Noisy direct shadows |
|
|
|
||
| Noisy indirect illumination | Noisy indirect diffuse illumination |
|
| Noisy indirect reflections |
|
|
| Noisy indirect refractions |
|
|
|
||
| Noisy volumetric objects | Direct lighting |
|
| Indirect lighting |
|
|
| Noisy subsurface scattering | Single scattering |
|
| Multiple scattering |
|
|
| Object specific sampling | Direct lighting |
|
| Indirect lighting |
|
|
Mantra user guide