| On this page |
Overview 
Houdini gives you volume-specific quality controls, allowing you to adjust the quality of volumes independently from surfaces.
-
See the help page on volumes for information on volumes in Houdini.
-
See render quality for general quality tips.
The discussions of render properties below sometimes reference where to find the properties in the mantra node’s parameter interface (for example, the Properties ▸ Sampling tab). Remember that you can add properties to objects (and even primitives) to give them customized values for these properties. Some of the properties are already be present on objects on the Render tab.
Transparent samples 
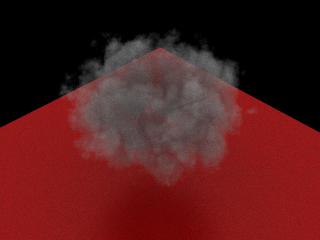
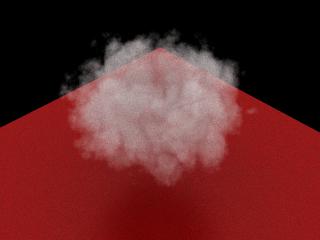
Stochastic transparency (on the Properties ▸ Sampling tab) applies an optimization for rendering transparent volumes where mantra will send just a few random rays to shade transparent pixels. This provides large speed increases when rendering highly transparent volumes.
However, you will often need to increase the number of random transparent samples. When the value is too low, you may get “salt and pepper” noise in the volume. Increasing the number of transparent samples decreases noise and renders detail and transparency in the volume more accurately.
The default value for Transparent samples is 1.
Try increasing this number to 2, then 4, then 8, then 12, stopping
when you can’t see a difference in quality.
If you stop at a high value (like 8 or 12), you might try backing off to
see if you can live with a lower number.
Tip
Increasing transparent samples increases volume quality independent of surfaces. If you need to increase the quality of both surfaces and volumes, try increasing pixel samples or ray samples instead.
|
Transparent samples = |
|
Transparent samples = |
|
Transparent samples = |
Note
Turning off stochastic transparency can greatly increase volume rendering time without increasing the quality enough to be worthwhile. However if you have highly transparent volumes viewed with a higher gamma setting you may try turning it off, since stochastic transparency tends to discard many of the low opacity samples.
More quality and speed tips 
-
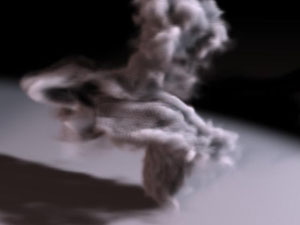
When rendering slow-moving/evolving volumes (such as cumulous clouds), you can add a
 GI light to cache photon maps,
speeding up rendering of the light bounces inside the volume.
GI light to cache photon maps,
speeding up rendering of the light bounces inside the volume.Note that if you change the lighting, you must regenerate the photon maps.
-
The high-level quality setting for all rendering is pixel samples. Pixel samples is a multiplier for the volume-specific properties above. So if you decide you need to increase pixel samples, remember that it will also increase the quality (and render time) of volumes.
-
Using more pixel samples also improves the anti-aliasing and motion blur quality for the volume.
-
Decreasing the Volume step rate and Volume shadow step rate (on the Properties ▸ Sampling tab) can speed up volume rendering but reproduces volumes less accurately (lowering these values makes the renderer takes bigger steps through the volume when sampling).
-
Many overlapping volumes are more work for mantra to render efficiently (like large displacement bounds on surfaces).
-
If you need to render volumes more accurately, it is generally better to increase volume step rate than to increase the pixel samples because a smaller volume step size will result in more accurate renders.
In the examples below, the quality is approximately the same. However, in the second example (increasing pixel samples), detail in the shadow has been lost and the volume is more transparent.
|
Pixel samples = 2×2, Volume step rate = 4 |
Pixel samples = 4×4, Volume step rate = 1 |

-
We recommend working in a linear color space (gamma = 2.2). (See rendering tips for more information.) One benefit is that linear color space pushes the darks down, making noise less visible.
|
Transparent samples = 1, Gamma = 1 |
|
Transparent samples = 1, Gamma = 2.2 |
Emitting light from a volume 
See the Volume Light shelf tool.
The shelf tool sets up a ![]() geometry light based on the selected volume.
geometry light based on the selected volume.
Note
Simply assigning an emissive material will make the volume emit light by itself.
However, using an actual light is more straightforward, less noisy, and faster,
and gives you convenient light controls such as rolloff.
Also, the emissive (Ce) value only contributes to the diffuse component,
it doesn’t affect the reflective component of the volume.
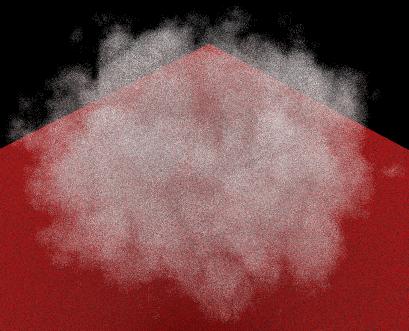
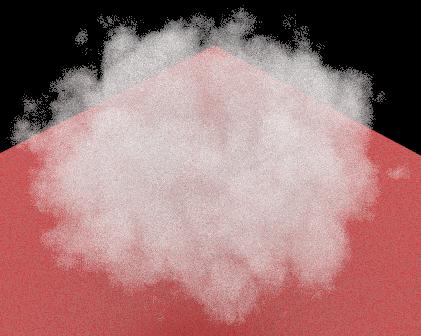
Volume limit 
The equivalent of the Diffuse limit property for volumes is the Volume limit (on the Properties ▸ Shading tab). This controls how much light is allowed to bounce around inside volumes.
The default diffuse limit is 0.
This doesn’t bounce light around inside the volume, so
the volume will not transmit light from objects behind it.
For example, if you have a semi-transparent volume in front of a red square,
the volume will transmit pick up a realistic amount of red through to the viewer.
You can increase this value to 1, 2, 3, and 4 to get
more diffuse bounces inside the volume.
This increases realism and quality but also increases render time.
You should generally not increase this value past 4.
(Note that increasing this value will make your volume brighter since
it will transmit more light.
The difference from 0 to 1 can be dramatic, but from 1 to 2
is much less difference.)
|
Diffuse limit = |
Diffuse limit = |
|
Diffuse limit = |

Volume filter 
-
The Volume filter property gives you control over the filter applied as mantra transforms the volume into camera space. This properties is available per-object on the Render tab.
-
The “Box” filter gives you crisp edges. The “Gaussian” filter helps prevent banding in the rendered volume.
-
If you have very high resolution volumes and don’t want to “anti-alias” them for camera, use the default (“Box” with a width of
1). -
For other volumes, use “Gaussian” with a small width (less than
1) and increase the width until you see no banding.
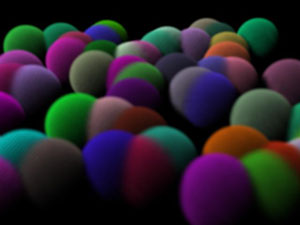
Rendering metaballs as volumes 
![]() Metaballs can be rendered as a volume in mantra. Metaball rendering can be enabled by turning on the Metaballs as Volume checkbox on the Geometry sub-tab of the Render tab of a Geometry object. Any point attributes on the
Metaballs can be rendered as a volume in mantra. Metaball rendering can be enabled by turning on the Metaballs as Volume checkbox on the Geometry sub-tab of the Render tab of a Geometry object. Any point attributes on the ![]() metaballs will be interpolated to the shading position in the same manner that point attributes are interpolated for metaball surfaces.
metaballs will be interpolated to the shading position in the same manner that point attributes are interpolated for metaball surfaces.
You need to apply a surface material that takes into account the volume primitives, such as basic smoke.
This examples shows metaballs rendered as a volume using randomized point color attributes.