| On this page |
Introduction 
If you have not done so already, download the necessary support files. This tutorial is standalone, and does not require assets from any previous tutorial, although it does require the support files.
In this tutorial, we are going to be acting as the “layout” department again. In this case though we will be doing some shot layouts using the already-created sequence layout as a base. In a production environment, each shot layout is likely based on a project or sequence layout. Every shot would get shots-specific customizations, for example, shot-cameras, layout tweaks, FX, animation, etc.
We are also going to begin to explore the power of layers, which is a very important feature of USD.
Let’s begin, and remember to save your file often as you work, for example as lops_tutorial_4.1.hip
Begin 
-
Start a fresh Houdini.
-
Switch to the Solaris desktop.
Make sure you can see the Scene Graph Tree in one of your panels.
-
Jump to
/stage.Note
You can create a LOP network at any level in Houdini, but for the sake of clarity, let’s keep our work in
/stage.
Create default layers 
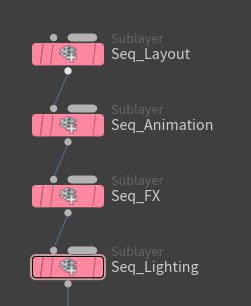
We are going to start by creating some default layers. The concept of layers and layering is key to understanding the power of USD, so please be sure to read the glossary entry on layers.
We are going to bring in the Sequence Layout as the first layer, and then we are going to create three other default, (and currently empty) layers: animation, fx and lighting. Of course, there may be more departments in your pipeline, but this setup is fairly common.
We are going to use the layout that you downloaded from SideFX, although you could use the one you created in the last tutorial. There may be subtle differences though, so it’s recommended you follow the instruction here.
-
Create a
 Sublayer LOP. Rename it
 Seq_Layout.File$HIP/LOPS_DEMO_FILES/Library/Layout/FullScene.usd -
Append another Sublayer LOP to the _Seq_Layout_ LOP. Rename to
Seq_Animation.Handle Missing FilesIgnore Missing Files -
Copy the
Seq_AnimationLOP, paste it and append to theSeq_AnimationLOP. -
Do this again and rename the layers Seq_FX and Seq_Lighting.
So what exactly has this accomplished? If you look at a Scene Graph Layers panel (or go RMB ▸ LOP Actions ▸ Inspect Layers), you won’t see any empty layers. These are here to basically remind artists what layers are expected.
Layer break 
Before we do anything else, we need to append a ![]() Layer Break LOP. If you scroll down to the end of this tutorial and get a sneak peek at what we're going to do, you will see the Layer Break happens before we start to “do stuff” to our stage. What this means is that everything above the Layer Break LOP will be ignored when writing out the USD file. Understanding this is the key to generating efficient USD files.
Layer Break LOP. If you scroll down to the end of this tutorial and get a sneak peek at what we're going to do, you will see the Layer Break happens before we start to “do stuff” to our stage. What this means is that everything above the Layer Break LOP will be ignored when writing out the USD file. Understanding this is the key to generating efficient USD files.
What we don’t want to do is have duplicates of our data. The Layer Break LOP will be the key to make this happen.
Note that the end result as it appears in the viewport is the same whether you have duplicate data or not. This is one of the challenging things about LOPs. If you are only interested in the final image in the viewport/image file on disk, you can make all kinds of inefficient changes to your scene graph hierarchy. Most node trees give you more or less gives the end result you expect as a rendered image. But if you want to be able to write efficient USD files out to disk, you have to follow a very different set of rules. You must always be conscious of when you are creating a new layer, and where that layer will be saved, and how that layer will be contained with other layers. Keep an eye on your Scene Graph Layers Panel.
Please see the layerbreaks section of the How LOPS Work for more information.
Sequence overrides 
We are going to deactivate the default lighting.
-
If you have not already done so, append a
 Layer Break LOP to your node chain. (See the finished LOP network image near the end of this tutorial for clarification.)
 -
Append a
 Prune LOP.Primitive Pattern
/lights/Layout/*MethodDeactivate-
NOTE: The easiest way to get the primitive pattern into the Prune LOP is to drag it from the Scene Graph Tree.
-
Deactivation is often used to visualize the scene without some effect, for example removing scene lighting to see character-specific lights better. Just like in Houdini, activation and display are different concepts. However, in Houdini, turning off the display of a light does not affect the light’s contribution to a scene. In LOPs/USD, turning off the display of a light does actually turn off its contribution. So in this case, (and almost all cases), there is no difference between activation and visibility.
Shot overrides 
Now we are going to do some shot overrides. We will start by creating a shot camera and then add some shot lighting. We will then go on to do similar things in a few other shots. See the finished LOP network image near the end of this tutorial to get a sneak peek at what you are going to be doing.
Camera 
Of course, in a sophisticated pipeline, cameras would have already been published and available as USD files which would be loaded as sublayers. However, for the sake of this tutorial, we will build our cameras now.
-
Tumble the scene until you see it in a pleasing way.
-
Go to the Cameras and Lights shelf, and CTRL + LMB on Camera. This creates a camera with that view. If necessary, lock the view through that camera and navigate the viewport to fine-tune the view.
-
Rename to
shot01_cam.Primitive Path/Scene/Cameras/$OS
-
Lights 
-
Using the method described previously, add some shot-specific lighting.
Of course, final lighting will be done by the lighting department later, but it might be that there are special time-of-day lights that might be set-up by the layout department so that dailies submissions and other departments before lighting get something useful.
If you want to skip this section, (making shot-specific lighting), simply bypass the Prune Lights LOP above.
More shot overrides 
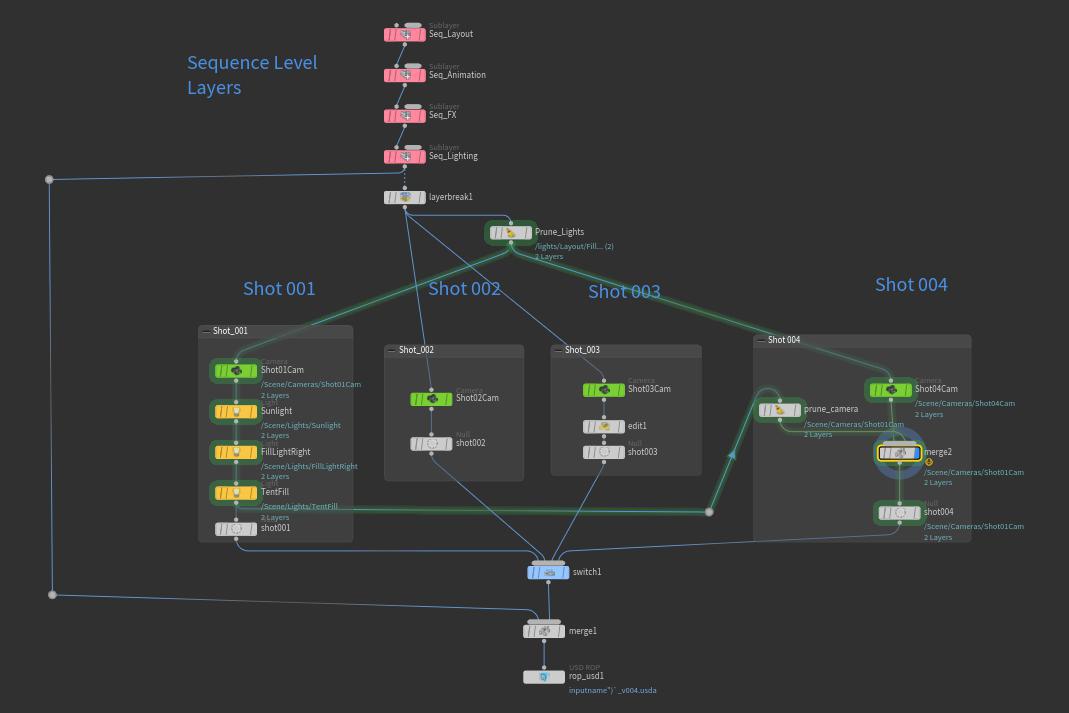
Referencing the finished LOP network image below, continue creating more shots for your sequence. Add a null at the end of every chain and rename it to the name of the shot.
-
In
shot_002, we have simply added a new camera. -
In
shot_003, we moved one of the props. -
In
shot_004, we have grabbed the lighting fromshot_001with a Prune LOP (to remove the camera but keep the lights) and a Merge LOP, (to layer the lights into the scene).-
Prune LOP:
Primitive Pattern/Scene/Cameras/Shot*(removes all cameras begining with “shot”)MethodDeactivate -
Merge Style
Flatten Into First Input Layer
-
-
IMPORTANT: Make sure you have the same “
/Scene/Cameras/$OS” path in each camera’s Primitive Path.
Note
For cameras, “Make Invisible” simply hides the display of the camera, but the camera is still there and usable. “Deactivate” makes the camera not visible and not availalbe. Note this is unlike almost everything else in USD, where “activation” and “visibility” are the same.
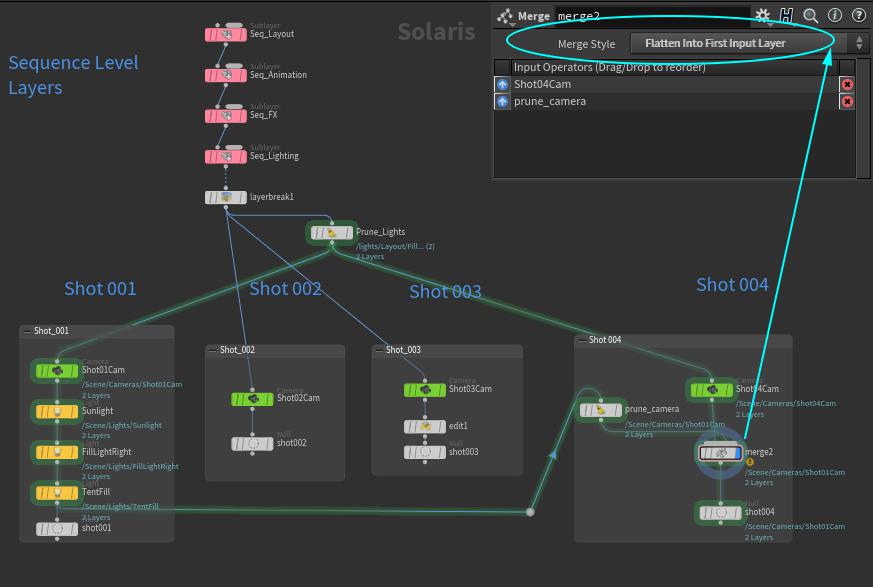
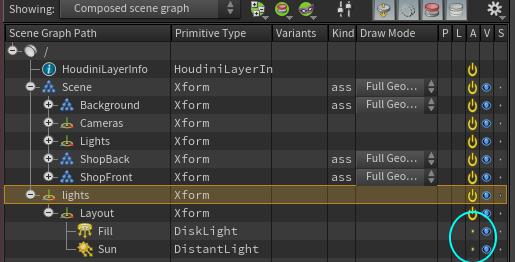
If you select the shot004 Null LOP as seen in the image above, and then look at the Scene Graph Tree, you will notice the pruned lights are still there, but they are not active. Remember, nothing is ever deleted in USD, (as other things might be referencing them). If you activate the Layout Xform in the Scene Graph Tree, you will then be able to see the sequence lighting. You can then activate the lights under the Layout Xform if you wish.
Note also how everything has been grouped under the “/Scene” prim. This will make it possible to later bring into another USD stage using a Sublayer LOP, (as you can only bring in one prim using a sublayer LOP).
Create shot switcher 
We are now ready to write out our USD files so other departments can pick them up. In this file, we have four shots, and we want to write out one USD file for each shot. Here is a simple way to do it, obviously in a sophisticated pipeline this would done more procedurally.
-
Append a
 Switch LOP, and pipe in each of the four shots into it as per the network image below.Input Name Default
`opinput(“.”, chs(“input”))`
The expression above grabs the name of the node that corresponds to the current “Select Input”. That is, when you move the slider to “0”, this expression should return “shot001,” when at “1” it should return “shot002,” etc. Middle click on the “Input Name Default” and move the slider to see this.
Add sequence level layers back 
Depending on your pipeline, this may not be necessary. Some pipelines will have each shot USD file contain only the prims belonging to that shot, and the other prims will be included procedurally by some other process. However, we do not have that luxury here, so we need to include the sequence-level prims in our final USD file.
We do not want to write out the entire USD file tree that represents this structure again though. We simply want a pointer to the original files. We will simply merge these prims into our tree.
-
Append a
 Merge LOP: to your Switch LOP and wire up as per the finished LOP network image below.
Write out the USD files 
-
Append a
 USD ROP LOP to the Merge LOP.
-
On the switch LOP above, in the “Input Name Default Field,” RMB ▸ Copy Paramater.
-
On the ROP USD node, first enter a path where you would like to save your USD files.
-
EX:
$HIP/tutorials/
-
-
Now click on the path so the cursor is showing, then RMB ▸ Paste Relative References
-
Add “
_layout_v001.usda” to the end of the file path.-
NOTE: Using the
usdafile format saves out an ASCII file and allows us to read the output in a text editor later.
-
-
-
Now, move the slider to 0 in the switch LOP, then press “
Save to Disc” to save the USD for shot001.-
Repeat for the next three shots.
-
You now have four USD files saved out that represent the state of the shot as it comes out of the layout department. In the next tutorial, we are going to load one of these USD files, do some FX work on it, and export a new USD file containing the FX department’s changes. Before we do that though, we are going to examine out USD files to see what is in them. Save your scene file now.
Review your work 
First, let’s see what our stage looks like inside Houdini. You should have both a Scene Graph Tree and a Scene Graph Layers Panel open. While keeping an eye on these two viewers, pan around your LOP network and bypass some LOPs and/or change their paramaters. Here are some examples:
-
Bypass the LOP we called prune camera. What happens in the Scene Graph Tree?
-
Bypass the Layer Break LOP. What happens inside the Scene Graph Layers Panel? What happens inside the Scene Graph Tree?
-
Note that bypassing the Layer Break makes no visible change in the Scene Graph Tree. So if all you want to do is render this scene, you would not notice a problem.
-
Note however how bypassing the Layer Break LOP causes the entire sequence level prim tree to be included twice in the Scene Graph Layers Panel. This would make for a very inefficient USD file.
-
Now examine the .usda file you saved out for shot_004. It should include something like this at the top:
#usda 1.0
(
    endTimeCode = 29
    framesPerSecond = 24
    metersPerUnit = 1
    startTimeCode = 29
    subLayers = [
        @../LOPS_DEMO_FILES/Library/Layout/FullScene.usd@
    ]
    timeCodesPerSecond = 24
    upAxis = “Y”
)
Note how the entire sequence-level prim chain is simply a pointer to a file on disc.
Now bypass the Layer Break LOP and save out the .usda file again. Note first of all how huge this new file is compared to the old one… approximately 5kb VS 1.6mb. Look at the file in a text editor and note that the entire sequence level structure is included twice: Once as a file pointer, and once as a huge block of ASCII text.
Finish up 
You are now ready to move on to the next tutorial. The usda files you saved out here will be used in the next tutorial.