| On this page |
Introduction 
If you have not done so already, download the necessary support files.
In this tutorial, we are going to be acting as the “fx” department. We are going to take one of the shot layout USD files, prune a bit of it out, create some animation via an (simulated) RBD simulation, then write out a new USD file that will be ingested both in the FX department, and further down the pipeline.
In this tutorial, there is no other department between FX and layout, but typically there would be at least an animation department. The power of USD is that each department can work independently, saving out their contribution to a shot, and these contributions can be layered together to create the final shot. So the lighting department will load the layout USD file, the animation USD file, and the FX USD file to see the composited result. They will create a lighting USD, and the composited result will be rendered for finals. At any time they can “mute” a layer to see the shot without the contribution of that layer, (for example, to mute out some heavy FX while lighters are tweaking lighting).
Let’s begin, and remember to save your file often as you work, for example as lops_tutorial_5.1.hip
Begin 
-
Start a fresh Houdini.
-
Switch to the Solaris desktop.
Make sure you can see the Scene Graph Tree in one of your panels.
-
Jump to
/stage.
Load layout USD 
The first thing we have to do is load the USD file from layout. We will look at two ways of doing this. Please see the “Sublayers, References” section of the USD Basics page for a discussion of these concepts.
-
Method 1: Create a
 Sublayer LOP.
-
Load one of the shots USD files you saved out in the previous tutorial. EX:
$HIP/tutorials/shot004_layout_v001.usd
-
-
Method 2: Create a
 Reference LOP.
-
Load one of the shots USD files you saved out in the previous tutorial. EX:
$HIP/tutorials/shot002_layout_v001.usd -
Rename it
Scene. Note how the$OSexpression in the Primitive Path parm converts the primitive path into/Scenefor us.-
In the Scene Graph Tree note how everything under “
/Scene” has been brought in, and nothing else. This shows the importance of properly organizing your USD stage. If you compare this to the Sublayer LOP you will see that it brought in everything including the non-active Layout lighting, (which was not under “/Scene”).
-
-
-
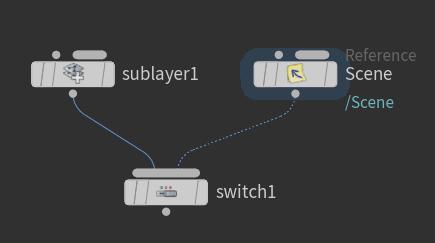
Switch Between the two methods: Create a
 Switch LOP LOP and wire the sublayer and reference LOPs into it.
-
By moving the Select Input slider from 0 to 1 and back, you should now see the entire scene with textures and all. Both the sublayer and reference LOP work equally well for this operation.
-
Prune the area of interest 
We now need to prune out the part of the scene we are interested in.
-
Append a
 Prune LOP to the switch LOP.
-
From the Scene Graph Tree, drag and drop the path
/Scene/ShopBack/Shelves/Contentsinto the “Primitive Pattern” parm.Primitive Pattern/Scene/ShopBack/Shelves/ContentsMethodDeactivatePrune UnselectedOn
-
-
Append a
 Layerbreak LOP to the prune LOP.
The layerbreak is the point at which we are going to be creating animation for the jars which will replace the static jars. The Layerbreak blocks upstream scene description from being written into a layer, so everything we do from here on will be part of the FX layer. This is a very important topic, so see the layerbreaks section of the How LOPS Work for more info on this topic.
Apply FX 
We are now ready to apply our FX to the shelves. Instead of a full RBD sim, let’s do something very simple for the sake of speed. Also, to make our simulation faster, let’s remove the herb-jars, which have a lot of heavy geo in them.
Tip
If you want to see a more sophisticated setup with a real RBD simulation in it, check out the FXLayerRBDsetup.hip file in the files you downloaded.
-
Append a prune LOP. We want to remove the foliage from the jars to speed up this process. Drag and drop from the Scene Graph Tree:
Primitive Pattern/Scene/ShopBack/Shelves/Contents/Prototypes/Stuff/HerbJarsAsset*MethodDeactivate -
Append an
 Extract Instances LOP to the prune LOP.Instances
/Scene/ShopBack/Shelves/Contents[*]Primitive Path/Scene/ShopBack/Shelves/RBD
This node turns instances (which traditionally can only be rendered) into USD prims we can animate. NOTE: If our desire was to simply jitter the position of the jars, the ![]() Modify Point Instances LOP would be a more efficient way to create this effect. We are using the Extract Instances LOP because we are simulating a more advanced process; an RBD sim.
Modify Point Instances LOP would be a more efficient way to create this effect. We are using the Extract Instances LOP because we are simulating a more advanced process; an RBD sim.
Specifying point instancer instances in a parameter field does not use standard pattern matching. The /Scene/ShopBack/Shelves/Contents part identifies the Point Instancer prim. The part inside the square braces is a pattern for choosing instance indices. This is a numeric pattern like you use in SOPs point/prim group specifications. So “[0-19]” would pick the first 20 instances. In this case though, “[*]” matches any index. (See the Primitive Matching Patterns page more information on pattern selection).
We are telling it to put the extracted prims in a layer called /Scene/ShopBack/Shelves/RBD
-
Append an
 SOP Modify LOP to the extract instances LOP.Primitives
/Scene/ShopBack/Shelves/RBD -
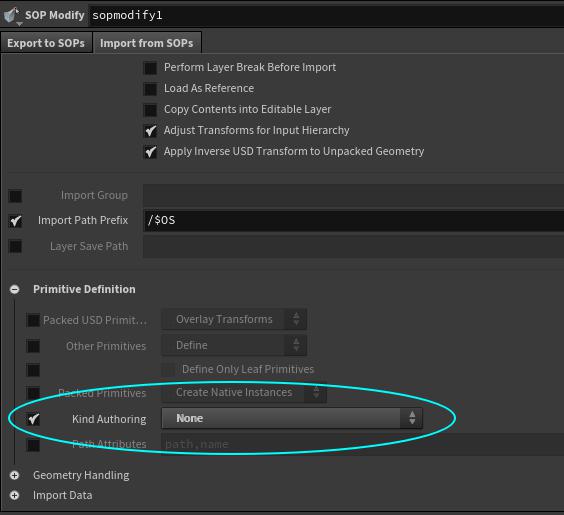
To prevent this LOP from authoring a Kind on
/Scene, go to Import from SOPs tab of the Sop Modify LOP:Kind AuthoringNone-
This way the kind won’t change and break your scene hierarchy.
-
-
Double-click on the SOP Modify LOP to enter it. We are now working on SOPs, not LOPs.
Note
In this case, we are happy to work on the USD primitives directly and just move them around a bit. If you were doing an action that required something more sophisticated (such as pre-shattering and doing an RBD sim) and needed to work on native Houdini polygons, you would append an ![]() Unpack USD SOP, using “Components” as the traversal.
Unpack USD SOP, using “Components” as the traversal.
-
Insert a
 Point Jitter SOP between the Geometry from LOPs Switch 1 SOP and the
  Output SOP.Scale
.025Seed$FF
Note
As this is set-up, all the jars will jitter as one. If you wanted them to jitter individually, insert an ![]() Unpack SOP and set iterations to
Unpack SOP and set iterations to 2. This will cause the USD to be unpacked two levels and each jar/lid to be represented by a single packed primitive. Change the iteration level to 3 and you will see that the lids and jars are jittered individually. (You could also use an ![]() Unpack USD SOP to do the same thing.) Go to
Unpack USD SOP to do the same thing.) Go to 4 and you will see each point on each lid/jar is jittered. Be sure to MMB on the SOP each time to examine what kind of geo you have.
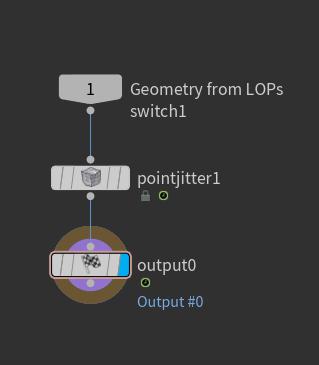
If you play the scene, you should see the jars jittering. Hit U to jump back up to /stage
-
Append a
 Configure Layer LOP. We want to tell LOPs where to put the USD file that contains the point transforms on our jars.Save Path
$HIP/tutorials/shot004-fx_v001.usdaFlatten InputFlatten Input Layers -
Create a
Sublayer LOP and wire it up as below.Sublayer TypeSublayer Inputs
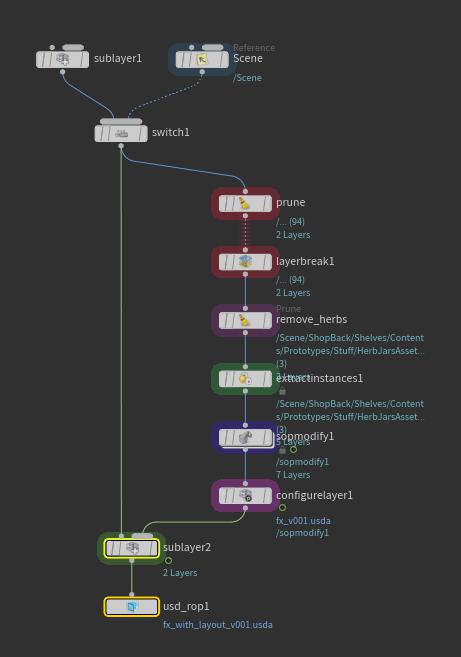
You should now see some of the jars disappear, (the clay jars with the herbs in them), and the rest of the jars jitter. We have layered the FX layer onto the layout layer. Try bypassing the last sublayer LOP to see the original scene.
Tip
If your RMB ▸ Inspect Active Layer on the SOP Modify LOP, you will see that only the transforms of the jars have been recorded, making this a very light-weight operation.
You can also mute (some) layers from the Scene Graph Layers panel via the “Mute” column. If there is a checkbox in the column, the layer can be muted. Only layers being loaded from disk can be muted this way. Layers authored in the LOP network, it is assumed, can more easily and effectively be deactivated by bypassing or disconnecting nodes.
Write out the USD files 
We are now ready to write out our USD file(s) so other departments can pick them up. In this case we will be writing out our FX transforms to $HIP/tutorials/shot004-fx_v001.usda (because the Configure Layer LOP told them to go there), and the layout with the FX transforms to $HIP/tutorials/shot004-fx-and-layout_v001.usda. Note that this is not a great file naming convention, we are only putting them here like this so they are easy to inspect later.
Again, depending on the pipeline, other departments might pick up the USD with the layout and FX, or sublayer the layout, FX, (and other department’s) layers in some other way.
-
Append a
 USD ROP LOP to the Sublayer LOP.Start/End/Inc
1,100,1Output File$HIP/tutorials/shot004-fx-and-layout_v001.usda
Make sure the switch LOP at the top is set to input zero, (the first input).
-
Press “
Save to Disk” to save the animation to disk.
Note
You will probably see some warnings like: Warning: Some layers were stripped during flattening due to a Layer Break. This is normal and can be ignored.
Check your work 
Now go ahead and inspect the files on disc with a text editor to see that they are indeed sparse and contain only the bare minimum of information needed to transport the data through the pipeline.
Load the $HIP/tutorials/shot004-fx-and-layout_v001.usda file back into the scene using a Sublayer LOP. You should see your jars jittering in the scene.
If you go back up and use the switch LOP to switch to input one (the second input), and re-save your USD files, you should get the same results as you do when you use input one.
In the next tutorial, we are going to use the fx-only USD and layer it with the layout-only USD for lighting.
Note
If you cannot read your files as they are binary, make sure you are saving the files out in ASCII format by using the .usda file extension, and not the binary .usd.