In Disney’s animated feature Raya and the Last Dragon, a young warrior princess called Raya (Kelly Marie Tran) goes in search of Sisu (Awkwafina), the fabled last dragon, to help her banish a terrifying enemy from her homeland of Kumandra. Throughout the film, effects animation serves not only to bring spectacle, but also advance the narrative and support character development.
“Our creative ambition for Raya and the Last Dragon was emotional storytelling through visual effects,” said Michael Kaschalk, Head of Effects animation at Walt Disney Animation Studios. “That meant immersing viewers fully into our characters’ emotional and physical journeys. We started with our chief story thematics of trust versus distrust, and hope versus despair. Through focused artistic collaboration, we infused those into the visual design, which was woven throughout every aspect of the movie.”
In the film, despair and distrust are embodied by the Druun, a mindless plague that absorbs the souls of its victims before turning them to stone. Opposing the Druun, and representing hope, unity and trust, are the dragons, mystical creatures inspired by the Nāga, a divine race of serpents prominent in the mythology of many south and southeast Asian cultures.
The visual appearance of both the dragons and Druun reflect their thematic roles. “The powers wielded by the dragon Sisu and her siblings evoke joy through a sky-filling spectacle of pulsing iridescence,” commented Kaschalk. “But the illuminated cores of the Druun are trapped by frenetic, non-persistent limbs. Convolving, inverting, and self-consuming, the Druun are fluid but seem to be at constant odds with themselves.”
Led by Kaschalk, the Disney effects team contributed to many of the film’s key sequences, including the magical release of dragon energy that ultimately obliterates the Druun. “We used machine learning to implement a state-of-the-art, neural-style transfer method,” Kaschalk revealed. “This involved embedding cymatic patterns into a volumetric simulation generated in Houdini.” The team also generated spectacular water simulations. “We had to create an instant drought and a lake-sized flash flood. When Sisu dies, we had eddies draining the entire Kumandran river. Upon Sisu’s resummoning, we used simulated elements to fill a panoramic waterfall in seconds.”
At a more prosaic level, the effects team helped Chief Benja (Daniel Dae Kim) rebuild Kumandra’s community of trust by boiling up a pot of tasty tom yum-style soup. “Our carefully blended three-stage simulation technique within Houdini enabled us to achieve full synaesthesia,” quipped Kaschalk. “Viewers even claimed they could smell the soup as it brewed!”
Running on Raindrops
Sisu shows off her magical flying ability in the film’s uplifting ‘running on raindrops’ sequence. Rippling airborne platforms materialize before the dragon, who leaps gracefully from one to the next. “We tried to incorporate this effect with other water effects previously created in the film,” said effects lead Joyce Tong, “such as the floating water effect around the dragon gem. We did this partly by using a similar iridescent color palette. During our design session, we were inspired by the dynamic relationship of oil paint mixed in with water.”
In order to create the ‘platforms,’ the team generated organic shapes with concentric lines and circular motion, and advected particles through a 2D outward-bursting pyro simulation. Due to the number of shots requiring the effect and the variety of animation techniques involved – from hero characters to large crowds – the team opted for a copy stamp approach.
“We used dragon-stepping data to control the speed, size, orientation, and falling rate of each of the copied effects,” Tong related. “After the ripple stamping process, we mixed our iridescent color palette in world space to vary the initial color of each ripple. Since these dragons have a connection with water, our base color was blue. We then introduced the iridescent palette to the more densely-concentrated point count area. Finally, we added a volume layer around each sparkle to create the look of a watery reflection.”
The final look of the ‘running on raindrops’ effect benefited from close collaboration between Joyce Tong and effects designer Peter DeMund. “Collaboration like this was a recurring pattern throughout the film,” observed effects supervisor Marc Bryant, “especially for the more magical effects. The leads would iterate alongside Peter, bouncing ideas and sketches back and forth. Through traditional drawovers and rapid Houdini prototyping, Peter’s strong artistic background allowed him to work as a force multiplier, inspiring the effects leads to extend their creative vision beyond what they could have produced alone.”
Destruction
For the destruction pipeline on Raya and the Last Dragon, Disney moved from a hybrid of proprietary and Houdini RBD tools to fully embracing the suite of RBD tools from Houdini 18.0, from fracturing through to simulation. “This pivot into Houdini toolsets dovetailed into a long-requested pipeline feature – to be able to provide point transforms and an adjoining set of fracture meshes,” said effects lead Ben Fiske. “It enabled us to provide rapid feedback to render by way of Houdini’s ability to output points from the RBD DOP, rather than full resolution, per-frame meshes. This meant not only smaller data footprints on disk, but also quicker turnarounds on simulations, playblasts, and renders.”
A standard workflow saw artists first fracturing geometry in Houdini, using the Boolean SOP to isolate an area of action and the Material Fracture SOP to fine-tune details. Using the new pipeline, artists were then able to output static meshes of the fractured geometry. “From then on, new simulation data was written out as simple point transforms,” Fiske elaborated. “The renderer would associate these with the fractured geometry for the correct appearance at render time. We could visualize everything in Houdini by using low resolution proxy meshes, and applying the transforms. This workflow maintained materials and instanced set vegetation with no issues.”
Effects artist Timothy Molinder built automated debris generation rigs through a combination of procedural and simulated workflows. “As with any big destruction, the effect relies on the believability of the material,” remarked Fiske. “Tim was able to build his rigs for dust and instanced debris by providing our in-house renderer, Hyperion, with instanced fractured pieces of the exact geometry that they would be emitting. Artist controls were bubbled to the top so they could define initial emission, timing, amount, directionality, and intensity, all in a setup that was easy to understand and use.”
This combination of workflows allowed for robust and flexible approaches, notably for a sequence in which the Fang palace cracks in half. “Our focus was providing fidelity and readability to a chasm opening in the palace floor very close to the camera,” Fiske commented. “We nested material fractures to get fine detail closer to the opening crack, outputting 50,000-60,000 fractures per shot.”
For the destruction of the surrounding city, effects artist Xiao Zhang used Material Fracture to accommodate many different material types. “In shots where characters were riding on top of destruction,” said Fiske, “the focus became matching camera and character animation, for which effects artist Francisco Rodriguez heavily leveraged guided simulations. The workflow became an indispensable part of our ability to tailor action and timing in these types of shots. We were able to address quickly any notes on shape and number of fragments.”
Sisu’s Iridescent Mist
Iridescence abounds in the various manifestations of dragon magic seen in the film. While iridescence in surface materials is well understood, Raya and the Last Dragon marks the first time Disney has attempted to coax such shifting color patterns out of a volume render.
“We began by writing a volume gradient function in our material,” said effects lead Jesse Erickson, “and used this along with the camera vector to obtain a volumetric camera facing ratio. Initially this caused a lot of chattering because the density values were changing a lot from frame to frame. We used Houdini to convert our density VDB to a level set – this provided a gradient value that was much more temporally stable. Sampling a level set also allowed us to fade the albedo as the camera got further away from the volume surface, simulating more of a surface shine and keeping colors cleaner.”
Since the volume material in the Hyperion renderer was physically based, the introduction of albedo values lower than one caused a loss of energy. “Our first all-in-one attempts produced fairly muddy results,” Erickson acknowledged. “So lighting artist James Newland came up with a process to combine the color of one pass with the value of another. We used this process to push the color of an iridescent volume render together with the value of a white albedo high-scattering volume.”
The Dragon Gem’s Water
The dragons fashion a powerful gem to help them in their battle against the Druun. In order to create the magical water that swirls around the gem, the Disney effects team opted for an entirely procedural approach.
“I used a combination of SOPs and simple VEX scripting,” said effects lead Thom Wickes. “This gave me the required level of control necessary to meet the very specific brief and visual development drawings.” Wickes began by generating base curves for the paths of the water. “I used simple functions to add spiraling and ramps, in order to control the profile as the curves wrap around the gem. I used basic noise to control the distribution of points, and the U-position along the curve to control the movement, as well as the dispersion of the points as they reach the top.”
The Dragon Gem’s Blast
The full power of the magical gem is revealed in the tremendous blast of energy it produces. Seeking ways to create a sense of harmonious fluidity, the effects team explored reference of Chladni patterns – visualizations of resonance that emerge at different frequencies of vibration, classically seen in sand scattered on an oscillating metal plate. Further inspiration came from cymatics, and the symmetry and shaping of mandalas.
In several shots, the gem blast is seen expanding quickly out to the horizon. The low angle of the camera, and its proximity to the center of the blast, brought unique challenges. “The high resolution needed for the areas near the camera had the potential to bog things down as the blast got further away,” said Jesse Erickson. “Houdini’s volume workflow helped us handle this efficiently. To achieve the magical feeling of symmetry we started with a Pyro simulation of a wedge – this was cached out and read in as a packed disk primitive type. Using packed disk primitives keeps memory usage lower, since it loads only the volume in the viewport and enables an easy switch to bounding box visualization if things are still too heavy. In addition, packed disk primitives offer a way to easily time offset by attributes, and swap out the underlying volumes for particles or geometry while preserving the transforms.”
Classic Houdini techniques enabled the team to find the right balance of fluidic detail and symmetry. “We referenced the angle of the wedge sim by a Copy node that duplicated the correct number of packed primitives around the origin,” Erickson related. “This allowed us to quickly evaluate multiple iterations of the effect and angle variations. It also delivered fast, high-quality viewport visualization.”
As the gem blast expands, it passes through distant mountains and terrain, leaving a glowing impression in its wake and causing a crashing wave effect. “The blast covered miles and miles of distance,” noted Erickson, “and one shot was a near-180-degree whip pan. Despite this, we were able to accomplish everything in one sim by converting the set to a height field and deactivating voxels of the unpacked sim wedges when they were not near the height field surface. This provided an efficient source for a single blast wave splash that spanned a massive distance, achieved using a Sparse Pyro sim. The same source was sampled by all environment materials to introduce glow wherever the blast wave penetrated the surface.”
Employing the same material as a starting point, the team found ways to align the look of the gem blast with that of the iridescent mist. “Instead of converting the density field to a level set as we did with the mist,” said Erickson, “we did the gradient calculation directly on the density field. Shading calculations were done in each packed primitives space so that, no matter the arrangement of a slice in the circle, the color ramp would match up.”
Ultimately, the magic dispelled from the gem blast smashes into the Druun, wiping them from the face of Kumandra. “We wanted to portray a vicious ending for these terrible creatures,” said effects animator Stuart Griese. “For visual inspiration, we looked at slow-motion test footage of nuclear explosions, where you see the test objects begin to emit smoke before the blast hits them. We included this anticipatory effect with a Pyro sim that starts just before the blast arrives. In order to efficiently destroy the Druun without having to change the simulation behavior, we introduced an additive Houdini rig to the already-stable Druun rig. This procedural workflow allowed us to launch our first passes from the shell, passing in Houdini global variables that determined which Druun to target, and on which frame it would be hit by the blast.”
The Dragon’s Creation of the Dragon Gem
Seeking visual reference for shots of the dragons creating the powerful gem, the Disney Animation effects team studied experimental 8k macro-cinematography of fluid art inspired by outer space. “The challenge was to keep things almost 2D,” said effects animator Marie Tollec.
“We wanted a very fine, sparkling filament effect that evolves slowly while still showing the energy required by the powerful magic. In addition, the action had to initiate and resolve in a very limited timeframe, with the camera panning 180 degrees around the characters. The action was seen from every angle – from profile to extreme foreshortening – and the effect had to remain readable throughout.”
The team built the effect from several layers. “We created a vein-like structure on the dragons’ chest plates,” explained Tollec, “where the energy is gathered by finding the shortest path between scattered particles. We built a magic stream from a FLIP simulation wrapping around the gem, plus very fine and distinguishable streams of emissive advected particles. We also added an emissive volume as a diffuse element around the main stream to unify all the elements.”
The setup was built once, then applied to all the dragons. Additional tweaking ensured it was readable from every angle. When it came to wedging, the same approach sped up the tweaking process in the overall effect.
Water Disappears from Kumandra
Raya and the Last Dragon boasts a number of large-scale water simulations, notably in a sequence showing the river draining away. “I used the sink option for fluids in conjunction with spiral velocities,” said effects animator Bob Bennett, “placing them randomly around the seabed. The sink was very tricky to use because it removes sim points as soon as they enter the sink area, causing the sim to disappear too quickly.” The key was finding the right scale for the sinks, alongside the correct spiral velocities. “This allowed the water to splash around naturally while still having the water line visibly decrease.”
Needless to say, all the water simulations were required at high resolution. Keen to keep simulation times to a minimum, the team decided to break down the simulations into sections. “The water closest to the camera was the highest resolution,” said Bennett, “and the water furthest away was the lowest. We blended the VDBs together to hide the seams. The sims shared the same sinks and velocities, so the edges came very close to matching. For one shot looking out over the whole sea – deemed too heavy to simulate – the team pre-rendered depth maps of the draining effects and animated foam textures. “These were manually placed, scaled and rotated, then planar projected down onto the ocean surface. This gave us control over the composition without sacrificing any detail.”
In order to combine all the simulated regions into a seamless water surface, the effects team used a levelset compositing pipeline developed for Disney’s Moana. “The levelset pipeline allowed us to merge multiple VDBs generated at varying resolutions,” said effects supervisor Dale Mayeda, “and combine them into a final camera-aligned water surface mesh. The pipeline does allow for blending between overlapping VDBs but, in order to get a smooth transition, the VDBs need to be reasonably similar in the blend regions. Since our simulations were overlapping but done at varying resolutions, we needed to have the sims align more closely in these regions for our blending setup to work.” To achieve this, the team created a rig capable of passing two VDB sims at different resolutions. “We used the SDF of the higher-resolution sim to influence and blend the lower-resolution sim VDB to match the higher as it approached the overlapping boundary region. We did this preprocess in Houdini.”
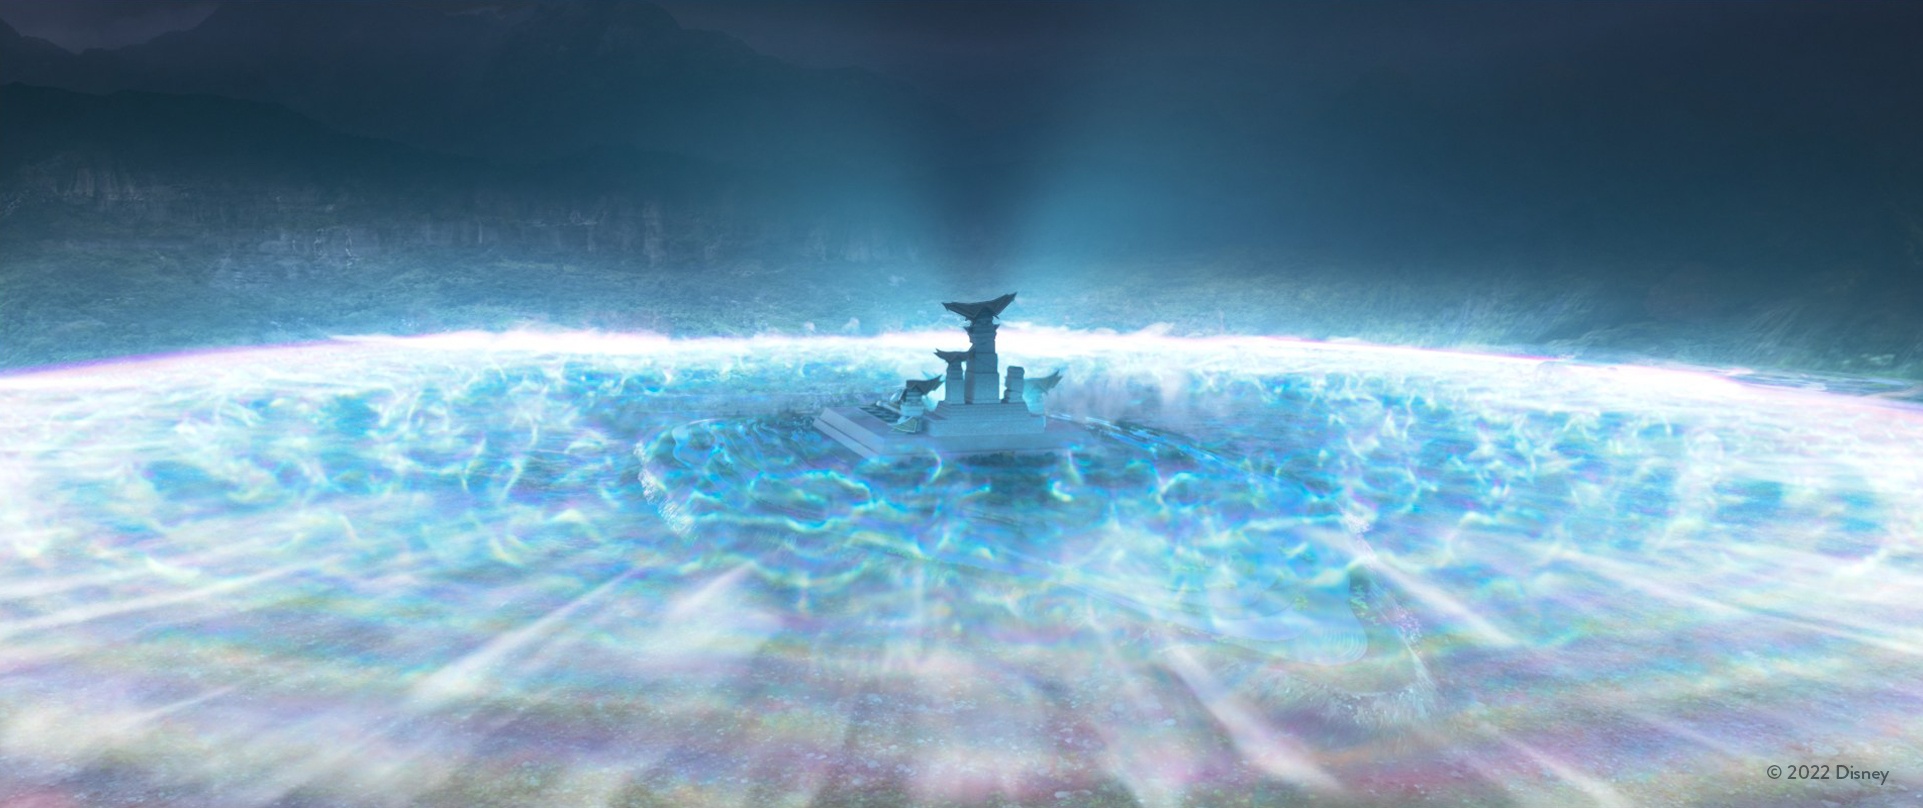
Summoning Sisu
Yet more water simulations were required for a sequence in which the dragons gather over the river to summon Sisu. The Disney effects team referred to these as the ‘whirlpool’ shots. “We quickly found we wanted it to be anything but an actual whirlpool!” said effects animator Joel Einhorn. “It really wanted to be more about the magic of the water. Jesse Erickson found a video online featuring a Chinese spouting bowl, and we all heavily gravitated towards how magical it looked. This led me to research standing wave patterns, sacred geometry, Chladni plate and cymatic patterns. We thought it would be cool if the dragons created interference waves to build a water column, from which Sisu would then emerge.”
Einhorn began by creating a velocity field at water level based on cymatic shapes. “Then, in a SOP solver, I took the FLIP points and flattened them to the water level,” Einhorn continued. “I added velocities, scaling them based on the normalized distance to the water level, then further scaled by a lookup curve. The nature of FLIP made these waves influence each other, so it got very messy, very quickly! However, I found that by suppressing the velocities in X and Z, and reducing the effect of the falling particles by tweaking their droplet attribute, I could control the waves pretty well.”
The team used five sources to generate the cymatic patterns – one for each of the five lands of Kumandra. These joined forces in the center to generate the water column. “This is where the nature of FLIP came in handy,” said Einhorn, “because the velocities amplified each other where the lines crossed or came closer together. This naturally created a growing column shape on the inside.
For closeups, Einhorn introduced extra detail with spray and mist elements. “As the main column grew, it needed to integrate with the water element Debbie Carlson was making. To do this, I simulated an extra piece for the top of the column, then blended the particles with the original sim and meshed both elements together.”
“A swirling mass of water arises out of Joel Einhorn’s cymatic dragon water column,” effects animator Debbie Carlson stated. “When it reaches the top, it is revealed to be Sisu. To implement this idea I used a POP Fluid simulation that runs in reverse in a local space, starting with the fluid mass in the final form of Sisu. In the simulation, fluid gets released over time from the Sisu form in a specific pattern, and starts swirling around its center faster and faster using a velocity field I constructed to drive it. It also employs Sisu’s form as an invisible collision object.”
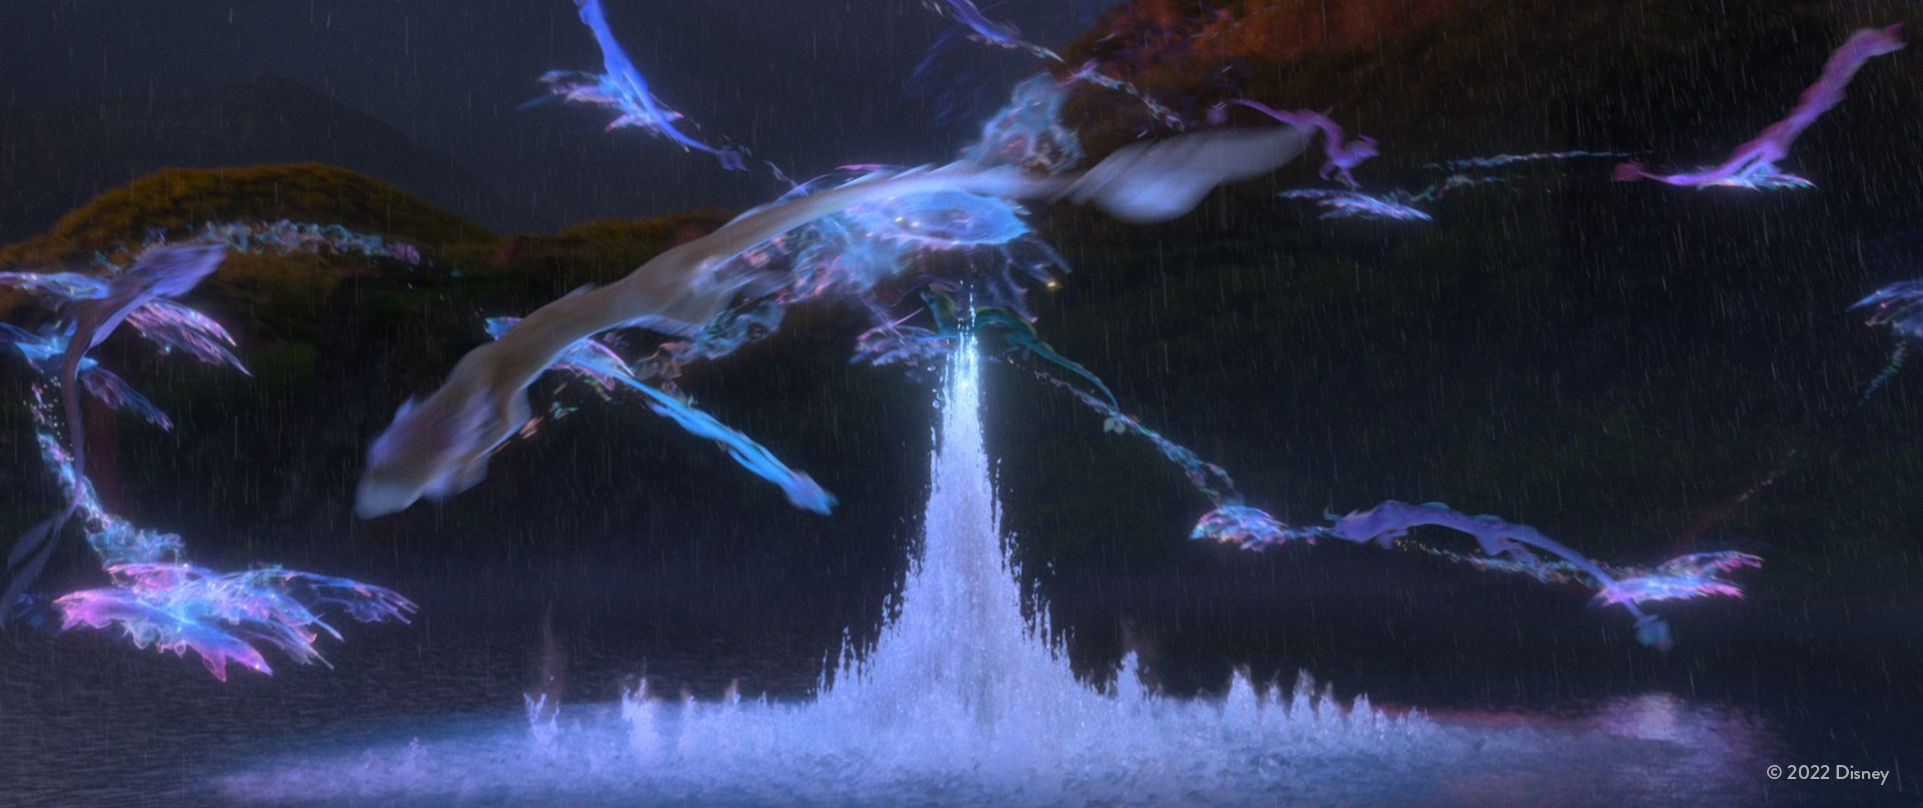
When played forward and placed in its final location, the rising water appears to start out swirling rapidly, gradually slowing as the water droplets resolve to their final Sisu form. “The shading of the Sisu fluid had an interior emissive volumetric component,” said Carlson. “For color and density, this used VDB primitives created from the POP Fluid particles. Each droplet gradually increases in density and transitions from a water color into a color determined by the projection of a rendered image of Sisu at each droplet’s final goal position. From this main fluid mass forming into Sisu, we also emitted drips, fine droplets, and magic iridescent mist.”
Waterfalls
The climactic return of the dragons is accompanied by even more water effects, notably the moment when the giant Fang waterfall returns to full flow. The biggest challenge for the effects team was the sheer scale of the cataract. “The waterfall is about two and a half times taller than Niagara Falls,” noted effects lead Tom Sirinaruemarn, “and its total width is around 600 meters. Given the scale of the simulation, I separated the sim into multiple domains. We decided not to use the distributed simulation because each waterfall stream did not require any data exchange and looked visually believable from afar. Having separated domains brings certain benefits, like being able to send it to the farm, change or fix things individually.”
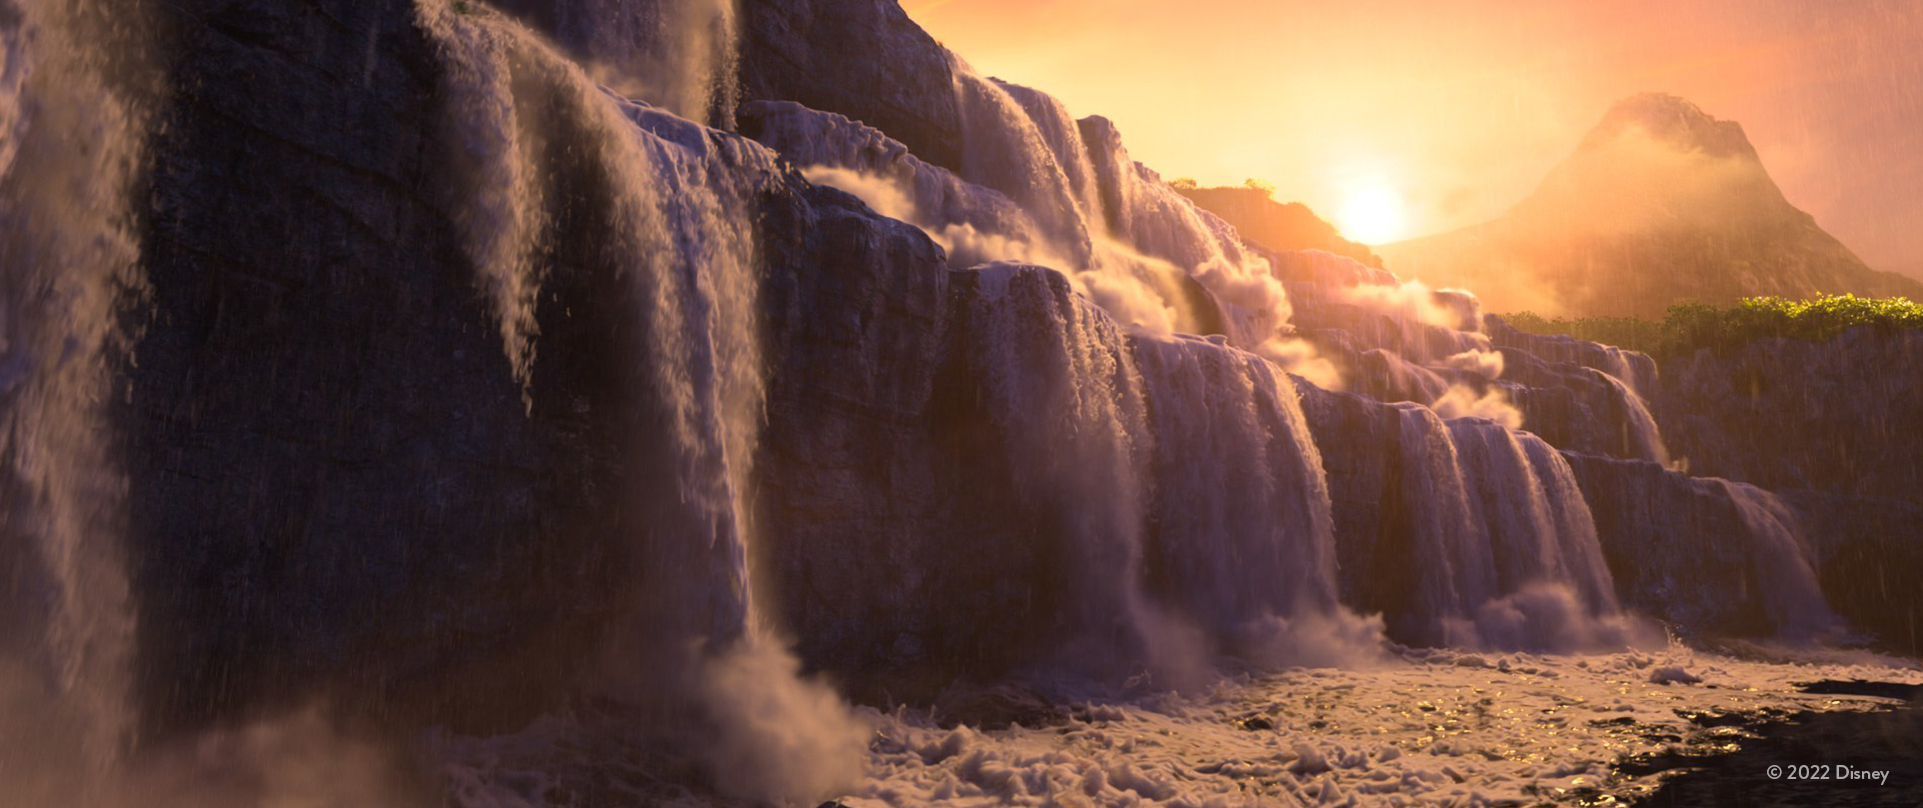
The effects team created 15 domains for each waterfall stream. “One domain contained four or five DOP simulations,” Sirinaruemarn said. “The main water simulation used the FLIP solver. We used secondary FLIP and POP for whitewater, plus Sparse smoke for both mist and interaction mist. The Sparse smoke solver was a lifesaver for this setup because it is much faster and saves more memory than the previous smoke solver. FLIP simulations take the longest time – on average, each FLIP sim took around 80-100 hours in the farm. Preparing the fluid source and environment collision at the right position for each domain was tedious work, so we put all the procedurally-generated sources and collisions together in a rig. We could then copy and paste that for each of the 15 domains.”
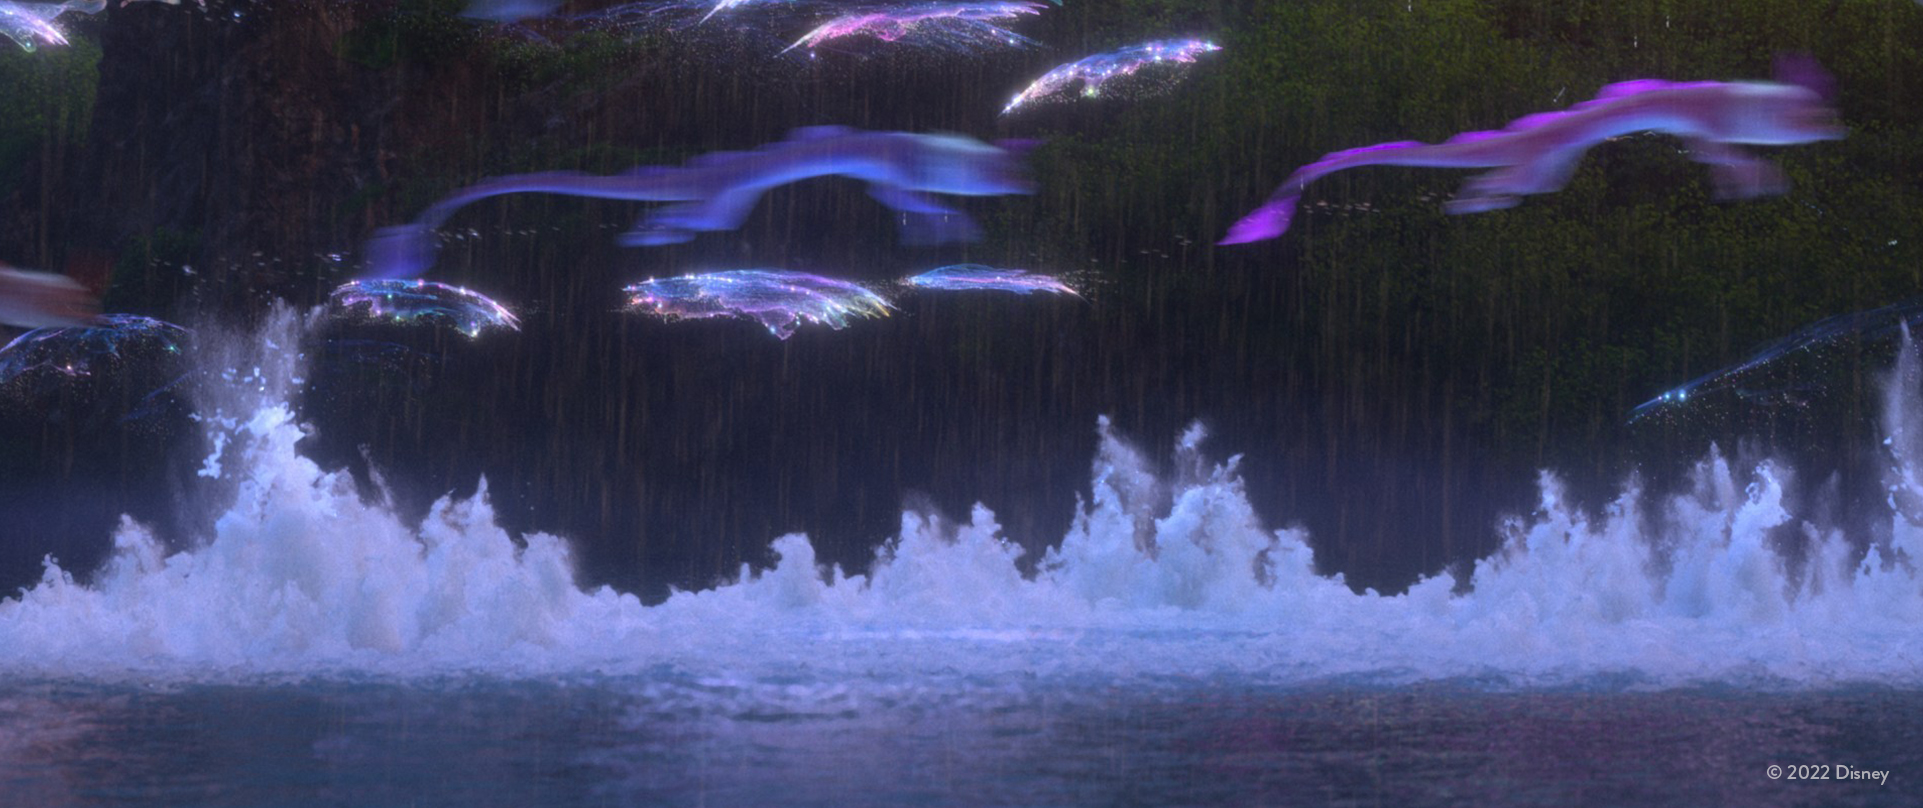
Sisu’s Transformation
One of the big emotional highlights of Raya and the Last Dragon is the first reveal of Sisu. The reveal had to be both beautiful and magical, not only pulling together the water elements that conjured her presence, but also evoking and foreshadowing the iridescent magic that she uses later in the story.
“Earlier in the film, we see that the magic gem has a low gravity effect on water,” said Ben Fiske, “and this slowly makes it more iridescent. The filmmakers decided to connect Sisu’s transformation to this idea, so that she forms out of low gravity droplets veiled by the iridescent mist we see throughout the film.”
The effects team combined a number of approaches when tackling the water droplets. “We needed to choreograph things so that the transformation was the central focus,” Fiske commented. “This meant framing the area within which Sisu would form rather than obstructing it. We built curves from several different directions, carefully sculpting them to ensure the dollying camera was traveling with the cloud of suspended moving droplets. This added interest and excitement to the frame as the droplets came in.” The curves drove a complex POP simulation. “We had to time the sim carefully at different points throughout the shot, to arrive believably at Sisu’s transformation without giving away the reveal.”
The POP simulation played host to a secondary POP Fluid simulation. This allowed for interplay and collisions between the droplets, and added the characteristic wobble of liquids suspended in low gravity. “As Sisu’s transformation begins,” explained Fiske, “all the droplets collapse together using a goal on her surface, from her nose down to her tail. This forms a liquid Sisu which is not immediately visible because, at that exact moment, more liquids are emitted along additional spiral curves that travel around Sisu’s shape, also from nose to tail. These extra liquids are emitted from the Sisu geometry itself and take on her surface color, giving a more magical reveal that resembles a blurry wipe. We used the same emission geometry to emit volumetrics simulated in Pyro, using Jesse Erickson’s brilliant iridescent shader techniques to render.”
Kumandra Soup Development
Perhaps less of a big spectacle, but no less significant to the story of Raya and the Last Dragon, is the soup made by Raya’s father, Chief Benja. Each ingredient added to the soup represents a different land in Kumandra, emphasizing the theme of harmony. “Knowing that it was important to the story,” said Dale Mayeda, “we wanted the soup to feel authentic, believable and appealing. Also, we did not want just any generic soup, but one that was specific to southeast Asia.”
Design inspiration came from tom yum soup, a hot and sour dish from Thailand. “Tom yum is usually cooked with shrimp paste, lemon grass, bamboo shoots, bird’s eye chilies and palm sugar,” Mayeda noted. “All these ingredients are actually mentioned in the film.” Reference proved easy to find. “We were really lucky that Cong Wang, who was our main soup developer, was also a great cook! Cong filmed detailed reference videos of himself making tom yum soup as he prepared it. We constantly studied every aspect of the soup as we moved forward in our effects development.”
The effects team executed the soup simulation using three main steps. “First, we used a boiling force to drive a low-resolution FLIP simulation,” said effects animator Cong Wang. “This created the broad boiling motion. The boiling force was a POP simulation that emitted rising bubbles from regions at the bottom of the pot. These flowed up to the top surface and became the driving force for the core sim.”
The second step required the simulation of heavier ingredients such as bamboo shoots. “Jacob Rice developed a custom buoyancy force,” related Wang. “We used this with our RBD simulation, which was advected by the low-resolution FLIP simulation in the previous step. This allowed us to define the height of the water level to which the heavier items would resolve.”
Third came the simulation of the final high resolution soup base, for which the team used Houdini’s FLIP solver and POP Fluid solver to create motion, and to cause the chili oil and foam to mass together. “The POP Fluid affected the subset of the particles representing the oil and foam,” Wang commented. “This achieved a realistic motion in which the oil and foam would tear and remerge. We gave these particles lighter density and higher viscosity so they would float above the rest of the FLIP particles and be constrained together. We used the RBD objects from the earlier step as collision objects.”
In order to get a smooth oil surface floating above the soup base, the team instanced flattened spheres to the oil particles. “The scale of the spheres was driven by surrounding density and speed,” said Wang. “We then rasterized those shapes into a VDB, which was smoothed to get an oil-like surface that was smooth and time-coherent.”
“The final step to create our appealing soup was handled in the materials,” added Dale Mayeda. “We used multiple layers of tri-planar textures, advected with Pref, to add subtle variations in color, reflectance and displacement. To get the color of the soup base, we employed an internal bounded volume to give the soup depth and complexity. We also used a meniscus modifier – developed on Moana in our proprietary renderer Hyperion. This bent the normal of the soup surface into the normal of surrounding geometry like the pot, bubbles and hard surfaces, giving a subtle detail of surface tension where the soup and those surfaces met.”
Sand Development and Stone Transformation
Alongside the many effects involving liquids, the Disney effects team also simulated such diverse materials as stone and sand. “We based our early sand development around a Vellum grain setup,” said Tom Sirinaruemarn. “We did this because Vellum gave us a lot of flexibility to design the look of the sand. Later, we simplified the setup by switching to POP grain – which looks amazing in the shots.”
The team separated the sand into two types – one falling from the ceiling and another piling on the ground. “The falling sand was a simple POP grain,” Sirinaruemarn related. “To simulate piles of sand, we sculpted the shape of the pile and then generated the layer of sand on top of it, using the sculpted geometry as a collision object. After we were satisfied with the sim, we used our proprietary upres tool to generate more points at render time. If the sand did not look dense enough, we solved the problem using a volume element.”
Shots of characters transforming from stone back to their true selves involved multiple steps. “Firstly, we animated rain droplets running down the statues,” said Thom Wickes. “For the majority of shots, we used a custom POP simulation following flow vectors combed on the statue’s surface. The particles left trailing points which we meshed. We grew the spreading pattern from these droplet meshes.”
The team began by scattering millions of points across the surface of each statue. “In a SOP solver, we spread an attribute from the droplets across those points,” remarked Wickes. “Using some simple functions, we isolated different ranges of the spreading attribute to generate mask VDBs. We used these to drive a wet map – this sold the absorption of the water into the surface, and helped us to hide the statue and reveal the character.” Additional effects such as dust particles, water splashes and falling rain were added afterwards.
The Druun
Featured in around 100 shots, the frightening Druun are not merely the product of spectacular effects simulations, but major characters in their own right. “The creative success of the Druun was a critical challenge laid before the effects team,” Michael Kaschalk asserted. “As the physical embodiment of despair, the Druun were designed to capture the perpetuating nature of depression and withdrawal from community. The idea was that they would be ever-changing and difficult to perceive as one continuous form. They are always taking in, never giving back, to the point where they consume even themselves.”
The flexibility of Houdini’s procedural workflow empowered the effects team to rapidly experiment, share, and rewire networks. “Using Houdini let us play freely and visualize a variety of test concepts,” stated Kaschalk. “These included the behavior of gluten, dough folding back on itself, water boiling in reverse, crusting smoke, aquatic-inspired flocking behavior, and dynamic web construction. This process challenged and inspired the team to innovate and discover novel solutions and visuals.”
The process of creating the Druun began with Disney’s internal automation pipeline, through which the effects team imported simple proxy geometry provided by the animation department. This proxy input provided composition, the scale of the Druun, and a rudimentary acting performance. Using a custom rig in Houdini, the team ingested the data and ran numerous simulations and renders to provide a first version of the effect. Artists then iterated to final creative completion, and delivered the result to lighting.
“The rig created procedural legs by connecting curves between the animated proxy shape and the ground,” said effects lead Henrik Falt. “We derived a walk cycle by using these curves as FLIP fluid sources and curve forces, and moved additional sources and curve forces along the surface of the proxy shape.” The outputs were fed into a new Houdini FLIP fluid simulation. “A major contributor to Druun behavior was a custom ‘surface gravity’ that pushed the fluid towards the surface of the proxy shape. We controlled the magnitude of the force using ramps driven by the distance to the surface.”
The team varied viscosity to dial in unique behaviors. “We used limited time-span for the fluid particles, with no reseeding and constant sourcing into the sim,” Falt explained. “Forces and procedural deformations kept the fluids tracked to the proxy shape as it moves. We used ground and other environment components as collision objects. The rig setup in Houdini allowed the artists to intercept the data at any stage of the process, but most of the work was done by manipulating the sources and forces during the FLIP sim. As the Druun have no face or traditional limbs, this step was crucial in maintaining a sense of intent and focus.”
The final Druun appearance derived from an integrated combination of the base structural FLIP sim, rendered as a volume. “We generated a secondary sim with particles tracked along the ‘surface’ of the FLIP sim,” said Falt. “This provided overlap and secondary structural detail. We rendered volumes with multiple material properties, bringing additional complexity. We completed the effect with interior webbing, an emissive core, and ground contact geometry derived from the curl of the fluid simulation.”
Druun’s Webbing
Generating the Druun’s internal webbing was a complex business demanding a two-stage process. “We began by tracking the fluid motion of the exterior dough,” said effects lead Jake Rice. “Then we generated the web-like structures. Since the webbing effect spanned the interior of the dough simulation, the primary goal was to capture the low-frequency motion of the input simulation, while maintaining an even distribution of points within the fluid itself. However, due to the chaotic nature of the Druun’s dough fluid simulation, its tendency to launch particles away from the bulk of the fluid, and the constantly-changing particle count, tracking the dough’s motion was no simple task.”
In order to capture the low-frequency motion of the dough fluid simulation, the team transported a set of points towards a target set of points, in an iterative process. “The process used the optimal mapping between the two point sets,” commented Rice. “This minimized the distance needed to travel from any single point to any target point per frame.”
The fluid tracking operation broke down into three main steps. The first filtered the incoming point set to remove regions of low density, such as fly-off particles. “The second step converted the points to a density field,” Rice explained, “and scattered random points uniformly within that density field. The third step found a coherent mapping from one frame to another between the random point sets by optimal transport.” The first two steps proved straightforward to achieve in Houdini using the VDB From Particles SOP and the Scatter SOP. “We implemented the optimal transport step using Numpy and a Python SOP in Houdini, following the same basic steps outlined by Gabriel Peyré on his ‘Numerical Tours’ blog.”
To generate the webbing itself, the team generated a relative neighborhood graph based on the tracked fluid particles at every frame. “We implemented the construction of this graph in Houdini with VEX,” said Rice. “To prevent flickering, we did this additively inside a solver. In order to keep our webbing moving, we once again used optimal transport to track our tracking points, with our web, since this helped to keep the webbing well-distributed within the core of the Druun. Because we could generate geometry quickly on the fly, and implement various algorithms – or relative neighborhood graphs – in parallel ways through VEX, we were able to build such complex structures in a much more manageable way.”
More implementation details are available in the SIGGRAPH paper Weaving the Druun’s Webbing.
COMMENTS
Please log in to leave a comment.