
In order to create zombie clothes in Houdini 20 we first need to make the outfit in its regular form. After you’ve carefully crafted your beautifully designed outfit, be prepared to ruin it by drawing out where the tears will be and let the vellum solver enjoy tearing it to shreds. This tutorial will cover just how to do that, so let's get started!
Step 01 - It all starts with a curve.
The first step in this repetitive process is by drawing a curve. Whether you will have a shirt, pants, a dress or a hood, you will start with a curve. In order to get this right, you need a basic understanding of how clothes are sewn. Typically you can find patterns online to see how they’re made, don’t worry it’s not that complicated.
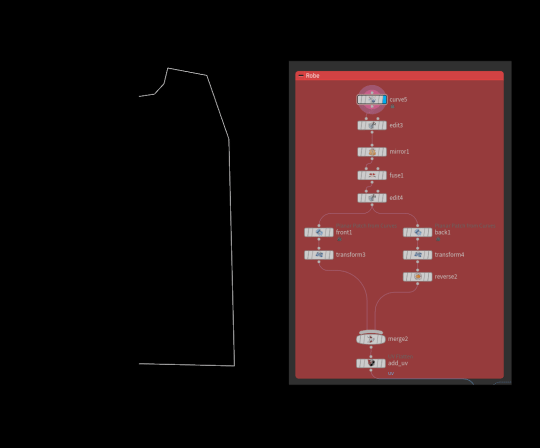
Draw a curve for one half of your robe, mirror that curve then fuse the closest points to make your closed path. Drop down a Planar Patch from Curves node and adjust the edge length to your liking. We use the planar patch because it generates triangles which is what you want to use in vellum to get nicer bends. You’ve now made one patch for your robe.
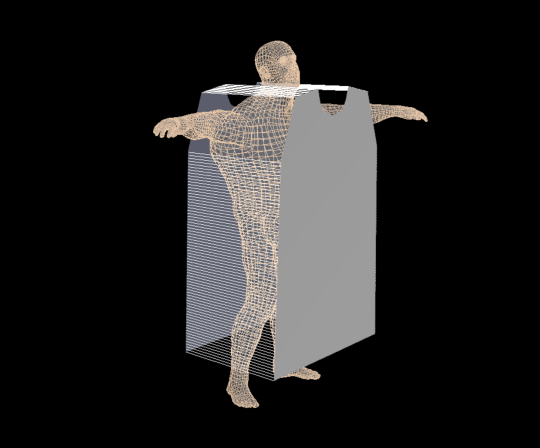
Take that patch and duplicate it. Put one in front of the model and one behind and make sure nothing is intersecting your model (that will be the collider). The patch you sent to the back will need to be reversed since it’s facing toward the model rather than away from it.

Step 02 - Sew it.
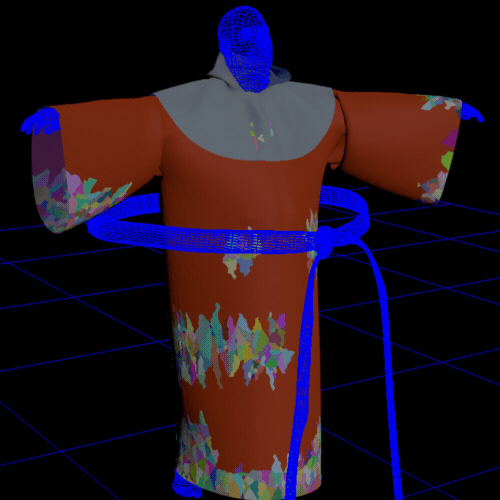
Once your patches are ready merge them together and set up their constraint properties. After the constraints drop down a Vellum Drape node and enable the Weld Additional Seams. You will be selecting your seam groups in Weld Seams properties along with the target group they will snap to.
Select the points you want to stitch together, try to keep the order the same. A handy tip is to hold down Shift+A and you’ll be able to select all the points in a row at once. Keep in mind which points you want to sew (leave the neck and arm holes, and the bottom unselected). Now let the solver do its thing and watch how you’ve managed to make a robe in seconds. Pick the frame you find to be the best and freeze it.
Important Notes in Draping
- In the Draping property >Weld Properties Welding Frame Delay - set this to 1 (sometimes 0 if you still find there are problems with the snap at 1). We don't want any delay for the snapping to occur.
- After the vellum drape, you want to drop down a post-process and make sure wield points is selected. Without this, if you take this to a vellum solver, the patches will separate and tear away from each other because technically the points were never fused together.
Step 03 - Clean it, Freeze it, and Repeat it.
Now that your robe is done, a good practice is to clean it by removing all the unnecessary attributes that were saved. You want to make sure to keep the "vm_cuspangle" attribute though, without it some of the nice curves in your drape will be gone.
Congratulations! You’ve finished the first piece of clothing. Now repeat this process for every other piece (the sleeves and hood). The only difference is you will be adding your finished pieces as frozen items into vellum drape since we don’t want to calculate them again.
Another thing to keep in mind is you always want to sew the same number of points on each side. That means when you come to stitch in the sleeves, the number of points need to match on both the end of the sleeve and the robe.
A few things to note for the sleeves:
- It's the exact same process mentioned above except we will also be using the bend node to bend the piece of fabric and fuse it together to make the sleeve.
- The sleeves are tapered. The area that will be sewn to the robe is smaller than the area near the wrist.
- Sleeves aren't a rectangle, the area under the arm is shorter than the area that goes above the shoulder.

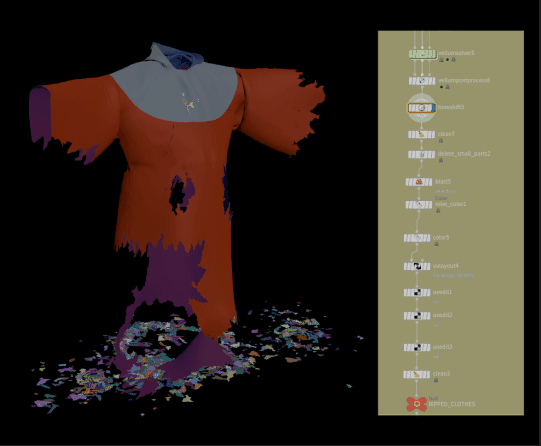
Step 04 - Rip it.
After you've successfully created all the parts of the outfit, drop down an Edge Fracture node and wire it into the first input. Move this node down a bit to give you some room. Take the completed outfit and poly reduce it to your liking, I went with 10%. Now this is important - freeze the poly reduce node. Freezing it stops it from recalculating each time, you want to avoid that since it will change your primitive numbers.
Make a group and select the areas you want to tear. Add a Dissolve node and change the operation to Dissolve Non-Selected. This is to choose which areas you want to tear and leave the rest unaffected. After the Dissolve node, add a Draw Curve node. Wire the outfit into the first input (Projection Object) and the dissolve into the second (Add Curves To). Change the Projection to Geometry and draw curves on where you'd like to get the tears. Finally, wire the Draw Curve node into the second input for the Edge Fracture node and adjust the Resample Accuracy. You can toggle on the visualization to see the fractured pieces by clicking on the icon in Output > Primitive Piece. Remember to freeze this node once you're done in order to maintain the work. Things will change each time Edge Fracture or Poly Reduce have to recalculate.
Our outfit is now ready to be torn. Connect it to a Vellum Configure Cloth node, the default settings work fine in this case. Then add a Vellum Attach to Geometry and add the areas you want to keep attached to the model (ex. points around the shoulders and chest to keep the robe and hood pinned). Finally, add a Vellum Stitch Points but change the constraint type to Weld Points. Keep everything the same but enable Breaking and set the threshold to something very small, I went with 0.001. Add that to a Vellum Solver and watch your clothes rip!

Step 05 - Clean it & Save it.
Once you find a frame that has the outfit in a way you like, freeze it by using a Timeshift node. Now will be a series of blasting away the torn up pieces that are on the ground, or any pieces that are dangling off the outfit that you don't want to keep. The Labs Delete Small Parts node is very useful here. You can even art direct small tears on the clothes by blasting away some lines to add more torn layers to your clothes.
Finally, clean away all the unnecessary attributes that you don't want to keep and save your outfit!
Note for UVs
If you will be texturing your outfit, make sure that you have been adding and keeping UVs throughout this process. At the end of it you can drop down a UV Layout to ensure the UV's are laid out properly before you save this out as an FBX to take into your texturing software.
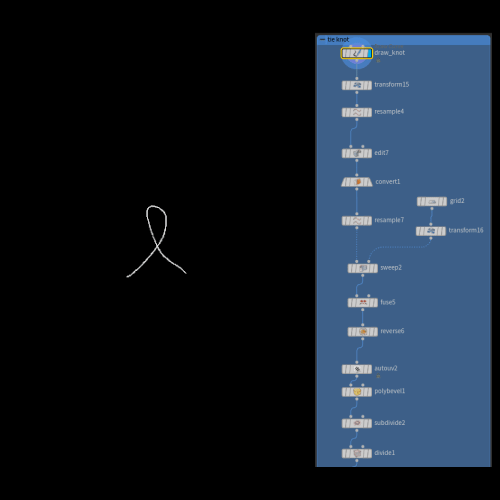
The Belt
The first step is to draw a loop and resample it. Then comes the toughest part, connect an edit node and start shaping the knot. Once you've successfully made a knot, convert the curve to a Nurbs Curve and resample it again. Then sweep a rectangle along the curve. Fuse any unconnected points and reverse the faces if they're in the wrong direction. Add a poly bevel to add some curvature then subdivide to have a smooth belt.
For the static loop around the waist, make a tube and shape it to your models waist. Extrude it and subdivide it.
The Knot:
To tie the knot, we will grab the two ends of the belt and animate them being pulled. This will look strange at first but we'll need this in the vellum solver to tie the knot properly. In the Vellum Configure Cloth add the two pins you created to animate the corners being pulled into the Pin to Animation property and set the pin type to Soft. Make sure to enable Match Animation. Increase the damping ratio in the Stretch to 0.015. Then add Vellum Struts node to make sure the belt keeps its shape.
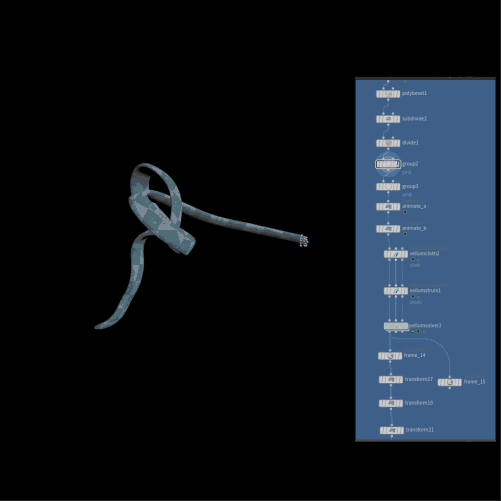
Increase the Substeps to 4 and the Constraint Iterations to 128. In the forces tab, set Gravity to 0 and increase Velocity Damping to 0.1. In Friction, reduce the Static Threshold to 0.1 and the Dynamic Scale to 0.02. Finally, in Advanced > Motion disable Normalize Stress.
Put it Together:
Use a Boolean and connect the static loop and the knot together. Line up the knot part to the middle area of the static loop. Group the areas you want to keep static and connect this into a Vellum Configure Cloth and Solver in order to make the two lines dangle down like a real belt.
Use a Vellum Post-Process to smoothen out all the jagged areas and freeze it to the frame you desire with a timeshift. Clean away all unnecessary attributes, and for good measure add a fuse to make sure there are no stray points.

The Nuns Veil
There are 3 layers to the veil. The first is a tight fitting cap, followed by a white under-veil that wraps around the head and around the neck/shoulders. Finally, the black flowing veil is pinned to the white.
I used the model's head to make the cap (not the greatest approach for real life but a quick and easy way for CG). To make the white veil took some trial and error but in a nutshell; make one side and then use a few edit nodes to lift the area that should fall on the shoulders to make sure nothing intersects the model. Even after the draping we will use edit to fix some of the intersecting folds that happened around the neck area.
The last layer is a lot easier. Use a Planar Patch and make a rectangle above the head. I went with an edge length of 0.015. To drape this on the head we need to pick out a few points on either side and sew them to the white veil. This is similar to real life when you would use a pin to keep it on your head, but in this case we're sewing it in. The rest is the same as mentioned before, freeze it and clean it.
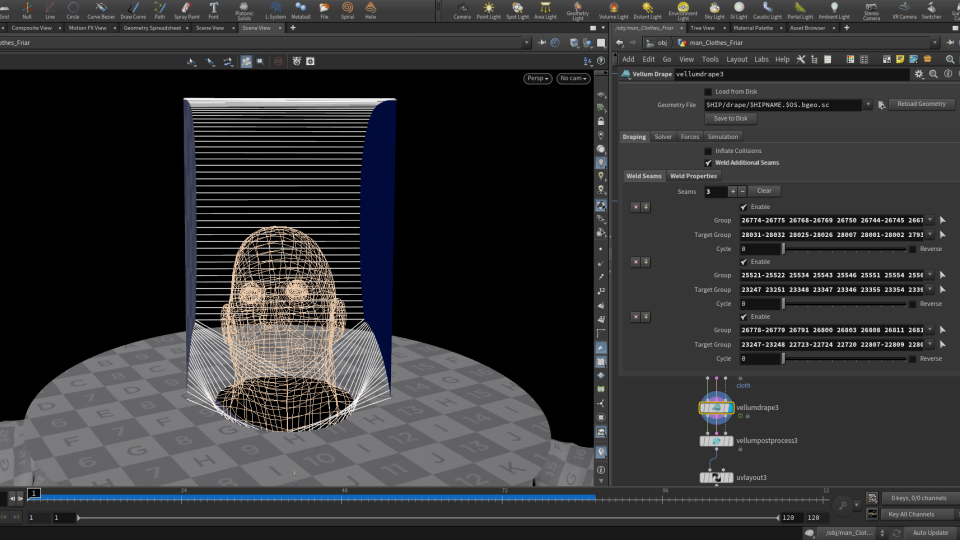
The Friar's Hood:
This is a lot easier than the veil. You'll use a Planar Patch set to Ring to make the base (make sure it fits the neck properly). And draw one side of a hood and follow the same steps mentioned above. The one thing to keep in mind is the number of points on the inner circle of the ring need to match the combined amount of points on the base of the hood curves. You will be sewing the hoods to each other from the curved back but also sewing the bottom points to the ring. The only points not being sewn are the ones around the face.
CREATED BY

COMMENTS
Please log in to leave a comment.