| On this page |
Animation 
-
MotionClip SOP nodes that output MotionClips now have a viewport state that allows you to visualize a MotionClip or its evaluated poses over time using a color ramp.
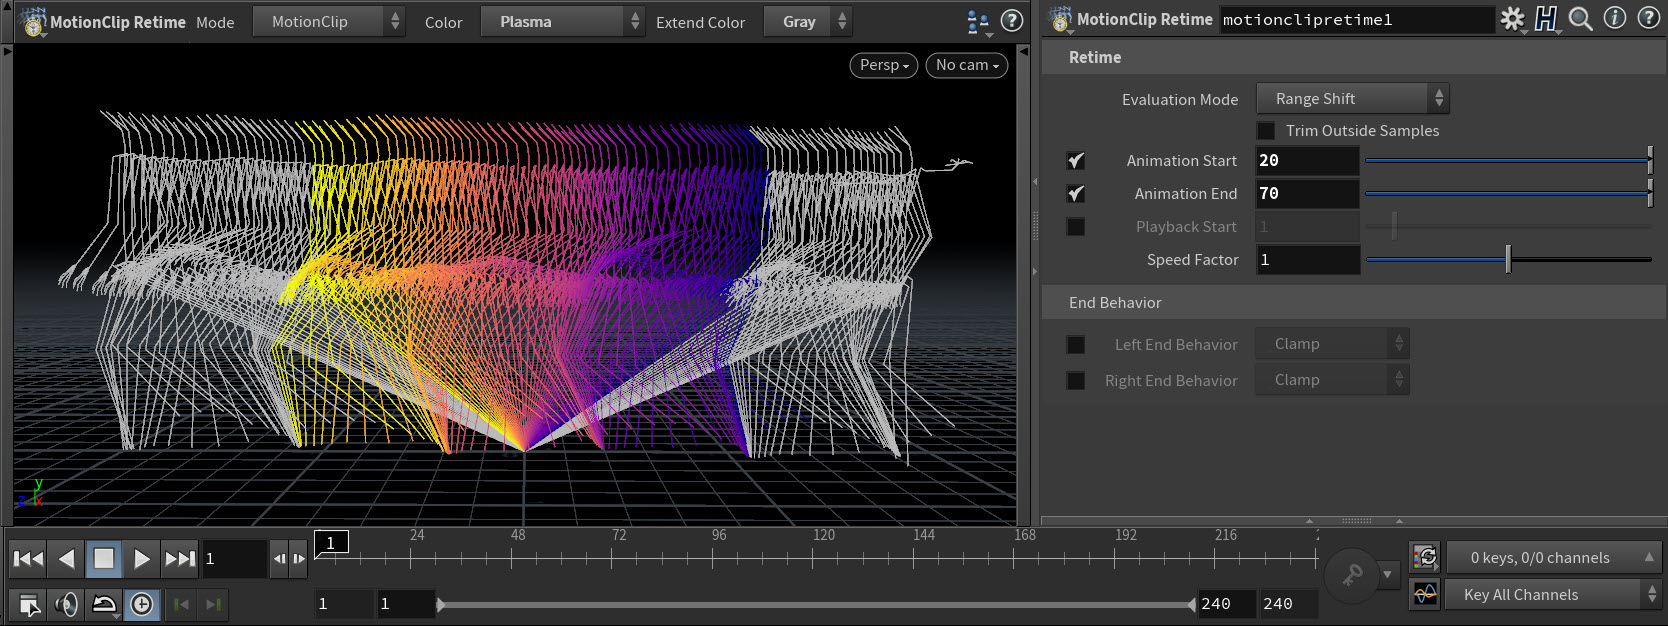
MotionClip Retime SOP node viewport state -
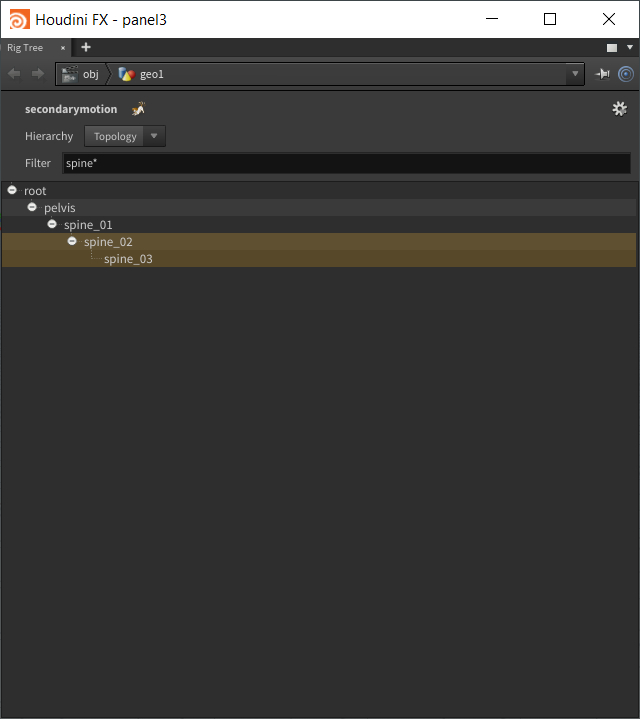
When working with MotionClips, you can now select individual joints from the MotionClip viewport state or the character Rig Tree pane. Also, motion trails now automatically appear for selected joints in the MotionClip viewport state.
Example: Selecting a joint in the MotionClip viewport state and the Rig Tree pane. -
You can now specify what to do with the attributes stored by the Attributes to Store parameter on the MotionClip SOP node with the new Rest Attributes and Animated Attributes parameters on all of the MotionClip nodes.
-
For the
 MotionClip Evaluate SOP and
  MotionClip Extract SOP nodes, you can define which attributes should be unpacked from the rest pose of the MotionClip and which attributes should be evaluated from the animated poses of the MotionClip.
 -
For the
 MotionClip Update SOP,
  MotionClip Retime SOP, and
  MotionClip Extract Key Poses SOP nodes, you can define which attributes should be evaluated and then repacked on each altered pose.
 -
For the
 MotionClip Cycle SOP,
  MotionClip Sequence SOP, and
  MotionClip Blend SOP nodes, you can define which attributes are stored in the animated poses of the output MotionClip.
-
-
Specify which attributes are evaluated from and repacked into MotionClips for each dynamically warped pose of your character’s animation with the new MotionClip Repack Attributes, Rest Attributes, and Animated Attributes parameters on the
 Dynamic Warp SOP node.
 -
Use the topology of the skeleton from the first frame of a MotionClip’s range with the new Use First Frame for Topology parameter on the
 MotionClip SOP node.
 -
Determine where the extraction frame rate and frame range are obtained from with the new Clip Range parameter and options on the
MotionClip Extract SOP node. -
Remove a subset of joints from each selected pose instead of all the joints with the new Joint Group parameter on the
 MotionClip Pose Delete SOP node.
 -
Specify which poses to remove from your MotionClip data with the new Frame Range, Frame Pattern, Pose Range, and Pose Group selection method parameters and all of their options on the
MotionClip Pose Delete SOP node. -
Specify whether the initial position for the locomotion is obtained from the rest pose or from the first pose of the MotionClip with the new Use Rest Pose as Locomotion Start parameter on the
 MotionClip Extract Locomotion SOP node.
 -
Specify which interpolation method to use when evaluating a MotionClip with the new Interpolation parameter and options on the
MotionClip Evaluate SOP node. -
The joint transform data in the
 Rig Pose SOP and
  Rig Match Pose SOP viewport states are now separated out into their own HUD so that it can be made visible independent of the hotkey hints. The numeric values are also now formatted more nicely.
 -
The
 Skeleton SOP viewport state now has a HUD.
 -
Access the bake controls for a
Rig Pose SOP node from its viewport state’s toolbar with the new Open Bake Dialog button. -
Keep a motion path locked to a specific joint even when selecting other joints in the same skeleton with the new Lock To Current Point option in the
Rig Pose SOP node’s motion path viewport state right-click menu. -
Change the default display settings for a motion path with the new Make Current Handle Settings Default option in the
Rig Pose SOP node’s motion path viewport state right-click menu. -
See how your motion path will cycle with the new Cycle Frames parameter in the
Rig Pose SOP node’s motion path viewport state handle parameter pane. -
Use the bounding box to set the pivot used for globally transforming the skeletons during a retarget operation with the new Set Pivot from Bounds parameter on the
Rig Match Pose SOP node. -
Improved frame rate change and key position handling for your animation sequences. For more information, see Global Animation Options.
-
Improved frame rate change and key position handling for your animation sequences. For more information, see Global Animation Options.
-
Apply a frame rate change to your scene explicitly with the new Apply FPS button in the Global Animation Options window. Changes to the current FPS are no longer applied automatically.
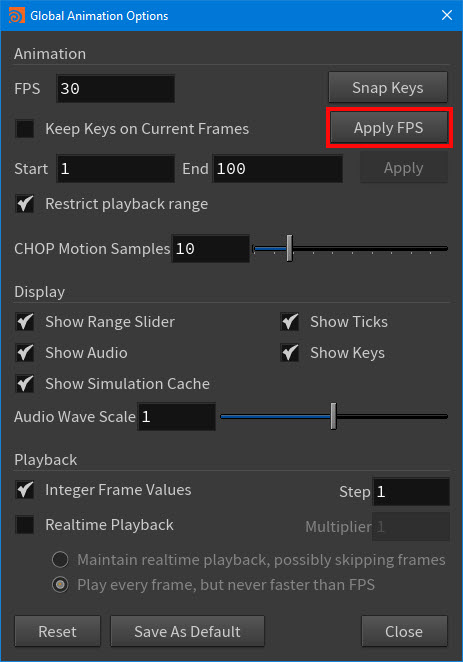
Apply FPS button in the Global Animation Options window -
Now when you change your scene’s frame rate (FPS), its current start frame (
FSTART) will be preserved by default. If you want to re-enable the old default behavior of changing the start frame to maintain its absolute time and maintaining the absolute times of keys, then set the new HOUDINI_DISABLE_FPS_MAINTAIN_FSTART environment variable to 1. -
Keep your animation keys on their current frames when changing your scene’s frame rate (FPS) with the new Keep Keys on Current Frames option in the Global Animation Options window. For example, if your first frame is 1001 and you change your scene’s FPS, then that first frame will be preserved instead of preserving the timing and then changing the first frame.
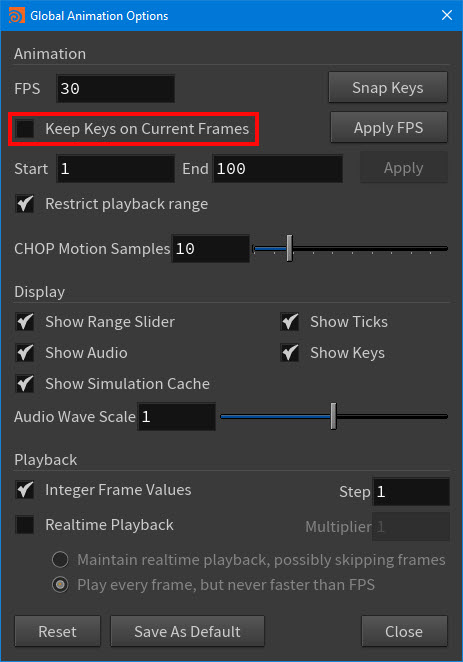
Keep Keys on Current Frames option in the Global Animation Options window
-
-
Set a fractional frame rate for playback with the new Enable playback at fractional frames button and its
 options on the playbar. This behavior already exists inside the Global Animation Options as the Integer Frame Values & Step options, but it is now easier to access from the playbar.
Enable playback at fractional frames button on the playbar and its options -
Smooth point, skeleton, or MotionClip animation data (local transforms or other specified attributes) using a Butterworth Filter with the new
 SmoothMotion SOP node.
 -
Smooth your animation keys using a Butterworth Filter with the new Smooth Keyframes on Selected Channels options window in the Animation Editor. This window’s options remove unwanted jitter and noise from your animation channels.
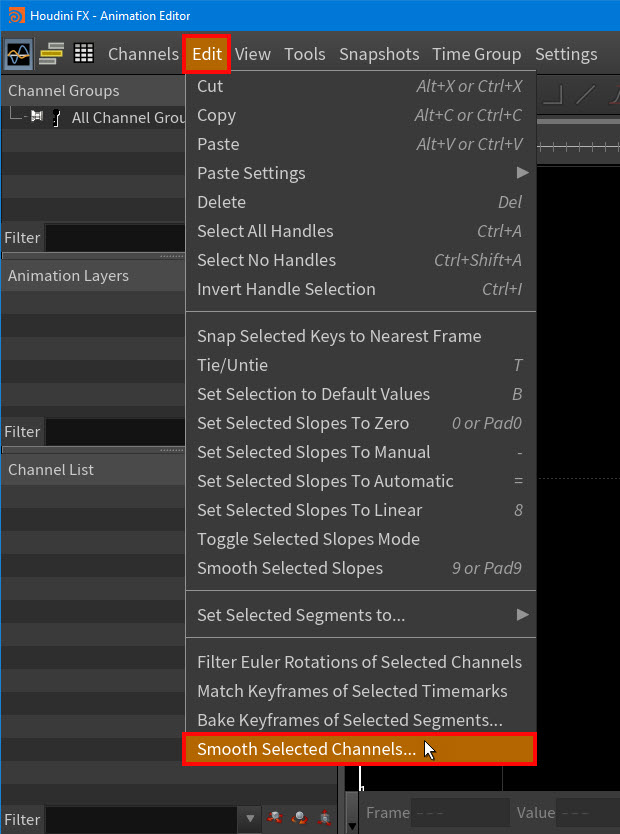
Edit > Smooth Selected Channel menu option 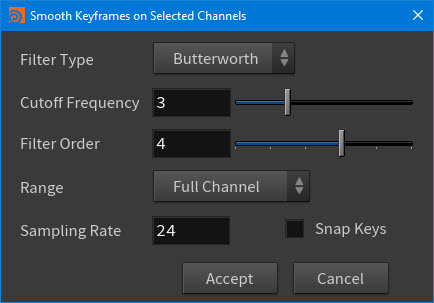
Smooth Keyframes on Selected Channels options window
Procedural motion and physics 
-
The
 Secondary Motion SOP has a new Use Driver Joint parameter that allows one to choose whether a custom joint is used to drive the effect.
 -
Create point attributes on a ragdoll simulation’s input skeleton for the purpose of scaling the
 ragdoll solver’s Stiffness and Motor Strength with the new Configure Ragdoll Attributes Per Joint parameter on the
  Ragdoll Collision Shapes SOP node.
 -
Use a point attribute to scale the stiffness of your character’s ragdoll simulation with the new Stiffness Scale Attribute parameter on the
Ragdoll Solver SOP node. -
Use a point attribute to scale the motor strength for your character’s ragdoll simulation with the new Motor Strength Scale Attribute parameter on the
Ragdoll Solver SOP node.
Procedural rigging 
-
New
 Joint Capture Paint SOP node provides an improved and simplified capture (skin) weight painting experience. This node replaces the
  Capture Layer Paint SOP node in the KineFX capture set-up workflow.
 -
Improve your biharmonic captures by using additional curves or geometry to distribute joint weights more evenly and broadly before refining your captures (skins) by painting capture weights with the new Role > Capture Geo parameter option on the
 Attach Joint Geo SOP node and the Capture Geo Options parameters on the
  Joint Capture Biharmonic SOP node.
 -
Improved character rig tree UI now makes it easier to interact with and navigate your joint hierarchies across all the KineFX SOP nodes.
-
You can now pre-visualise all mappings that will be made while mirroring mappings in the Map Points viewport state.
-
You can now use box selection to select points, edges, and controls in the KineFX viewport states.
-
Compute connectivity-aware capture weights and smooth deformations for animated polygonal surfaces or the surfaces of tetrahedral meshes with the new
 Point Capture SOP. You can use this node as an alternative way to calculate and supply capture weights to the
  Point Deform SOP.
 -
Improved
 Character Blend Shapes SOP performance. It is now 8.1 times faster for the initial match points set-up and 1.5 faster when animating the blend shape deformations frame-to-frame using animated weights.
 -
Add or extract in-between shapes to or from your
character blend shapes with the new Add as In-Between Shapes parameters on the  Character Blend Shapes Add SOP and
  Character Blend Shapes Extract SOP nodes. These parameters allow you to introduce intermediary target shapes to your character blend shape set-ups that your hero shapes will then transition through along their way to deforming to their main target shapes. For example, you can set-up a lip in-between for a mouth smile-no smile blend shape set-up to avoid any interpenetration between the lip and teeth geometry of a character.
 -
New
 Character Blend Shape Channels SOP node which allows you to create and then apply parameters and/or detail attributes to a character’s skeleton that then drive its blend shapes. You can use this node to set and animate your character blend shape weights.
 -
Use a per-element mask to set or scale blend weights for each blend shape input with the new Blend Masking and Blend Mask Attribute parameters on the
 Blend Shapes SOP node. This is useful when you want to layer multiple deformation effects.
 -
New
 Skeleton Blend 3.0 SOP node with multiple improvements to how pose blending and weighting are handled.
 -
Determine whether to read the frame range from the
clipinfodetail attribute on the input geometry or set a custom range on all KineFX nodes that have a frame related parameter. -
Automatically determine and set the Rig Doctor’s Joint Scale parameter value based on your skeleton’s root joint scale and the size of its bounding box with the new Initialize Scale From Root button on the
 Rig Doctor SOP node.
 -
Help determine the up vector that is used to your orient joints with the new Reference Point Attribute for Lookat parameter on the
 Orient Joints SOP node. If you use this parameter, the up vector is computed as the direction between the current joint and the transform specified by the up reference matrix point attribute.
 -
Choose how to resolve membership conflicts between a newly created joint group and an existing joint group with the new Initial Merge parameter on the
 Group Joints SOP node.
 -
Set all joint scales in your rig visualizations to be effectively equal to one unit with the new Ignore Joint Scales parameter on the
 Visualize Rig SOP node.
 -
When attaching control shapes to your character, you can now specify the rest pose for its skeleton with the new Rest Pose Attribute parameter on the
Attach Joint Geo SOP node. -
Configure the tolerance that is used for determining near-zero values when re-normalizing capture weights with the new Tolerance parameter on the
 Capture Correct SOP node.
Input/Output 
-
New
 Character I/O SOP 2.0 node with multiple improvements including expanded MotionClip support.
 -
 USD Skin Import SOP node now issues a warning when it encounters invalid skinned USD primitives.
 -
 Mocap Stream SOP now supports Qualisys devices via the Qualisys Track Manager.
 -
Specify the pattern to use when renaming the blend shape detail attributes that define the facial motion from an input character with the new Facial Attributes parameter on the
Mocap Stream SOP node. -
Determine how the input and output skeletons should be layered with the new Layering parameters on the
Mocap Stream SOP node. This allows you to more easily combine motion capture performances from multiple sources at the same time. -
For Optitrack (Motive) motion capture devices, you can now ensure a successful connection to a multicast group by specifying the IP address of the machine running Houdini with the new Local IP parameter on the
Mocap Stream SOP node. -
 ROP FBX Animation Export SOP and
  ROP FBX Character Export SOP nodes now support a variety of default frame rates as well as custom frame rates.
 -
 FBX Animation Import SOP and
  FBX Character Import SOP nodes now support both static and animated custom attributes which they import as
 fbx_custom_attributespoint dictionaries.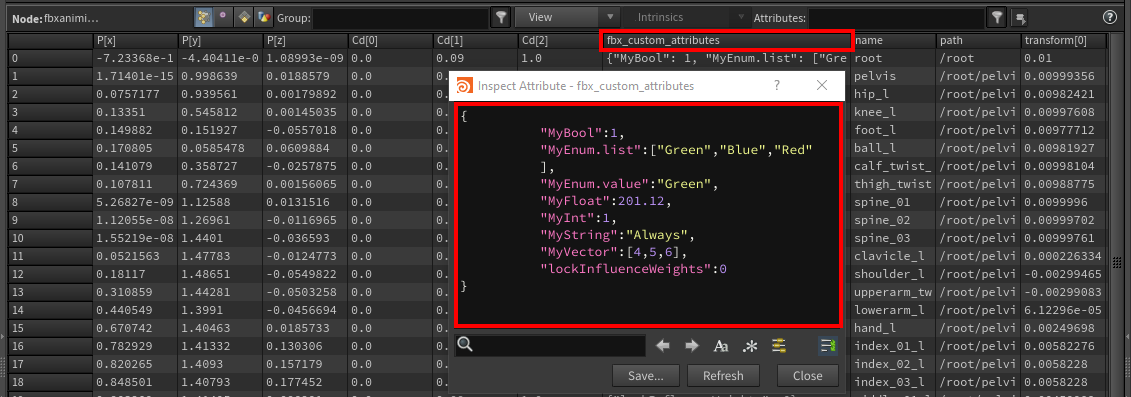
FBX Animation Import SOP custom attributes point dictionary -
Import or export user-defined properties from/to FBX files and store them as
fbx_custom_attributespoint attributes with the new Import User-Defined Attributes and Export User-Defined Attributes parameters on the FBX Animation Import SOP, FBX Character Import SOP, ROP FBX Animation Output SOP, and ROP FBX Character Output SOP nodes respectively. -
Specify the skinned shape name that a capture joint is attached to with the new
fbx_skinstring array point attribute stored on capture pose geometry and understood by the FBX Character Import SOP and ROP FBX Character Output SOP nodes. This attribute supports the more accurate FBX import/export of bind poses for joints that are not bound to any skin points. -
Look at all the FBX custom attribute animation curves that you want to export and automatically delete any identified constant curves (curves with no change in key values) with the new Remove Constant Animation Curves parameter on the
ROP FBX Animation Output SOP and ROP FBX Character Output SOP nodes. -
FBX Export Window (File ▸ Export ▸ Filmbox FBX),
 FBX ROP node, and
  ROP FBX SOP node now support custom frame rates.
 -
When importing FBX geometry using a
 File SOP node, you can now use the new
 convertunitspath syntax option to perform unit conversion during the import. For example,filename.fbx#,convertunits. -
When exporting your scene files with FBX, you can now embed any media (like textures, sound, and videos) related to your scene in the export with the new Embed Media parameter on the
ROP FBX Output SOP and Filmbox FBX ROP nodes. -
Convert any non-changing topology deforming mesh sequence into a bone-based animation with the new
 Dem Bones Skinning Converter SOP and
  Dem Bones Skinning Converter ROP nodes.
Channels 
-
Filter audio input and/or animation channels using a frequency response that has a maximally flat magnitude with the new Butterworth filter type on the
 Pass Filter CHOP node.