ALICEVISION PLUGIN

UPDATE 2.3.0 - December 9th, 2020
The plugin has been updated to support AliceVision 2.3.0! In order for it to work, update SideFXLabs to build 18.5.421 or newer! It also requires updated binaries! See download link in installation instructions below.After updating, make sure you use the new definition of the tools! Opening a .hip with previously created node instances will still use the older definition! Either create a new instance of the tools, or update their type!
Note
Requirement: NVIDIA CUDA-enabled GPU (built with CUDA-10 compatible with compute capability 3.0 to 7.5).
Description
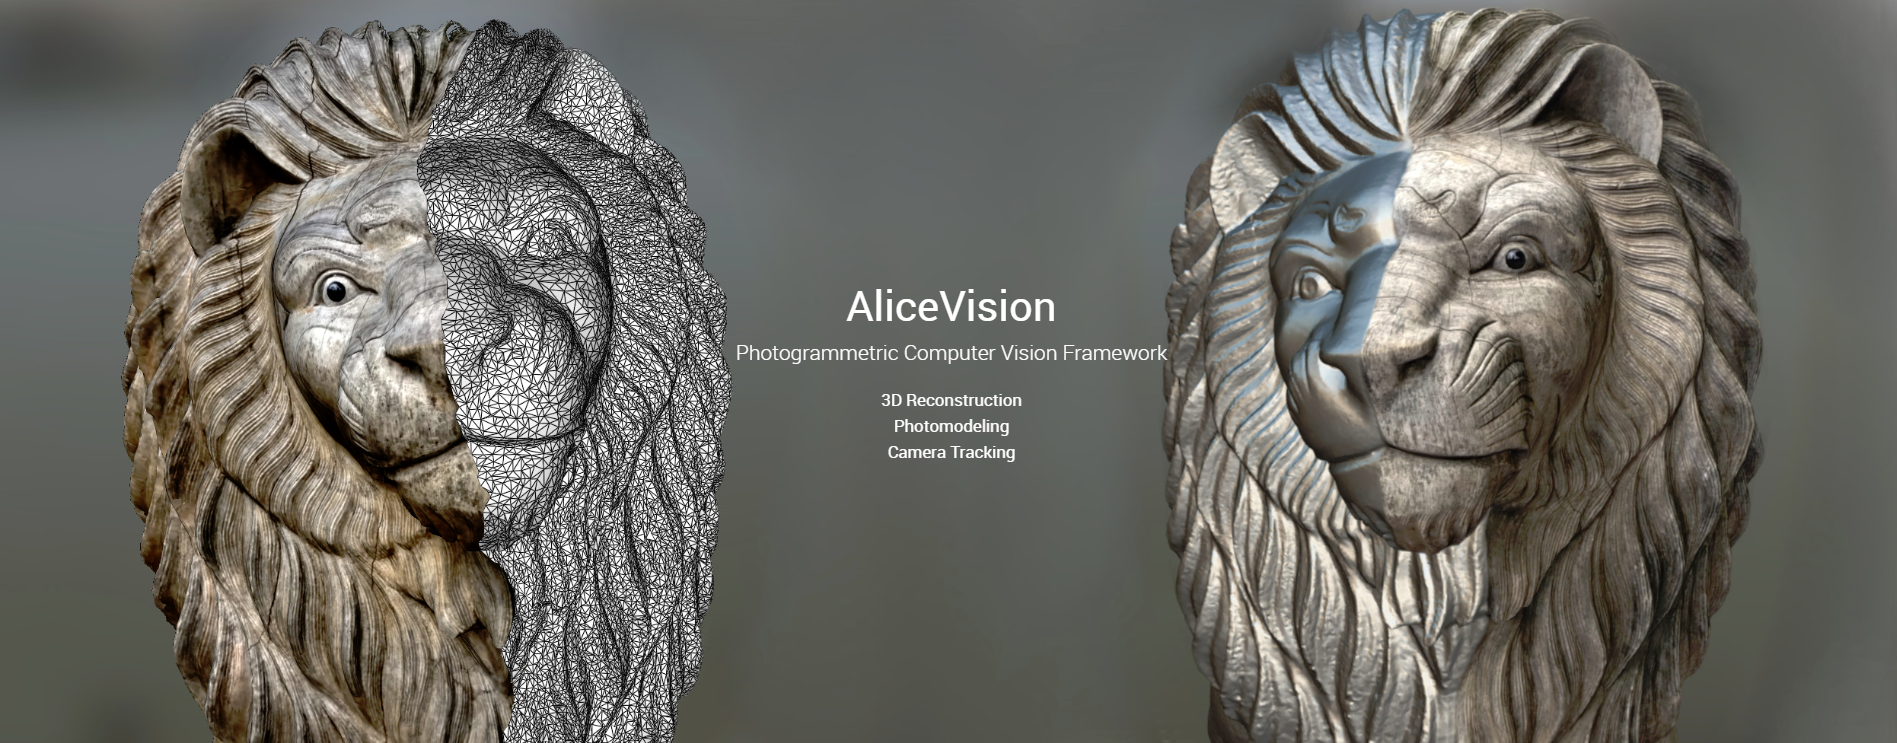
AliceVision is a Photogrammetric Computer Vision Framework which provides a 3D Reconstruction and Camera Tracking algorithms, which can be found on Github. It is being developed by the post-production company called Mikros Image, about whom you can find more information here: About AliceVision
Due to its command line capabilities, we have been able to successfully create an implementation inside Houdini as part of SideFXLabs (FREE)
AliceVision is licensed under the MPL2 license
Quick Demo
Installation Instructions
- Install SideFXLabs 18.5.421 or newer
- Run Houdini and Verify the nodes are being properly loaded
- Download Meshroom_Windows or Meshroom_Linux version 2020.1.1 below depending on your platform
- (Optionally) Download Sample Content
- Extract the zip file somewhere without whitespace (space) in the path.
- Correct: C:\My\File\Path\Meshroom-2020.1.1\ Incorrect: C:\My File Path\Meshroom-2020.1.1\
- Point the nodes (or houdini.env as seen in optional step 7) to the aliceVision folder inside the Meshroom-2020.1.1 folder
- (Optional but highly recommended) Add to your houdini.env:
- Windows --> ALICEVISION_PATH = C:\Your\Path\Meshroom-2020.1.1\aliceVision
- Linux --> ALICEVISION_PATH = "/Your/Path/Meshroom-2020.1.1/aliceVision"
Note
You can also decide not to set the ALICEVISION_PATH houdini.env variable, but that will require you to link to the binaries on the AV Initialize node every time you create a new node instance. It is therefore for convenience sake recommended you use houdini.env
Usage Instructions

Basic
- Get to the geometry context by creating a geometry node and enter it.
- Create the AV Photogrammetry sop.
- Set the Project Name parameter. (Ensures unique cache id for current process)
- Set the Cache Directory.
- Click the Add Images button on the Initialize tab to configure which images need to be processed.
- Optionally tweak any of the other parameters.
Advanced
If you wish to customize more than just the very few basic parameters on the AV Photogrammetry sop, you can also construct the internal node network using the provided nodes yourself. Do this in the following order:
AV Initialize - Configure which images to process.
AV Analyze Images - Match all features between candidate image pairs.
AV Structure From Motion - Detects 3D points with position and orientation and calibrate the cameras accordingly.
AV Depth Map - Retrieves the depth value of each pixel from the cameras.
AV Meshing - Creates a dense geometric surface representation of the scene.
AV Texturing - Texture the generated mesh
PRO-TIP
There are a few node specific parameters you can change to speed up some of the steps. (For example for previews)
Structure from Motion: Set max number of matches to anything above 0 (default of 0 is unlimited). This reduces the number of images Alicevision tries to match.
Depth Map: Increase the down-sample amount.
Texturing: Reduce the generated texture resolution.
Node Descriptions
In the current version there are 7 Nodes, which can be found in the geometry context under Labs/AliceVision.
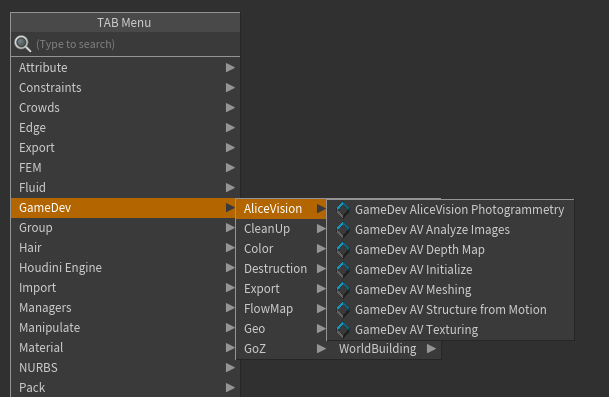
AV_Initialize
This node is the start of the AliceVision node-network, and where you add your images. Simply click “Add Images” and a dialog will launch in order for you to select your chosen images. The image list is then stored as a detail attribute and will be passed on to the next nodes. It is therefore essential this node is always part of you network.
After you have added the images, set the Cache Directory and Project Name. The project name will ensure a new Cache Directory subfolder, meaning it will not overwrite previously processed data.
AV_Analyze Images
The objective of this step is to extract distinctive groups of pixels that are, to some extent, invariant to changing camera viewpoints during image acquisition, and to match all features between candidate image pairs.
AV_Structure_from_Motion
The objective of this step is to understand the geometric relationship behind all the observations provided by the input images, and infer the rigid scene structure (3D points) with the pose (position and orientation) and internal calibration of all cameras. The output of this node will be a point cloud.
AV_Depth_Map
The objective of this step is to retrieve the depth value for each pixel in the images and cameras that had previously been resolved by Structure From Motion. This can take a very long time depending on the resolution and number of images provided.
AV_Meshing
The objective of this step is to create a dense geometric surface representation of the scene. The output of this node is a high-poly mesh, which can be used for any further processing in Houdini.
AV_Texturing
The objective of this step is to texture the generated mesh. The output of this node is a high-poly mesh with very basic UVs and textures. It is highly recommended to reproject the textures on a meshwith custom UVs. (For example using the Games Baker or Simple Baker)
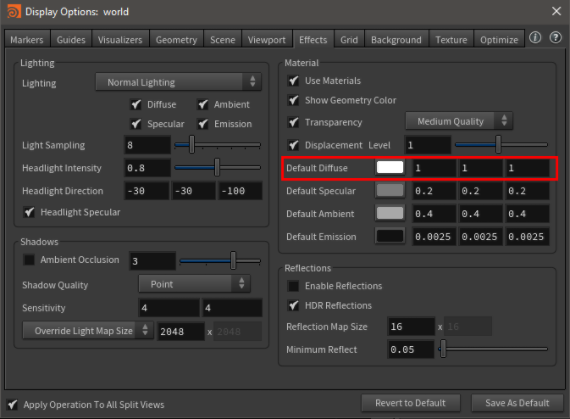
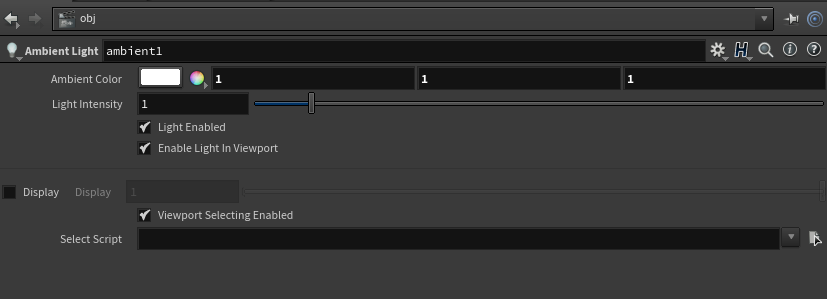
Note
For better analysis of your model, you might want to change some of the default display settings. This can by done by hitting D while on the viewport. As well as add an Ambient Light to your scene, cranked to white.
Detailed Documentation (WIP)
The team behind AliceVision has also been working on Meshroom, which is a free, open-source 3D Reconstruction Software based on the AliceVision framework. The documentation for Meshroom contains very useful information regarding the steps AliceVision goes through, including descriptions of every tweakable parameter. This can be found HERE.
Technical Information
Minimum Requirements
OS
Windows x64, Linux, macOS (some work required)
CPU
Recent Intel or AMD
RAM/Memory
8 GB
Hard Drive
~400 MB for Meshroom + space for your data
GPU
NVIDIA CUDA-enabled GPU (compute capability >= 2.0)
Recommended Requirements
CPU
Intel Core i7 or AMD Ryzen 7
RAM/Memory
32 GB
Hard Drive
20 GB+ HDD or SSD
GPU
NVIDIA GeForce GTX 1070
FAQ
- What image formats are supported?
- '.jpg', '.jpeg', '.tif', '.tiff', '.png', '.exr', '.rw2', '.cr2', '.nef', '.arw'
- AliceVision also supports other formats part of OpenImageIO, but it is recommended to stick to the ones listed above.
- Can I provide a boundingbox around my pointcloud to restrict what gets used for further processing?
- No, this is currently not supported by Alicevision.
Known Issues
- Error reporting is relatively light right now
- Cameras currently cannot be extracted from the scan due to a bug in Alembic import in Houdini. This should soon be resolved.
Trouble Shooting
- No output generated
Try setting the project name to something you haven’t used yet. The problem might be caused by previous cache files interrupting the current process.
- Alicevision not found
Make sure you either set the ALICEVISION_PATH houdini.env, or link to the Alicevision directory on the AV nodes themselves.
- Other
Please send support questions to support@sidefx.com
Related Links
CREATED BY
