Creature by Alex Novitskiy
This is a collection of tips/tricks that may help you if you are tasked with making a creature in Houdini, particularly if it involves muscles, rigging, animating and everything in between. There are probably some things I may have missed, and this is not meant to be a step-by-step tutorial -- but hopefully this list can help save you some pain and get you faster to interesting results for your creature. I also presented my progression and findings, which you can view here, or just jump straight to the project file that is free to download and inspect on your own.
Otherwise, let's begin!
Prepare the geometry
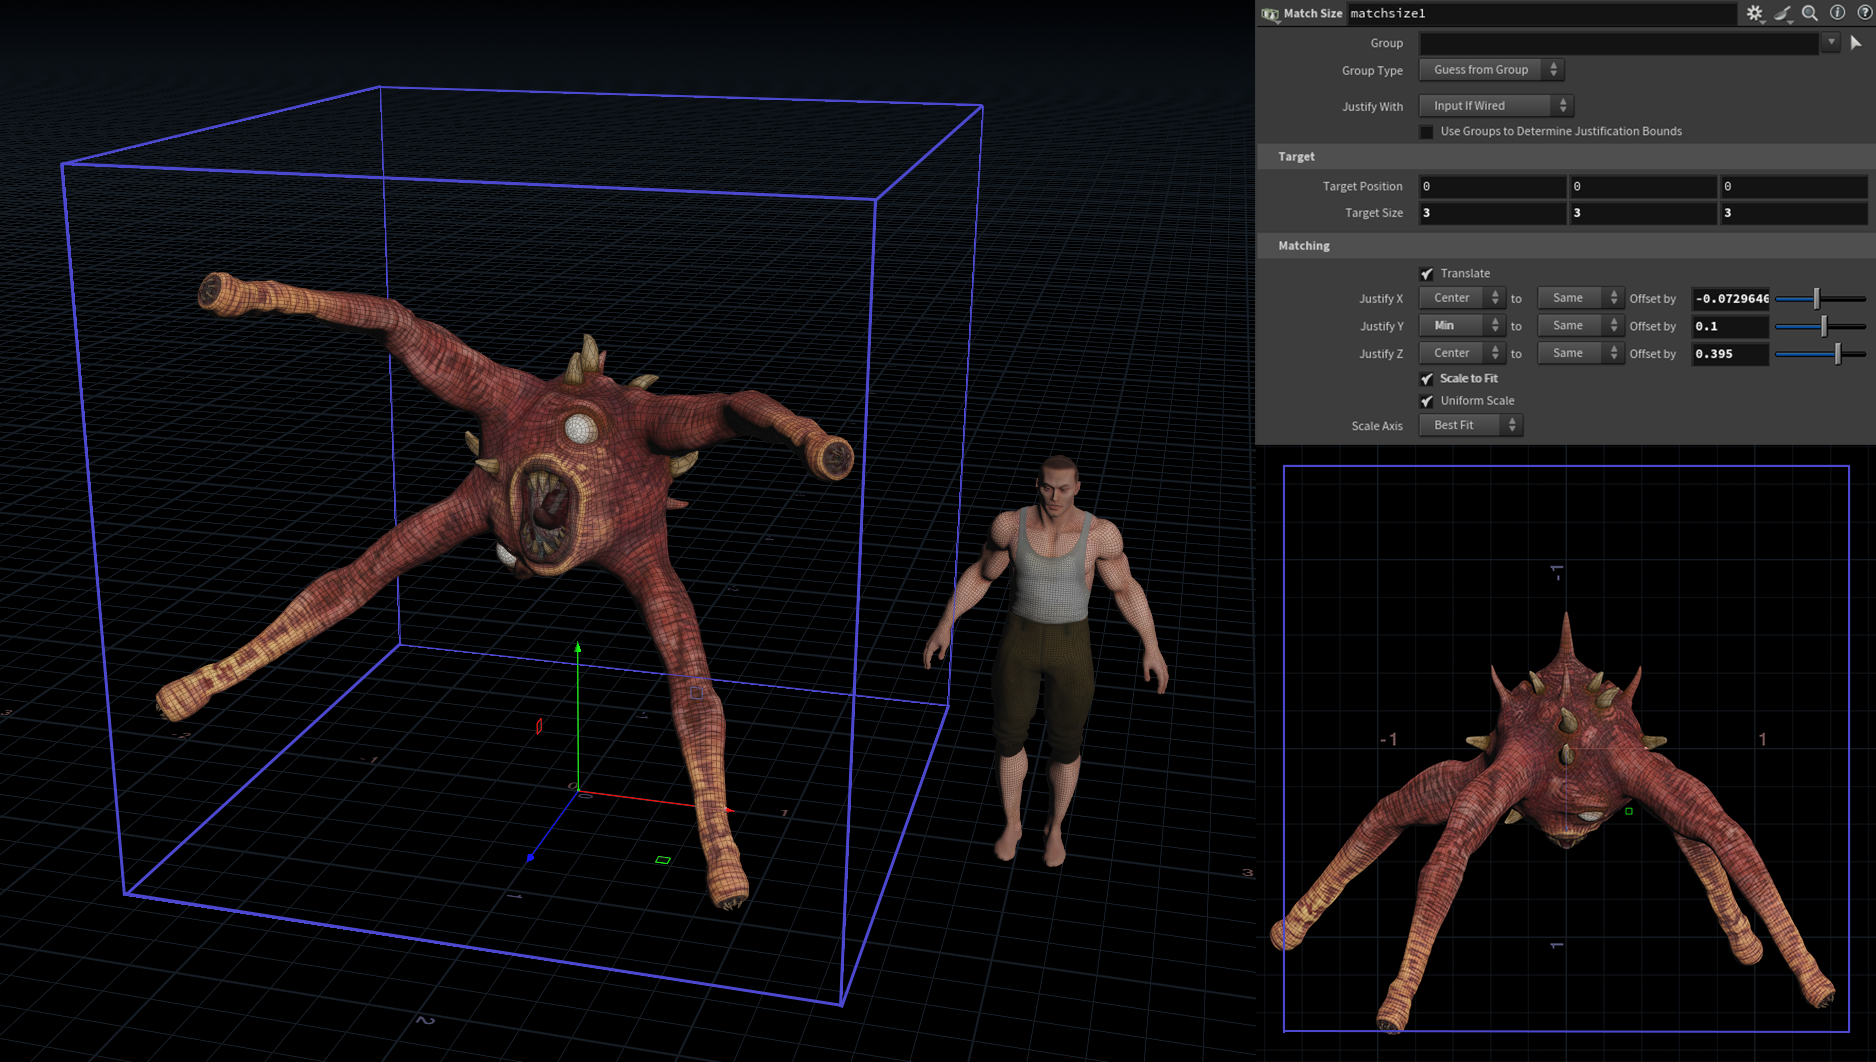
Proper Sizing
Before doing anything, make sure your character is at the right size and aligned on the world's origin. It's something you can do easily with a Match Size.
1 Houdini unit = 1 meter
Intersections
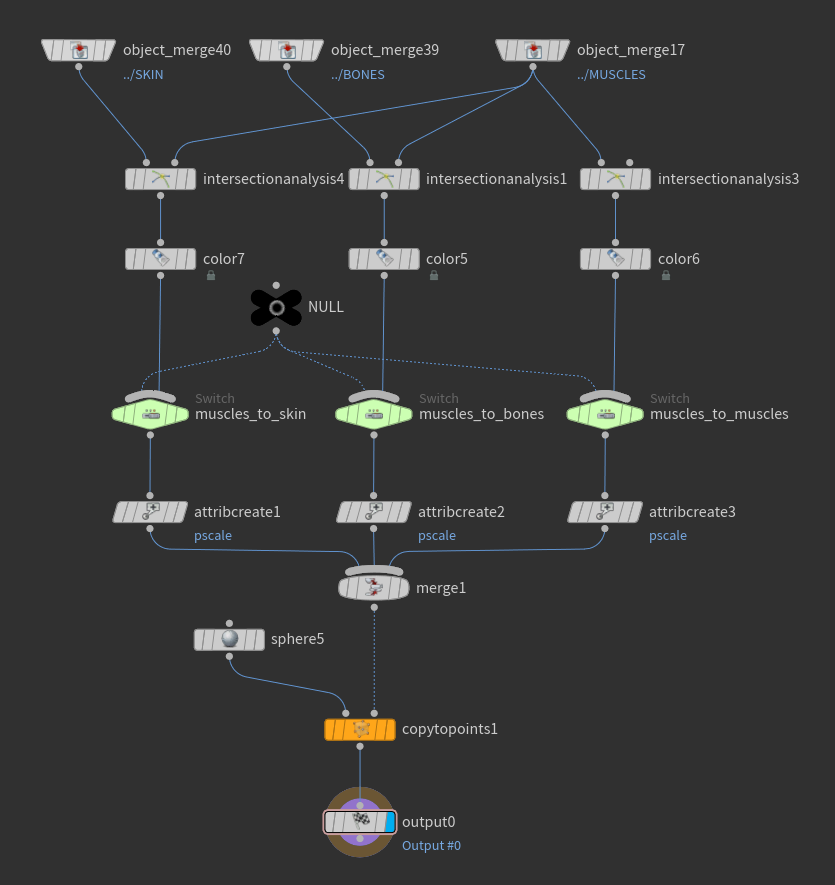
Check if there are no interpenetrations between any of the elements of your character that will be used in the simulation (skin, bones, muscles). You can use the Sculpt node to fix them.
You can quickly check them using Intersection Analysis nodes which give you points where intersections are detected. You can create an asset containing these nodes to analyze interpenetrations between the different elements of your character. On this asset, you could change the color and size of the points, control which geometries and intersections are displayed…

For more advanced techniques to deintersect muscles and bones, for example with a Vellum simulation, you can check the chapter 2 of this masterclass
https://www.sidefx.com/muscles-masterclass-advanced/
When you start rigging, check with a Bone Deform node for potential interpenetrations between bones during the animation. What you want to avoid during the simulation is muscles or fat being stuck between two intersecting bones. And if so, adjust the joints placement or resculpt the geometry. You can fix these interpenetrations after the animation with a Shot Sculpt node, but it's always better to have a clean geometry from the beginning.
Rigging
Skeleton Creation
You can manually create all the joints for your character with a Skeleton node, but sometimes it's better to create them procedurally to avoid repetitive tasks and be more precise. It's a good idea, for example, if you need to place, orient, and name a lot of similar joints, or if the base geometry changes and you would have to adjust the placement and orientation of the same joints every time.
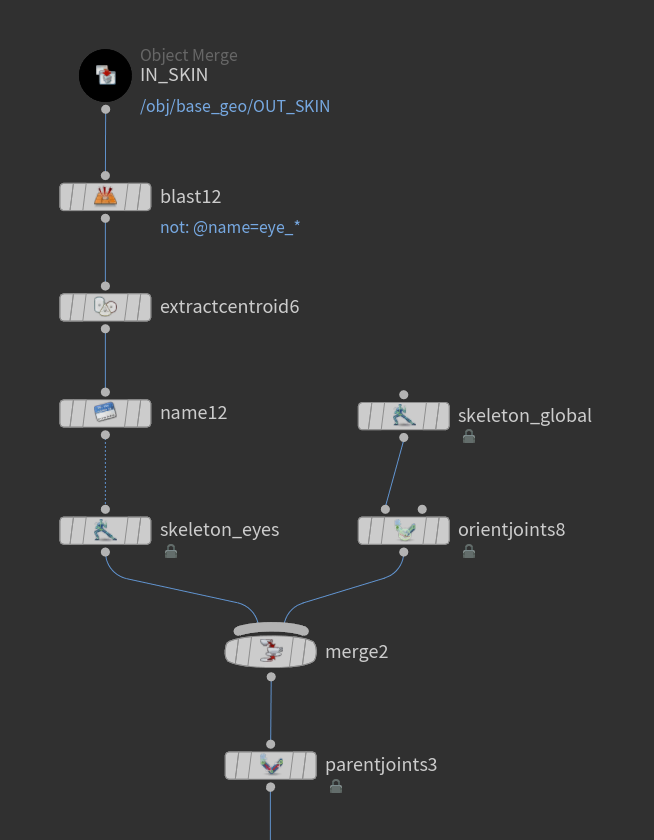
If there is a joint that I would highly recommend to create procedurally, it would be the one at the center of each eye. This ensures they are positioned precisely and prevents any offset when they rotate during the animation.
Isolate the eyeball geometries and extract their centroids. Then, feed these points into a Skeleton node to convert them into joints. If you don't want to name them directly in that node, you can do it with a Name node placed before the Skeleton node instead.
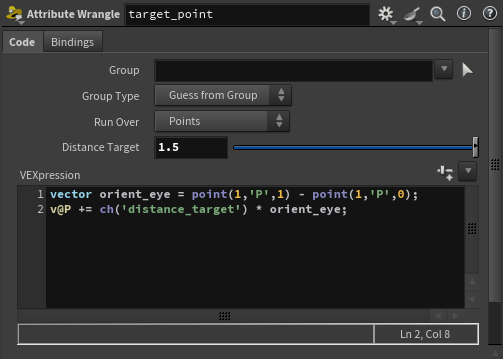
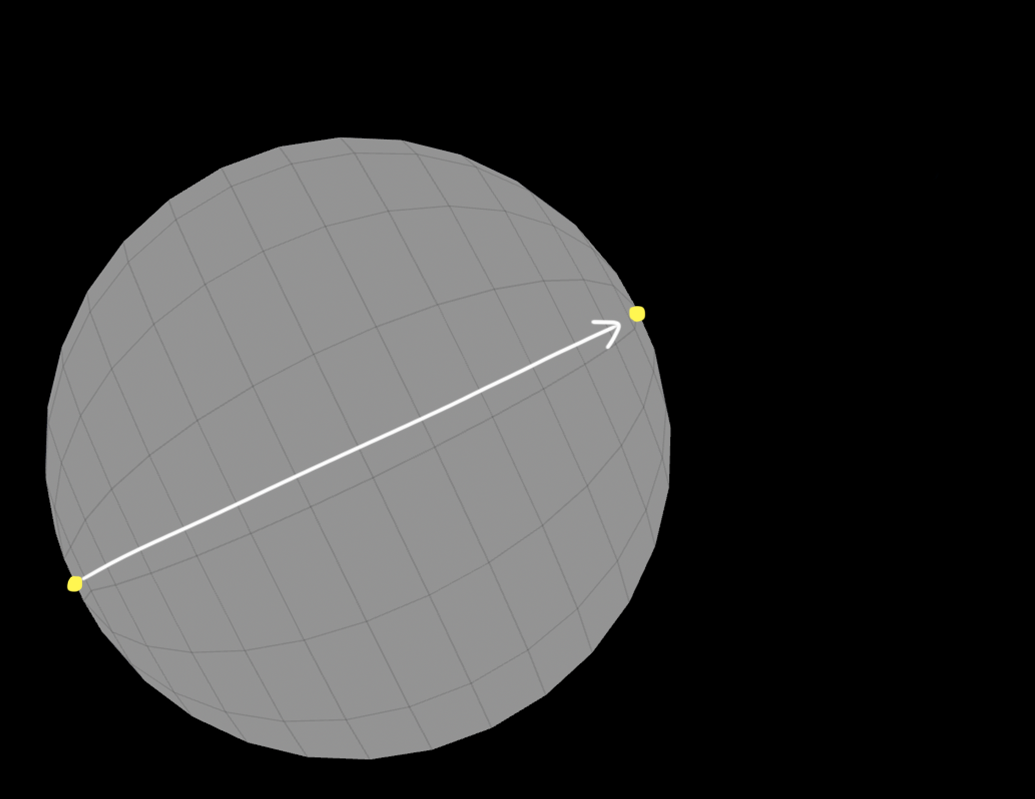
If, as on my creature, the eyes of your character are not oriented toward a single axis, it can be more difficult to precisely position the target/Look At joints in their axes manually.
Duplicate the points you created at the centers of the eyes to create the Look At joints. Isolate the extremity points of the eyeballs meshes, create a vector between these two points and use it to displace the duplicated points along each eye's axis. You can add an offset to push these points further.

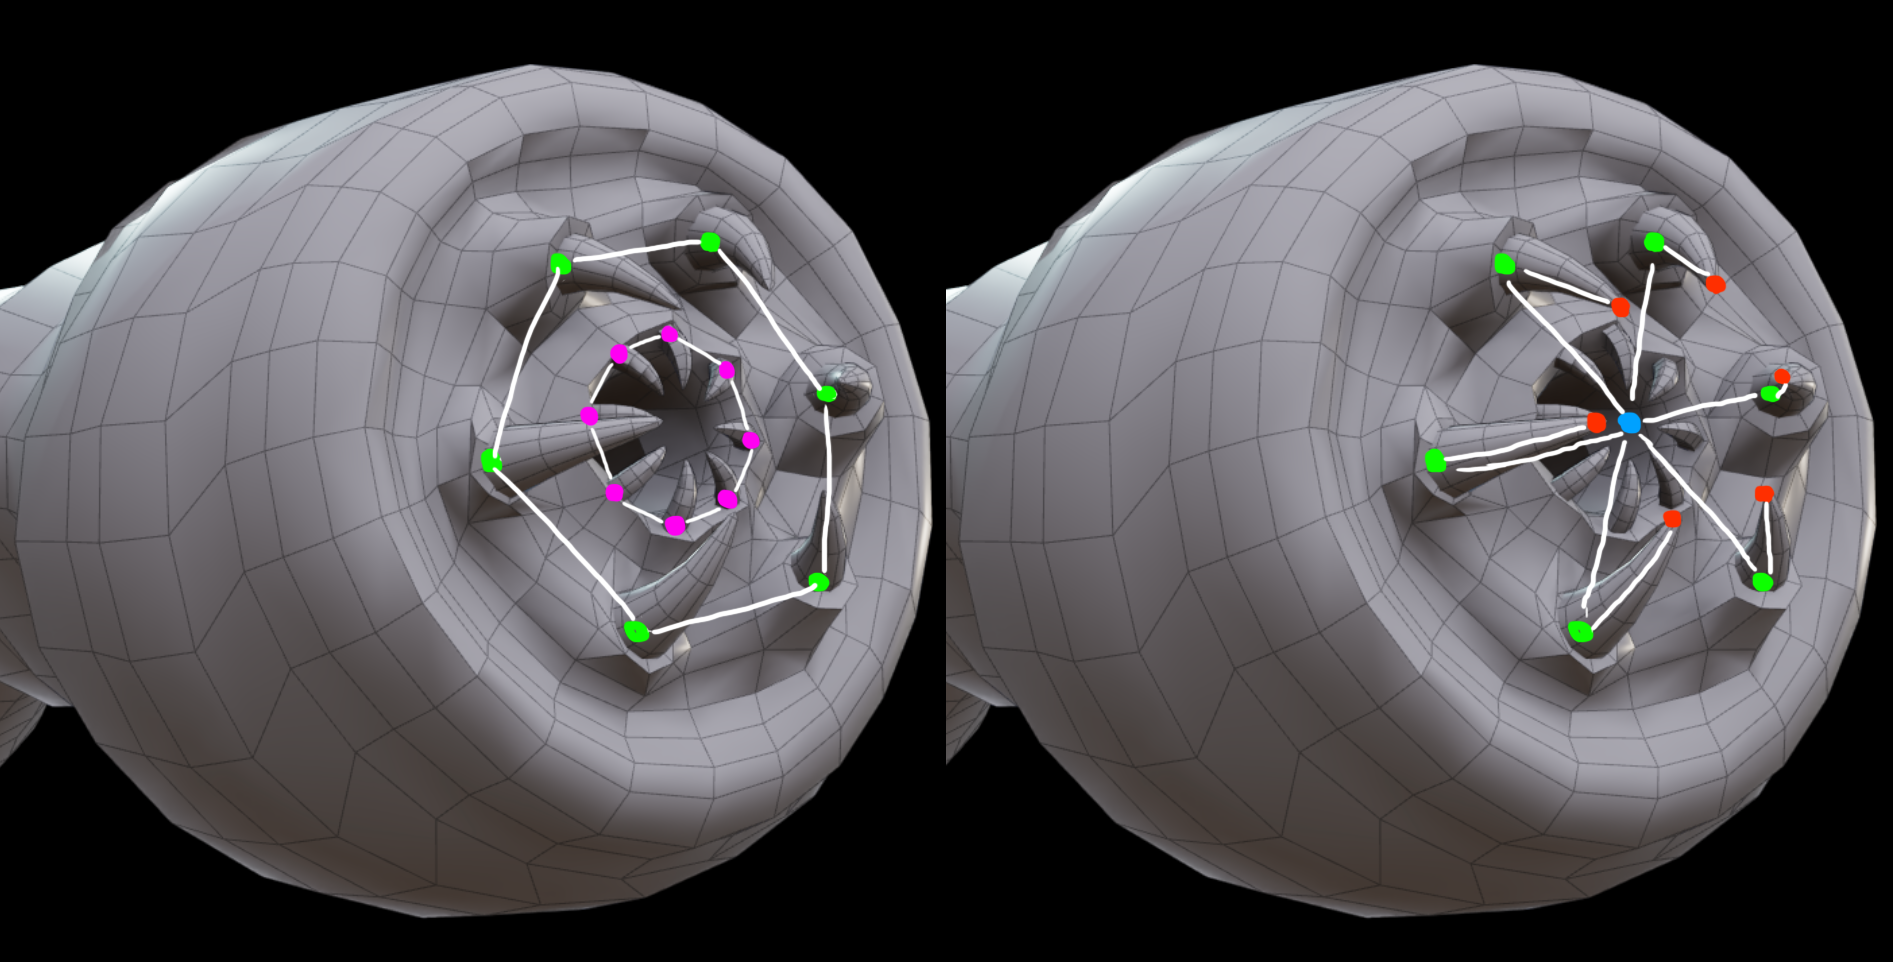
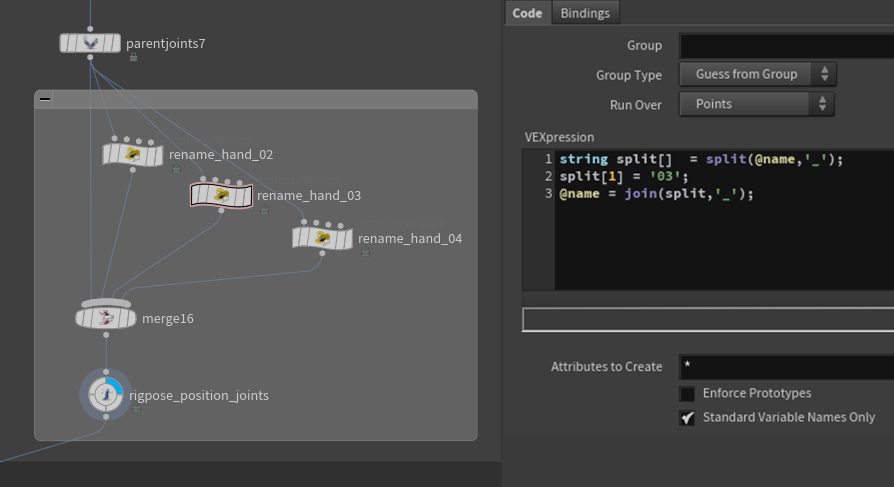
My creature here has a lot of teeth at the ends of each arm, and I wanted to create 2 joints for each. So instead of placing, orienting, and naming 112 joints, I did it procedurally. My idea was to use the points of two circles to create the root joints of each tooth, then, create additional points from these for the end joints, and use the centers of these circles to create the main joints.
To name them, I first gave the same name to all the root joints "hand_01_smallTooth_root_0", and I used the ptnum to number them and complete their name.
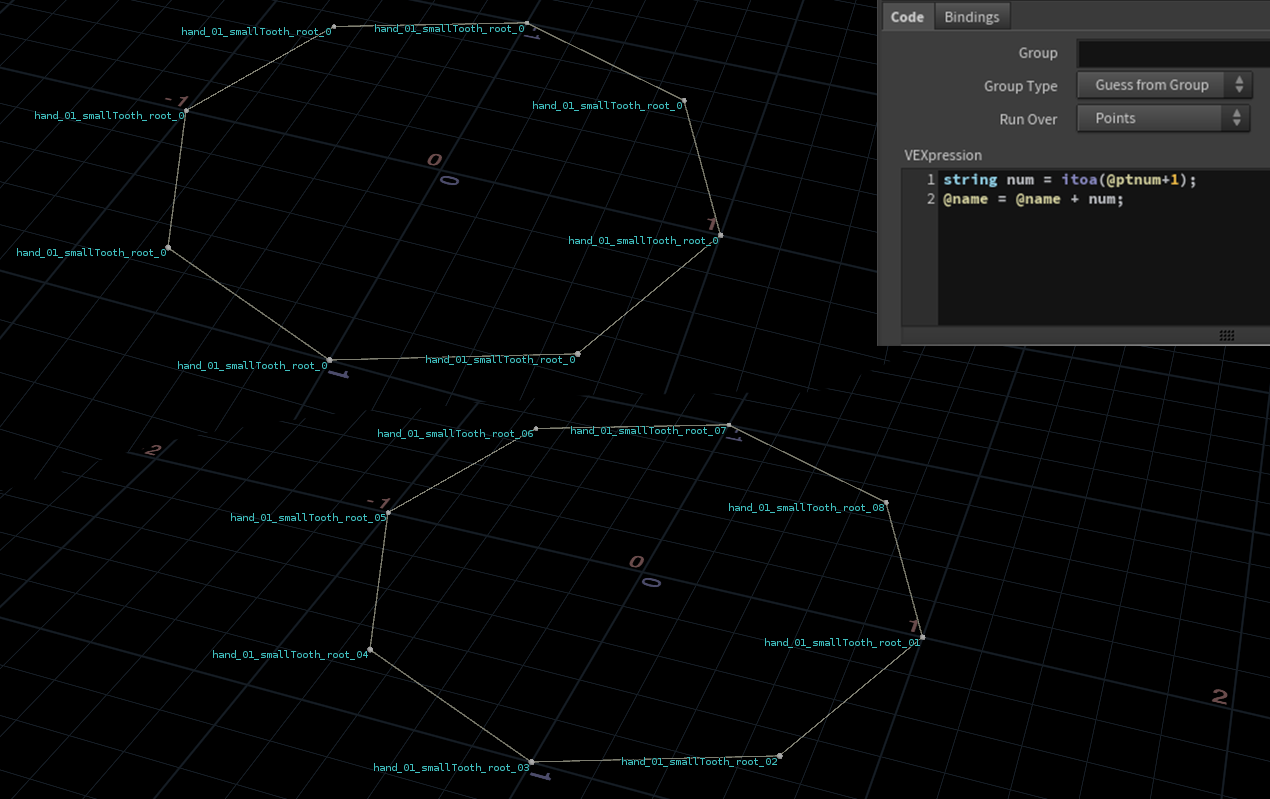
Then, I named the corresponding end joints from these names, I just had to remove "_root" with a bit of VEX. For example, if the root joint name was "hand_01_smallTooth_root_01", its end joint is renamed "hand_01_smallTooth_01".
Capture
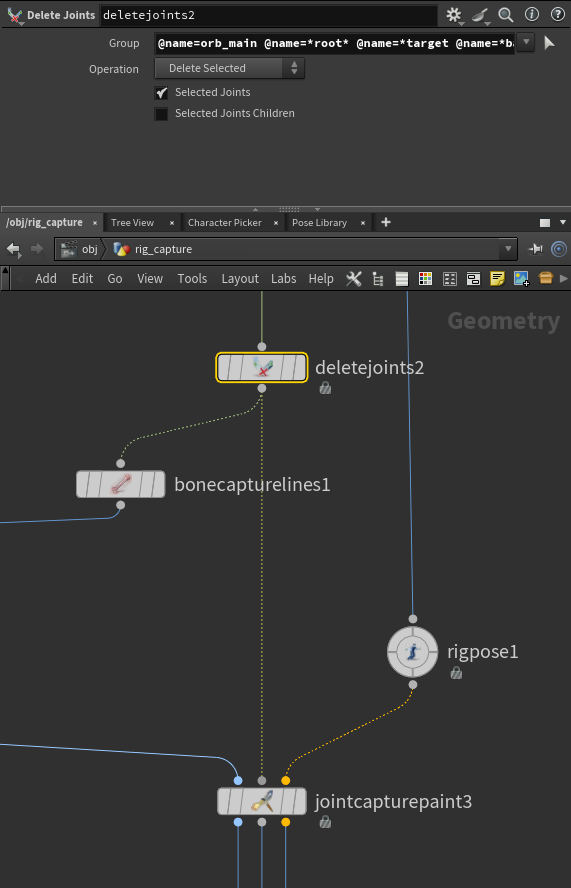
In the skeleton rig, some joints don't directly influence the skin but are necessary to control or orient other joints. You can delete these joints from the skeleton used for the weight painting so they won't transfer any information to the skin, and you won't have to clean it later with a Joint Capture Paint. It's particularly useful if your skeleton contains a lot of joints.

Point count
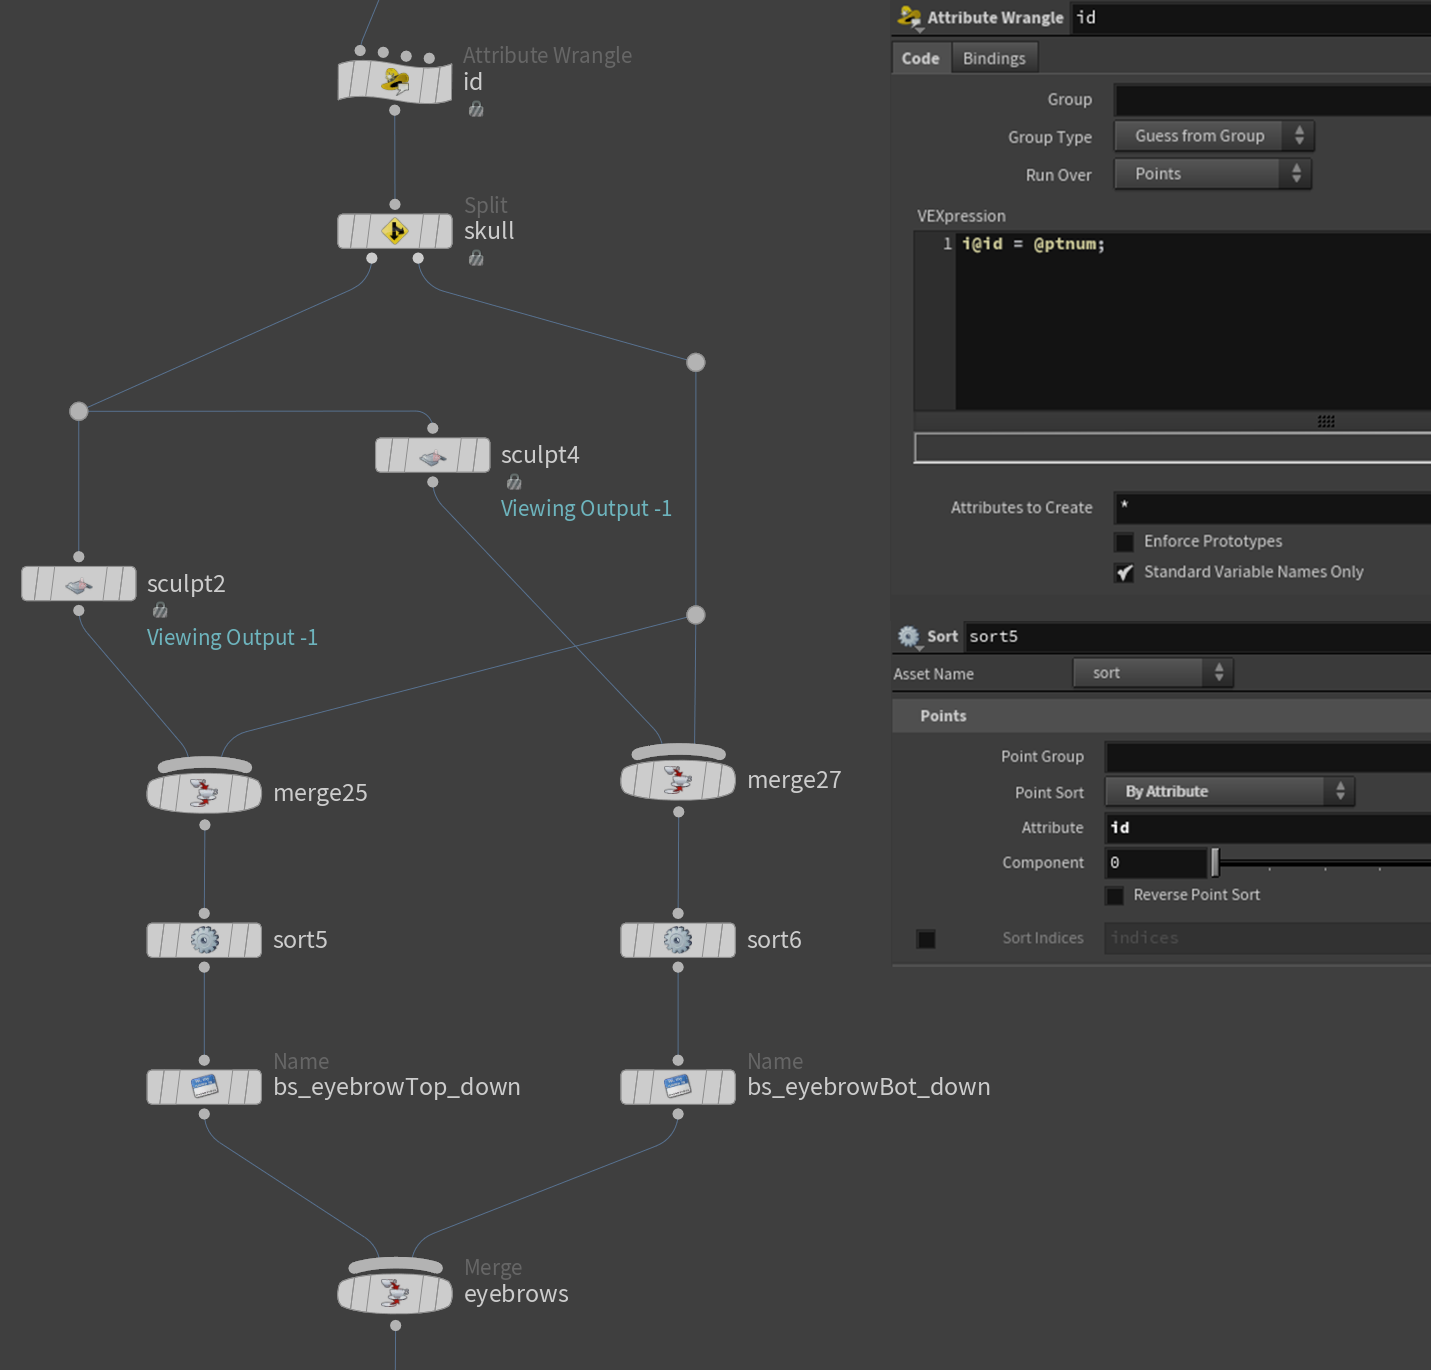
For the weight painting and the blendshapes creation, because sometimes I split the geometry and then re-merge it, the point count could change. It creates issues when blending geometries with different point counts.
To ensure the point count is restored after merging the geometry, you can create an id attribute based on the ptnum before splitting the geometry. And after re-merging it, use a Sort node to sort the points by the id attribute.
Animation
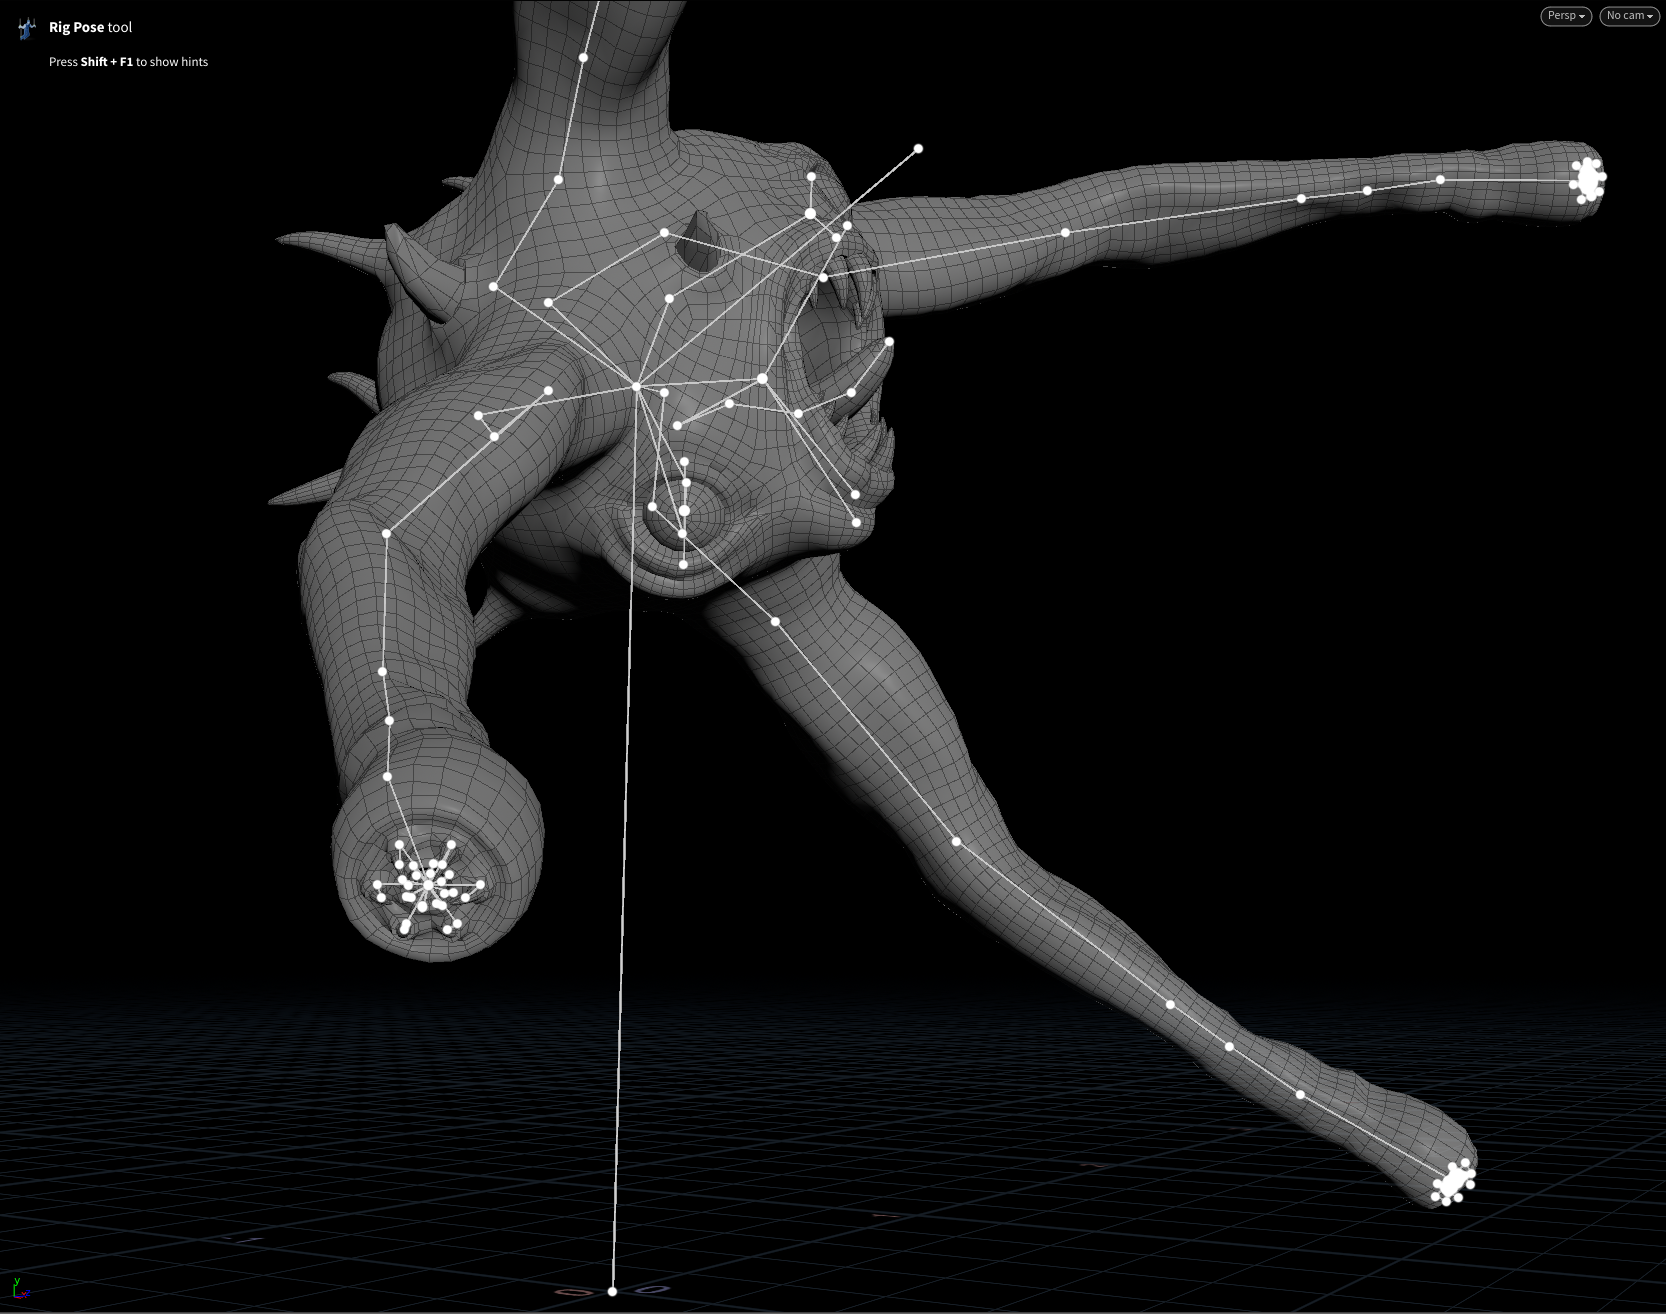
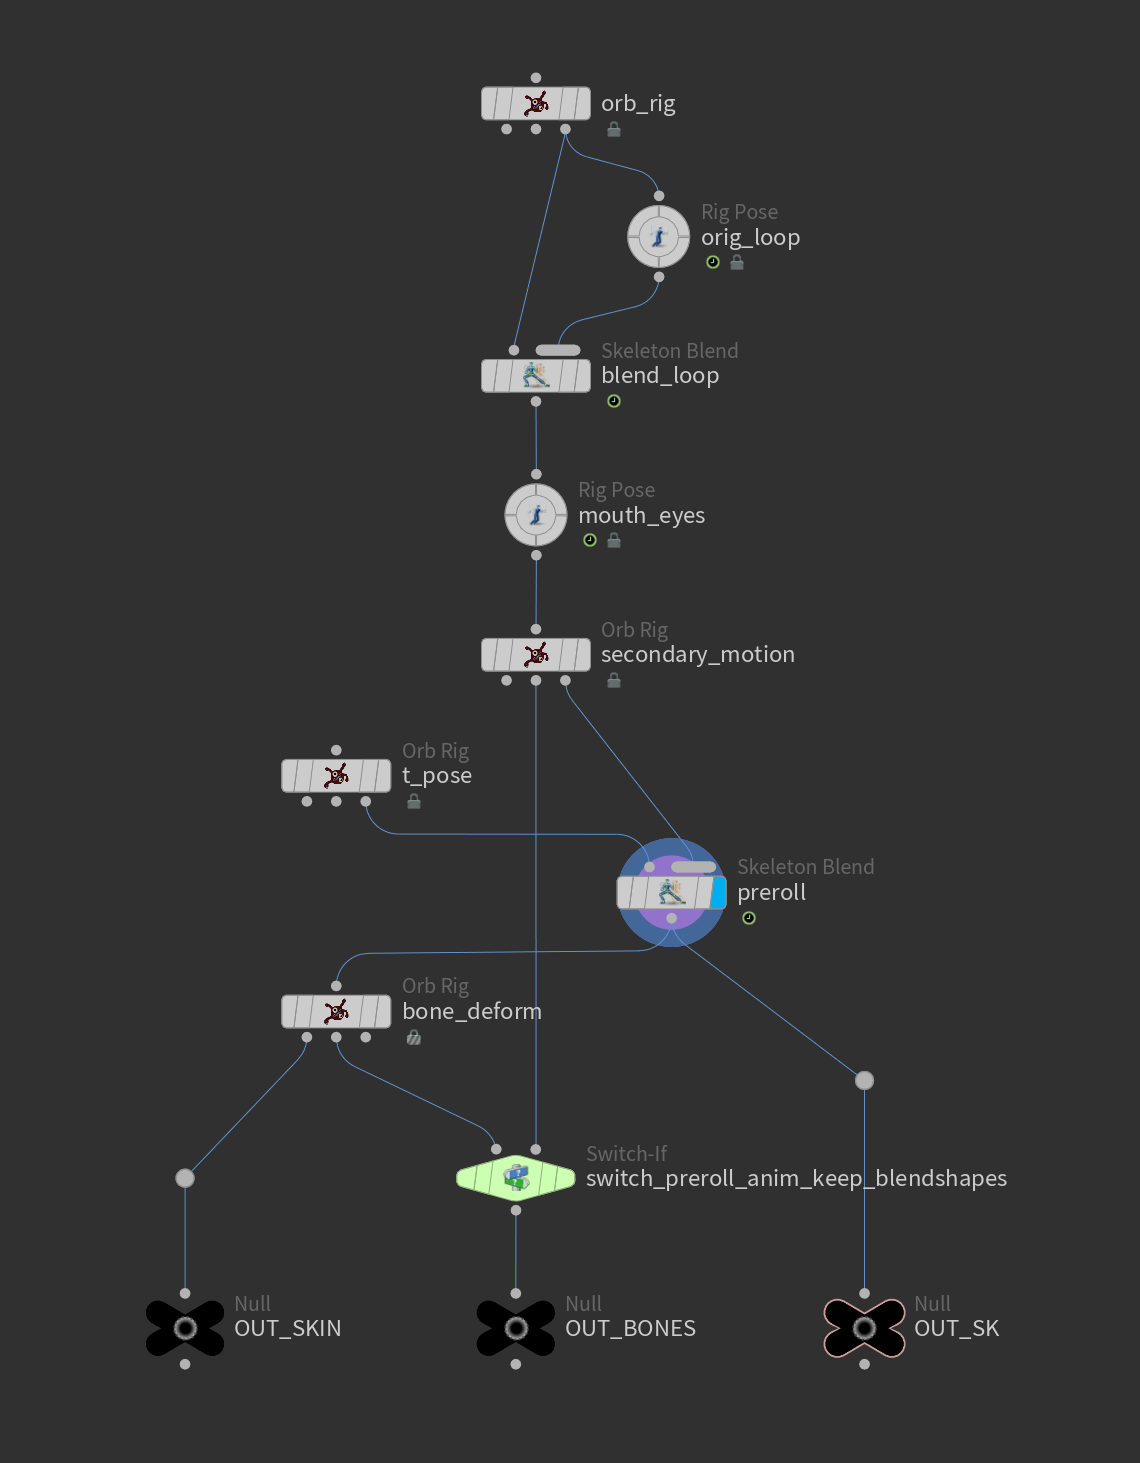
I recommend creating an HDA containing all the rig constraints (FK, IK, Look At…) as well as other elements like blendshapes or Secondary Motion nodes.
You can duplicate this HDA and stack your animation : use the first one for base animation, then another one for secondary motion. You can also use Rig Pose nodes to add more control and manipulate joints in ways your rig HDA doesn't allow. You could even create multiple HDAs with different types of control on the same skeleton, for example, one for FK on the arms, and another one for IK.
Shot Sculpt
I recommend creating multiple tracks, one for each part of the character you want to sculpt, to keep the graph clean, without too many in-between keys and overlapping clips.
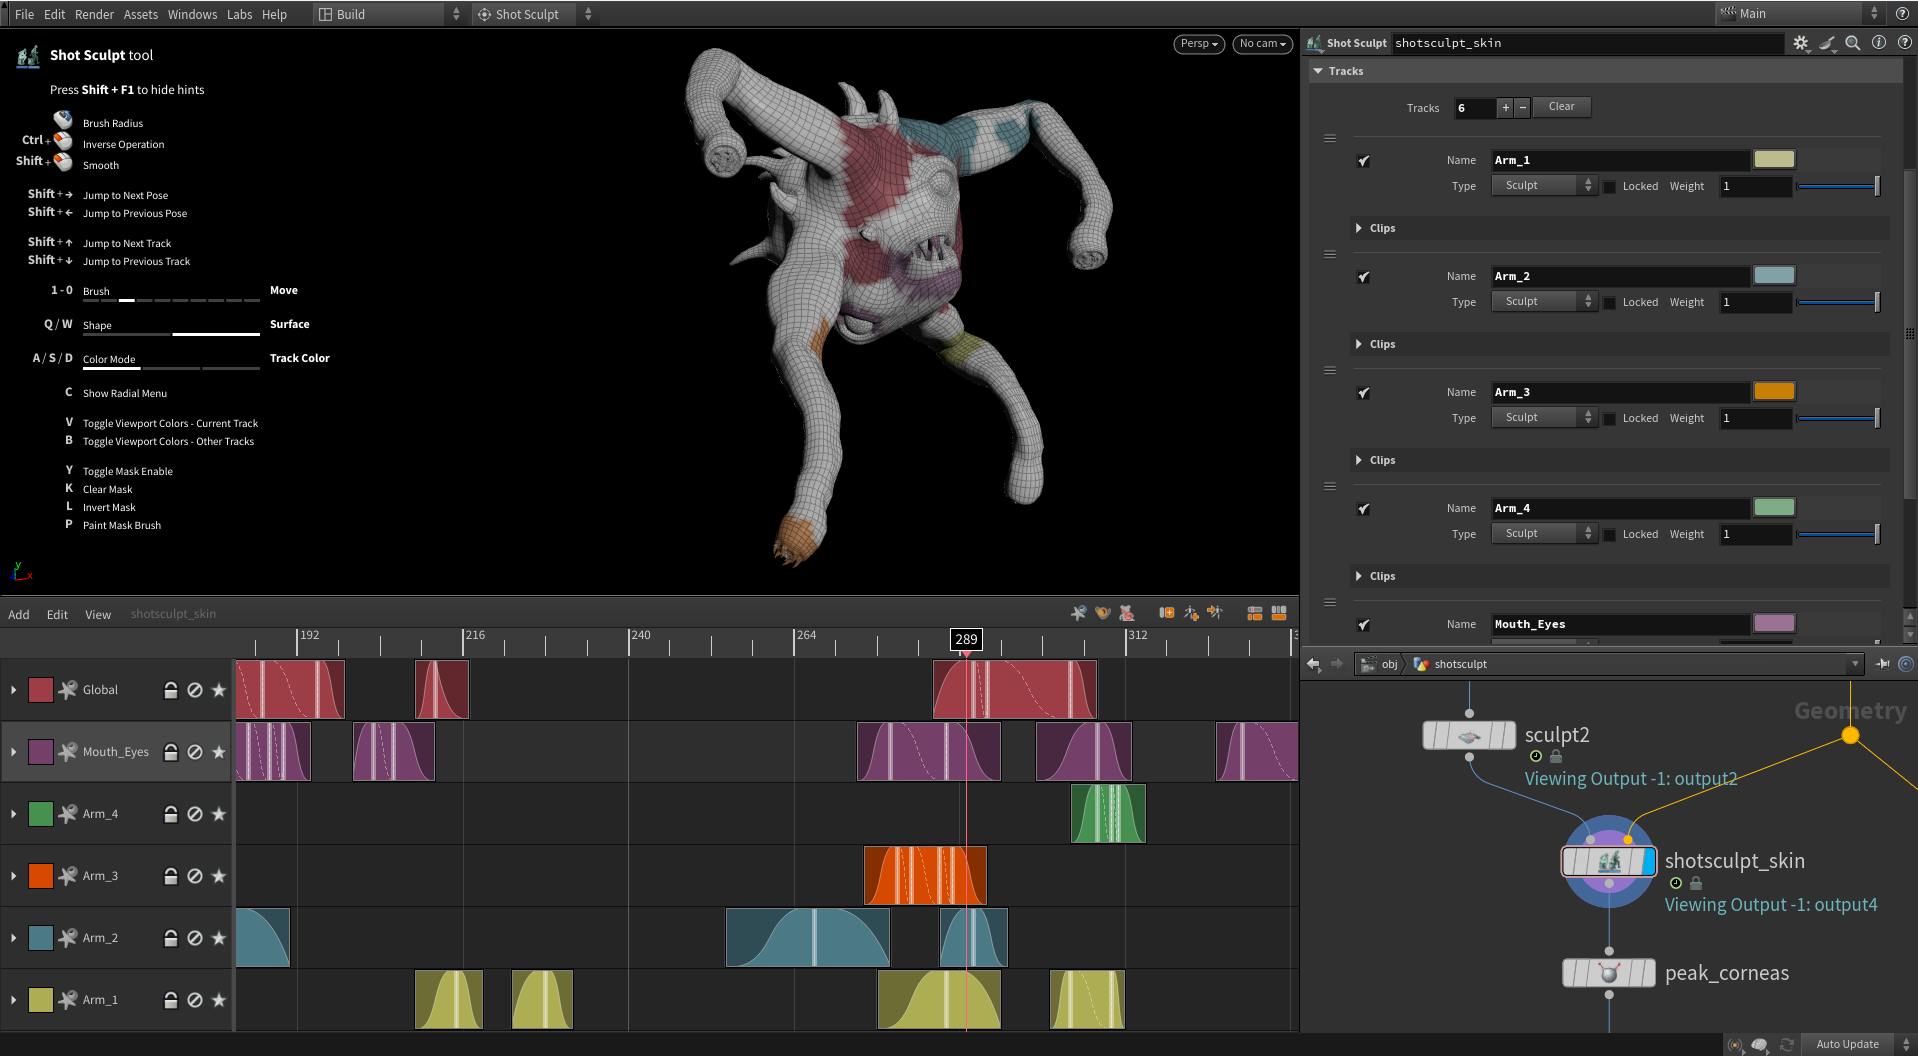

Elastic brushes affect a specific area but smoothly blend their influence with the rest of the geometry you're sculpting, giving you a clean and natural result.
You might not notice it, but they slightly move the entire mesh, and Shot Sculpt stores this sculpting data on a lot of points. It increases the file size and fills the mesh with color visualisation, making it harder to see where you sculpted. To avoid this, you can create a mask with Shot Sculpt on the area you want to affect, and then use any brush to sculpt it.
Aside from Elastic brushes, you can also use masks simply to work more precisely on specific parts of the mesh.
Armature Deform
Armature can become slow when you adjust parameters to increase the quality and precision of the result. I recommend following these steps:
Check the bones animation with a Bone Deform to see if there are big interpenetrations occurring between them during the animation. Small interpenetrations are not always a problem, but big ones can create a not very fancy result. If so, reshape the bones.
Try Armature on one frame of your animation and play with the parameters of Armature Deform to find the desired look.
Decrease the Element Size of the tetrahedons in Armature Capture to achieve a more precise and realistic result. Enable Self Collisions in Armature Deform if necessary. You can start with a lower Collision Stiffness, like 1000, and increase it later if needed. Also, try to increase the number of steps in Armature Deform to see if it improves the result. Note that all of these parameters will make Armature run more slowly.
Once everything works on this frame, identify the parts of the animation where it could be more challenging to have a precise result with Armature Deform. For example, when the mouth or the eyes close, check if they close correctly. The influence of bones or gravity could make them not follow exactly what you want. Adjust parameters and play with skin and bones constraints if necessary.
When it works properly on these frames, run Armature Deform on the entire animation.
Skin and Bones Constraints
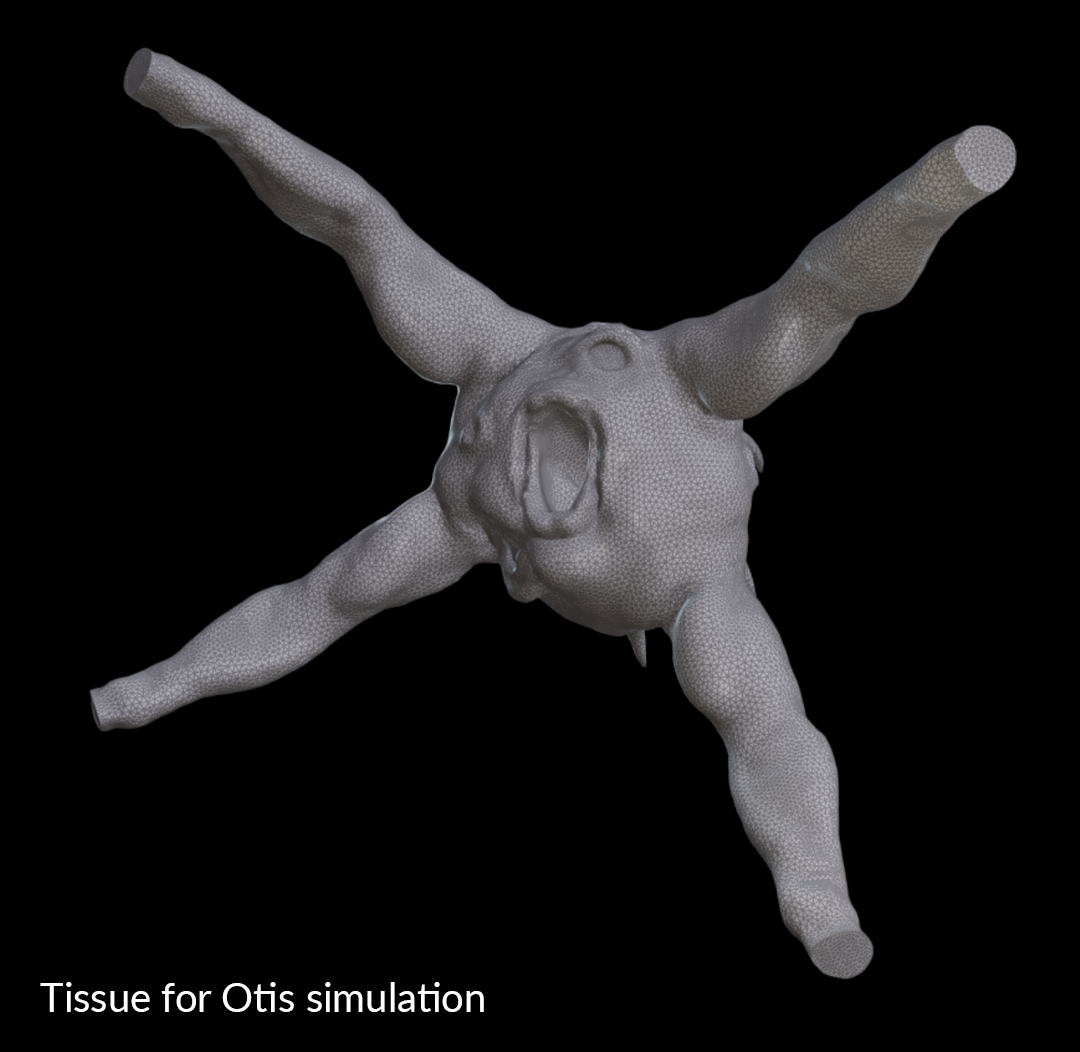
When you do a Vellum or Otis simulation (for muscles and tissue), you usually remove some parts of the skin to create the tissue for the simulation, such as the head, hands and feet, and other rigid elements. You don't particularly want any physical deformation on them, but something more precise, so you animate these parts in a more traditional way and blend them with the simulated parts.
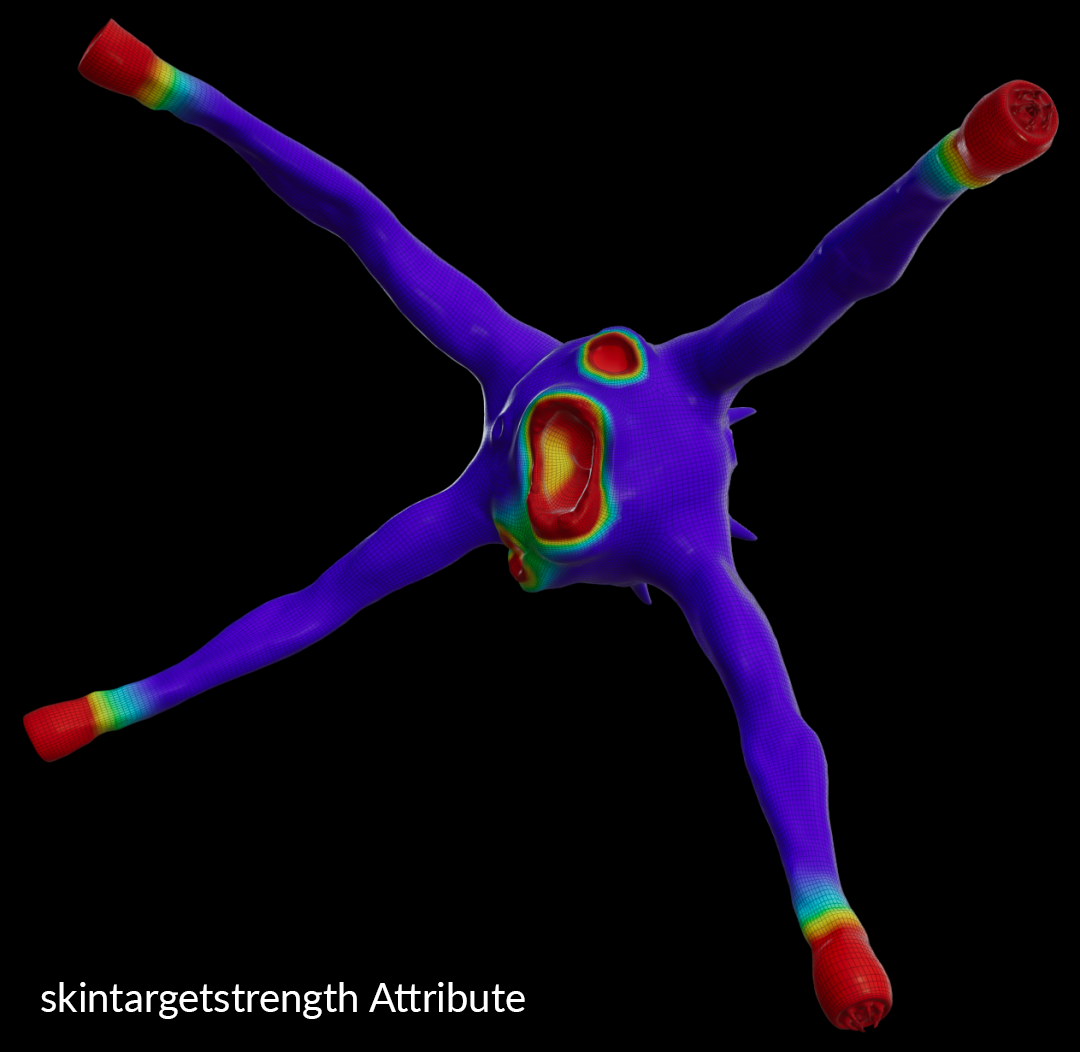
You can use Armature a bit the same way: you can include these "non-simulated" parts in the Armature Deform and paint a skintargetstrength attribute on them. It will give you a result closer to what you can have with Bone Deform. Or, you can directly use a Bone Deform node to deform them, and blend them after with the ones deformed by Armature Deform.
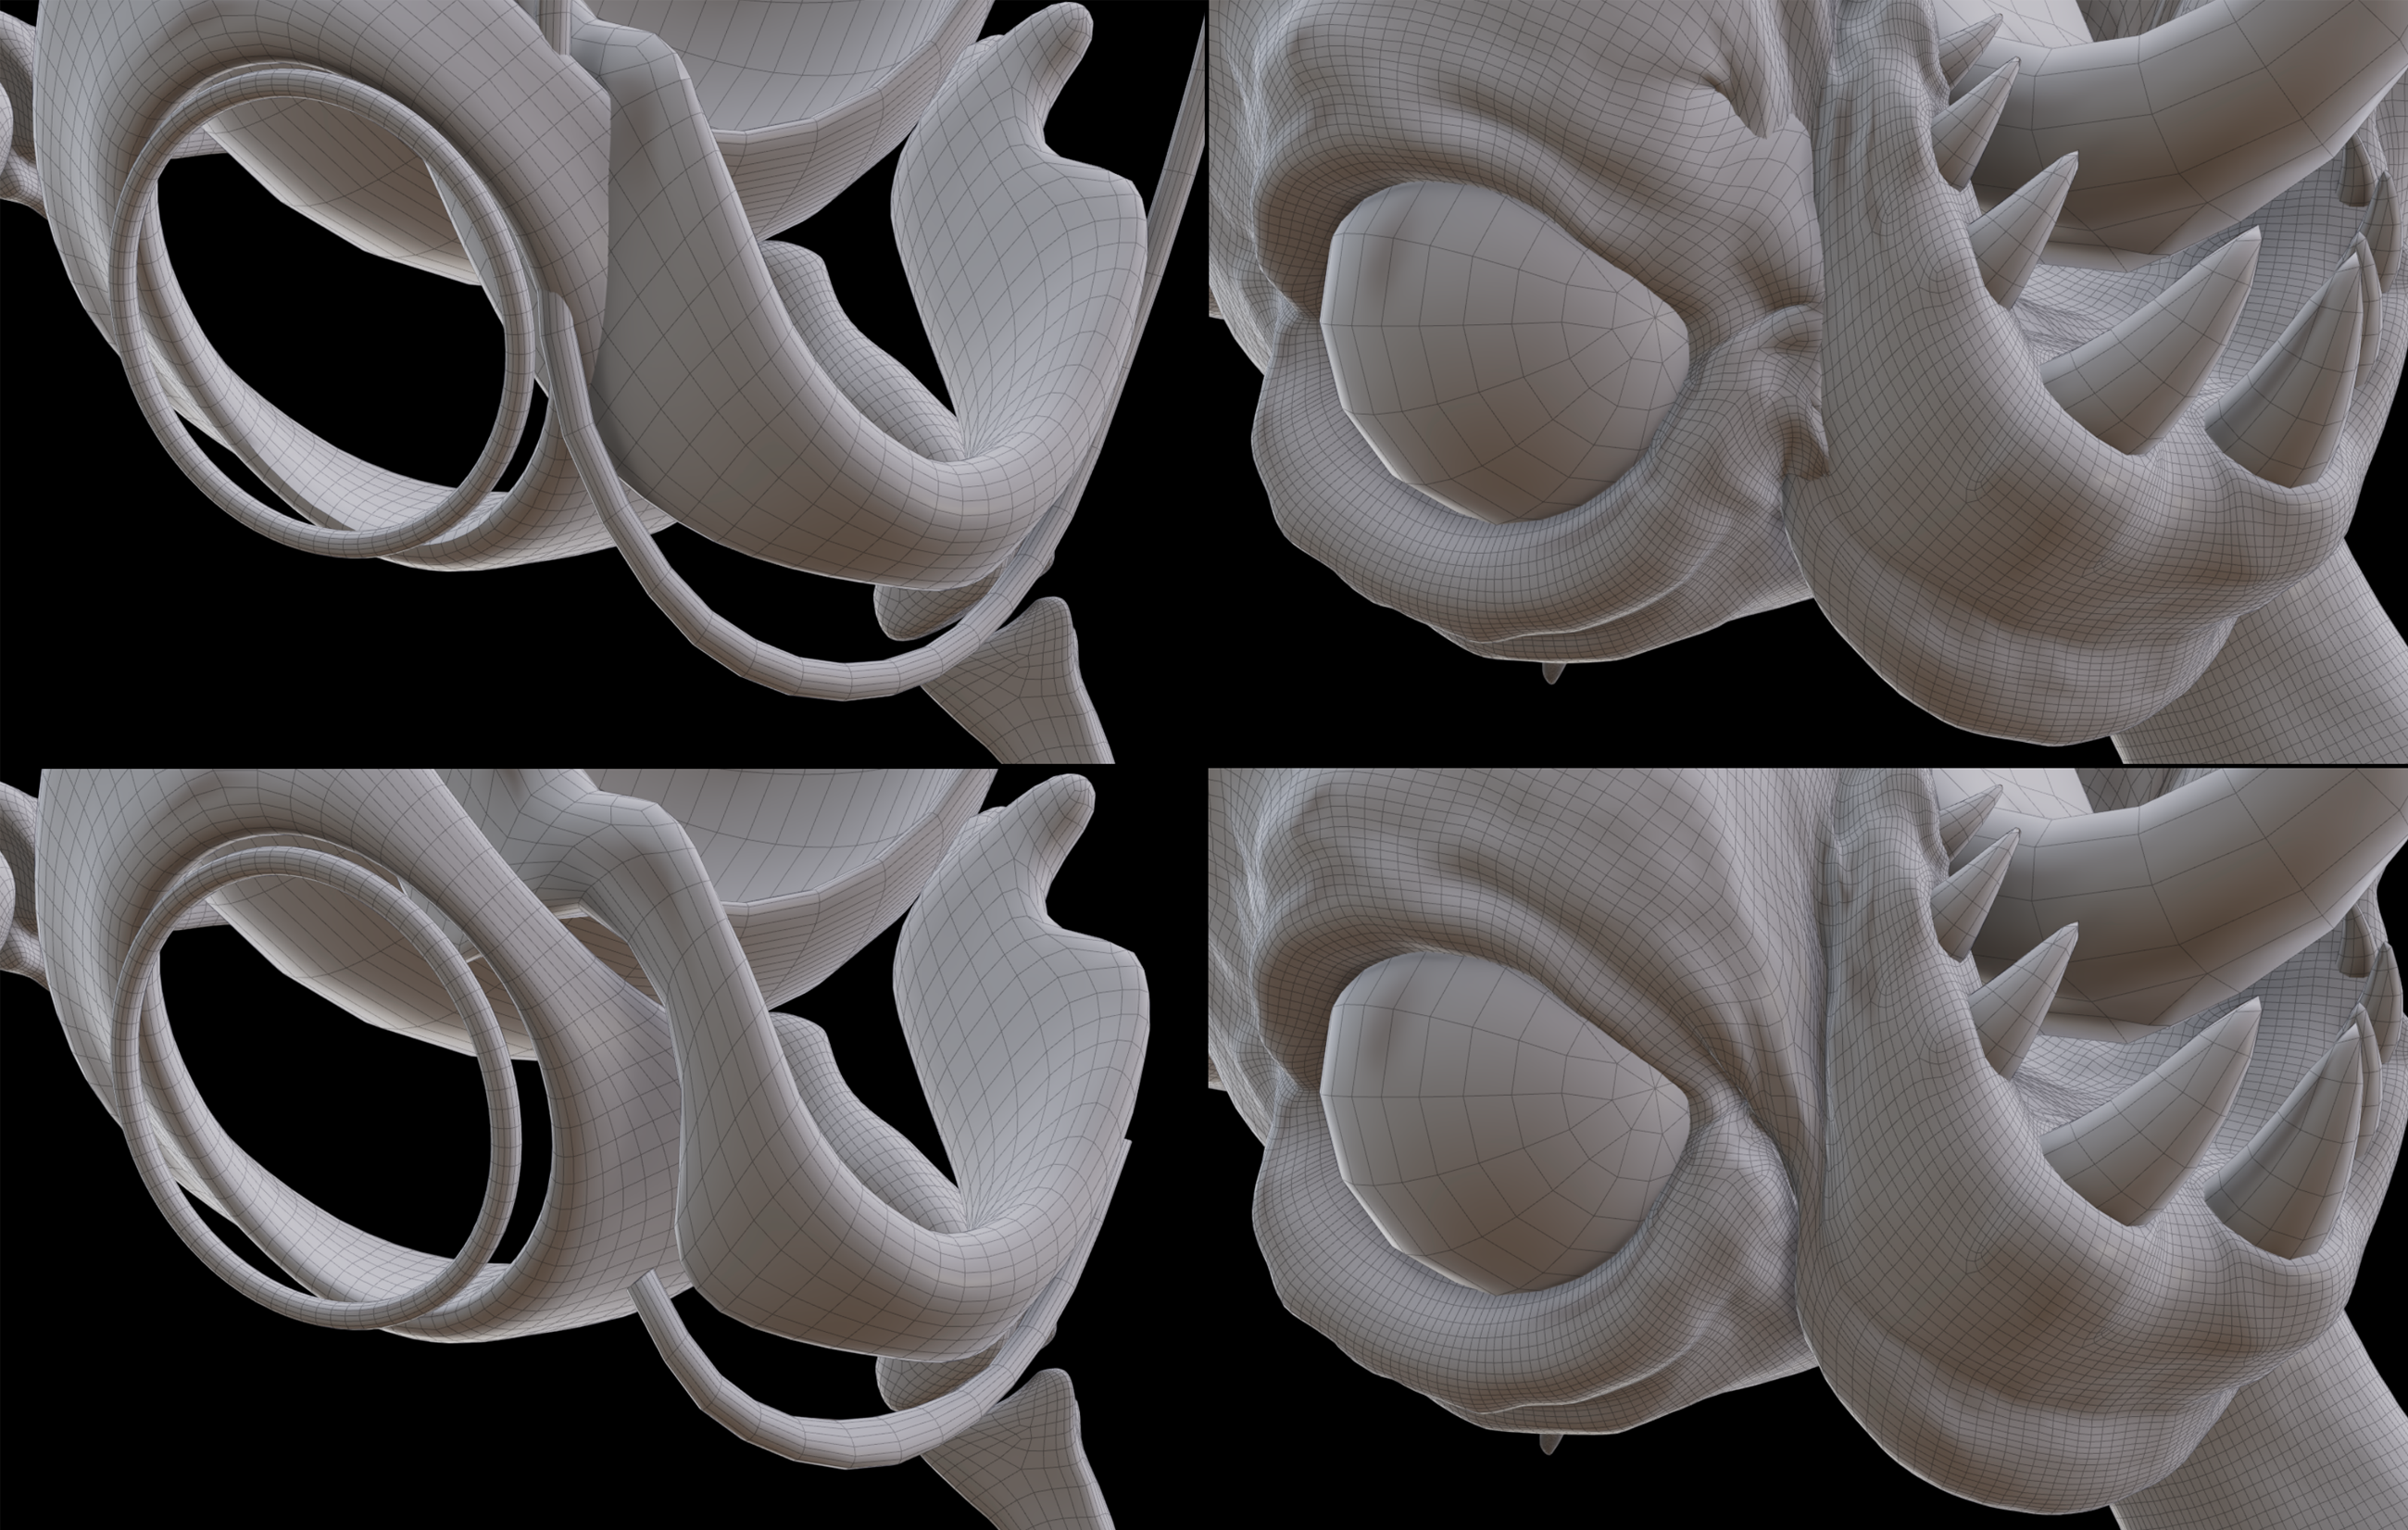
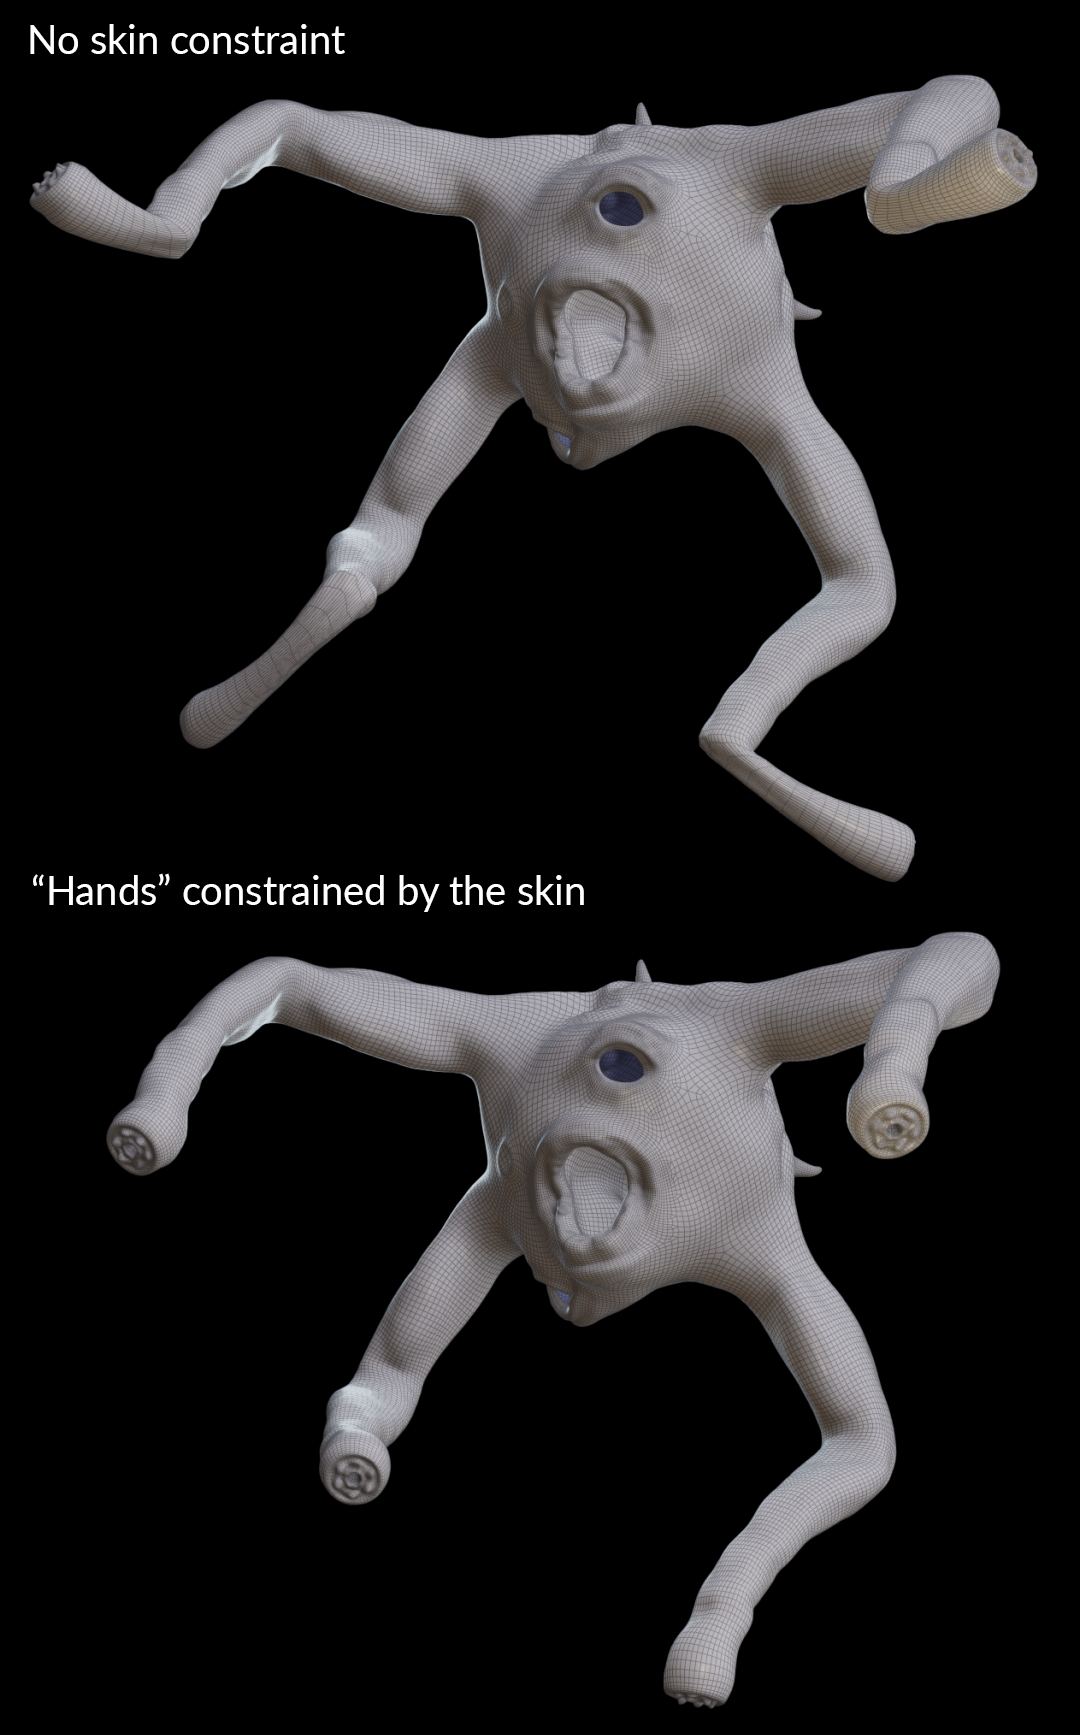
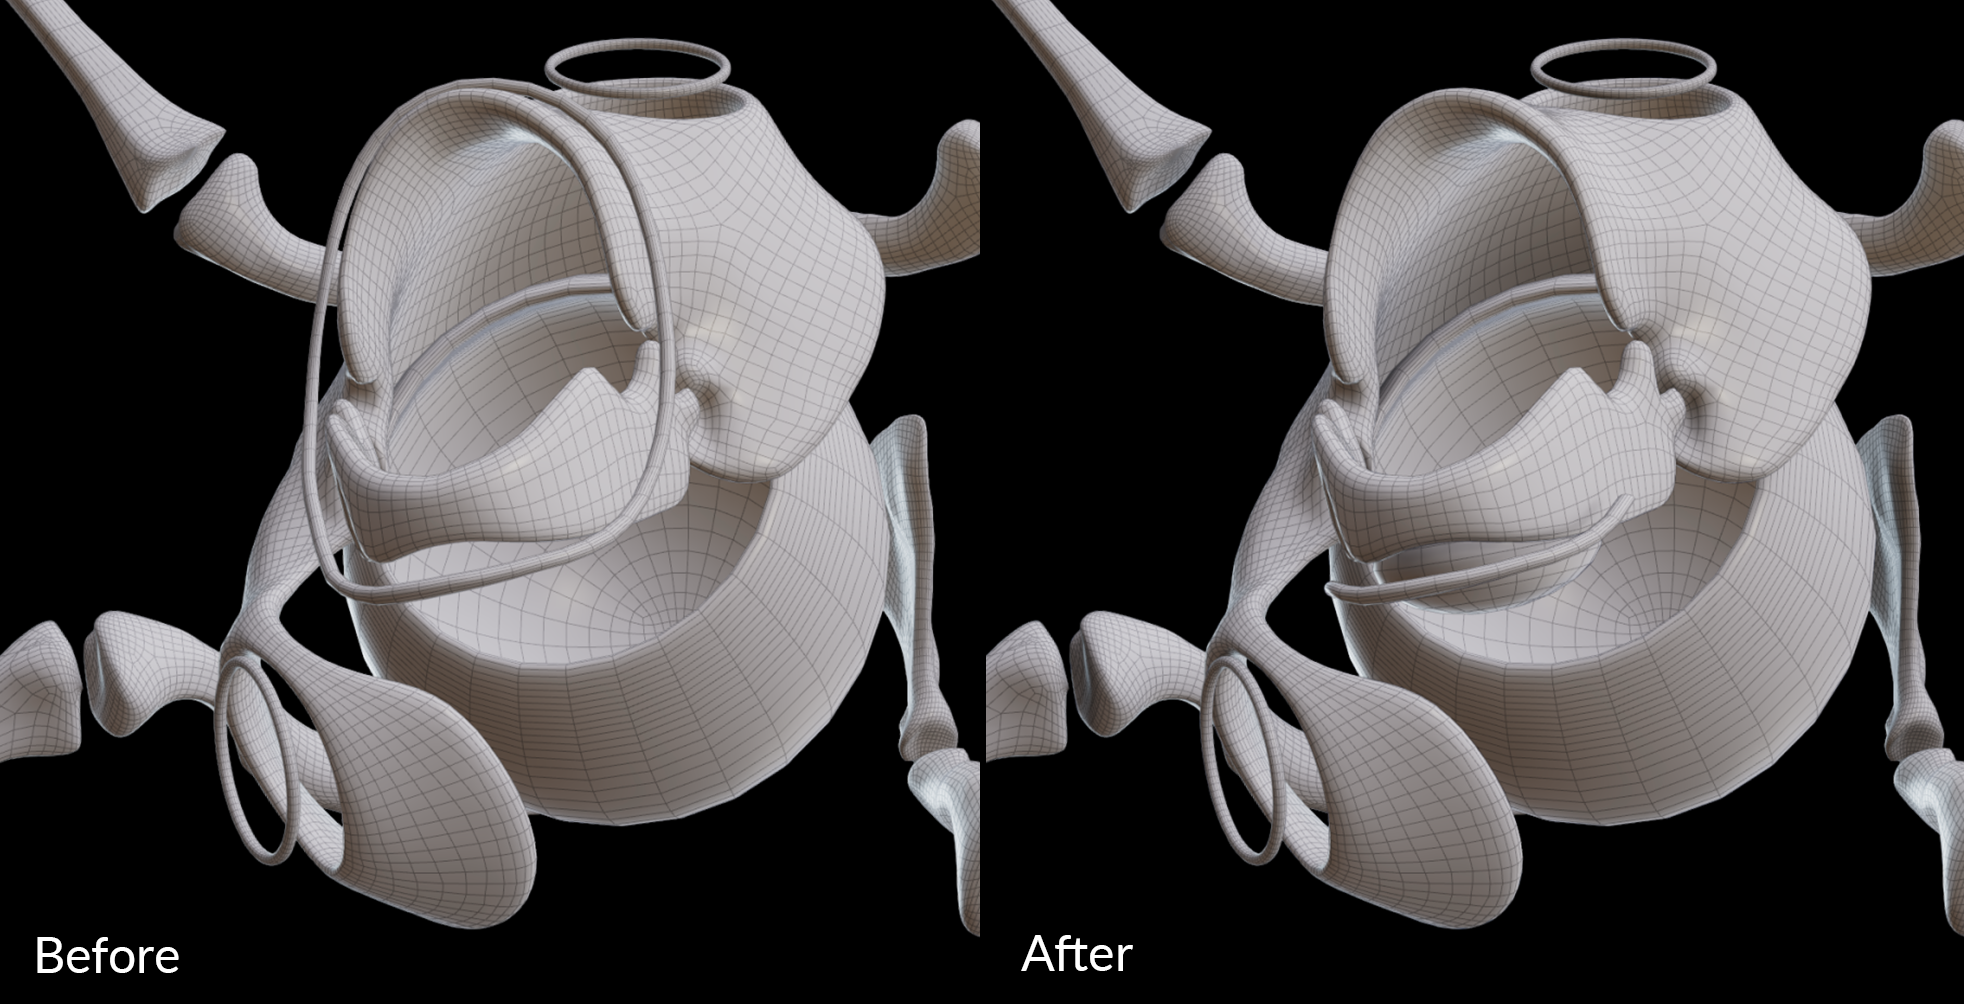
Here, the "hands" are not constrained by any bone, so they move more freely. With the skin constraint, they will follow the animation more accurately.
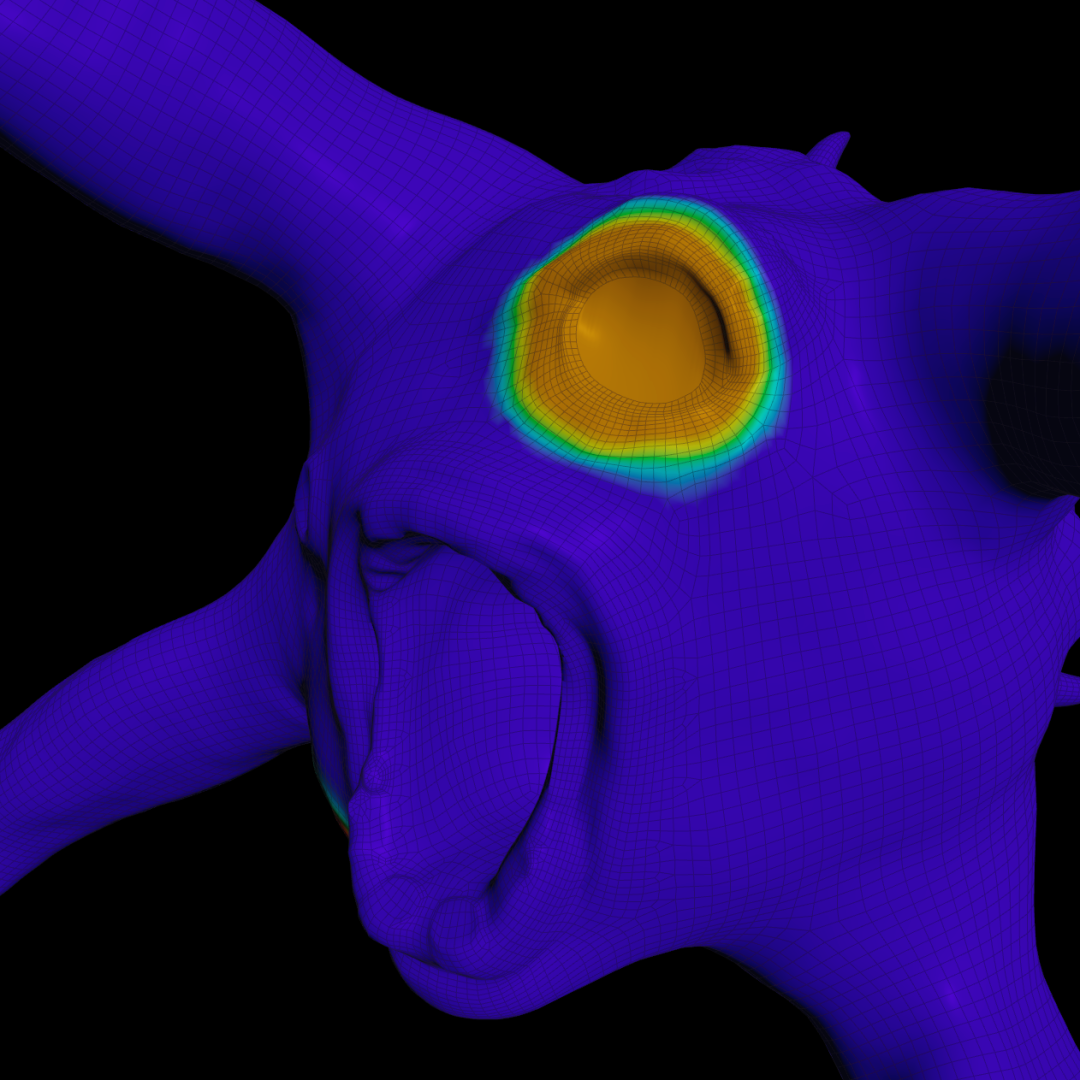
Here, even if the eye is constrained by the skin (skin constraint in red), it loses its spherical shape. It's probably because of the bones being too close and constraining it (bones constraint in blue). A solution would be to reshape the bones to reduce their influence and to also change the skin constraint. But, in this case, it can be easier to just use a Bone Deform for the eyeball and blend it later with the rest of the body.
You can control the shape of the character with the bones constraint.
Here, I removed some parts of the bones around the mouth, where their influence was too strong. You can also resculpt and add new geometries inside the character to control its shape (don't forget to create a captureBones attribute on these new bones). For example here, I added a sphere in the skeleton to have more volume under the jaw.

Scale
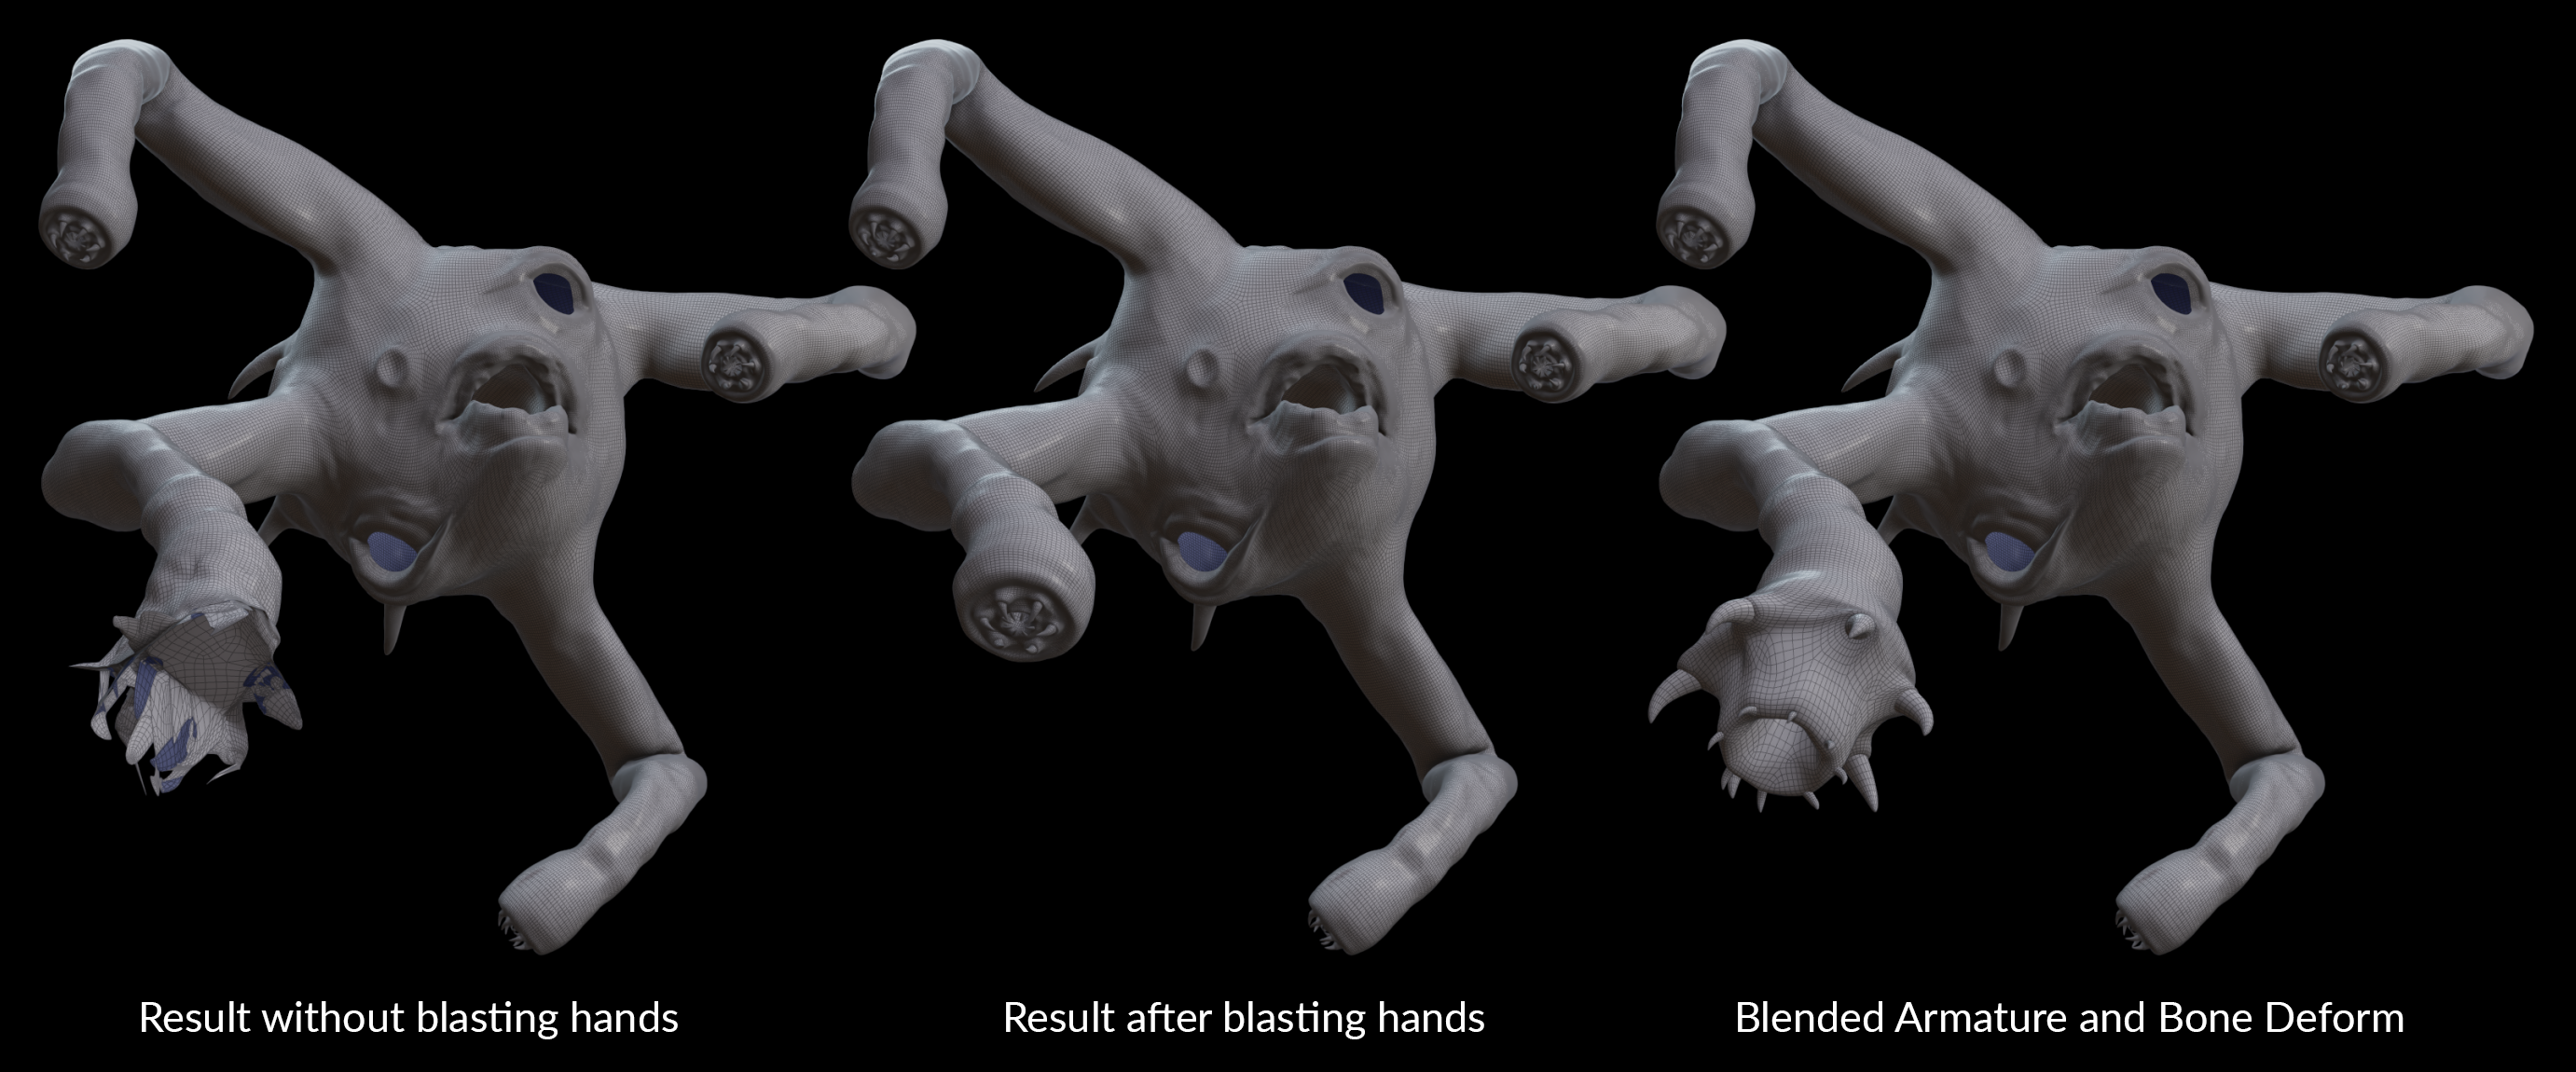
During the animation, if you scaled some joints a lot, it can cause issues because it's not well supported by Armature. To prevent the geometry from breaking, you need to blast these parts before the Armature Capture node. However, you don't need to blast them in the geometry input into the Armature Deform node, but these parts won't receive any animation information from Armature Capture anymore.
To get this animation information back, you can use a Bone Deform node for these specific parts of the body and blend them with the ones deformed by Armature Deform. In my case, I created a blend attribute in the geometry input into the Armature Deform node to blend the hands (which were scaled) with the geometry deformed by Bone Deform.

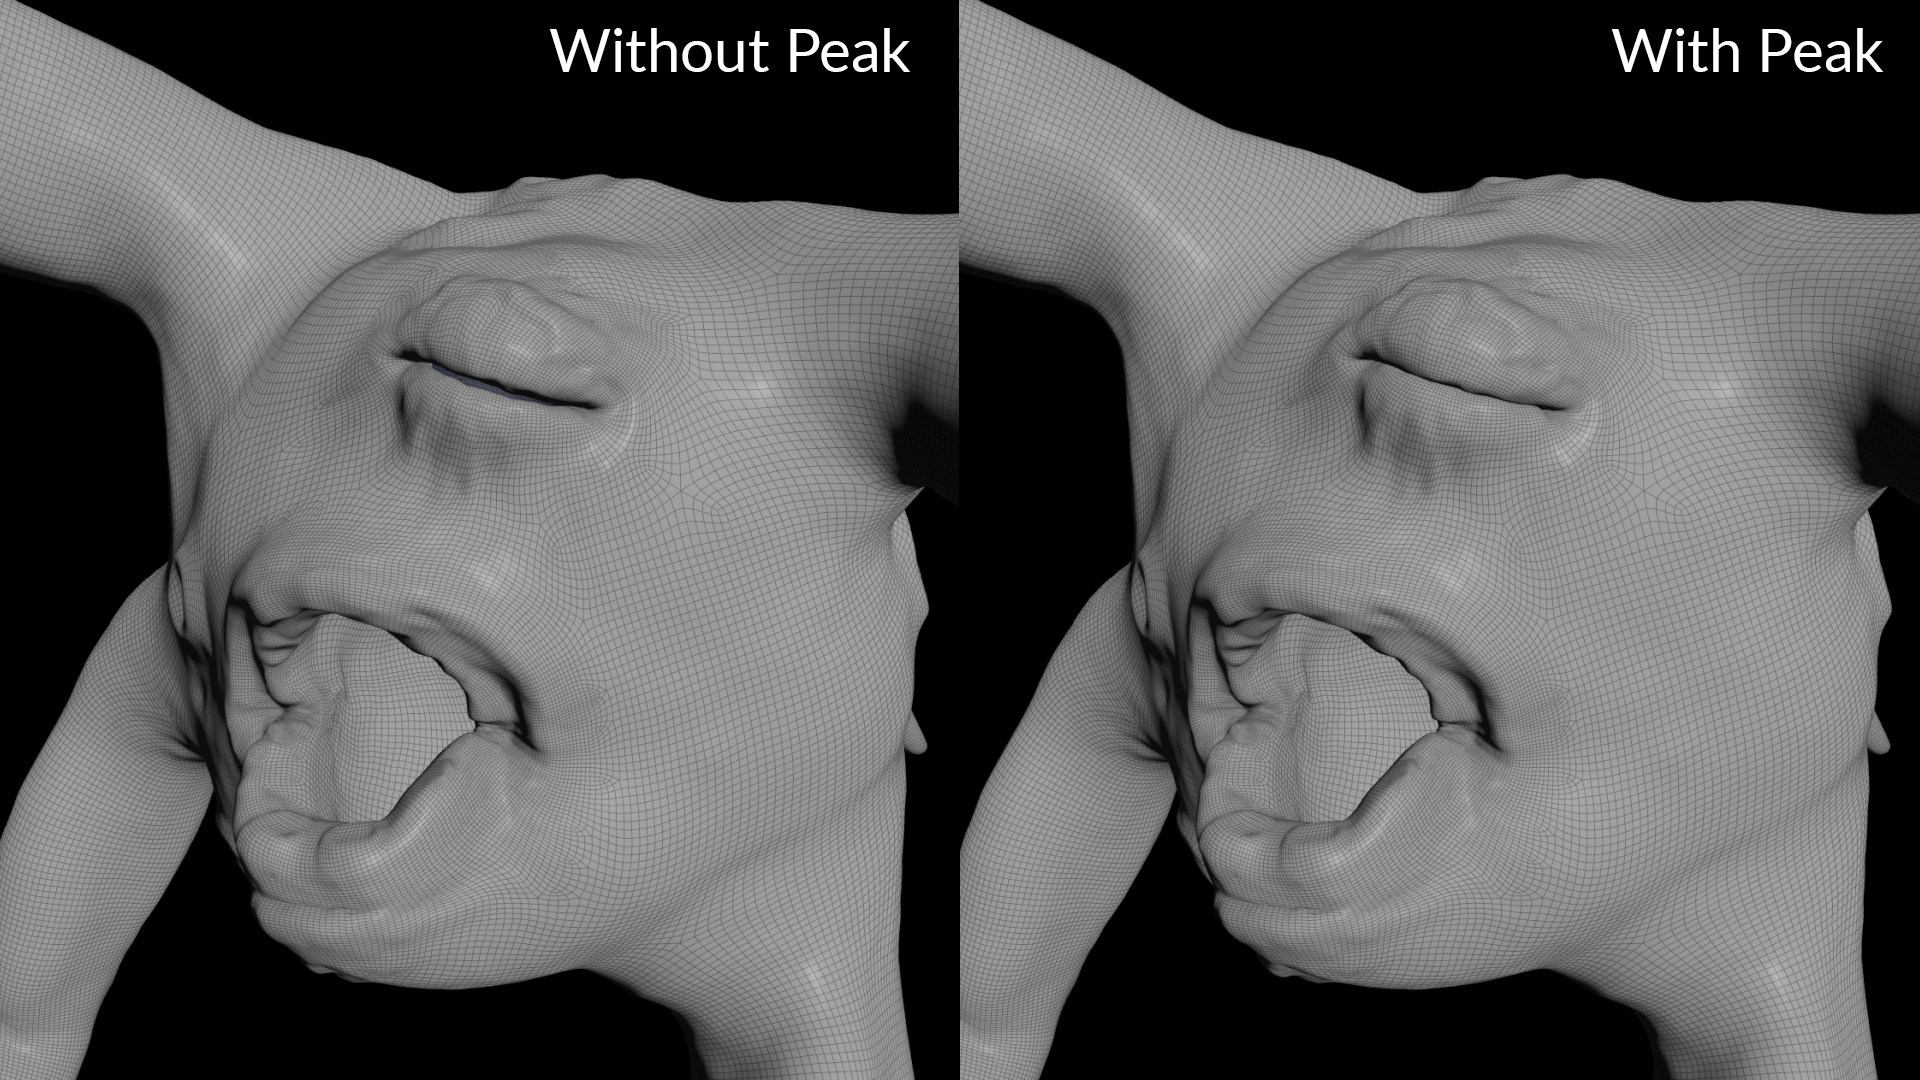
Peak tweak
If you use Armature on a character who is blinking and you notice the eyes don't fully close, you can very slightly inflate the geometry around the eyelids you input into the Armature Deform node with a Peak node. For my creature, I created a mask attribute and used it in the Peak node to smoothly blend the modified areas with the rest of the body.
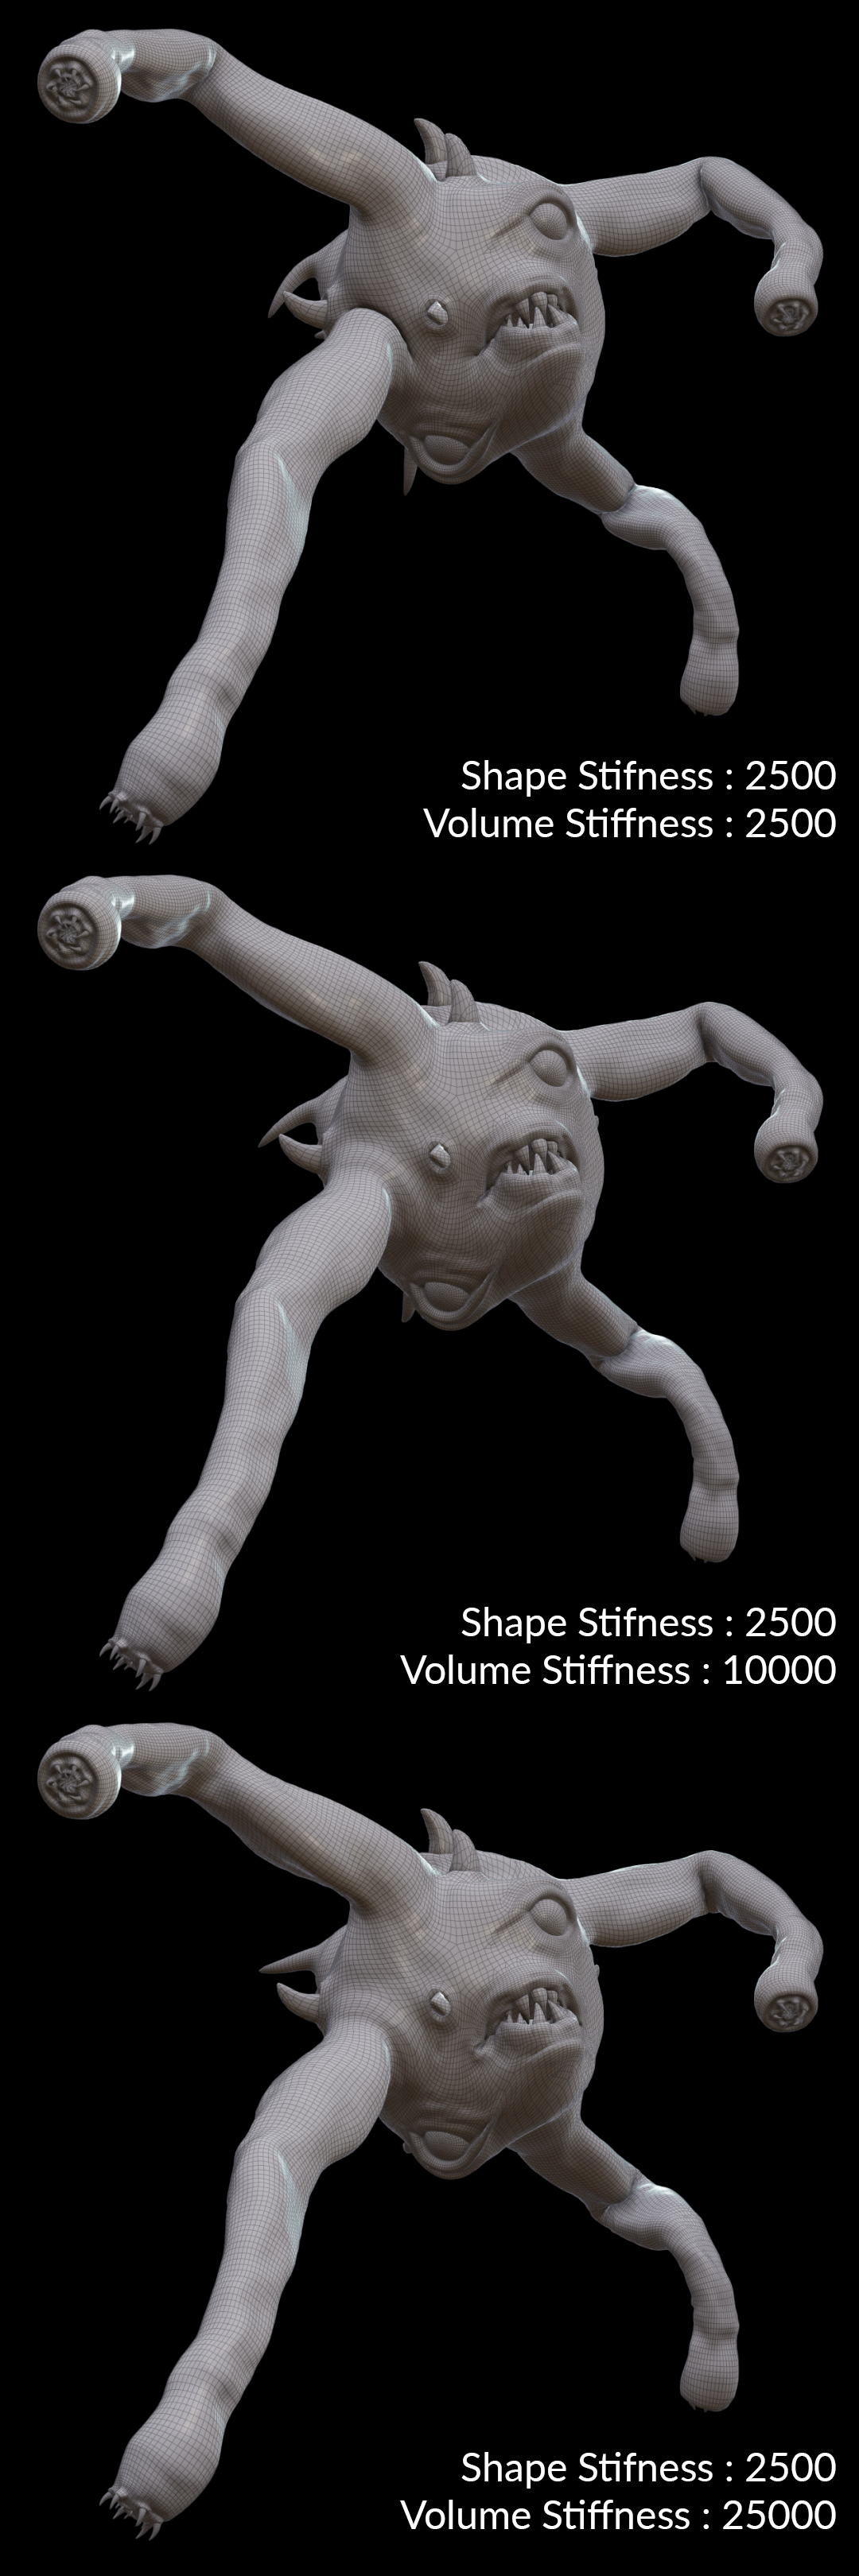
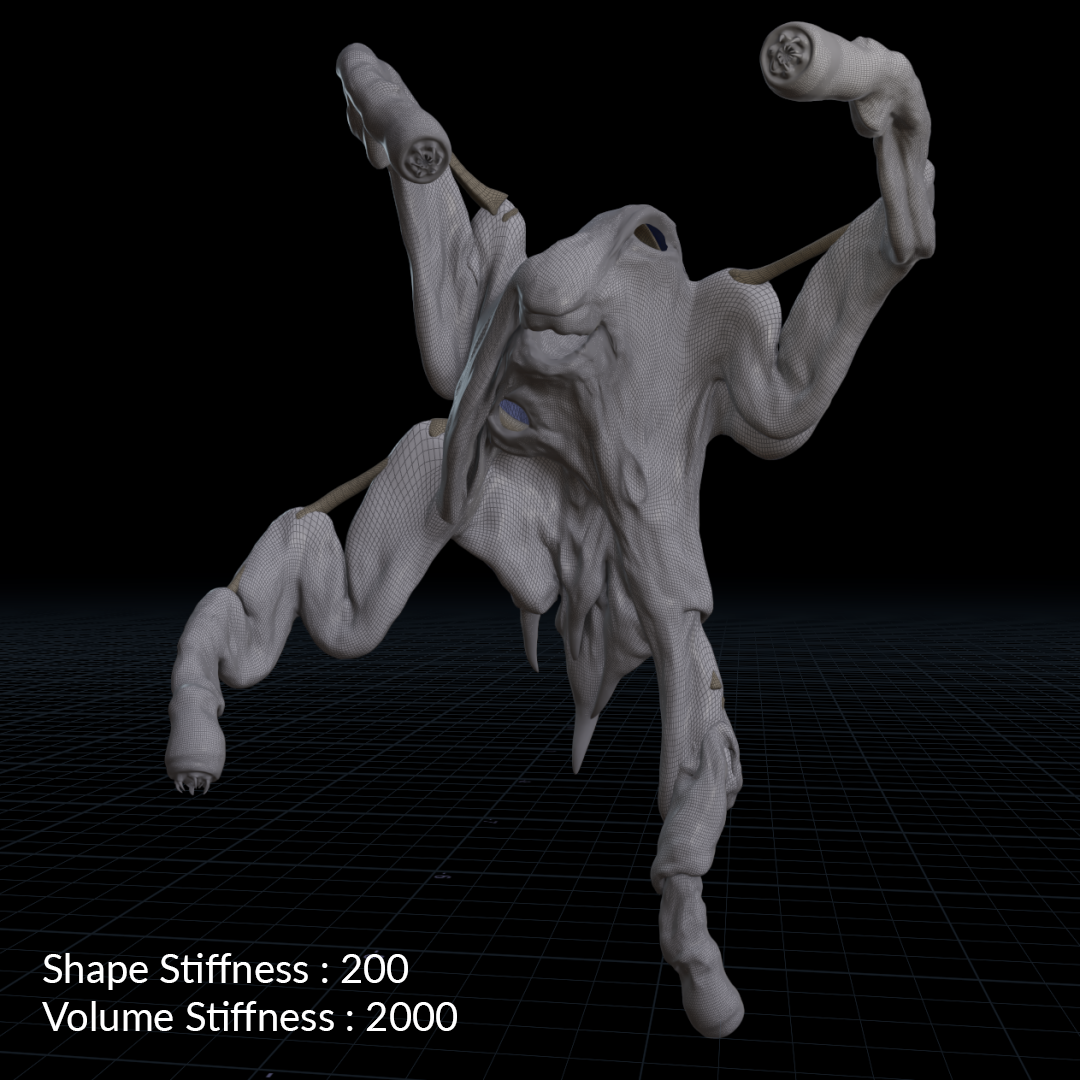
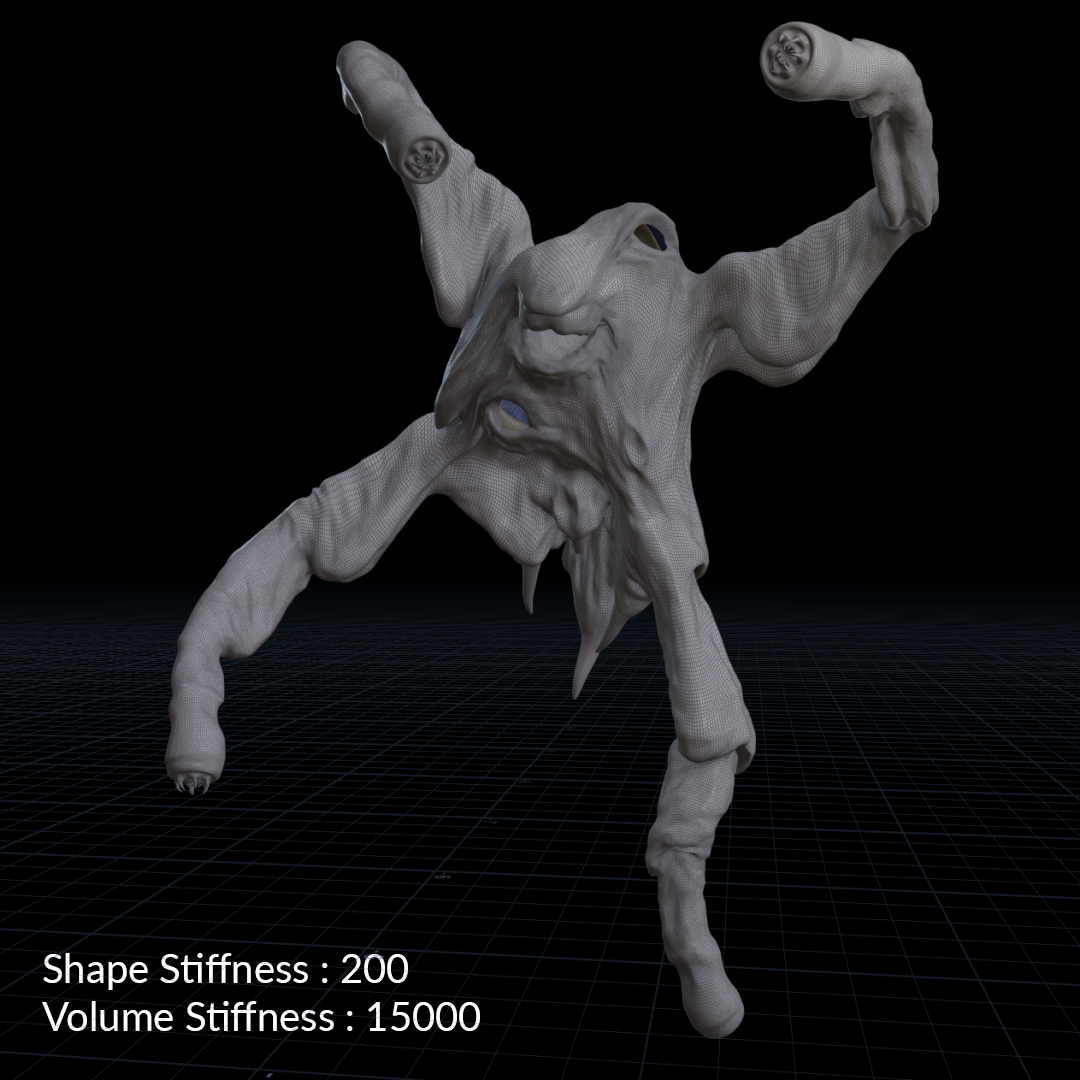
Shape and Volume Stiffness
In general, you will want the Volume Stiffness parameter to be higher than Shape Stiffness to have more volume preservation and achieve a more natural result.
Depending on the shape I wanted to give my creature, Volume Stiffness ranged from 2 to 10 times higher than Shape Stiffness (it can be even higher for other characters). If you enable the Skin Layer, you may have to increase the Volume Stiffness even more.
For example, for the big orb, without the Skin Layer, the Volume Stiffness is 2 times higher than Shape Stiffness. And to achieve a similar look with the Skin Layer enabled, Volume Stiffness needs to be 18 times higher.
If you want a loose skin effect, you lowered the Shape Stiffness a lot and you added the Skin Layer, you may have to increase the Volume Stiffness so the skin doesn't go through the bones. For example, in my case, with extreme deformations, Volume Stiffness is 75 times higher than Shape Stiffness.
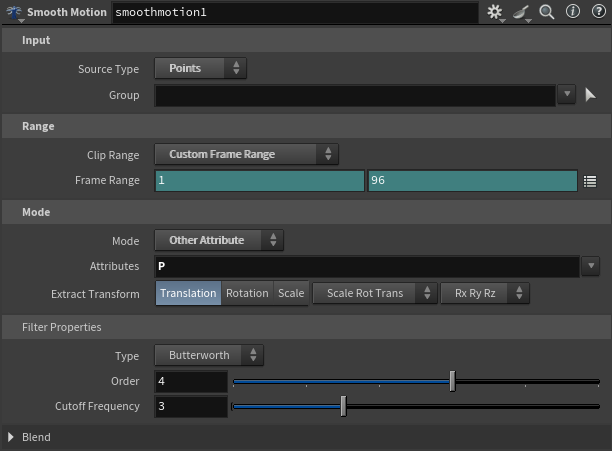
Smooth Motion
More details
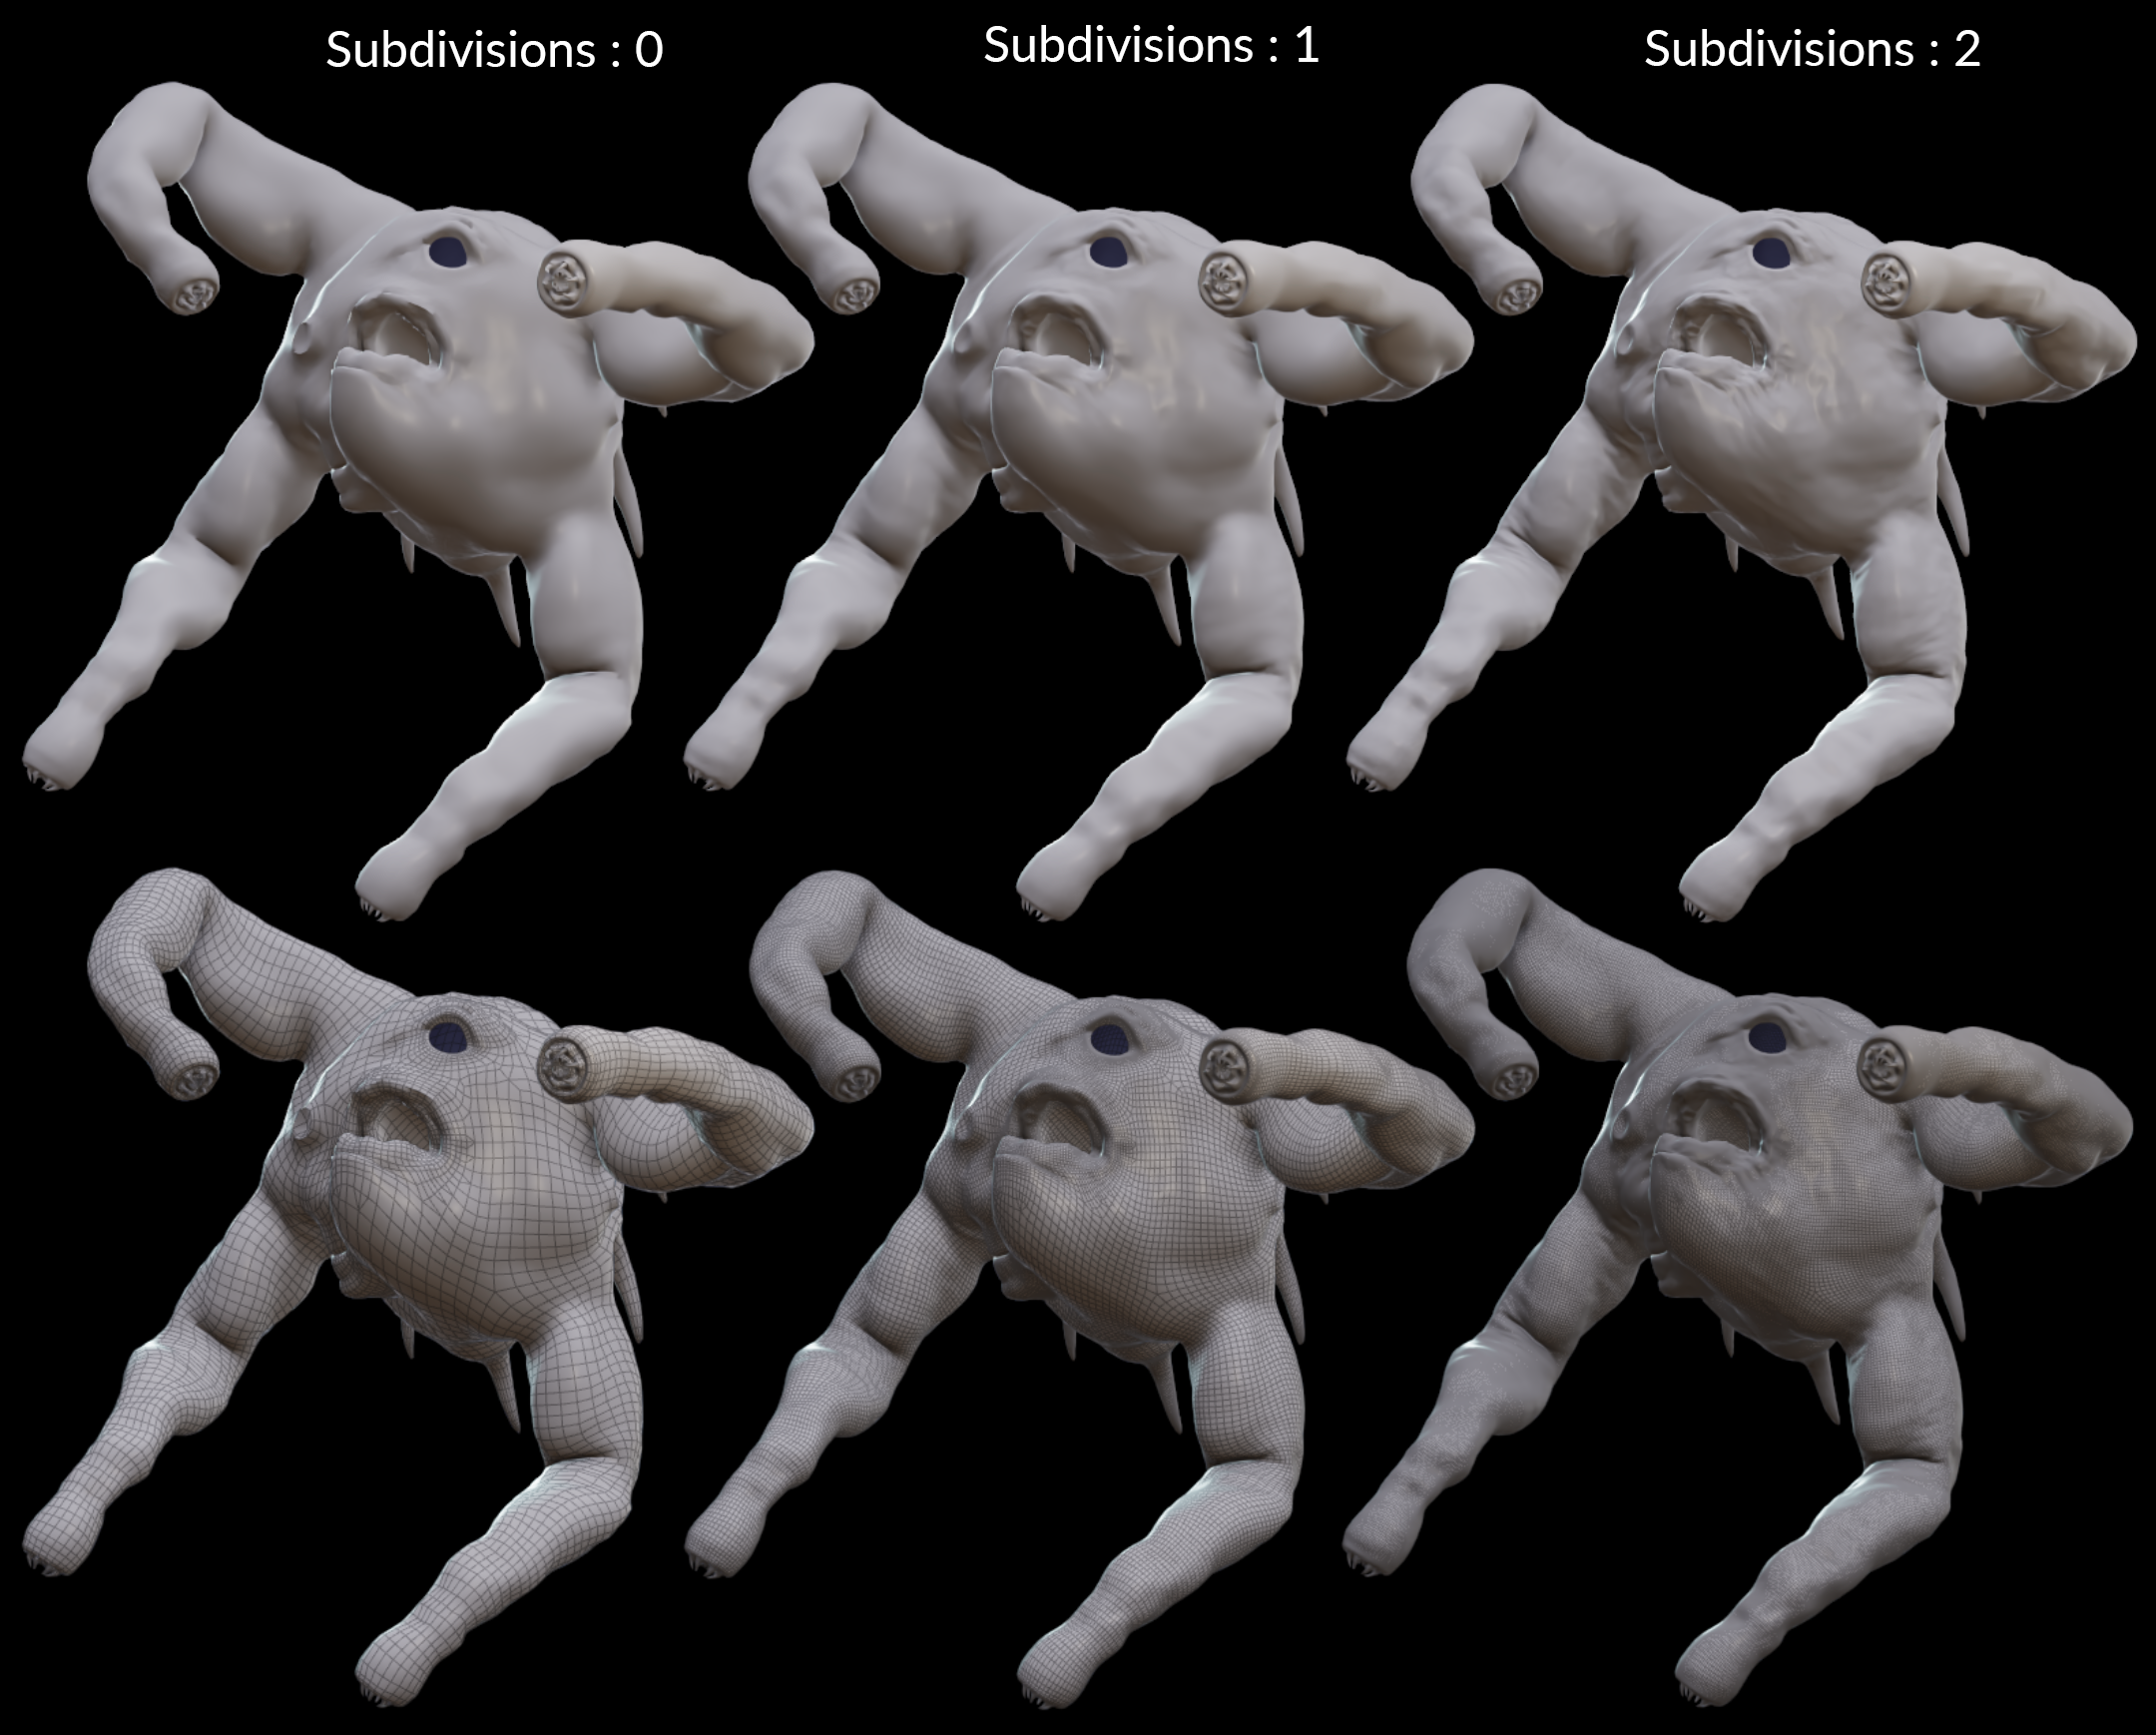
To get a more precise result with Armature, you can decrease the element size. A value of 0.01 worked well for me. You can also subdivide the geometry that you input into the Armature Capture node.
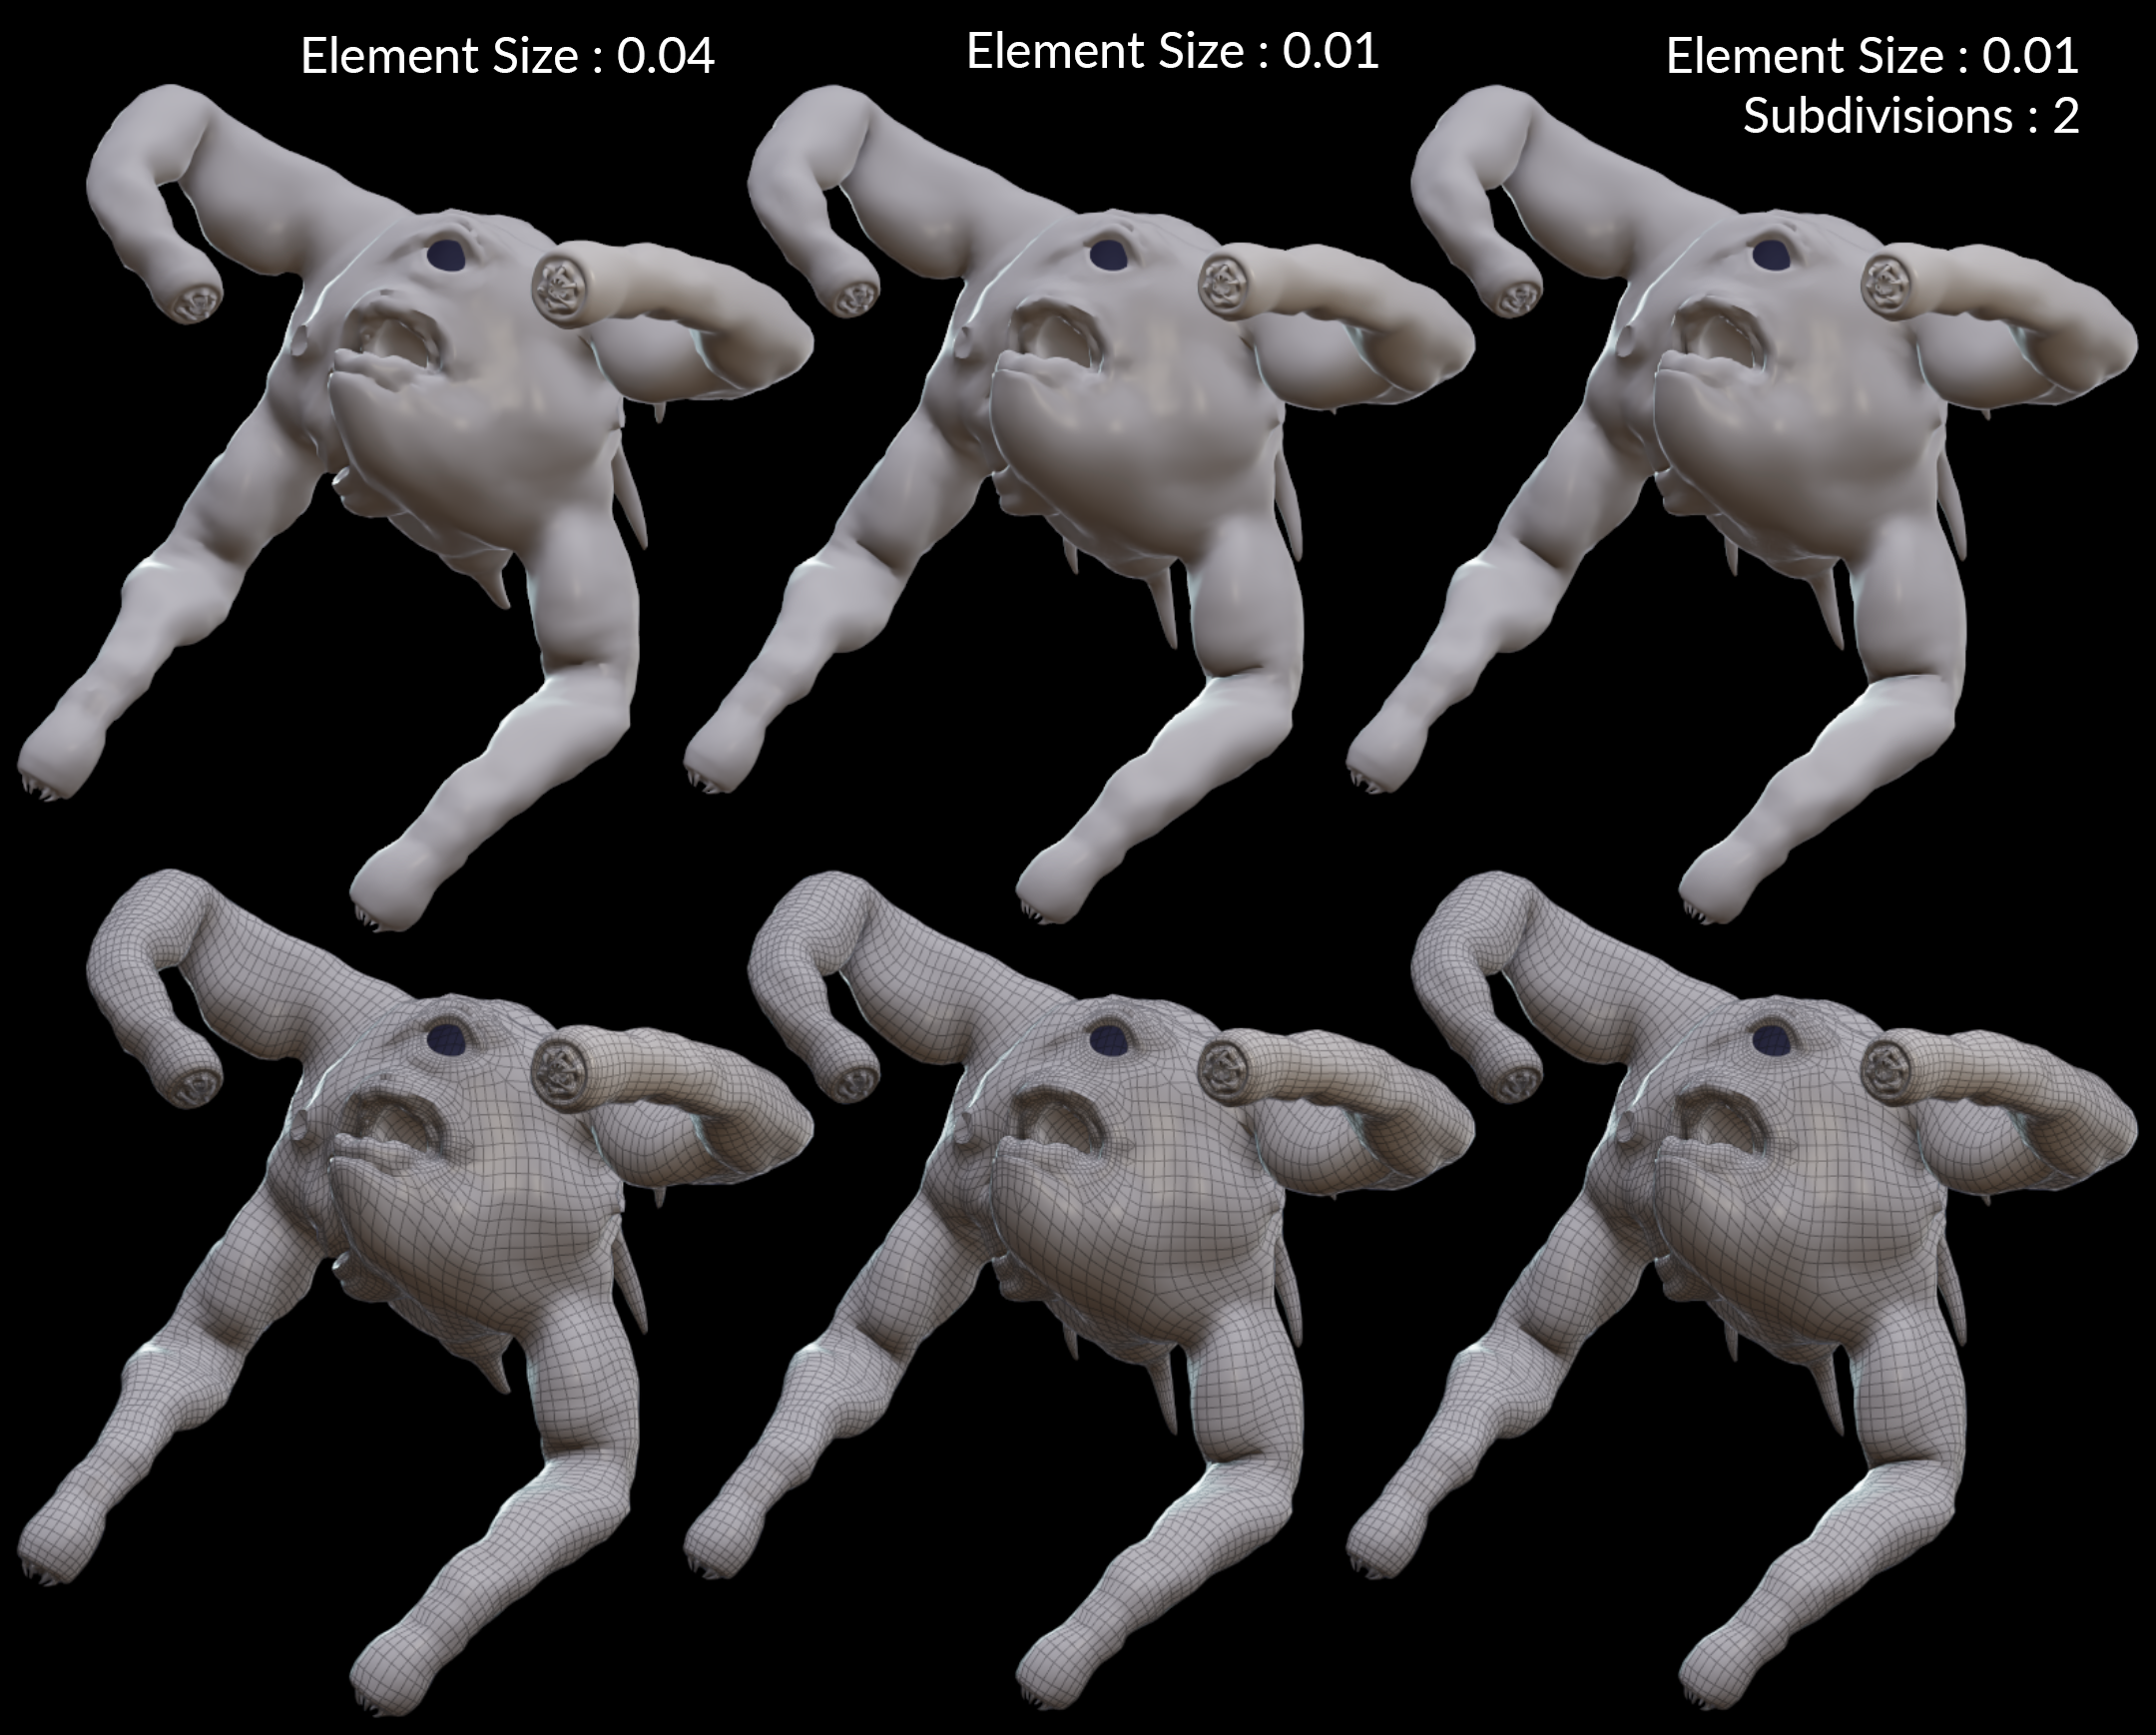
To add smaller skin details, like wrinkles, you can also subdivide the geometry that you input into Armature Deform.
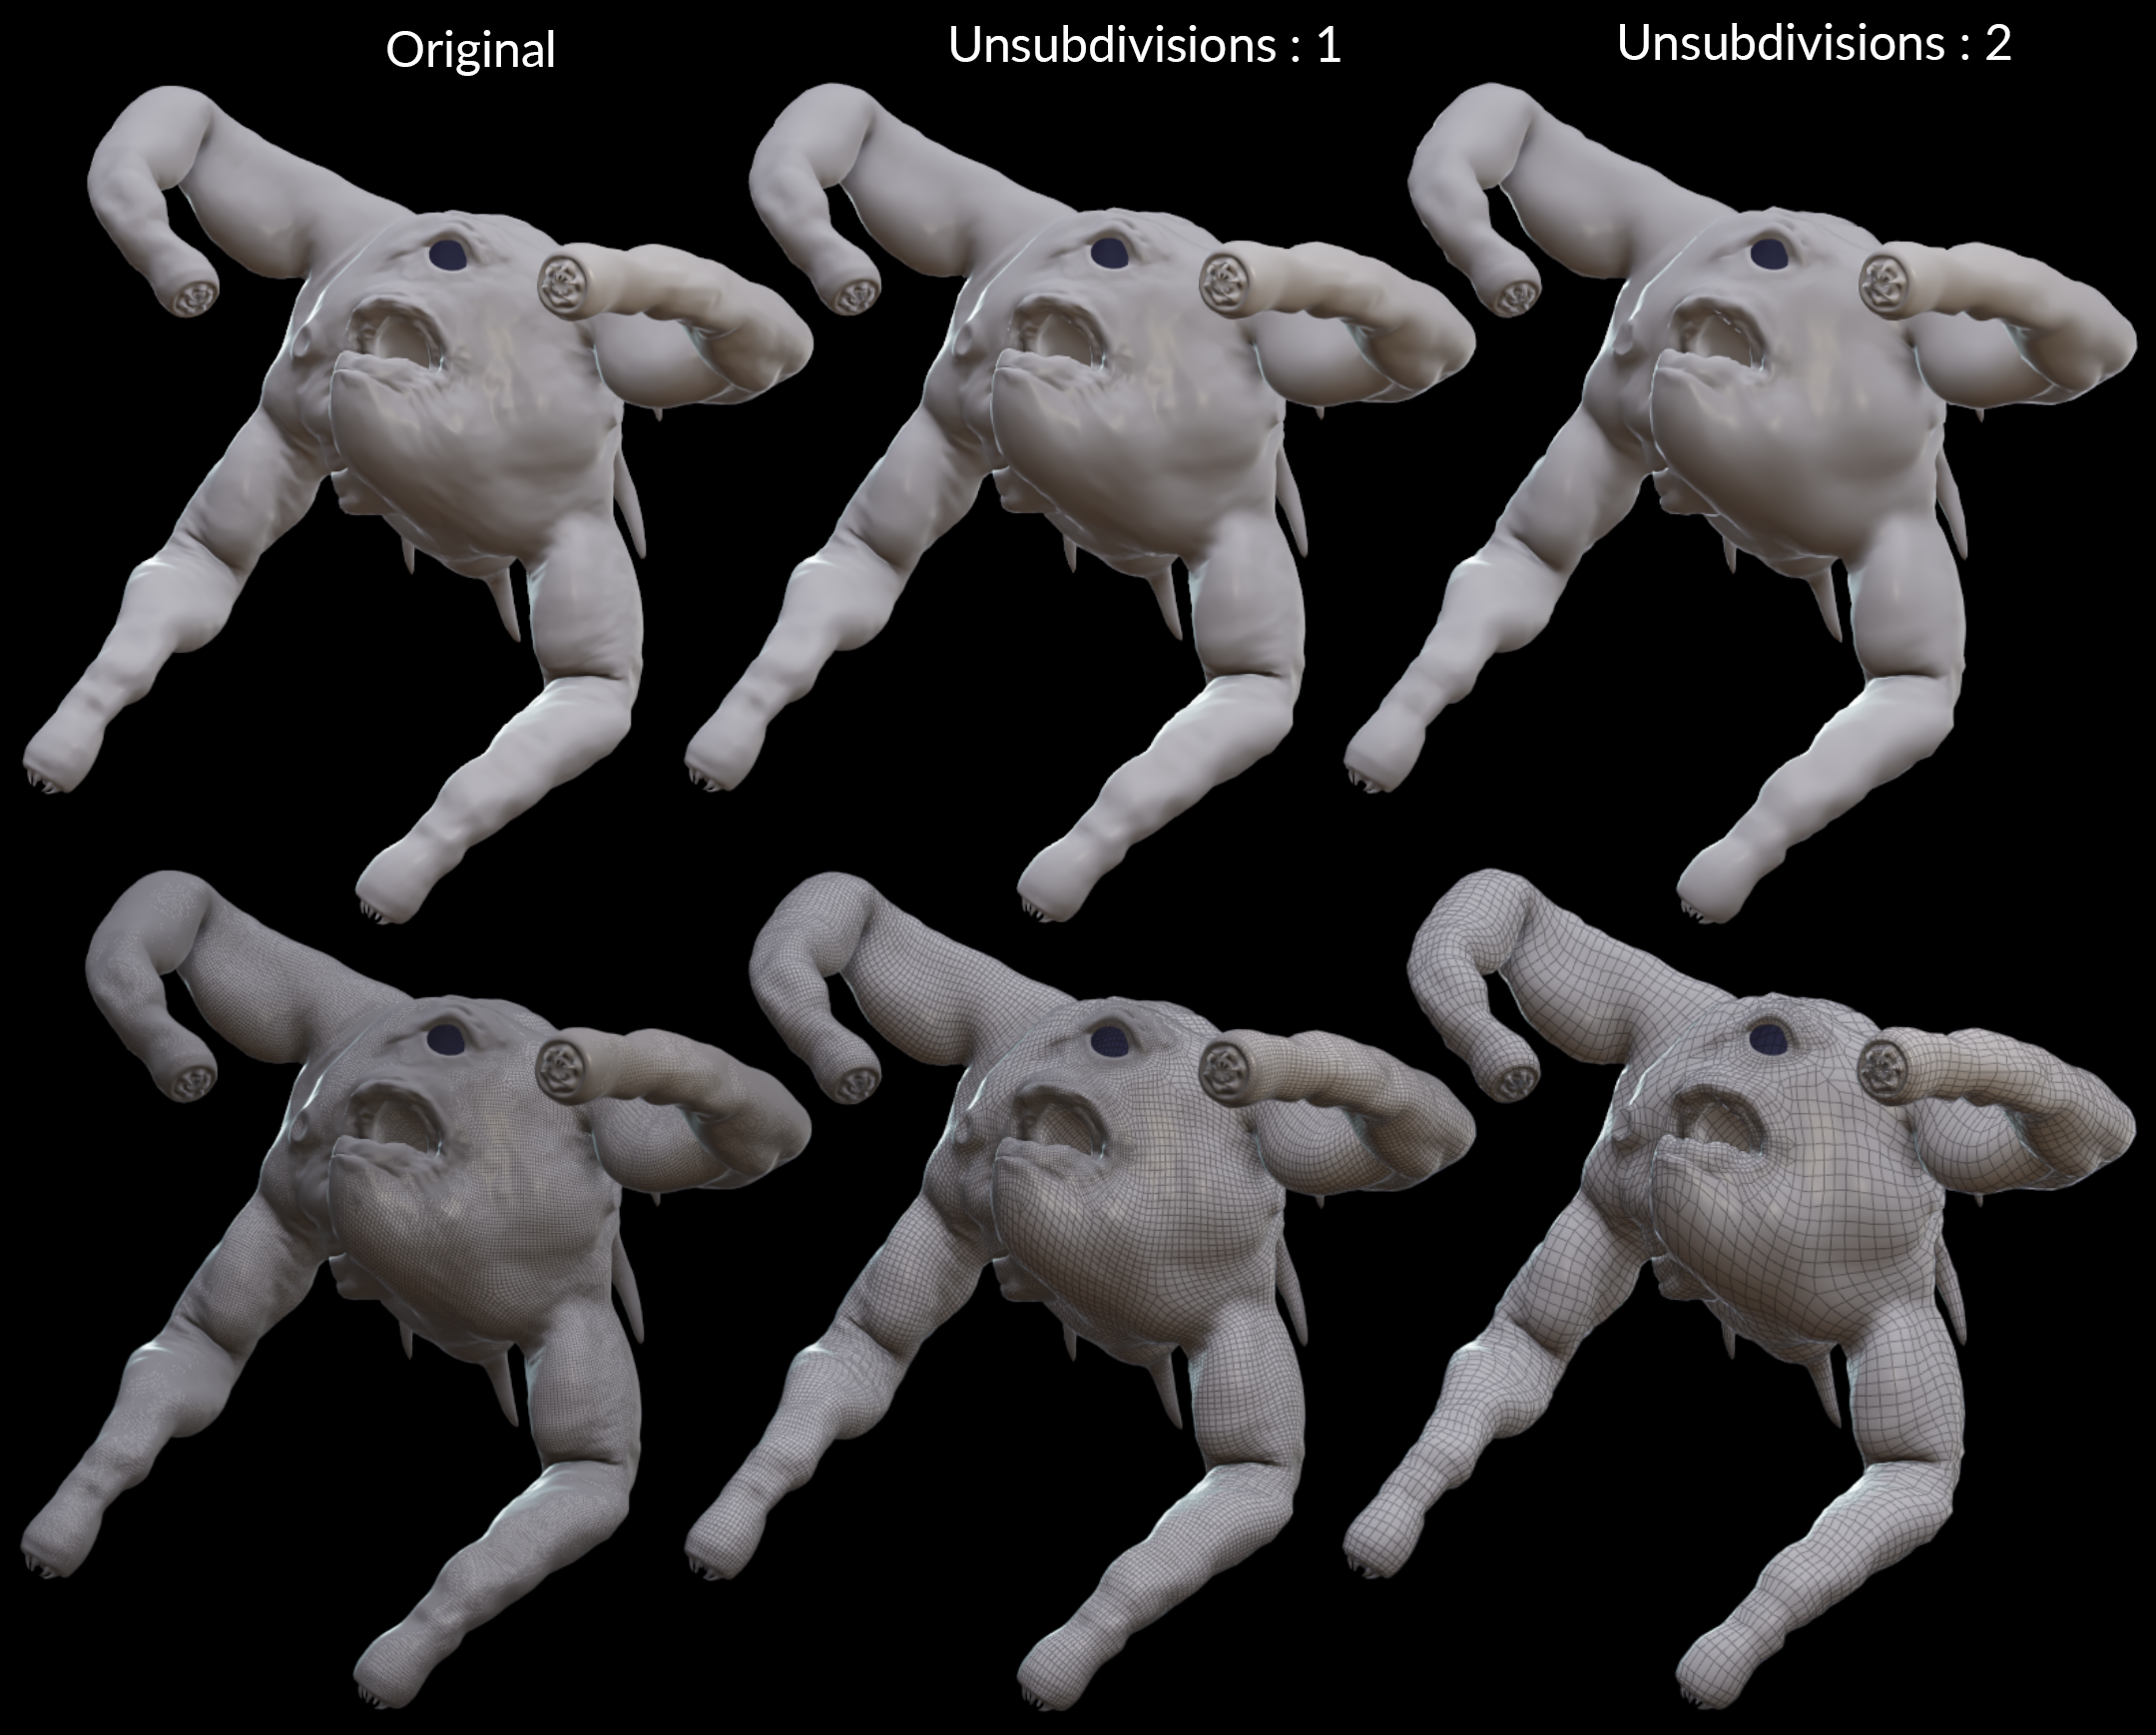
Now that your character is heavily subdivided, to make it easier to manipulate after Armature and to optimize your render, you can use the Unsubdivide node. It will restore the topology you had before subdividing your character while preserving some details.
Otis Solver
Intersections
Check the intersections between muscles, bones and skin after solidifying muscles with the same tool you may have used earlier (probably with Intersection Analysis nodes), during the geometry preparation. It can be very slow to use an Intersection Analysis directly on tetrahedralized muscles, so you can instead use the second output of the Muscle Solidify to analyze intersections on the surface only.
If you notice intersections, there are several things you can do:
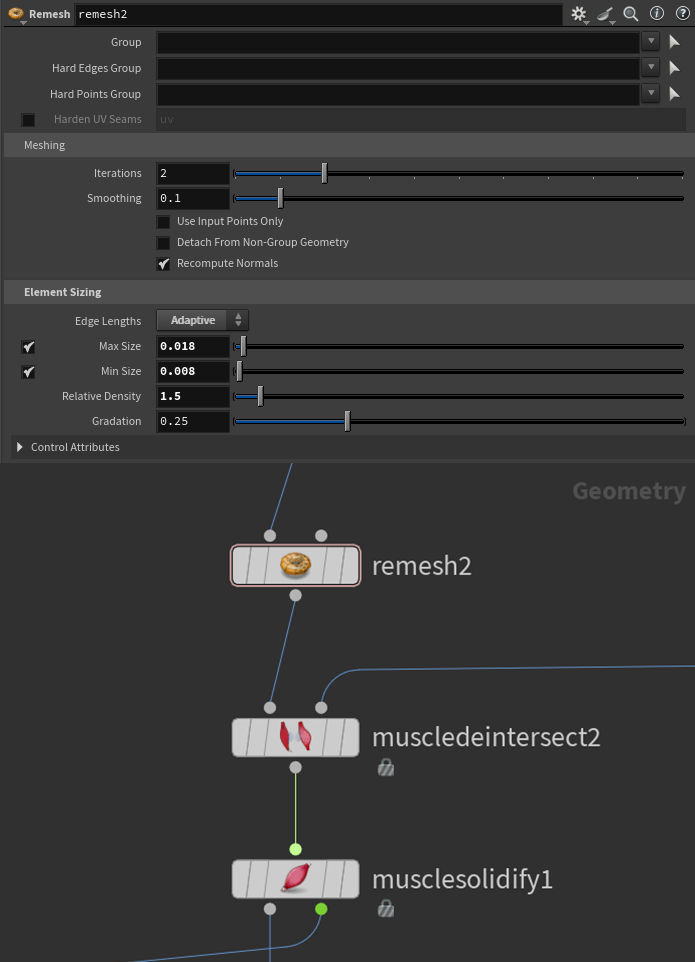
First, you can use a Remesh before Muscle Solidify to get a better topology that follows the shape of your original muscles. It can help remove intersections, especially if they were caused by the remeshed surface being too low res in the Muscle Solidify node. Then, toggle off Remesh Surfaces in the Muscle Solidify.
You can add a Muscle Deintersect node before Muscle Solidify, with the bones as a second input. And adjust the parameters.
Subdividing the muscles before Muscle Solidify can also help remove intersections if necessary.
Another trick that sometimes gave me good results was adding a Muscle Deintersect node after Muscle Solidify instead of before. However, this is not recommended because you shouldn't deform a tetrahedral geometry to not risk creating inverted tetrahedra that will break the simulation. If you still decide to try this approach, make sure to check for inverted tetrahedra with a FEM Validate.
Custom attributes
If you need to customize an attribute like the tensionmask, instead of using a Muscle Paint node, you can try to create a more procedural way to do it, so if the geometry changes (even slightly), you won't have to re-cache the strokes of the Muscle Paint.
For example, you can use the method shown in this masterclass (chapter 6):
https://www.sidefx.com/muscles-masterclass-advanced/
I've also created a tool where I draw a curve on the muscles. This curve has the attribute I wanted to customize, and it transfers it to the muscles, to add or replace it. You can think about other similar tools depending on the muscle's shape and the attribute's shape you wanted to paint.
Muscles strength

To check the muscles strength without the influence of the animation and tissue on them, you can plug the static bones into the second input of the Muscle Flex node (where you usually input animated bones) as well as into the Otis Configure Muscle And Tissue node. Unplug the tissue from this node. Then run the simulation. Muscles will flex according to the muscletension attribute transferred from the tension lines.
TIP
Note that they may flex too much overall, but the tissue and the animation tend to reduce this effect.
Doing this helped me check quickly if muscles flexed in a coherent
direction and if the constraints between muscles and bones were
properly set.
Substeps
If you cached your animated bones before the solver, this geometry probably doesn't have substeps anymore. You can add a Time Blend after the File Cache to recreate substeps. It might help your simulation work better, since the bones will move a little bit at every substep.
You can toggle off Integer Frame Values in the Global Animation Options, then if you move in the timeline with the arrow keys, you can see if the animation is stepping or moving smoothly between frames.

Tissue issues
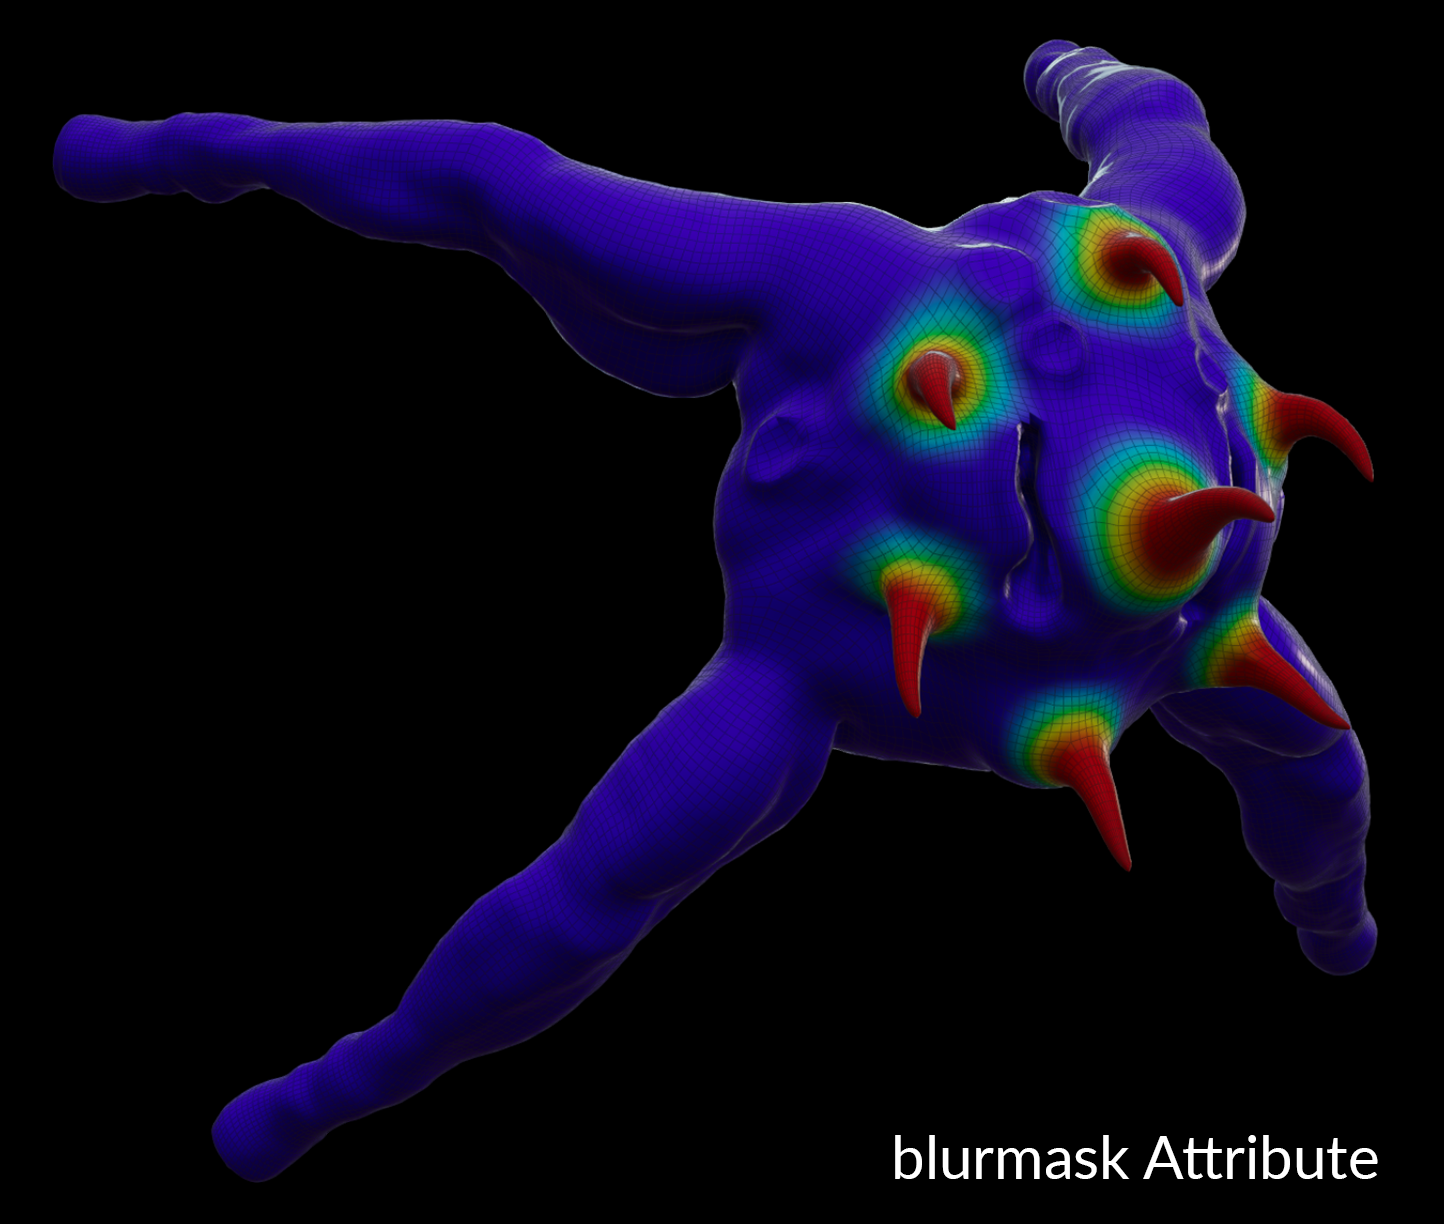
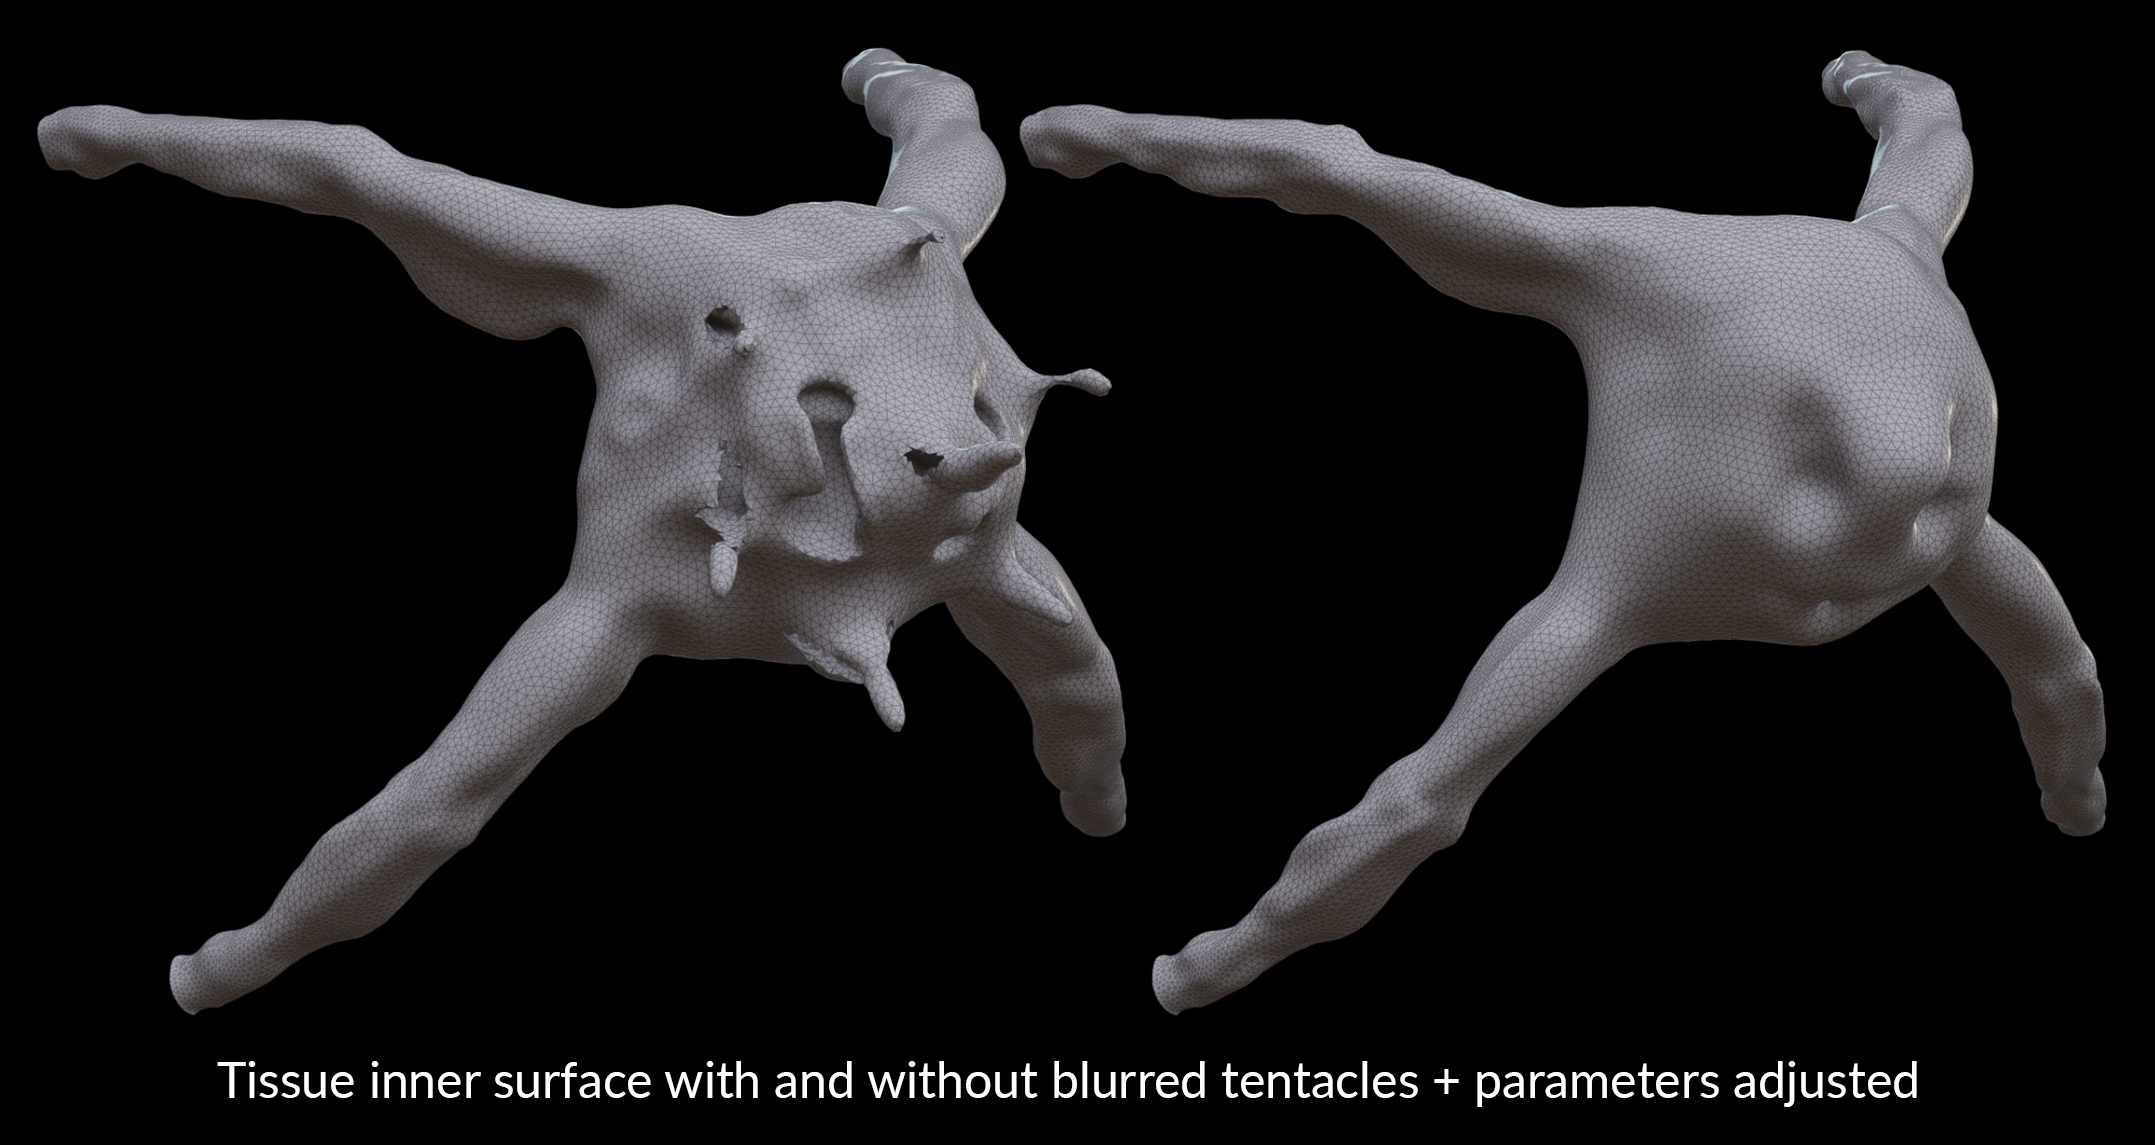
- When you create the tissue from your character's skin using the Tissue Solidify Otis node, visualize the inner surface to check if it's clean.
- For example, here, my creature has thin tentacles, and the inner surface doesn't look good around them with the usual settings. The inner surface is useful to keep muscles in place during the simulation. Because there were no muscles inside these parts of the creature, I could simply remove them from the inner surface by blurring them.
- If your character has these kinds of narrow parts without any internal elements, you can create a blurmask attribute for those areas to blur them, and adjust the parameters of the Tissue Solidify Otis.
Related Links
How to get your monster shredded (or not)
Download project file
Alex Novitskiy (creature design, 3D model)
CREATED BY

COMMENTS
aparajitindia 3 months, 3 weeks ago |
superb. Thanks for giving such insight. I am in learning process. concepts are now clear to me. aparajit ninawe from India
Please log in to leave a comment.