| On this page |
Layers are one of the most important concept with Houdini’s heightfields. In fact, almost everything you do creates a new layer. You can also extract and combine layers, convert them into masks, drive parameters and separate different materials like debris and water. This guide gives you an overview about the most important concepts with layers. Layers are the essence of complex setups. There you define layers, combine and blend them, add distortion and features like terraces. All this together results in a realistic terrain.
You might ask if there’s a difference between masks and layers? “Layer” is an umbrella term and a mask is a specific type of layer. This also applies to your terrain’s height layer. Both layers are created with the heightfield. Click the heightfield node’s Node info to see the layers.

-
heightcontains elevation values for every grid point of the HeightField SOP. This information is used to create the displacement. -
maskis only accessible when you connect a mask node to the HeightField Noise SOP’s second input.
Copying layers 
Copying layers is an essential technique, for example if you want to convert a mask into a separate layer. Let’s say you want to define a mask to drive thermal erosion. This is a typical scenario where you copy the mask to a new thermalerodabilitymask layer. This way you preserve the new layer and you're safe to override the mask layer with new information.
Height and mask 
The example below illustrates the concept for working with @height and @mask layers. The network creates a plateau at 20 meters and masks this area. Then, you copy the mask into a new cliparea layer.
Note
Here, we assume that you have created a terrain already. If not, please read the Heightfield base and Heightfield noise chapters from the introduction to get started.
In most cases you’ll use one of Houdini’s heightfield mask nodes like ![]() HeightField Mask by Feature. In this setup you’ll use a wrangle and a few lines of VEX to create a custom mask.
HeightField Mask by Feature. In this setup you’ll use a wrangle and a few lines of VEX to create a custom mask.
-
Add a
 HeightField Wrangle SOP and connect its first input to the output of the existing network’s last upstream node, most probably the HeightField Noise SOP.
 -
Use ⌃ Ctrl + C to copy the VEX code below and paste it with ⌃ Ctrl + V to the wrangle’s VEXpression field.
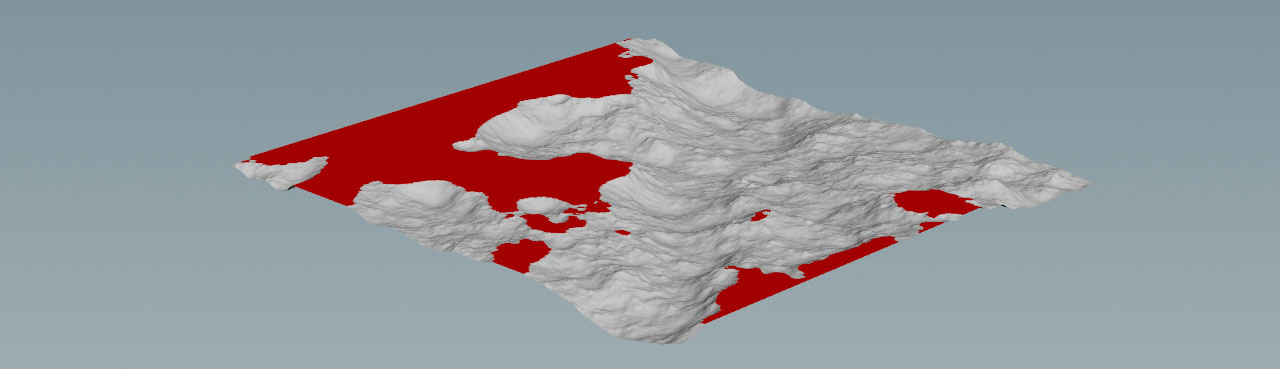
This short code snippet says that, if the terrain’s height is greater than 20, it’ll be clipped to 20 and the voxel will also be part of the mask layer.
if (@height > 20) {
    @height = 20;
    @mask = 1;
}
Here’s what you get when you turn on the wrangle’s blue Display/Render flag.
Mask to layer 
Right now, the red area represents the global mask layer. In a small network like that it’s ok to proceed with the mask, but in more complex scenes you’ll most probably override the mask layer several times and lose information. You should therefore turn mask into a separate layer, e.g. cliparea.
-
Lay down a
 HeightField Copy Layer SOP amd connect its input with the output of the wrangle.
 -
For Destination, enter
clipareaand open the copy node’s Node info to check the new layer.
The copy layer node lets you create extra layers with different information. You can, for example, create feature layers from the terrain’s slope or occlusion, or paint masks and save them as separate layers. Later you can reuse the layers, for example as patches for another terrain or scattering.
Layer to geometry 
It’s also possible to convert a layer’s content into actual geometry.
-
Put down a
 Convert HeightField SOP and connect its input with the output of the wrangle. This node converts the field information into polygons. The
 cliparealayer is now a point attribute. -
Use Density to control the mesh’s resolution. Higher values create more polygons.
-
Add an
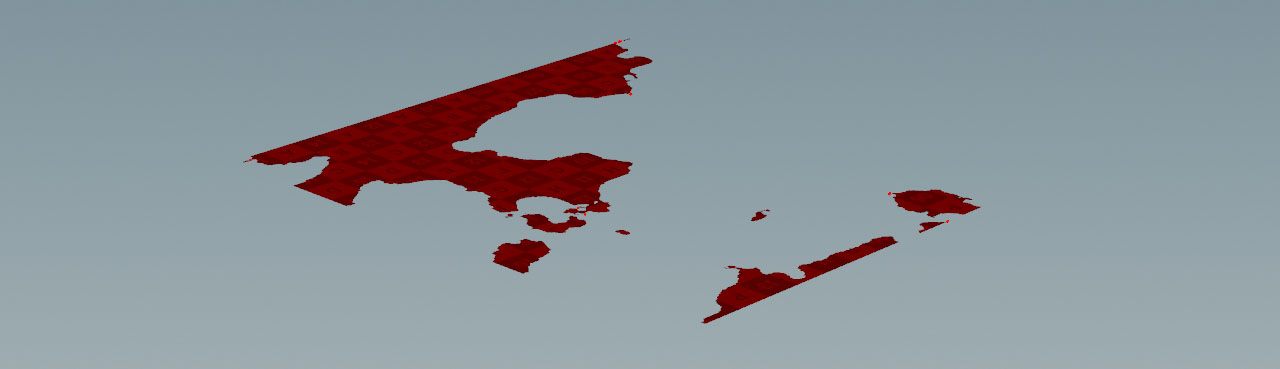
 Attribute Wrangle SOP and connect its first input with the output of the convert node. Like the heightfield wrangle, this node also expects VEX code. This time, the script will create a
 mesagroup from theclipareapoints. Only points with an@clipareavalue of exactly1will be added to the group and also receive a red color. Copy and paste the following code to VEXpression.if (@cliparea == 1) { @group_mesa = 1; // Add the point to a 'mesa' group @Cd = set(1,0,0); // Apply a red color to the point }
-
Add a
 Blast SOP and connect its input with the output of the wrangle.
 -
For Group, enter
mesaand turn on Delete Non Selected. -
When you turn on the blast node’s blue Display/Render flag, you will see the result. What you get is a regular piece of geometry and you can connect it to any other SOP node.
Combining heightfields 
Especially with complex heightfields it’s helpful to keep things separated and work on each layer independently. In this example you create a terrain with sharp ridges and a rocky base layer to become familiar with the basic concepts of how to combine layers. One method is to try to adjust the heightfield’s noise function, perhaps add some erosion and hope for the best. Another, more convenient, artist-friendly and faster way is to combine two heightfields with different noise settings through a ![]() HeightField Layer SOP.
HeightField Layer SOP.
Tip
You can also find a complete example project, where combined heightfields help to create inclined and folded terraces, on the Terracing page.
One of the big advantages with this node is that the connected heightfields don’t have to share equal Grid Spacing values. The layer node also provides a third input for a mask to define areas, where you want to merge the heightfield information.
Here’s the network you’ll be creating.

-
Start with two HeightField SOPs and two HeightField Noise SOPs. Set the noise node’s names to
worelyandsparseto make them distinguishable. -
Connect each heightfield to a noise node.
-
Select the
worleynode and go to its Noise Settings section. From the Noise Type dropdown menu, choose Worley Cellular F1. -
Adjust Amplitude and Element Size for both noise nodes to your liking. There’s no right or wrong.
-
The Worley terrain is shifted along the negative Y axis. To compensate for this offset, add a
 HeightField Transform SOP. Connect its input with the
 worleynode’s output. -
Adjust Height Offset. The terrain’s midpoint should roughly be around the scene’s center.
-
Lay down a HeightField Layer SOP. Connect its first input with the transform node and the second input with the
sparsenode’s output.
Blending 
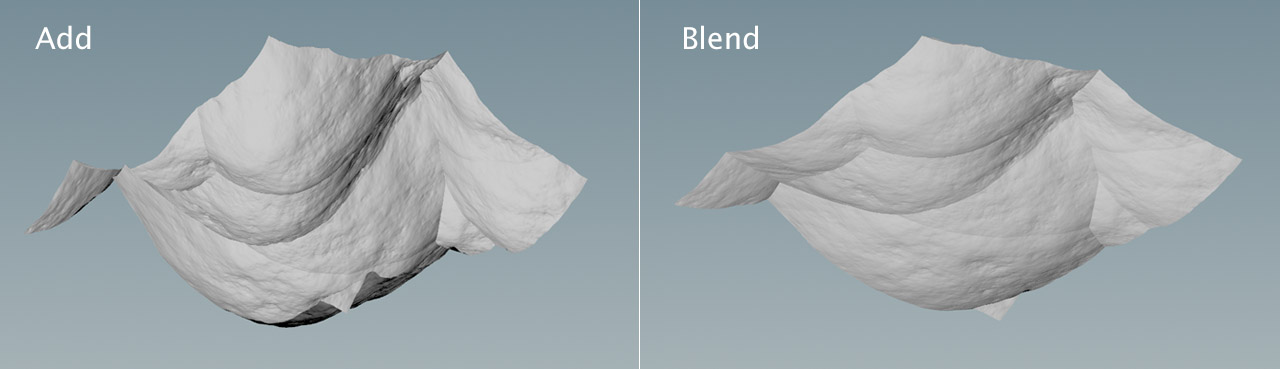
The result is a little disappointing, because now the sharp ridges of the Worley Cellular noise are gone. In fact you only see the terrain from the layer node’s second input. To change this, open the HeightField Layer SOP’s Layer Mode dropdown menu.
-
Choose Add to sum up the
heightvalues of both terrains. This results in a terrain with higher peaks. You can go to the Remapping section and decrease Base Scale to flatten the terrain. -
Choose Blend for an averaged heightfield. The advantage with this mode is that you can use the Blend parameter to control how much a heightfield contributes to the final terrain. With
0.5both heightfields have the same share of the overall result. When you drag the slider to left, you will see more and more of the terrain from the node’s first input. You also have access to Base Scale to adjust the terrain’s height.
Now you can create new masks, and apply erosion, distortion or terraces to the combined result. You can also add more HeightField Layer SOPs and blend in the information from other heightfields. This way it’s possible to create very complex setups for highly detailed landscapes.
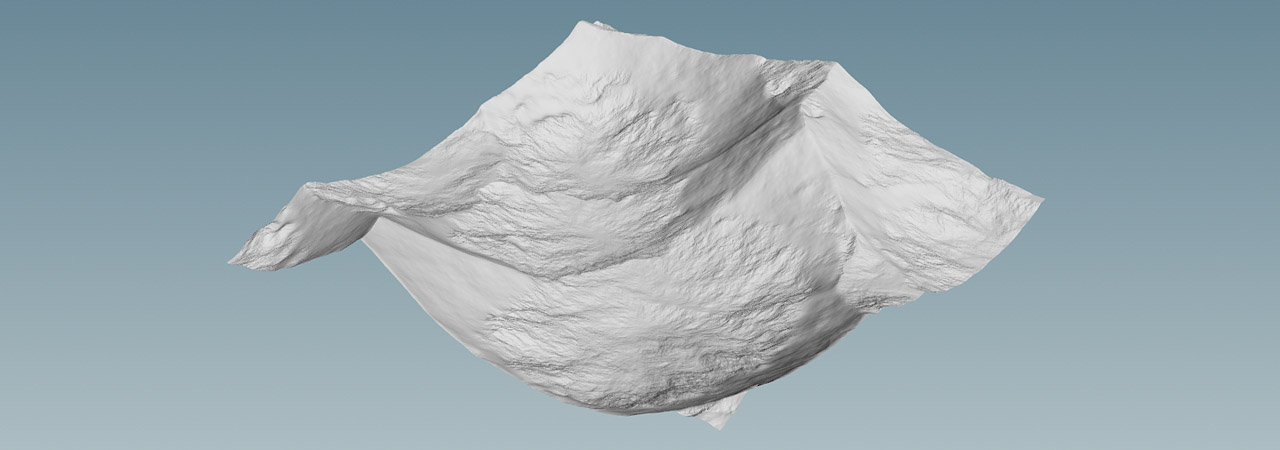
The image shows the heightfield from above with some additional masks and a ![]() HeightField Distort SOP. Distortion adds the fine details, while areas around the tops are smooth. The ridges are also blurred through a curvature mask to remove the sharp edges from the Worley Cellular noise. Such a landscape is suited for mountains with snow.
HeightField Distort SOP. Distortion adds the fine details, while areas around the tops are smooth. The ridges are also blurred through a curvature mask to remove the sharp edges from the Worley Cellular noise. Such a landscape is suited for mountains with snow.
Height control 
Some Layer Modes create extreme height values and the entire terrain appears to be unusable. However, there’s a method to level the values.
-
On the HeightField Layer SOP, change Layer Modes to Multiply. What you get is a stretched terrain.
-
Go to the Remapping section. There you can find Base Scale and Layer Scale parameters that let you scale the connected terrains individually on their inputs. Decrease the values until you've got the expected result. Depending on the terrain, you often end up with very small values like
0.01or less.
Combining masks 
If you have gone through the Combining heightfields example, you might have noticed an asterisk entry on the HeightField Layer SOP’s Layers parameter. The character indicates that all layers from the node’s inputs are merged together. However, it’s possible to select individual layers/masks from the parameter’s associated dropdown.
The workflow is exactly the same as described with layers and the only real difference is that you replace * with the actual name(s) of your layer(s). You also have the same options for blending the layers by choosing a Layer Mode.
Clearing and deleting layers 
When you clear a layer, it won’t be deleted, but you’ll add a constant value to all voxels. To see the effect, add a ![]() HeightField Layer Clear SOP to your scene and connect it with the output of a HeightField Noise SOP. Then, do the following.
HeightField Layer Clear SOP to your scene and connect it with the output of a HeightField Noise SOP. Then, do the following.
-
For Layer 1, enter
heightor choose the layer from the associated dropdown menu. -
Now the terrain is completely even and every grid point has a height of
0. Drag the Value slider to the right to increase height. You can watch how the plane offsets along the Y axis.
Clearing doesn’t only work with height, but with any other layer and you can control multiple layers through a single node. If you want to clear several layers at once, increase Number of Clears and specify the appropriate layer(s). This also works for mask, but for masks you can also use the HeightField Mask Clear SOP instead. It’s a preconfigured layer clear node.
If you really want to delete a layer, you need a ![]() Delete SOP. Removing a layer completely helps to free resources.
Delete SOP. Removing a layer completely helps to free resources.
-
Add a Delete SOP after the last node where the layer, meant to be removed, is required.
-
Go to the Group parameter’s associated dropdown menu and choose a layer, for example
mask. The input field changes to@name=mask. -
Also make sure that Entity is set to Primitives.