| On this page |
You've spent a lot of time to shape your terrain and now you want to render it. For this purpose you’ll be importing terrain and scatter points into Solaris and render everything with Houdini’s internal Karma render engine.
This is the last page of the heightfields scattering guide:
-
Scattering: SOP illustrates how to prepare your scene.
-
Scattering: Removing points shows methods for controlling the number of scatter points.
-
Scattering: Attributes creates attributes like
pscaleandorient. -
Scattering: Solaris shows how to create instances.
Note
This part of the heightfield scatter guide only deals with certain aspects of Solaris that are required to bring your geometry into Solaris. If you want to know more about Solaris, USD and Karma in general, please read the appropriate parts of the doucmentation.
Please also note that the provided workflow is just one method to assemble a scene in Solaris and there are many other ways. If you're familiar with Solaris/USD, feel free to use your own technique. This also includes names and paths.
Tip
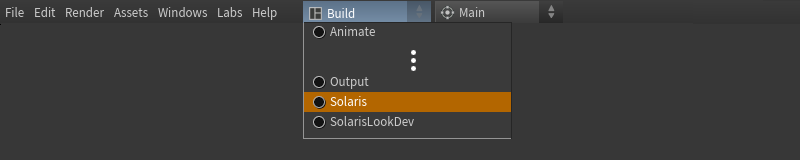
Before you start to create your render network, we recommend changing Houdini’s desktop. From the main menu bar, open the first dropdown menu (set to Build by default) and choose Solaris or Solaris LookDev. It’s important to have access to the Scene Graph Tree, where you can see the scene’s primitives and their hierarchy.
Heightfield import 
You've prepared your SOP network and now you're ready to go. Let’s start with the terrain, because it’s the basis for everything.
On Houdini’s stage level, create a ![]() SOP Import LOP. The SOP Path parameter’s
SOP Import LOP. The SOP Path parameter’s ![]() opens a floating window with a tree representation of your scene. Navigate to the container with the heightfield and choose
opens a floating window with a tree representation of your scene. Navigate to the container with the heightfield and choose TERRAIN. Confirm you choice with Accept.
The node imports the terrain as a volume. If you prefer geometry, open the import node’s Primitive Definition section and turn on Import Height Fields as Mesh. Alternatively, you can also use a ![]() Convert HeightField SOP inside your SOP network.
Convert HeightField SOP inside your SOP network.
Instance prototype 
The next steps creates the prototypes. A prototype is the base geometry that will be instanced. You can use any object, e.g. different rocks or plants. Here, you’ll be using a simple ![]() Cube LOP. This is just to make things easier to explain.
Cube LOP. This is just to make things easier to explain.
On the stage, add the Cube LOP and increase its Scale.Y value to 5 to stretch the object along the Y axis. To make the cubes sit on the terrain, enter the following expression to the Translate.Y parameter: ch("sy"). When you change Scale.Y, you’ll automatically update Translate.Y.
Instancing 
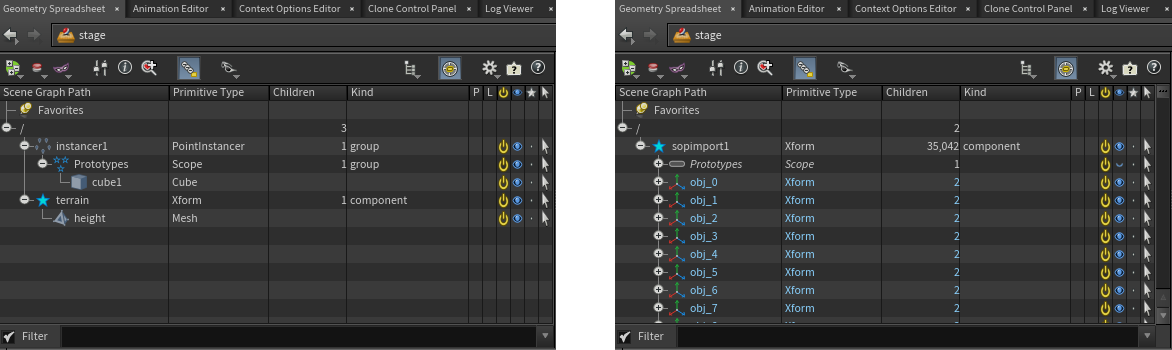
The introduction pointed out that it is not very economic to do the instancing process in SOPs. The reason is that you might end up with a huge amount of individual objects in Solaris, because the instances will be converted into meshes. If you want to keep your scene manageable, we strongly recommend the workflow presented below. With this technique, you only have one Scene Graph Tree entry for the entire instancing process and one for the terrain geometry. On the right image, however, you can see 35,042 children!
Now you're about to add the centerpiece of the network where you connect scatter points and instance object.
-
From the tab menu, lay down an
 Instancer LOP.
 -
Connect the instancer’s first input (
Input Stage) with the output of the SOP Import LOP. Then, wire the second input (Possible Prototype Source) to the cube’s output. -
On the Target Points section, open the Location Source dropdown and choose External SOP. There are several methods available to create or load the scatter points, but here you can access them directly.
-
You can now see a SOP Path parameter with a
 Open floating operator chooser button. Click it and navigate to the
 POINTSnull from the terrain’s SOP network. Click it and confirm your selection with Accept.
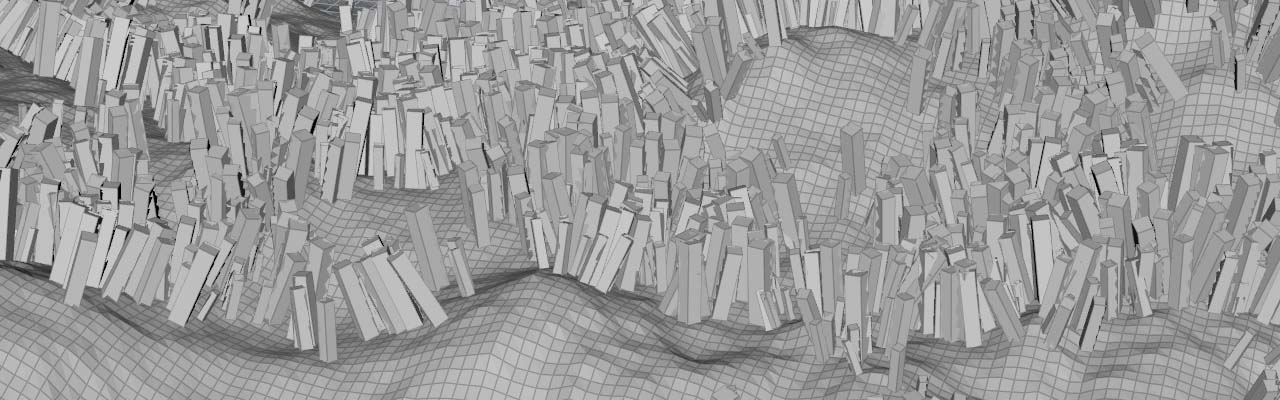
You can now see the result in the viewport. You might also notice that the pscale and orient attributes were obviously correctly transferred. To make sure that all attributes exist, go to the Scene Graph Tree and click the instancer1 entry. On the right side there’s the Scene Graph Details pane. Browse the Name and Value columns for hue and saturation.
Material 
The material in this example is just an orange color, but its hue and saturation will be driven by the attributes you've written to the scatter points. Note that the material is really just a very basic setup to illustrate the concept. The main idea, however, also works with complex shaders.
-
Lay down a
 Material Library LOP and connect its input with the instancer’s output.
 -
Double-click the library to dive inside and call the Karma Material Builder tool from the tab menu. Again, double-click the new
karmamaterialnode. Inside the material there’s a preconfigured shader network. -
Add a
 MtlX Color Correct VOP and connect its
 outoutput to the standard surface node’sbase_colorinput. When you select the color correct node, you can already see the Hue and Saturation parameters. -
Change the Input Color values to
1, 0.5, 0to get a bright orange color. Below you see an already rendered preview.

Reading the attributes 
We're still inside the karmamaterial node and now you’ll connect the points' hue and saturation attributes with the parameters of the color correct node.
-
Lay down a
MtlX Geometry Property Value VOP and connect its outoutput with the color correct node’shueinput. -
For the new node’s Geomprop parameters, enter
hue. Make sure that Signature is Float. -
Add another property value node and connect it to the
saturationinput. -
The entry for Geomprop is
saturation. -
Also, set Default to
1. This parameter is a fallback that’s used if the attribute from Geomprop is not available. The value corresponds with the default of the color correct node’s Saturation parameter.
Preview rendering 
If you want to improve your scene, you can also add a light source, for example a ![]() Dome Light LOP. You can place it between the SOP Import LOP and the Instancer LOP.
Dome Light LOP. You can place it between the SOP Import LOP and the Instancer LOP.
To see the result you have to render the scene and for this purpose, Karma offers an “Interactive Preview Rendering” (IPR) system. In the upper right corner of the viewport you can see a dropdown menu with a Persp default entry. Open the menu and choose on the Karma engines.
It’ll take a moment for the shader to compile, but then you can see an image similar to what’s shown here: