GAME TOOLS | SKINNING CONVERTER
Skinning Converterは、トポロジが変わらないメッシュの変形シーケンスをボーンベースのアニメーションに変換するための Houdini Digital Asset (HDA) です。 各種パラメータを用いて、期待する結果を得ることを可能にします。
Direct Conversion
メッシュの変形シーケンスがあって、これをボーンベースのアニメーションに変換したい場合、単にツールの最初の入力に接続するするだけです。インターフェイスには、期待する結果を得るために微調整可能なパラメータが提供されています。
Global Settings (グローバル設定)
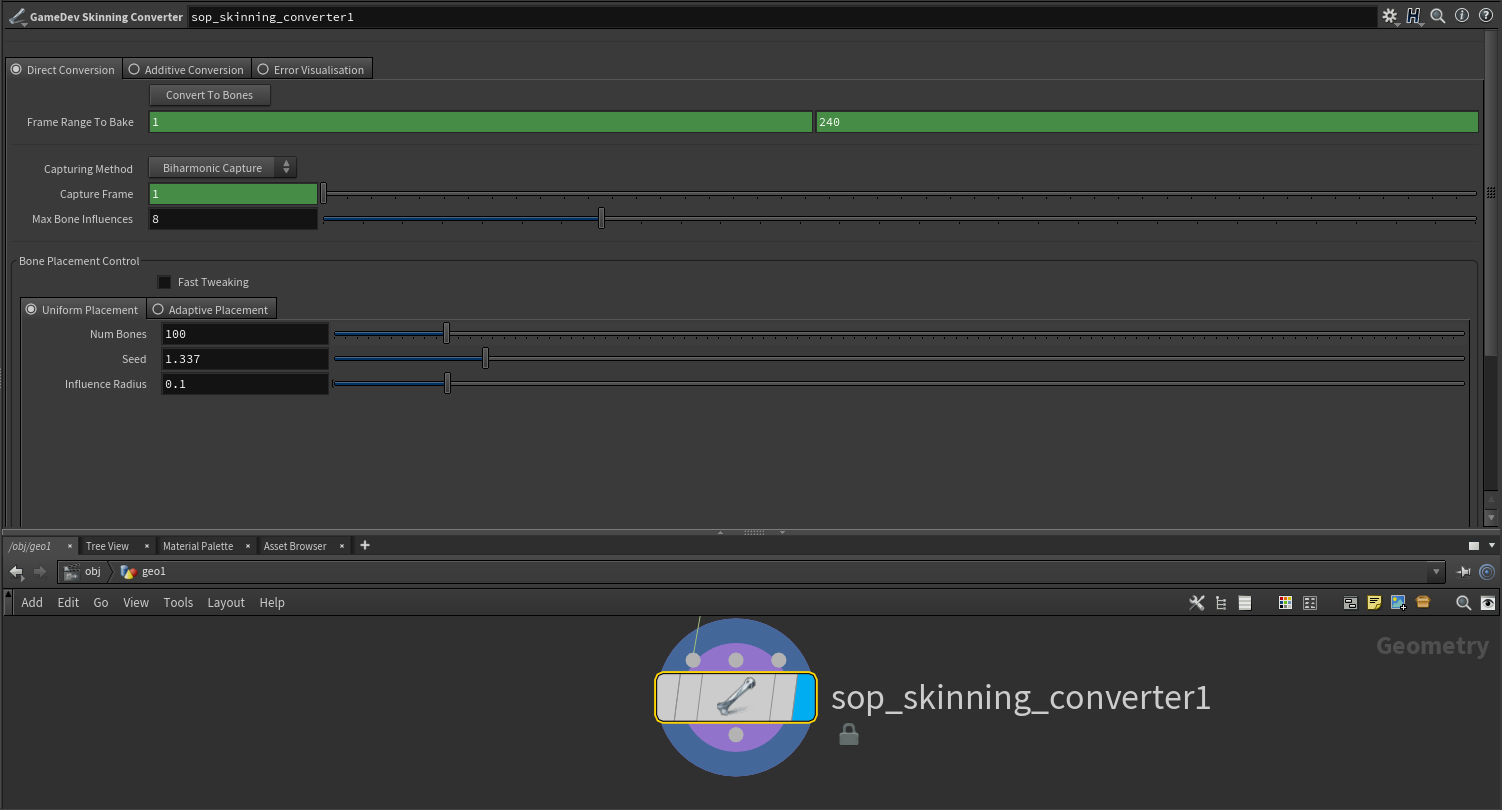
"Convert to Bones" ボタンは入力メッシュシーケンスを変換します。
ユーザは、ベイクするフレームの範囲指定することが出来ます。デフォルトでは、start-end のフレーム範囲になっています。
Capturing Method (キャプチャ方法) は、Biharmonic Capture (バイハーモニックキャプチャ) または Proximity Capture (近接点キャプチャ) のいずれかを使用するように構成可能です。通常、Biharmonic Captureを使用することをお勧めします。理由は、 Proximity Capture よりも精度が高いからです。ただし、Proximity Capture を使用することで、キャプチャ処理速度を向上させることができます。
Capture Frame (キャプチャフレーム) は、どのフレームを使ってキャプチャポーズを決定するかを決定します。 最初のフレームを使用することをお勧めします。
Max Bone Influences は、影響を受けるボーンの数をコントロールします。 値が大きいほど結果は滑らかになりますが、ゲームエンジン内での負荷も増加します。
Bone Placement Control
Bone Placement Control タブでは、ボーンの配置を生成する2つの方法、Uniform と Adaptive のいずれかを選択できます。
Uniform はボーンをメッシュ上にただ均一に分散します。これは迅速に結果を求めたい場合に便利です。詳細なデフォメーションを保持しなくとも良いシーケンスの場合、これが最善の方法です。
Adaptive はメッシュシーケンスのモーションを解析し、与えられたルールセット (Area Deformation、Curvature、Velocity)に基づいて最も重要と思われる領域にボーン密度を増加します。 その後 "Primary" ボーンスライダによって、重要領域内のボーンの数を制御します。
Input Bones
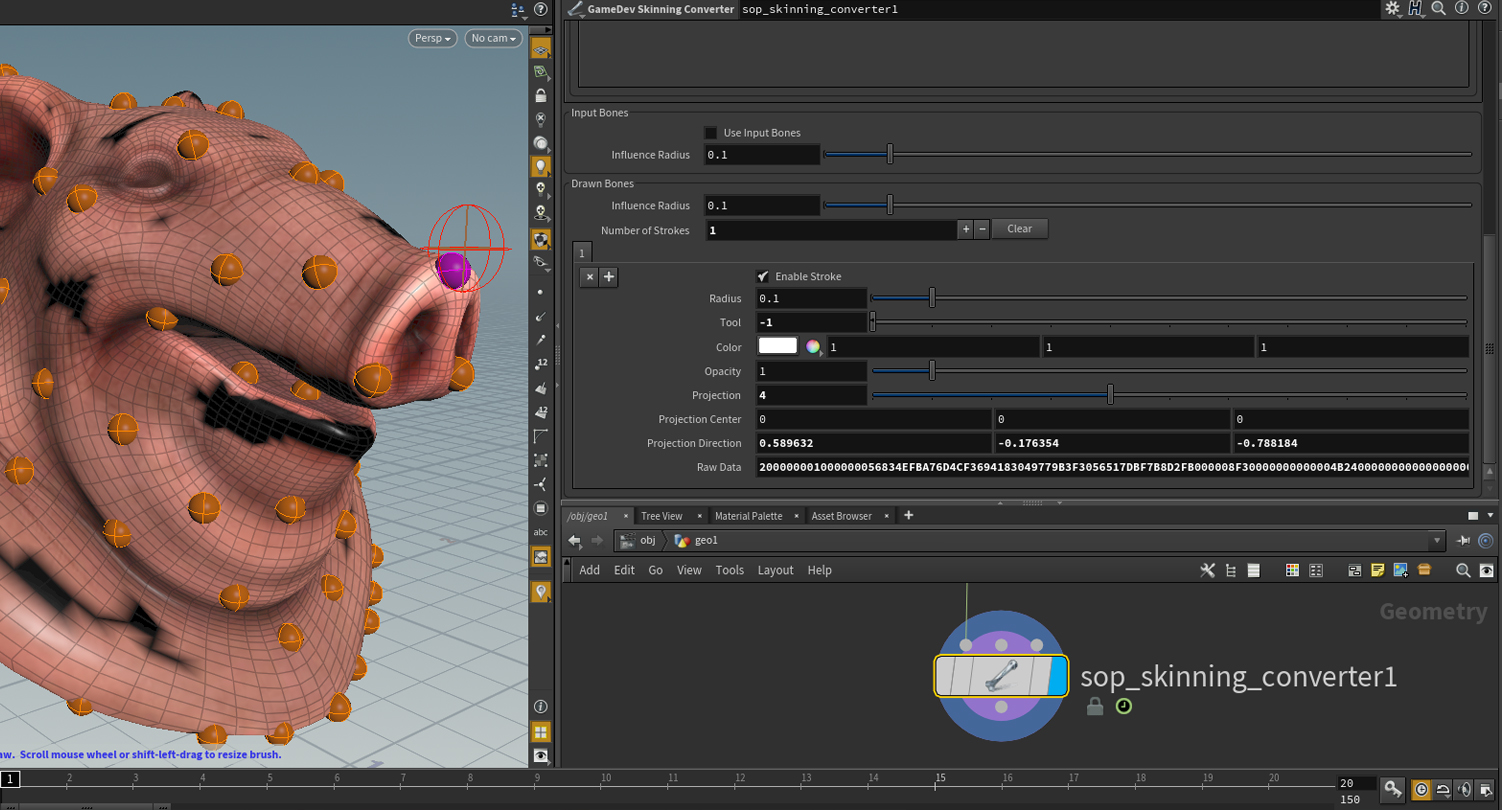
このツールは、2番目の入力にカスタムのボーンの配置情報を入力することを可能にします。 これにより、ボーンの配置場所を決定するための独自の方法の使用が可能になります。この際にツールは指定されたキャプチャフレームでトランスフォームをロックします。
Drawn Bones
このツールも非常に便利な機能で、メッシュ上にボーンをペイントする可能にし、非常に正確な配置を得ることが出来ます。ネットワーク内のツールを選択し、Enterキーを押してペイントモードに入ります。ツールの下部にストロークを表示され、ここで各ストロークの削除も可能です。このモードを終了するには、Escape を押すだけです。
Error Visualisation
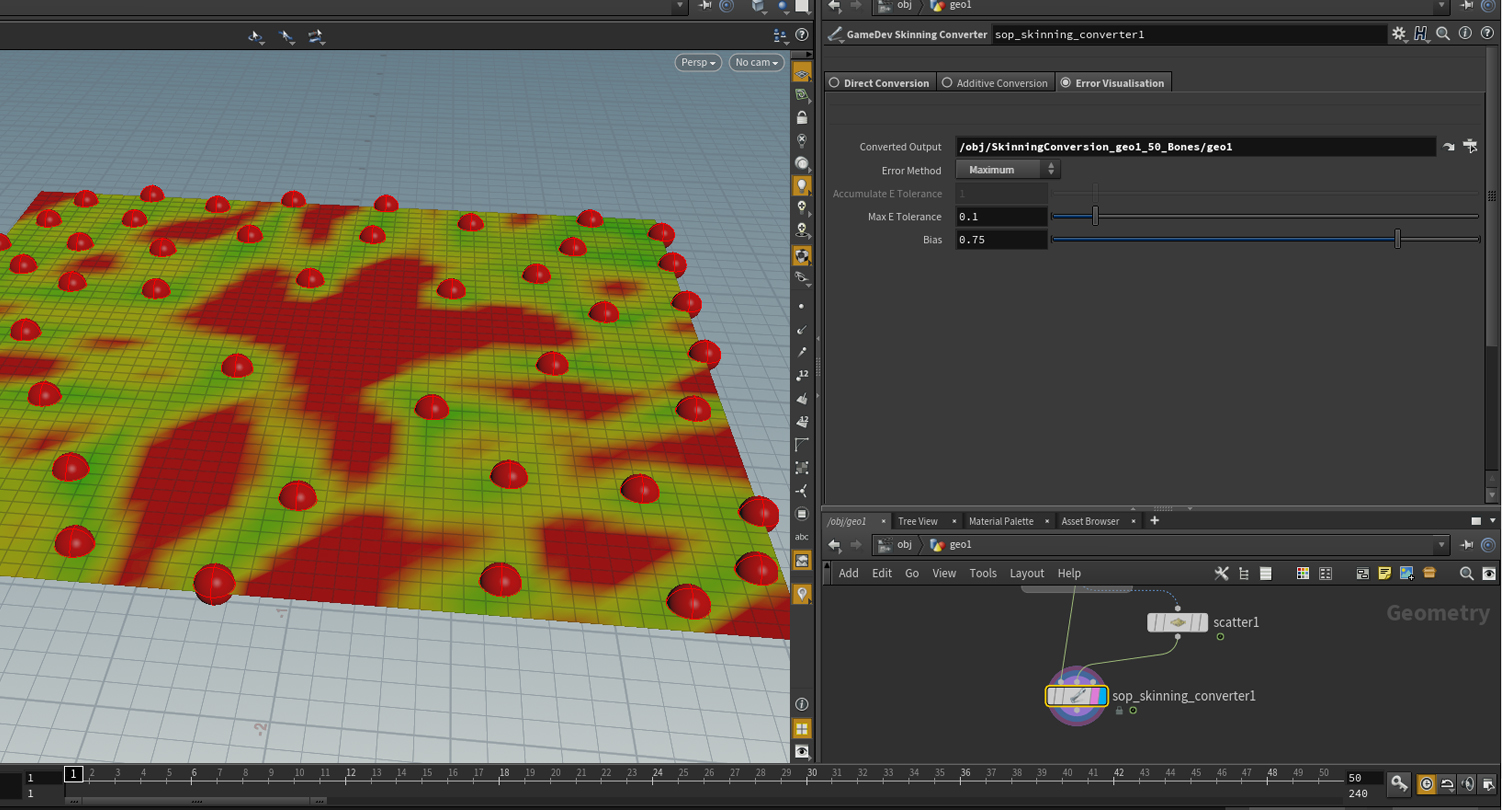
"Error Visualisation" タブでは、入力メッシュシーケンスと一致しない変換結果の領域をすばやいデバッグを可能にします。緑色は同一、黄色はほぼ同じ、赤色は離れていることを意味します。
Converted Output フィールドは変換された出力メッシュを参照し、 Maximum Error, and Accumulated Error の2つのいずれかの方法を使用してソースと比較します。Maximum は、任意の時点におけるすべてのフレームの最大誤差を表示します。色分けは、指定した誤差許容値に基づいて行われるので、コンバージョンの正確さを設定することができ、ツールは精度 (距離差) を表示します。ツールは、メッシュに着色するだけでなく、これらの値をアトリビュートとして格納するので、改善プロセスの自動化も可能になります。
Accumulated Error (累積誤差) 法は、指定された許容誤差に基づき、ソースと結果の間においてすべての点の差の累積を計測します。これはワールド座標で行われます。
CREATED BY

コメント
ztyqaz111 8年, 7ヶ月 前 |
Very useful!
Can i create bones from different topology mesh sequence?
ztyqaz111 8年, 7ヶ月 前 |
sop_polydeform&SKINNING CONVERTER i found it!
Ambrosiussen 8年, 7ヶ月 前 |
Hi!
Glad to hear you found a solution!
If you have questions, feel free to send me a DM.
Paul
dedeks2999 8年, 6ヶ月 前 |
Great Video !
Matt Vitalone 8年, 5ヶ月 前 |
This tool looks great. We have an in-house Maya tool that does this, but it seemed like something that Houdini would naturally be better at.
DiegoM 8年, 5ヶ月 前 |
Hello! Is there some way to change the size of the visualization spheres? I have some really dense geometry and I have areas that are being covered up entirely by the spheres. Thank you!
Ambrosiussen 8年, 5ヶ月 前 |
Hey DiegoM,
Unfortunately not without diving into the tool and adding one line of code. I will add it to my to-do list though :)
If you want to quickly make the edit yourself, simply dive into the tool, and just above the "Copy to Points" marked in orange, put an attribute wrangle (set to run over points).. In that wrangle, simply write "@pscale = 0.1;" 0.1 meaning 10% of current size, so change it to whatever you need.
Paul
waltz 8年, 3ヶ月 前 |
How do i export it for a game engine once i am done with the process of converting?
Ambrosiussen 8年, 3ヶ月 前 |
Hi Walter,
You can use the Filmbox ROP to export an FBX file containing all the data you need.
Paul
waltz 8年, 3ヶ月 前 |
Thanks for the prompt response Paul ;)
Alain2131 8年, 3ヶ月 前 |
Hey Paul, awesome tool ! Very usefull and easy to use, thanks a lot !
Is there a possibility to have the same for rigging wires ? I tried to use the tool on a bunch of wires (even separated wires), and the result is bad :(
Ambrosiussen 8年, 3ヶ月 前 |
Hey!
The tool works less successfully on surfaces that have a lot of small motion on them.
What you could try is using the "custom bone input" on the tool, and feed the tool points that lie in the center of the wire. (Like a spine)
Let me know if that works for you!
Paul
Alain2131 8年, 3ヶ月 前 |
Hey Paul,
thanks for the fast reply !
Actually, this is exactly what I did ! Sadly, weird results occured, see https://image.ibb.co/e4zqWc/wire_rigging.jpg.
Ambrosiussen 8年, 3ヶ月 前 |
Hmm yeah that's what I figured. :/
You could either try to increase the number of bones. (Probably dont want to do that)
Or use the VAT tool.
Alain2131 8年, 3ヶ月 前 |
Indeed, can't have too much bones.
Thanks, will look into it !
Awesome tool nonetheless, still a life-saver !
Doomhammer 7年, 11ヶ月 前 |
Is this compatible with Apprentice, or is it only Indie and above?
I've tried updating the GameDevelopmentToolset to the latest that shows up in dev (currently 1.15) and it doesn't appear in the shelf or the node list even after several attempts / reloads.
Doomhammer 7年, 11ヶ月 前 |
Solved over on
https://www.sidefx.com/tutorials/game-dev-toolset-installation/#comment-2148
Looks like I didn't drill down far enough - apologies for the double post :c
Yoshiaki Yamaguchi 7年, 5ヶ月 前 |
Hi,Paul
Thank you awesome tool.
When using a vertex cache imported, there is nothing in the result geometry.
I tried to export it using Filmbox ROP.
Yoshiaki Yamaguchi 7年, 5ヶ月 前 |
Sorry, I solved it.
How to make a vertex cache had a problem.
canalesbr1 7年, 3ヶ月 前 |
Paul, awesome tool. Thanks a lot.
I was actually wondering what tool you were mentioning in the beginning of the video that places a bone per each point? Trying to do a tentacle animation and it would be extremely useful to have each joint in my polyline be represented by joint in the bone animation.
Cheers,
-B
Ambrosiussen 7年, 3ヶ月 前 |
Hi,
Sorry for the slow reply. I was attending GDC all last week.
That tool is no longer part of the toolset, since it has been replaced with the GameDev SkinningConverter.
To replicate this behavior you're after, see 13:10 in the video. You can plug in any points into the tool to be used as bones. (Just make sure they are from a static frame, and not animated) This would basically be the points of your polylines. :)
Paul
John Riggs 7年, 1ヶ月 前 |
Hi, i am trying to use bones that are already in a skinned mesh, I cant figure that part out. I brought in a FBX that has bones and skinning already but I cant seem to figure out how to access those bones for skinning converter. It goes, file(the skinned fbx)>BoneCapture>CaptureOverride>BoneDeform>Blendshapes>SkinningConverter, If i try to put the output from any of the nodes in that chain it just gives me a bone per vertex when I enable "Use Input Bones", how do I get the bones from the skinned mesh to input into skinning converter?
Thank you!
aaronc-unity 7年, 1ヶ月 前 |
Looks like this tool requires a single contiguous mesh. I'm trying to use it with an Alembic sequence comprised of about 40 separate meshes, but it only seems to work if I delete all but one of them.
Is there any way to get it working with multiple meshes? For example, my character is comprised of: head, shirt, pants, shoes.
Thanks,
Aaron
Ambrosiussen 7年, 1ヶ月 前 |
Hi,
The skinning converter does not add animation to your pre-existing rig. If you however just want to grab your nulls/joints as points and feed those into the tool you can do this:
Create Object Merge in SOPs, set the [Object1] parameter to [ ../../null* ] The * allows you to grab all nodes that have a name starting with null. So null0, null1 etc) Set the transform parameter to [Into This Object], and then below the Object Merge put an Add node. Tick the [Delete Geometry but keep the points] parameter.
That should give you a pointcloud of your bones.
Paul
John Riggs 7年, 1ヶ月 前 |
Thats basically what I ended up doing, thanks for the quick response!
aaronc-unity 7年, 1ヶ月 前 |
Never mind my question; I dug into the network and figured it out. Turns out the 'bone capture biharmonic' SOP was throwing an error due to the time offset not being linked to the correct frame.
Ambrosiussen 7年, 1ヶ月 前 |
Hi,
Glad you found the issue to your problem! If this is a bug in the tool, please submit it at https://www.sidefx.com/bugs/submit/ with an example so I can take a look :)
Paul
Ambrosiussen 7年, 1ヶ月 前 |
Hi,
The skinning converter does not add animation to your pre-existing rig. If you however just want to grab your nulls/joints as points and feed those into the tool you can do this:
Create Object Merge in SOPs, set the [Object1] parameter to [ ../../null* ] The * allows you to grab all nodes that have a name starting with null. So null0, null1 etc) Set the transform parameter to [Into This Object], and then below the Object Merge put an Add node. Tick the [Delete Geometry but keep the points] parameter.
That should give you a pointcloud of your bones.
Paul
pthuriot 6年, 10ヶ月 前 |
Being *very* new to houdini, I'm wondering does this happen to work with imported Alembic caches? When add the skin converter, I'm only seeing one bone generated (no matter how many I add in the options). Thanks in advance!
Ambrosiussen 6年, 9ヶ月 前 |
Your geometry is probably packed.
Try creating an "Unpack" sop before the skinning converter.
To confirm you're dealing with pure geometry and not packed geometry, middlemouse click on the node that is plugged in to the skinning converter. It should say how many polygons you have, and not list any "packed" data.
Paul
redmanni 6年, 8ヶ月 前 |
Hello,
Really new to houdini. Just wondering is it possible to add this function to already rigged and animated mesh? If animation is baked on joints and then added to existing skeleton?
Sirvoxelot 6年, 8ヶ月 前 |
is it possible to use this to convert several different alembics to the same bone&mesh set
so you could save out the conversions as separate animations for one skeletal mesh rig?
for say unreal or unity?
dickonknowles 6年, 1ヶ月 前 |
Hi!
I'm extremely impressed with the potential for this tool, and have had great success is using it on simulations that are fixed in place (I.E. A flag attached to a pole). But I'm trying to use it on a character's cloths and am finding that when my character turns 90 or 180 degrees the bones don't seem to know which direction the character is facing and I'm getting some really strange results.
Do you have any advise for tackling this kind of problem?
Thanks
Please log in to leave a comment.