FEM COMPRESSION SIMULATION
In this tutorial, we will go through the process of performing compression on a stack of solid objects, which is an interesting example to showcase the better accuracy and volume preservation that are introduced in the updated FEM solver in Houdini 18. The new global-nonlinear (GNL) solver works with the new built-in Neo-Hookean material model.
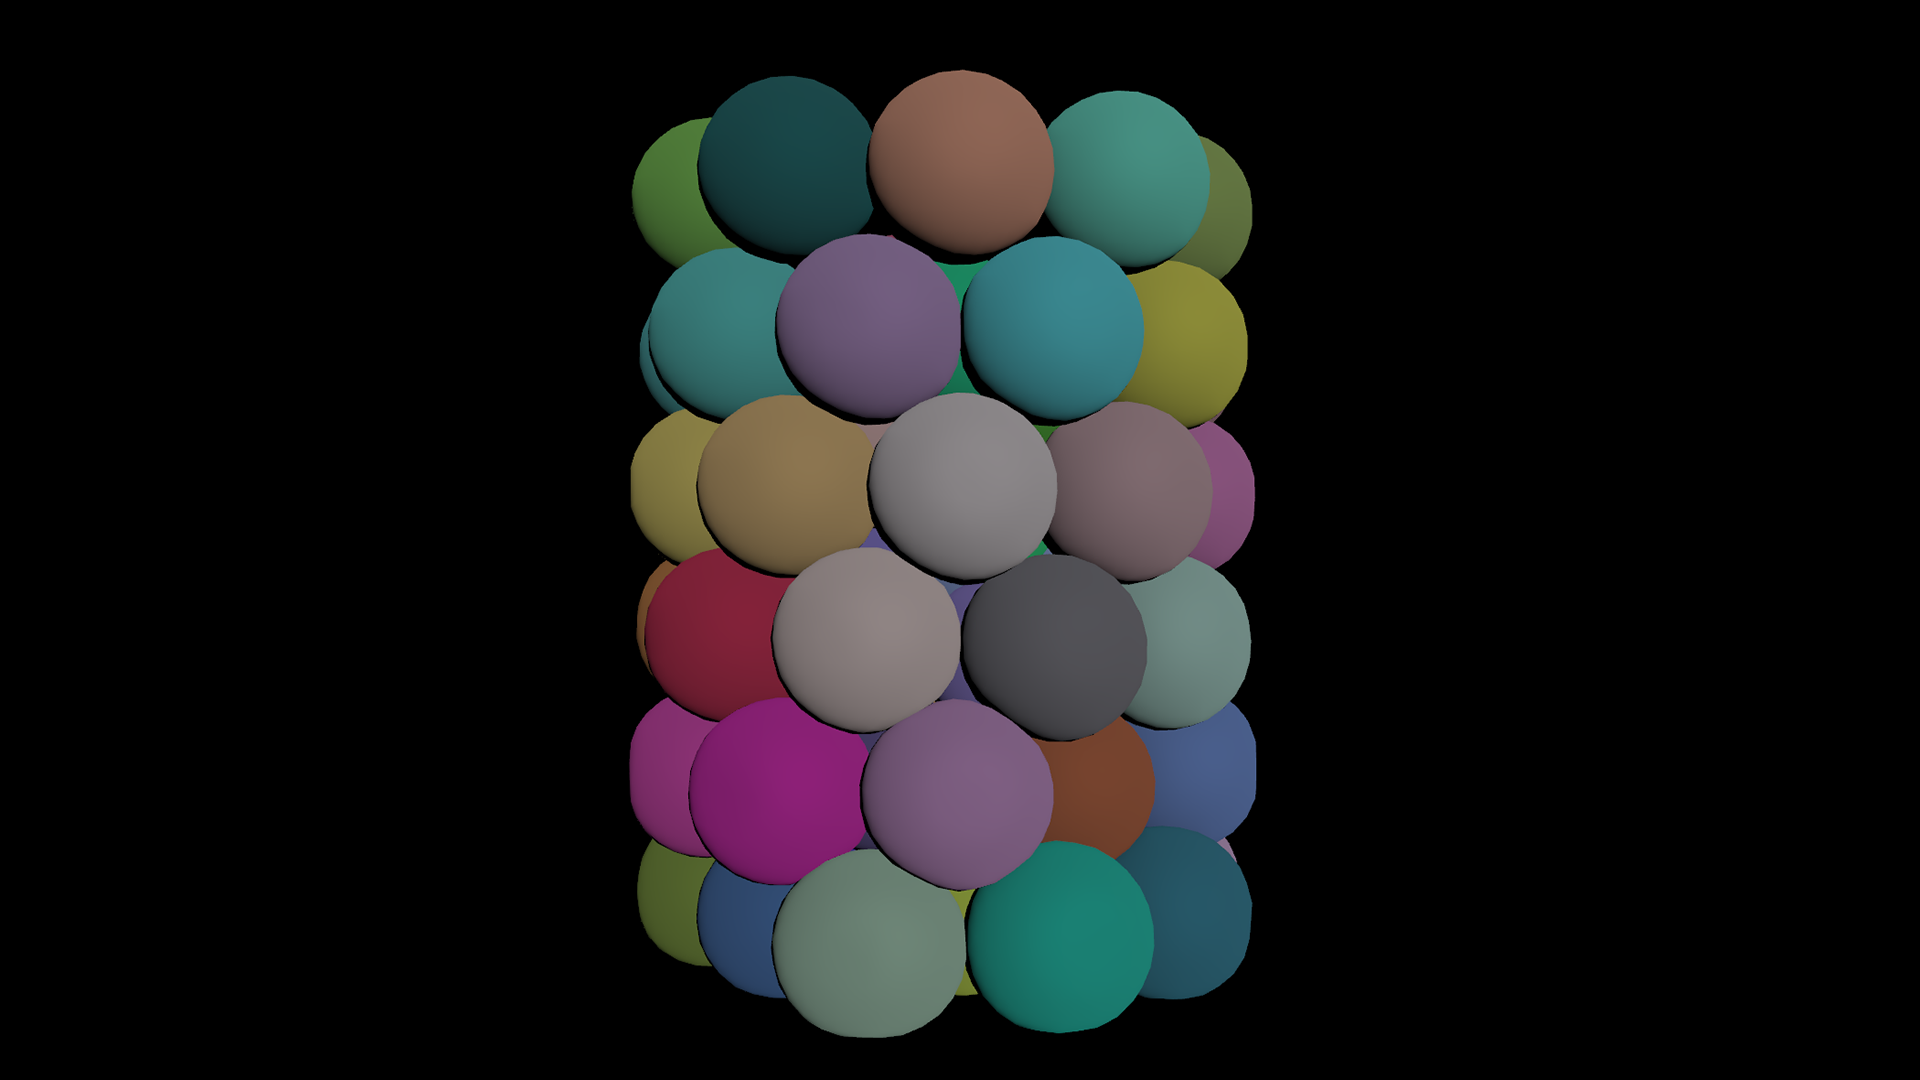
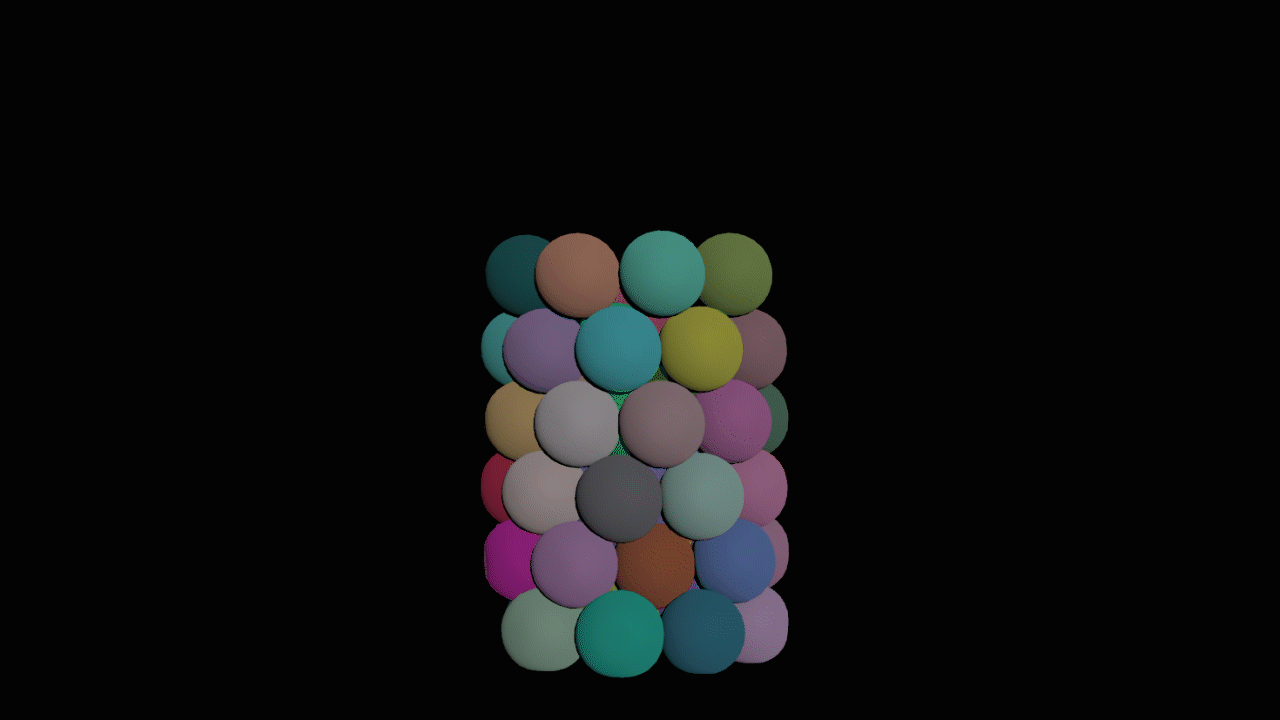
Thanks to the model courtesy by techninja at blendswap.com, we created an example with some gummy bears. In this example, however, we will replace them with simple spheres for distribution purposes.
The setup for this simulation is pretty straightforward, so we will go through it while focusing more on some specific tips that you can use when doing general FEM simulations.
Geometry Preparation
We will begin by preparing our simulation geometry. The simulation takes in tetrahedral meshes as finite element solids. To prevent poor simulation outcomes, you should make sure that your simulation mesh doesn't have poor-quality tets.
Whether you are simulating complex geometry or something as simple as a sphere, there are a few steps that could improve your FEM workflow.
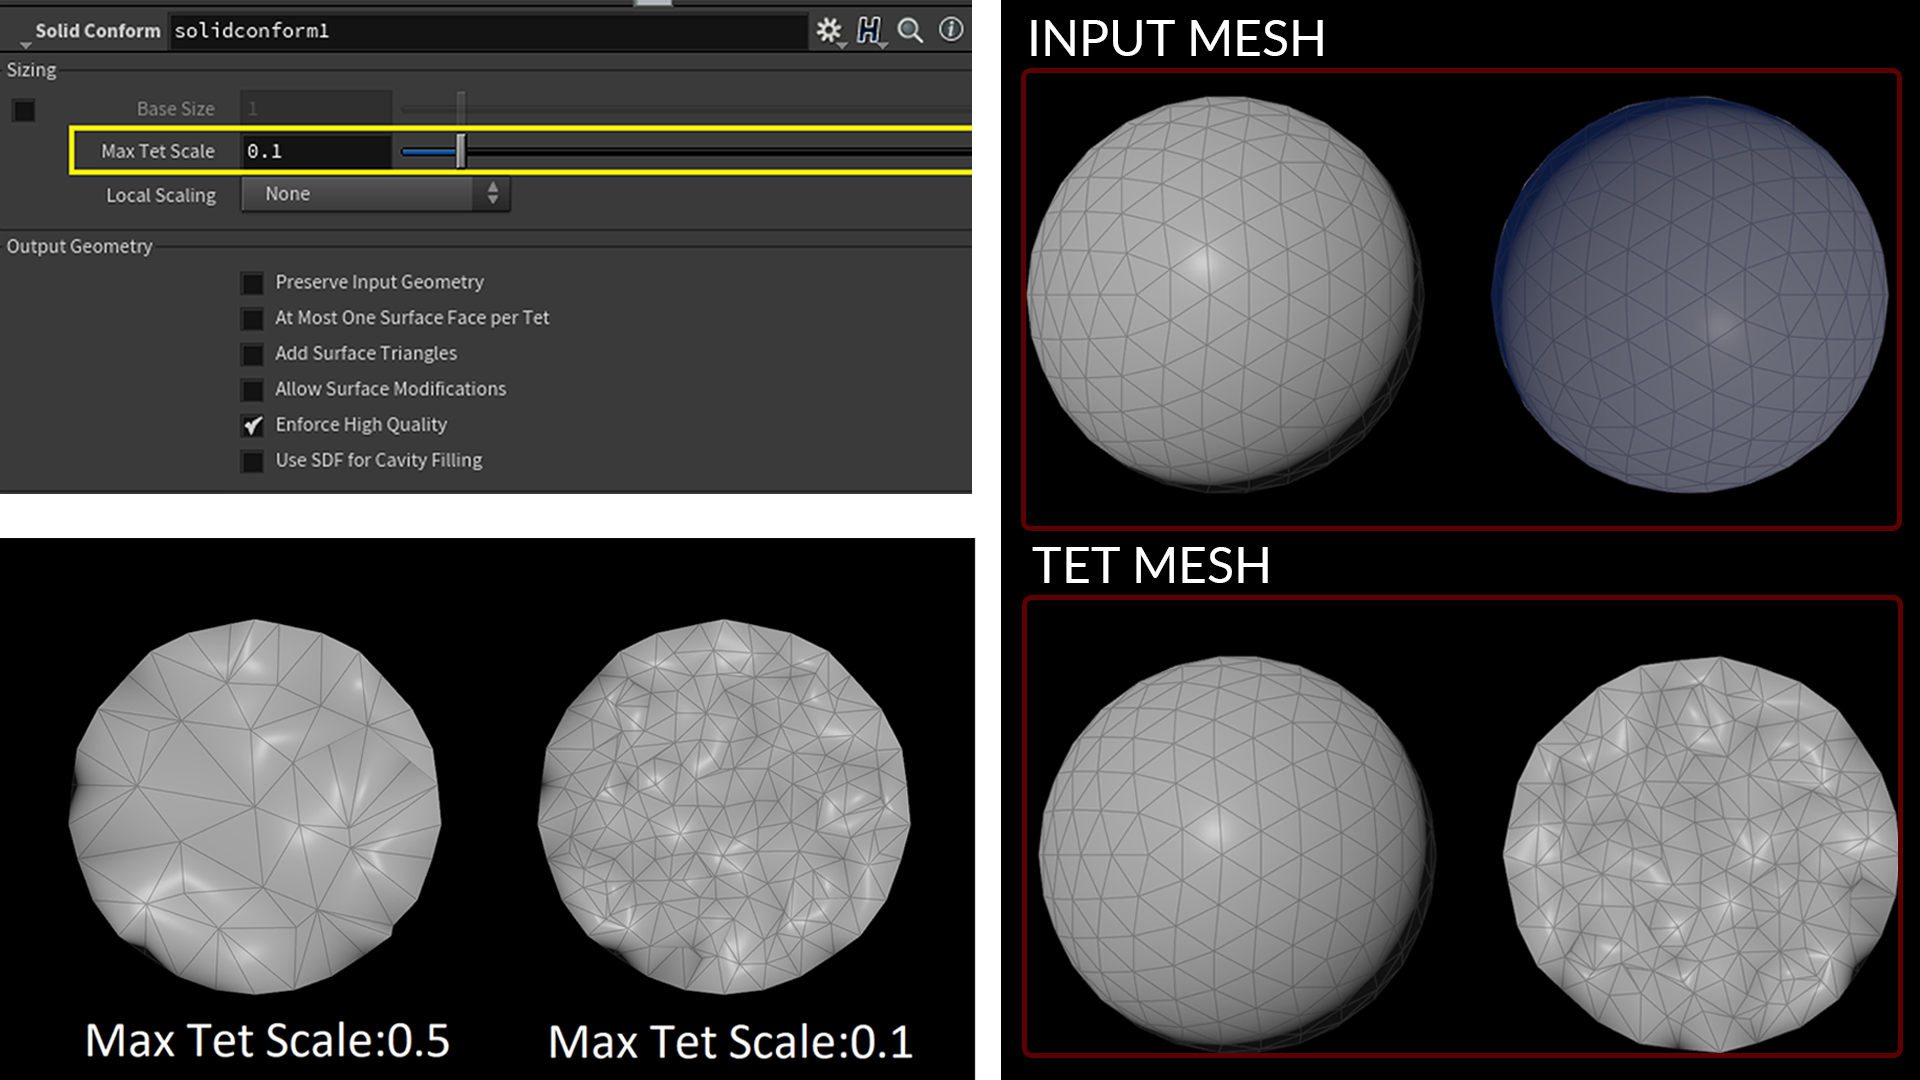
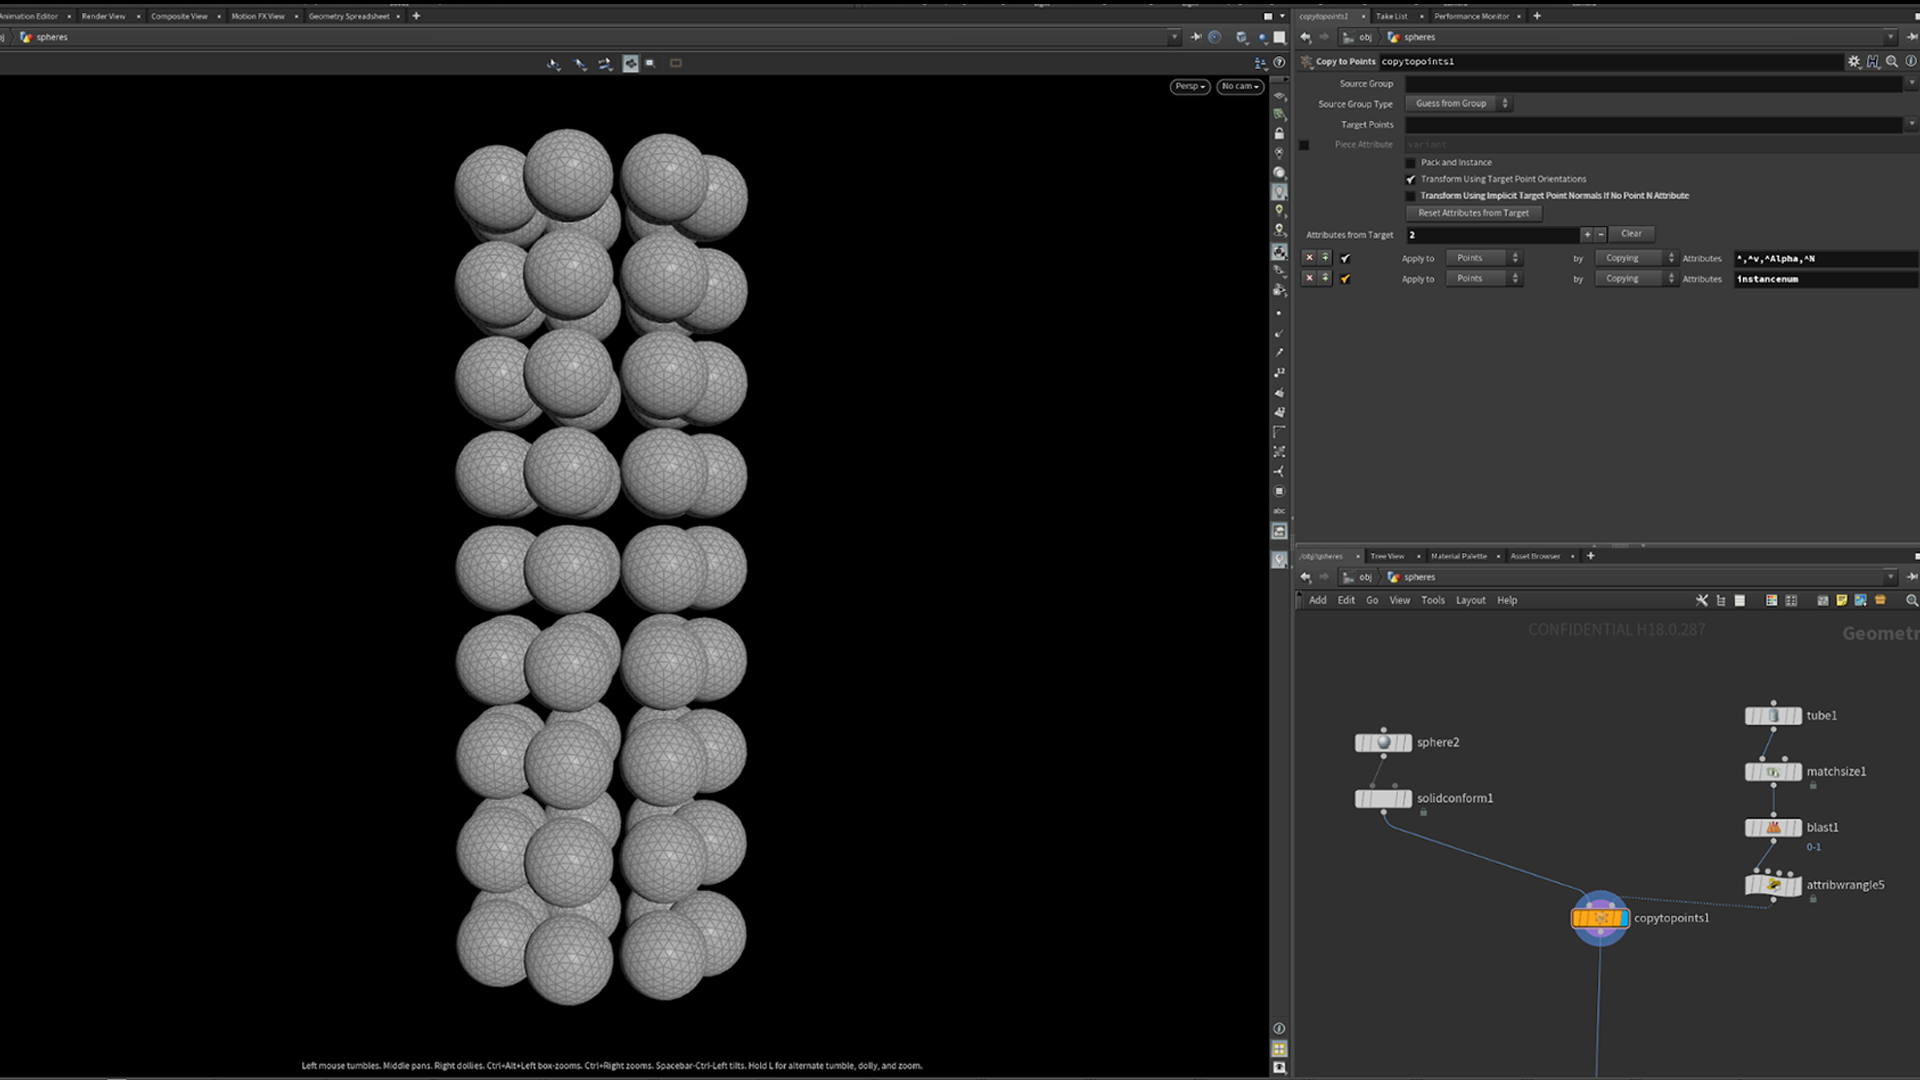
We will start with a sphere. The next step is to convert it into a tet-mesh. We can do this by either using the Solid Embed SOP or Solid Conform SOP. In most cases it’s more effective to use the Solid Embed SOP, which creates a simplified tet mesh that works well with the embedding feature inside FEM. However, in this example, we won’t be embedding our geometry, so we are going to use solid conform because I want the tet layout to match the source polygons exactly. We will use 0.1 for the Max Tet Scale.
QuickTip
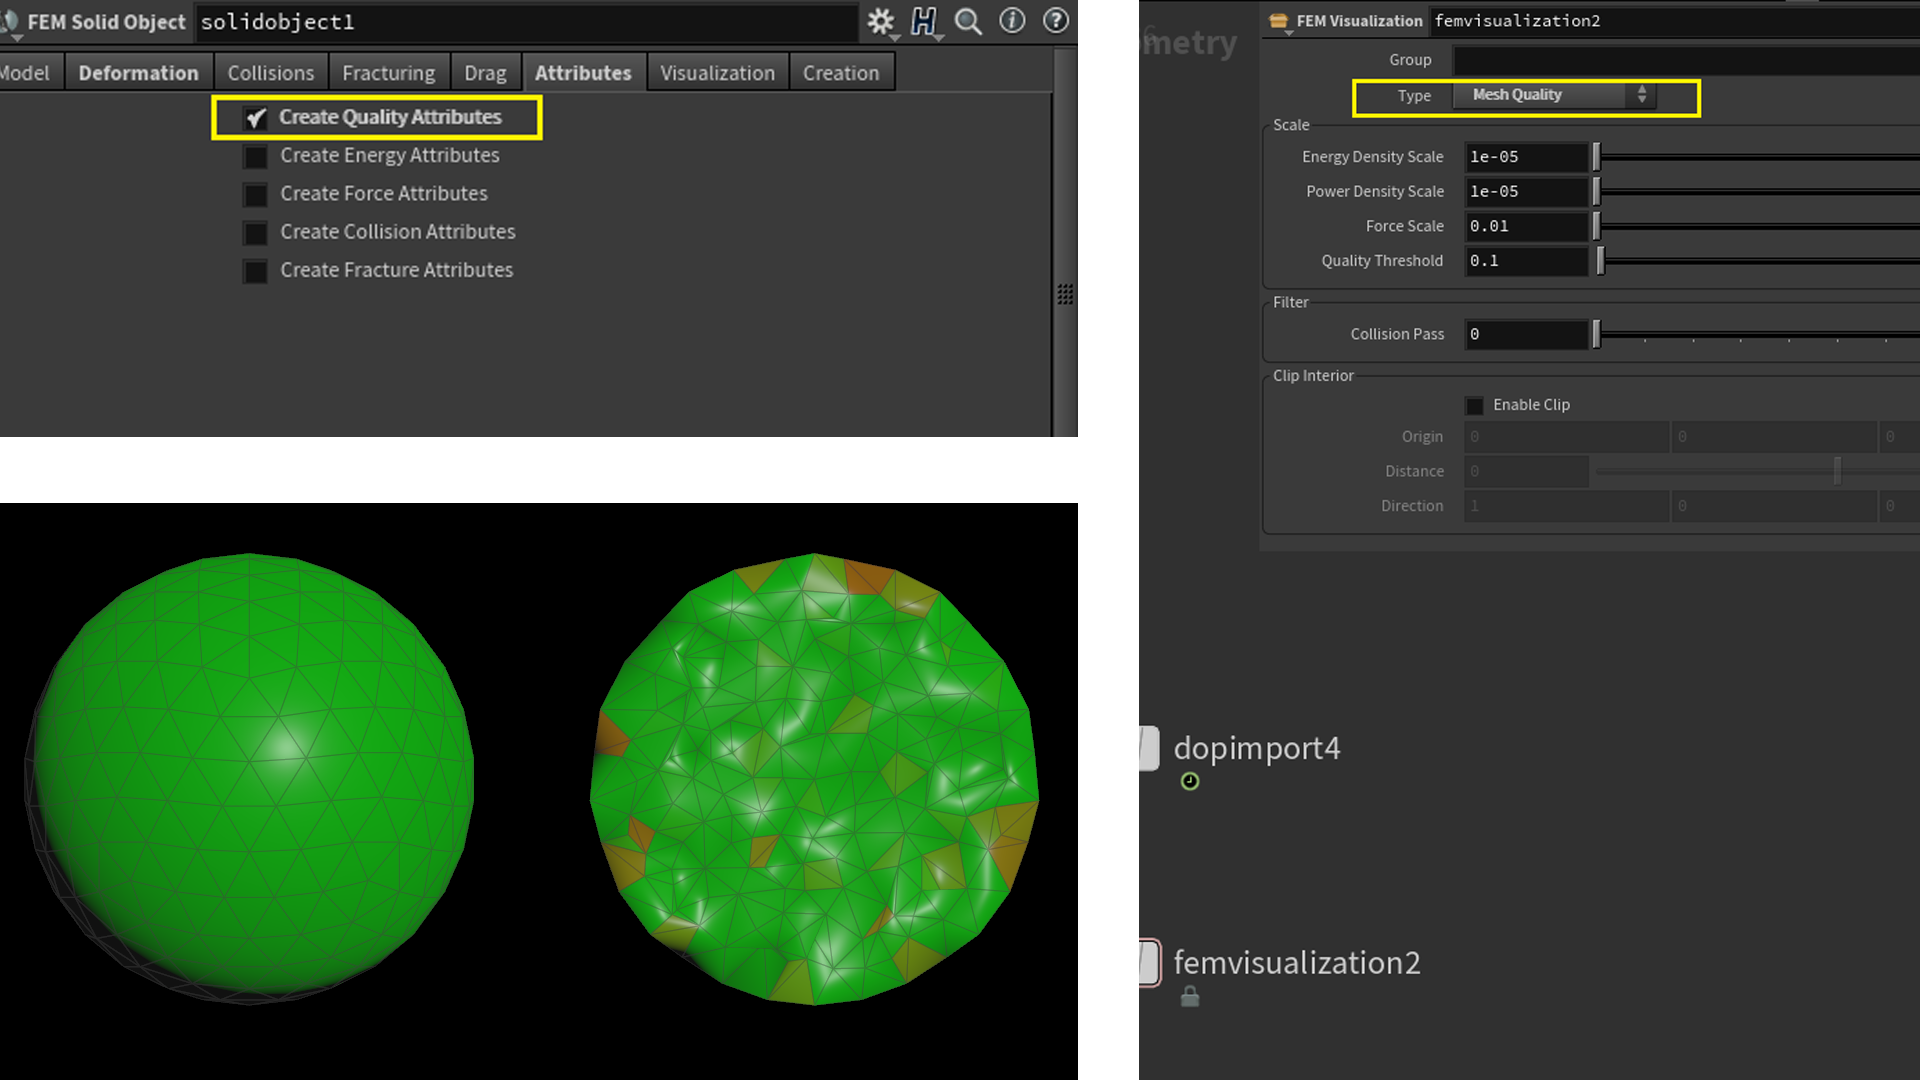
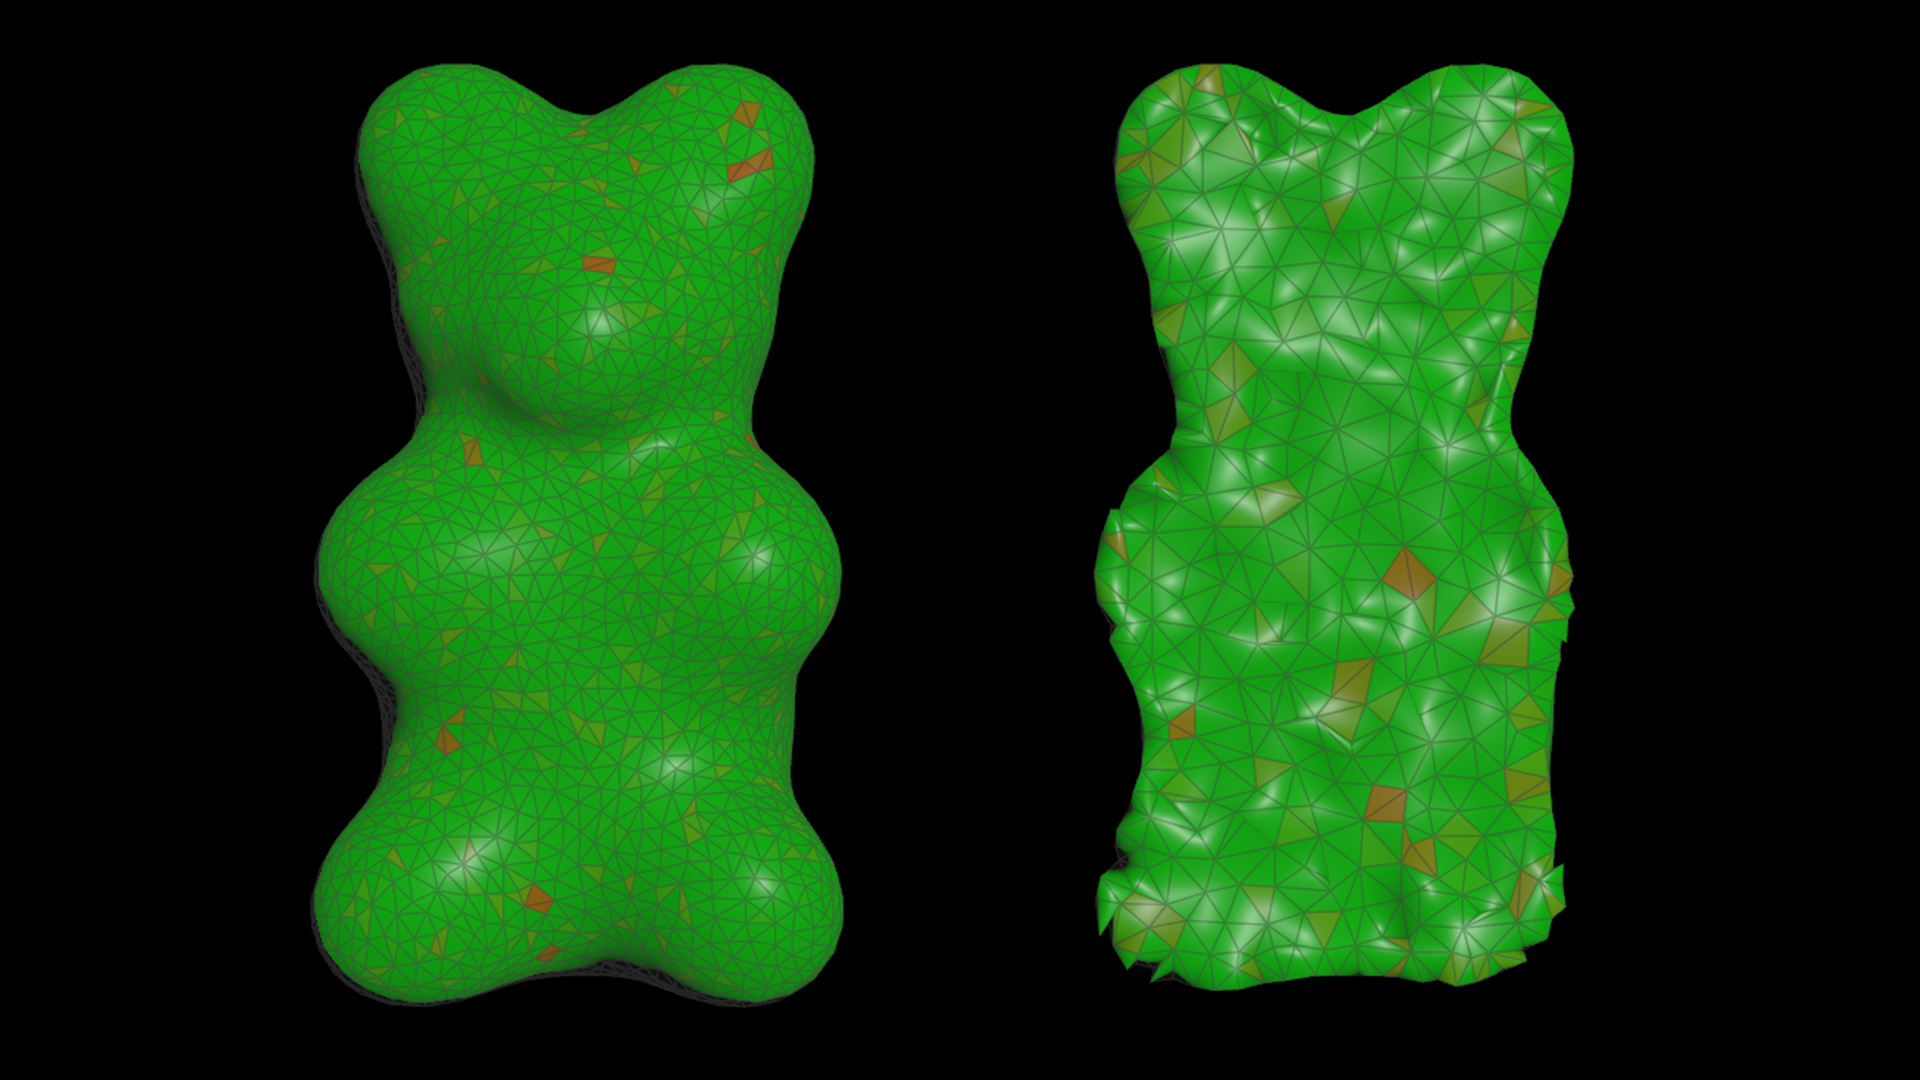
Always use a clip node to check your interior tets, having not enough tets will limit the degrees of freedom in your simulation. You can adjust your interior tet size by changing the Max Tet Scale parameter.
Normally when using the Solid Conform SOP, you should not use it directly on your geometry. You can remesh or polyreduce before solid conform. If you want to be more safe, you can clean up your geometry by converting it to VDB and back to polygon to make sure there are no holes or intersections that could introduce problems to the meshing process.
QuickTip
QuickTip
start with less amount of tets, since FEM is resolution independent. If you can get a behaviour that you are happy with, with lower resolution, you can then increase the resolution for your final simulation and expect it to look fairly similar.
Our simulation will be split into 2 parts; the first part will be the settling the spheres, the second will be squashing the spheres.
Settling the geometry
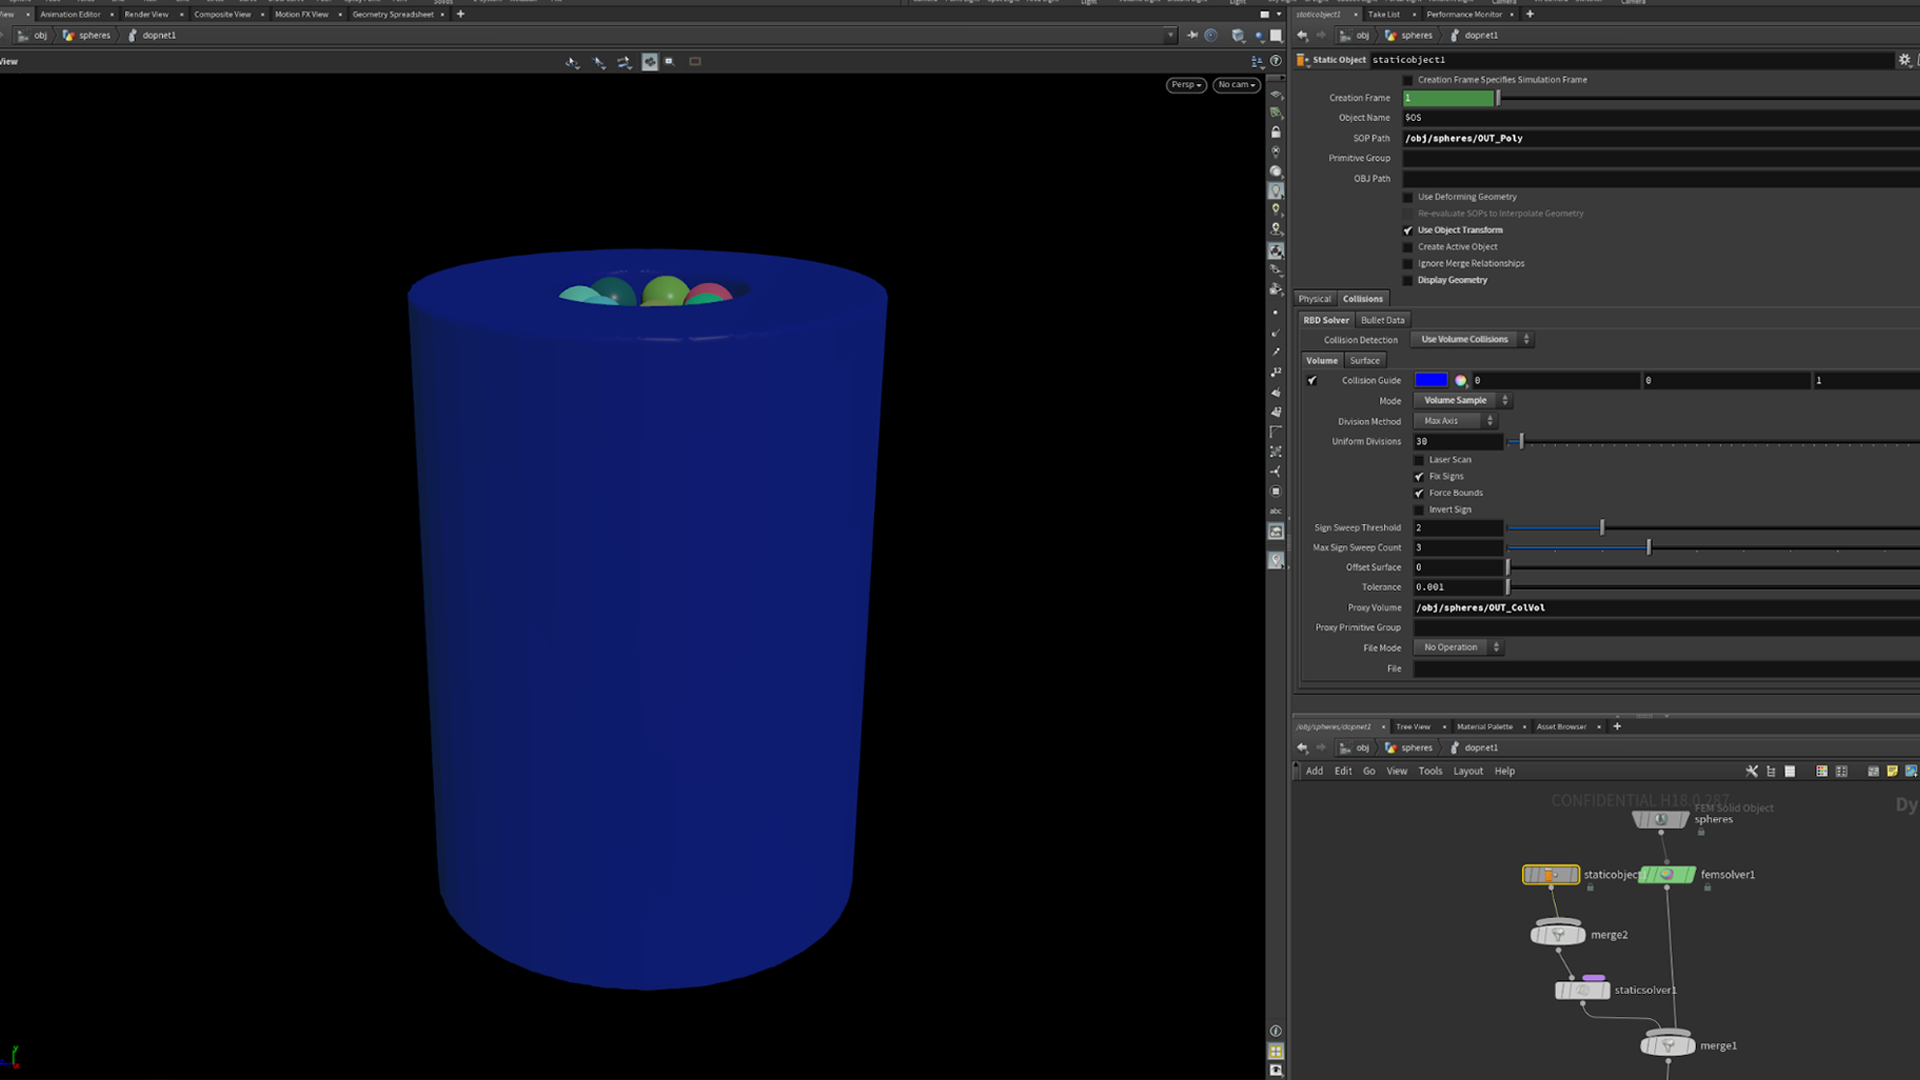
As all of our spheres are floating in space and we want a good and realistic starting point for the compression simulation. We can do a very simple FEM simulation to let the spheres settle realistically, instead of placing them by hand.
We are going to use a tube as the container. I used volume collision and the voxel size 0.01. If your collision volume is too low-res (result will be bumpy), it could cause your geometry to have unintended deformation on the surface, so it’s worth sacrificing a bit of simulation time to ensure you have a decent volume for collision.
QuickTip
you can turn on collision guide to make sure your collision geometry is looking right, displaying geometry doesn’t necessarily reflect what the collision geometry will be.
Depending on what behaviour you want with your FEM, you can adjust the settings accordingly. It’s worth going through the presets for a good starting point. If you are unsure what the settings do, it’s good to look through the documentation to get a basic understanding, but you can also set up wedging in PDG so you can see exactly what each parameter does - as well as for future iterations.
Setting up PDG
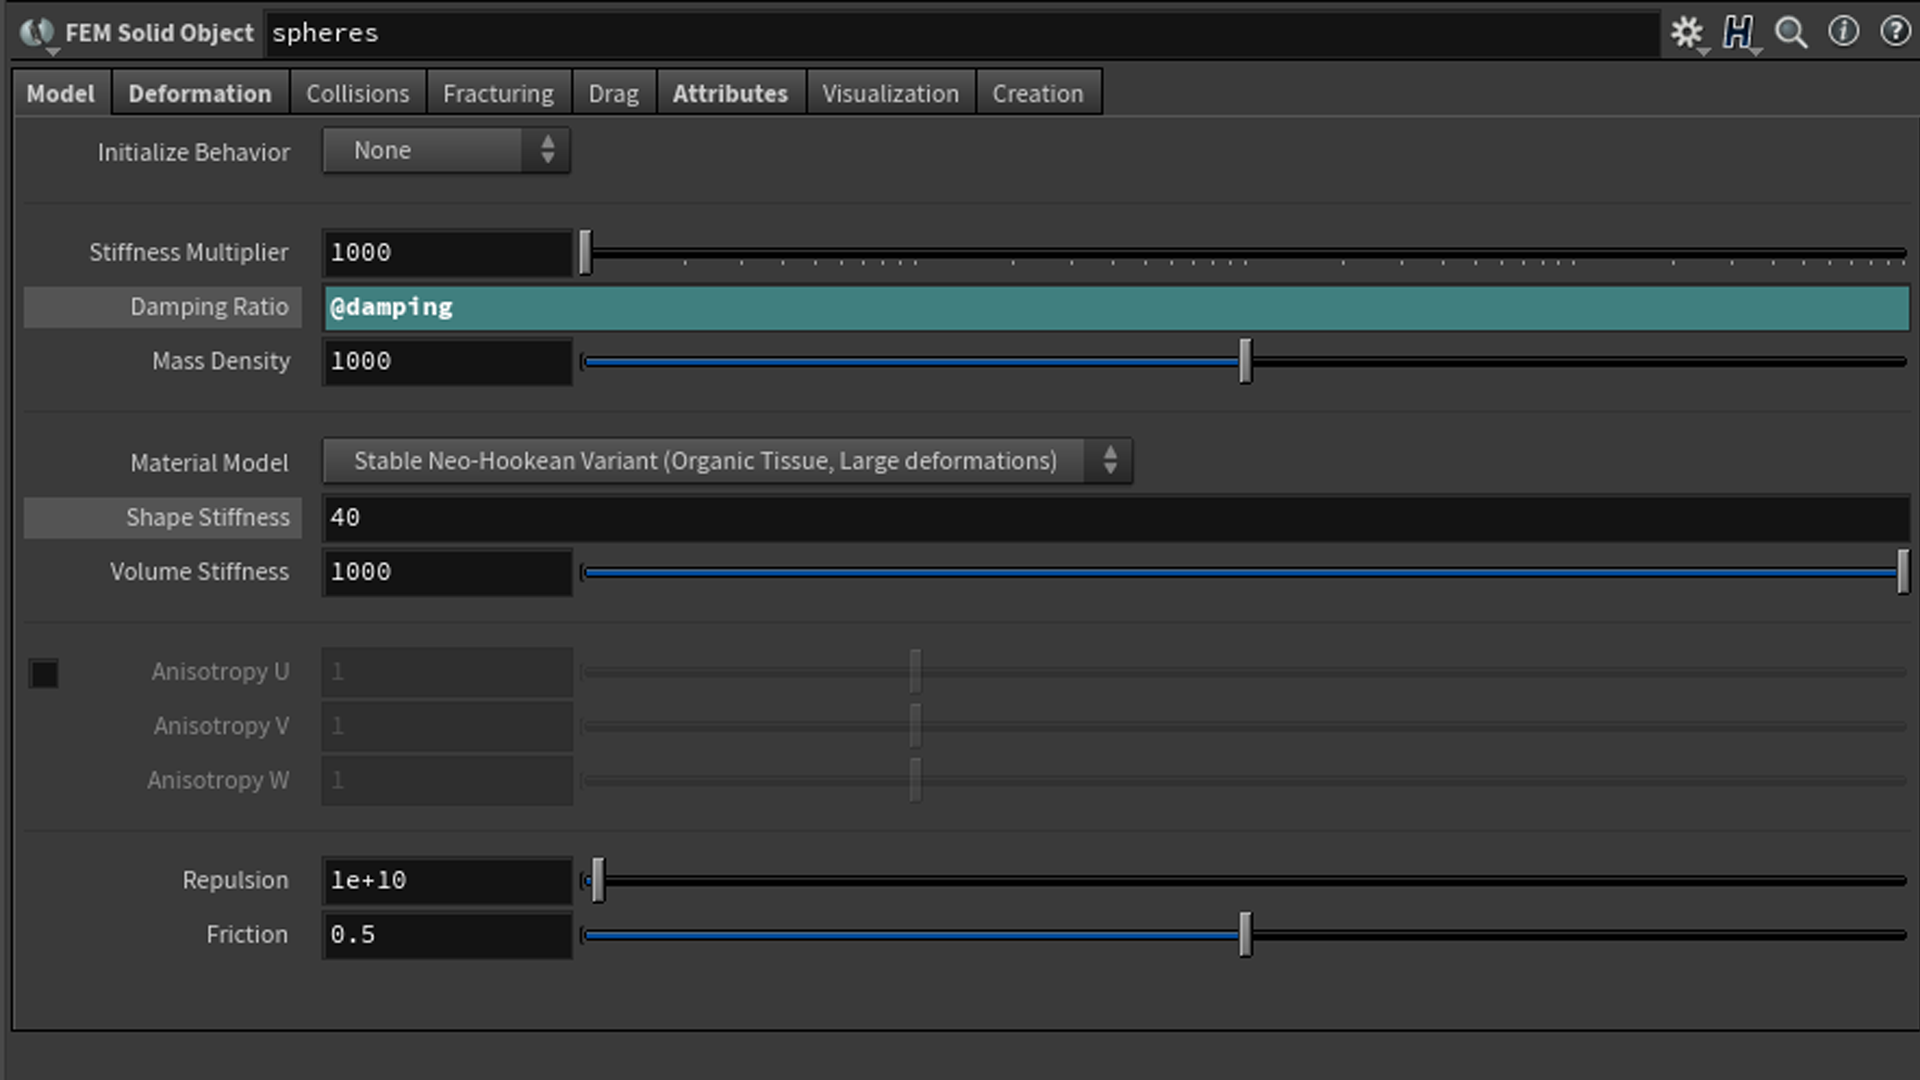
You can give an attribute to a chosen parameter; here, we will do @damping for the damping ratio.
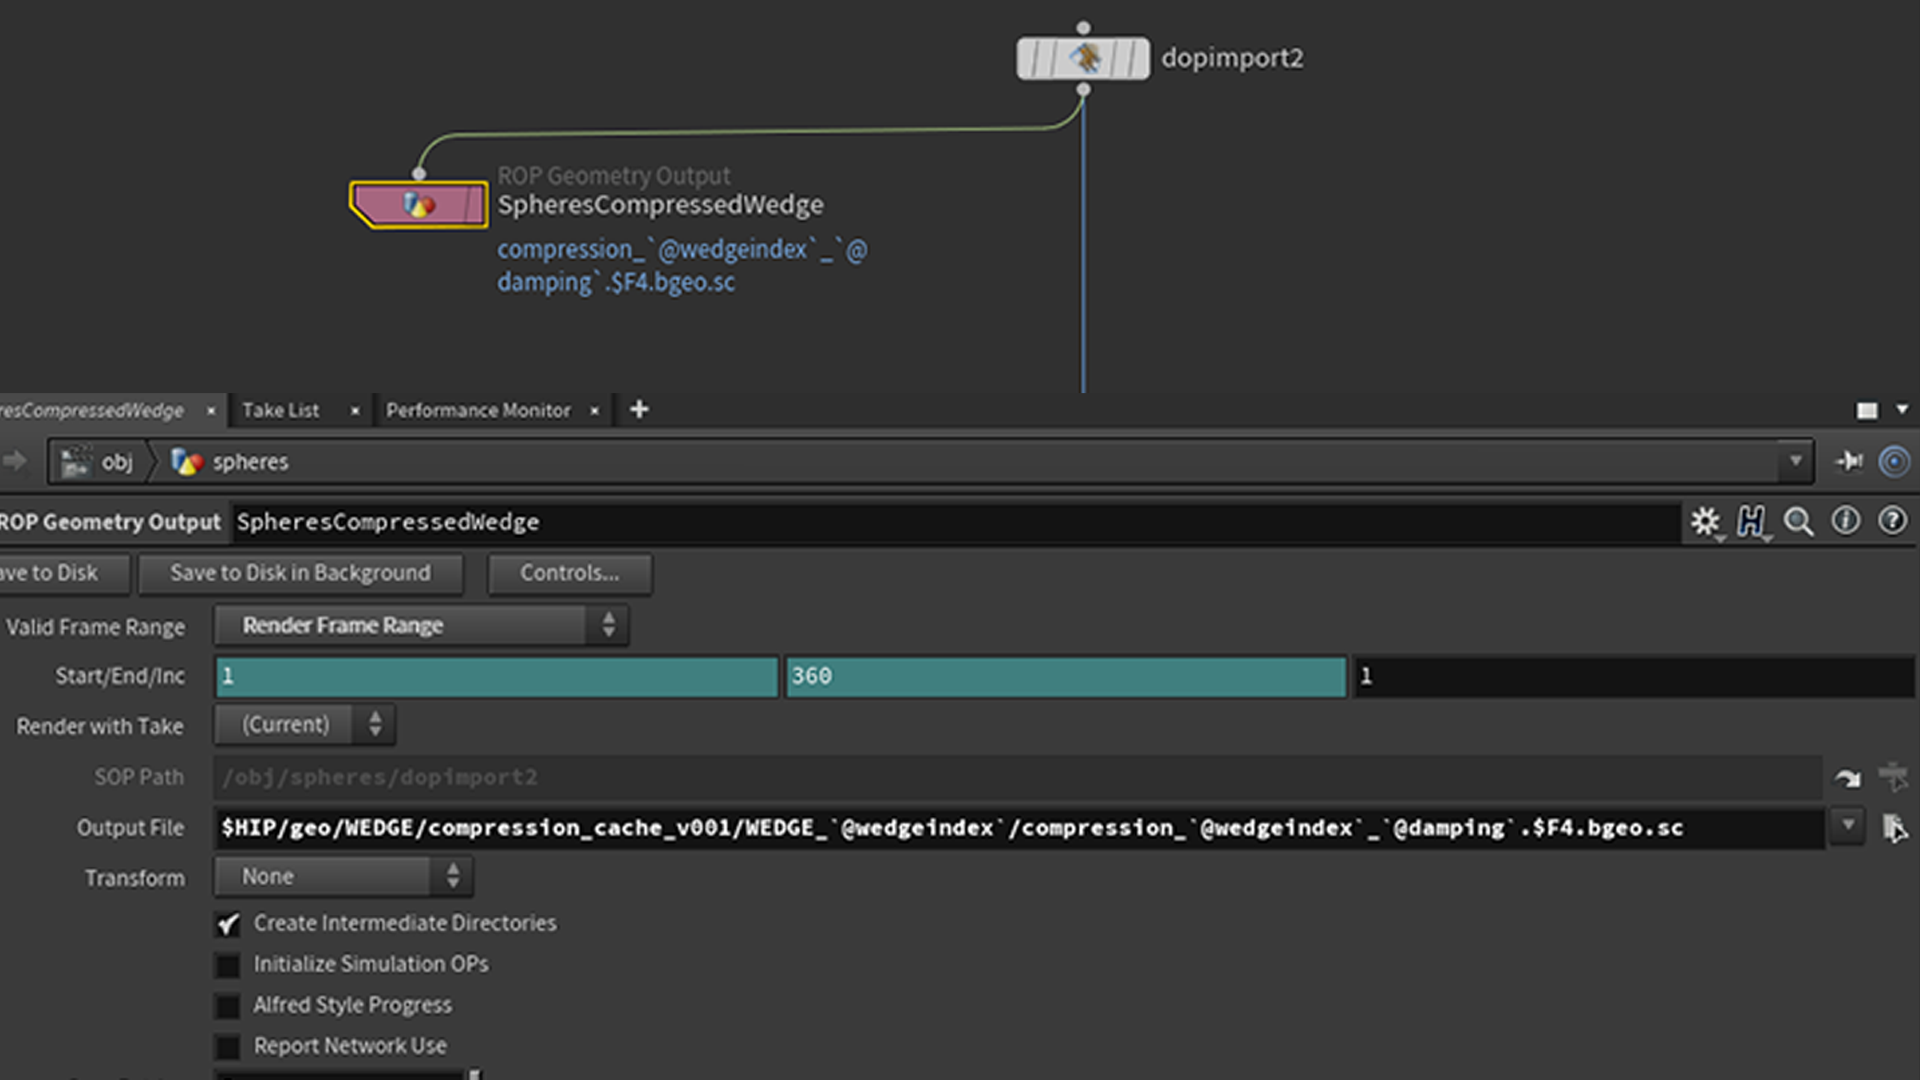
Outside the dopnet, underneath dopimport, we can put down a ROP Geometry Output, the file path can be something like:
$HIP/geo/WEDGE/compression_cache_v001/WEDGE_`@wedgeindex`/compression_`@wedgeinde
x`_`@damping`.$F4.bgeo.sc
This will create a good file structure for your caches and you will know exactly what your values are, the output will be something like this:
$HIP/geo/WEDGE/compression_cache_v001/WEDGE_1/compression_1_0.25.0001.bgeo.sc
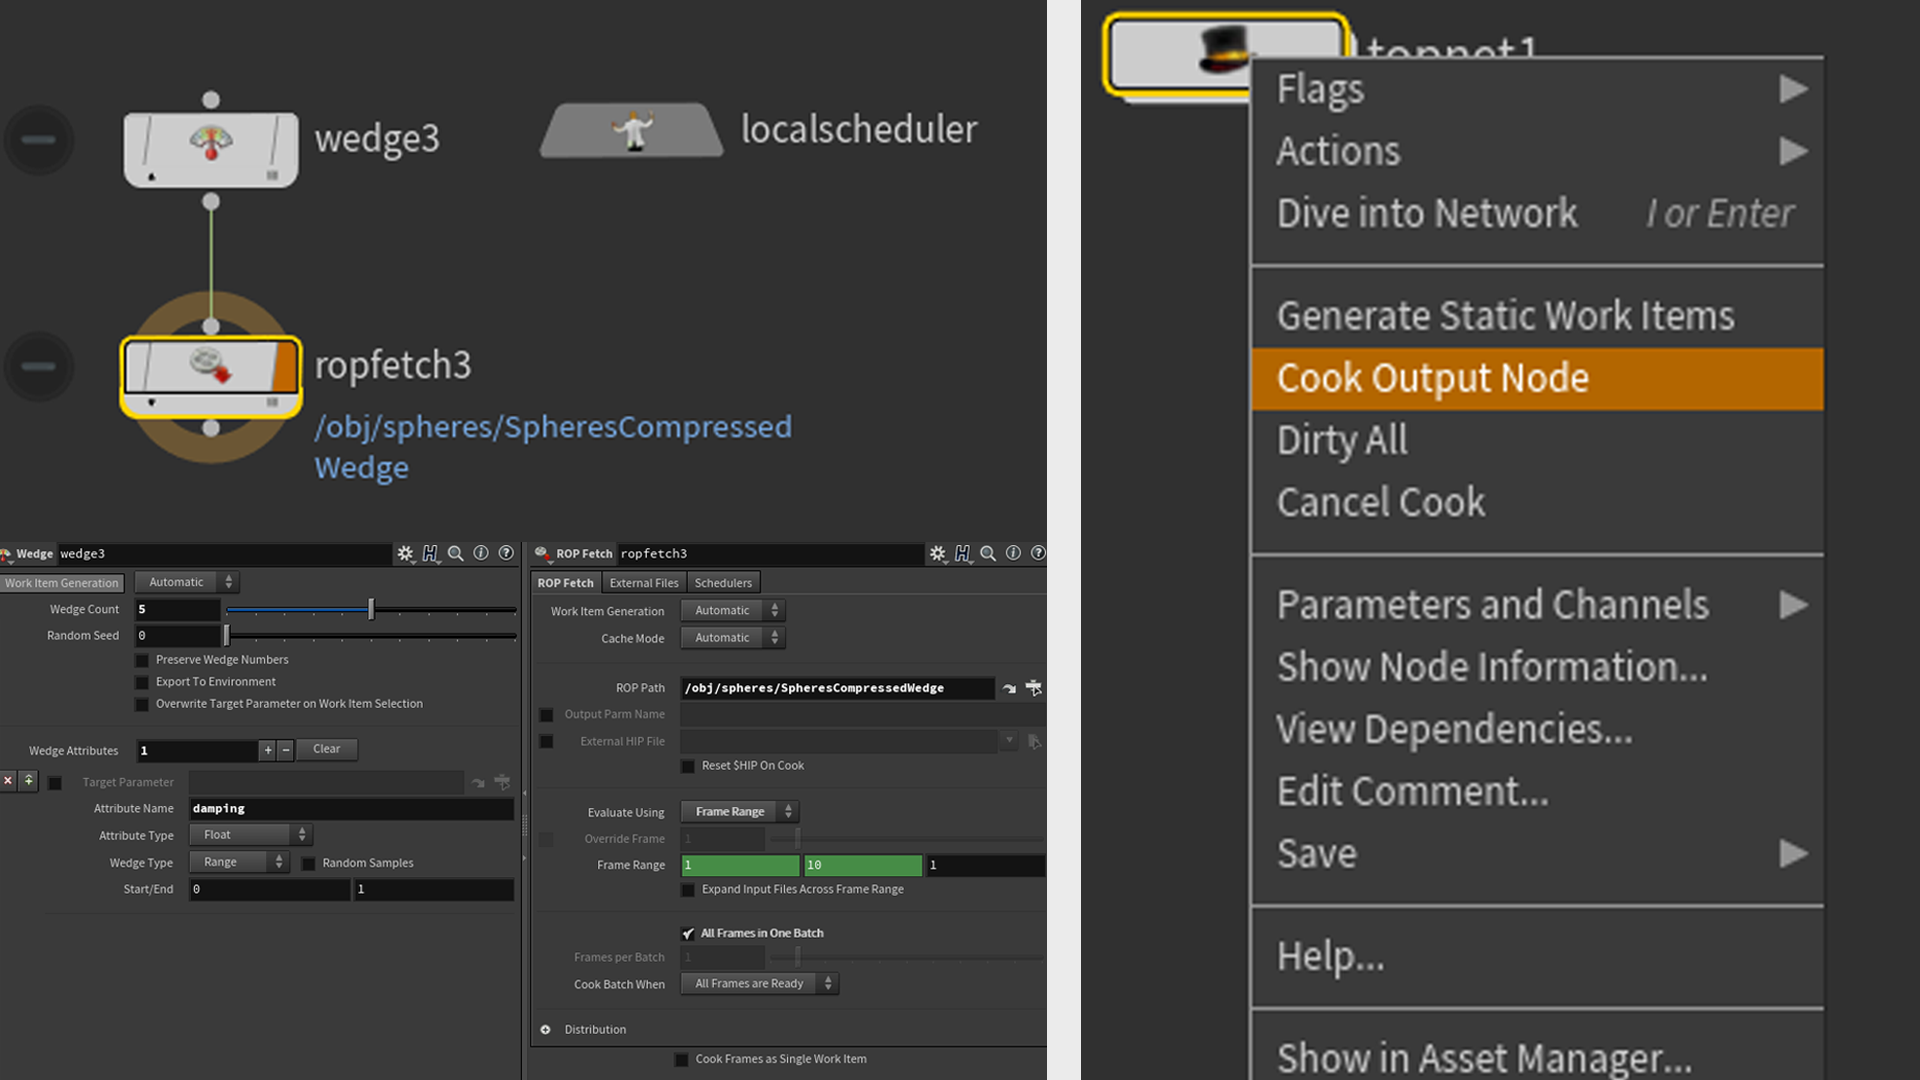
In the Topnet, we will just drop down a wedge and Rop Fetch, go back out and press Dirty All -> Cook Output Node, come back later and check on our results.
In this example, we don’t want the spheres to deform too much, just be squashed directly from the compression and turn back to their original shape as soon as no pressure is applied to them. We can give the Damping Ratio a value of 1, Substeps a value of 4 and leave everything else at their default. We will use the same settings for the compression sim as well. Let the simulation run until you get a nice initial state for the main simulation.
QuickTip
Note that there are some updates on FEM Solid Object and FEM Solver. There are now 2 material models you can choose from: Co-Rotational and Neo-Hookean. We will be using the new Neo-Hookean model. This model only works with the GNL solve method which is an update on the FEM Solver for Houdini 18. These are the default settings, but if you change them, make sure to check that you are using the right solve method for the correct material model.
Compression
Now we have a settled stack of spheres, we can move on to compressing them with an additional collision geometry using a tube. It is very important to make sure that we do not over compress the spheres, as this will produce broken results.
Rather than animating the tube by eye, we can calculate its position and height by using the total volume of the spheres.
Calculating the height of the collision geometry
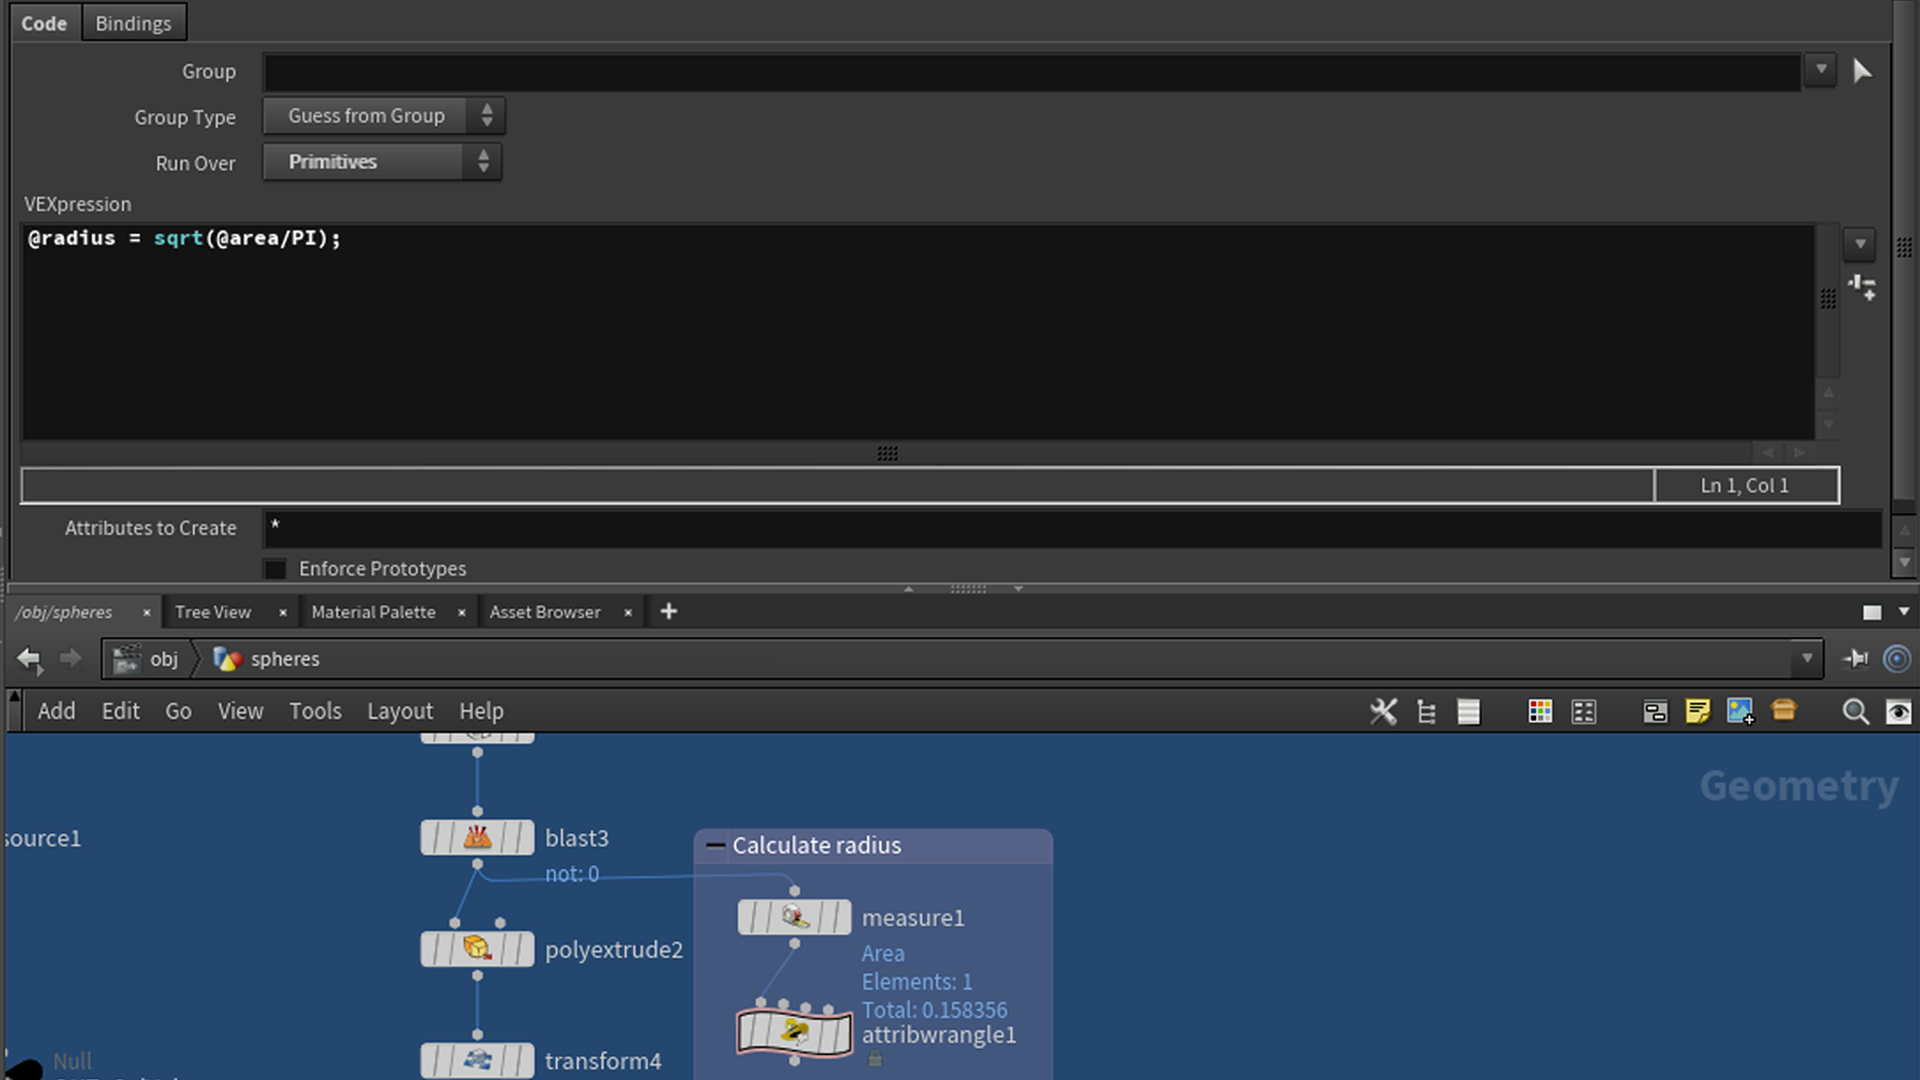
We will start by finding the radius of the tube, depending on how you created the tube, you can get that directly from the tube parameter, or you can calculate it using the Measure Sop. I found the area of the circle and in a primitive wrangle I put @radius = sqrt(@area/PI); to find the radius.
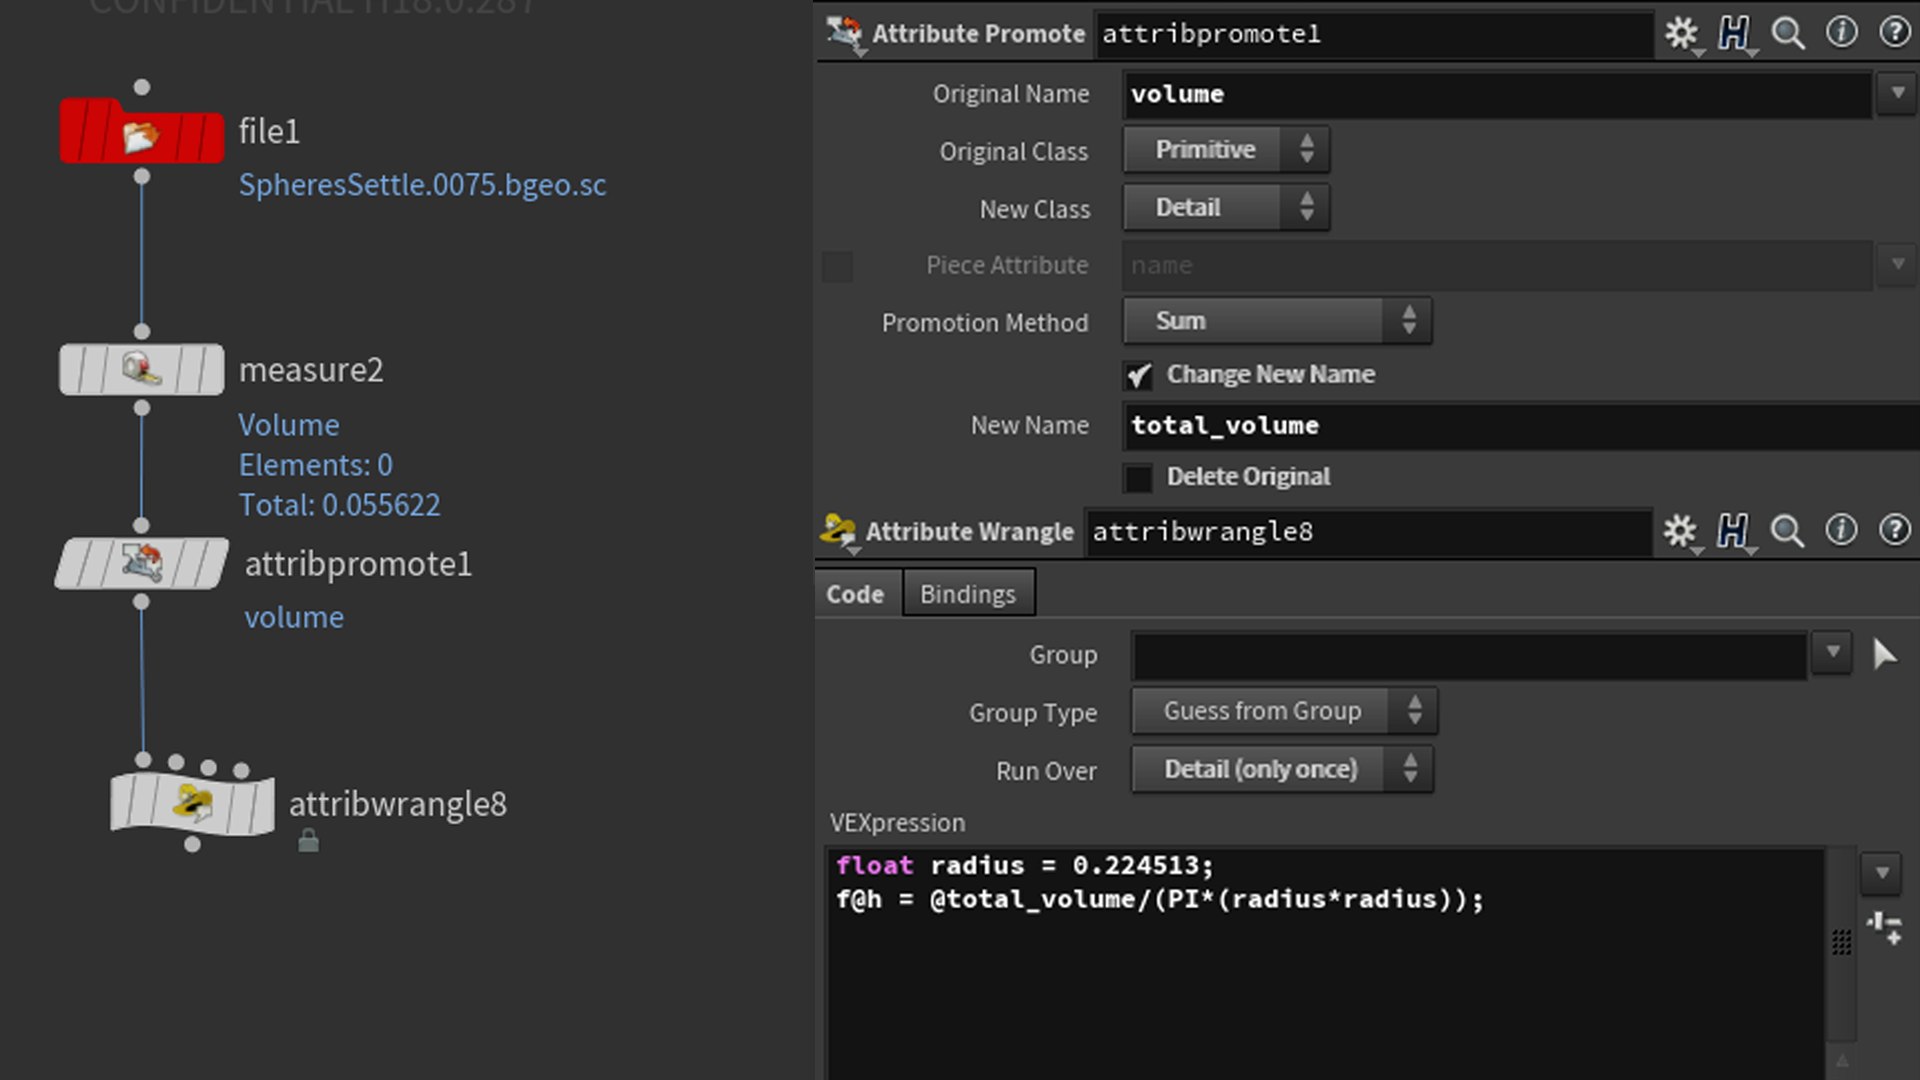
It doesn’t matter what geometry you are using, as long as you make sure you calculate the correct position such that the total volume in the tube below that height is equal to the total volume of the spheres.
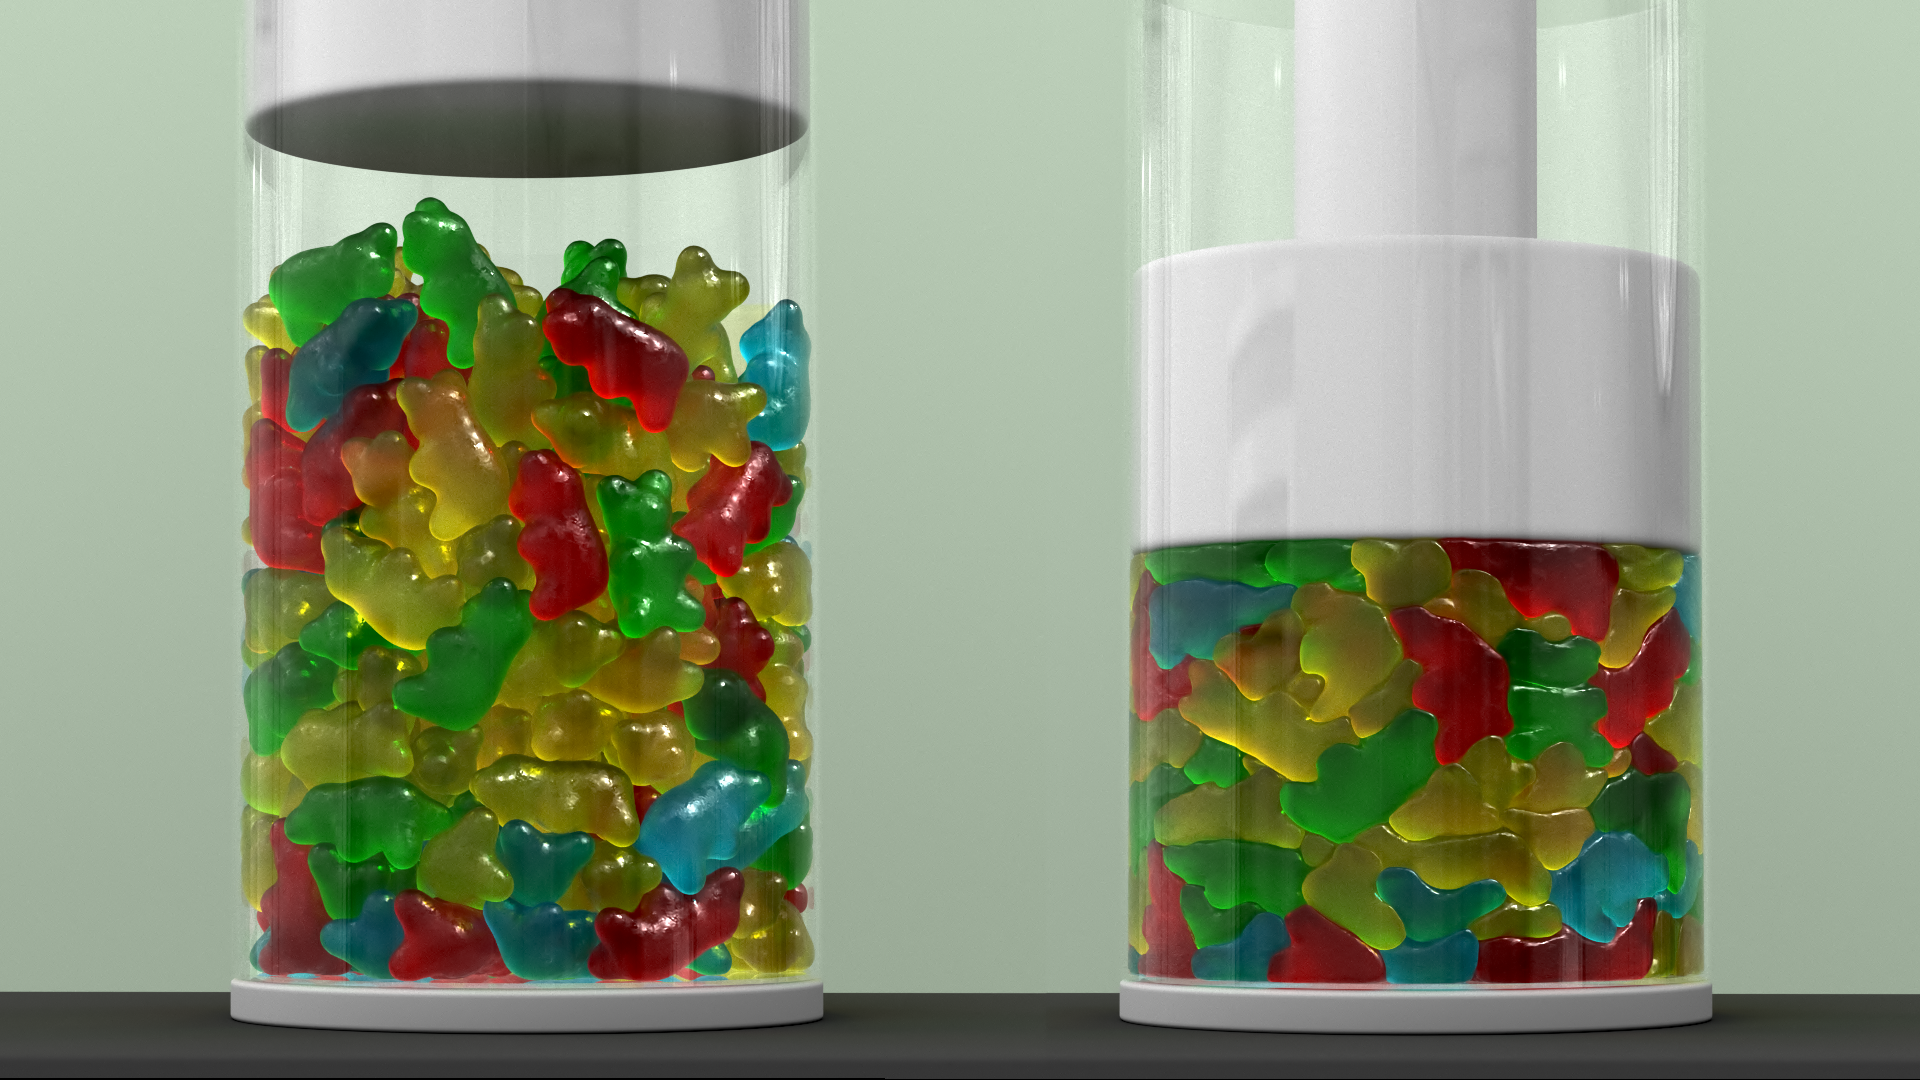
With the same collision geometry settings, we can now proceed to simulate. The volume preservation for this example is 95% when it is most compressed. This can be further improved by using higher resolution and substeps. Here's a flipbook for the spheres and a render for the gummy bear version.

That’s it for this tutorial, hope you found something useful that you can use in your future FEM simulation!


Emily Fung
Hi! My name is Emily Fung and I am a Houdini FX artist with a generalist background. I am currently an intern at SideFX, with a focus on Solaris and FEM. I have also an interest in Pyro.
COMMENTS
CGxiao 6 years, 7 months ago |
It seems the file cannot be downloaded
fianna 6 years, 7 months ago |
Should work now, CGxiao.
CGxiao 6 years, 7 months ago |
Thank you
Lobato 6 years, 7 months ago |
Fantastic Emily.
olivetty 5 years, 11 months ago |
Omg, the bears at the end cracked me up! xD Amazing! Thanks for the tut!
jim707jim707jim 5 years, 10 months ago |
I am wondering why there's only one video tutorial about fem in sidefx tutorial page(not a masterclass) , what you were doing all of these years :)
twitchtamilan 5 years, 5 months ago |
good
steeevenjohnson 4 years, 8 months ago |
Nice thread! Thanks http://www.sirpriz.com/post62
Keanorin 2 years, 8 months ago |
I often find myself engrossed in playing online games at Lucky Tiger Casino. The wide range of thrilling options they offer hooks me right from the start. Whether it's classic slots, immersive table games, or cutting-edge live dealer experiences, they have it all.Try https://lucky-tiger.casinologin.mobi/ and the stunning graphics and smooth gameplay will not leave you indifferent. Moreover, Lucky Tiger Casino ensures a secure and fair gaming environment through their state-of-the-art technology and reputable licensing.
Please log in to leave a comment.