UNITY SHADERS FOR VERTEX ANIMATION EXPORT TOOLS
Setting up the unity shaders is relatively straight forward but there are a couple of things you need to change to the import settings of the mesh and textures for correct results. Watch the video or follow along with the details below.
1. Setting up the shaders
- Download the latest version of the Game Dev tools from GitHub - https://github.com/sideeffects/GameDevelopmentToolset/tree/Development
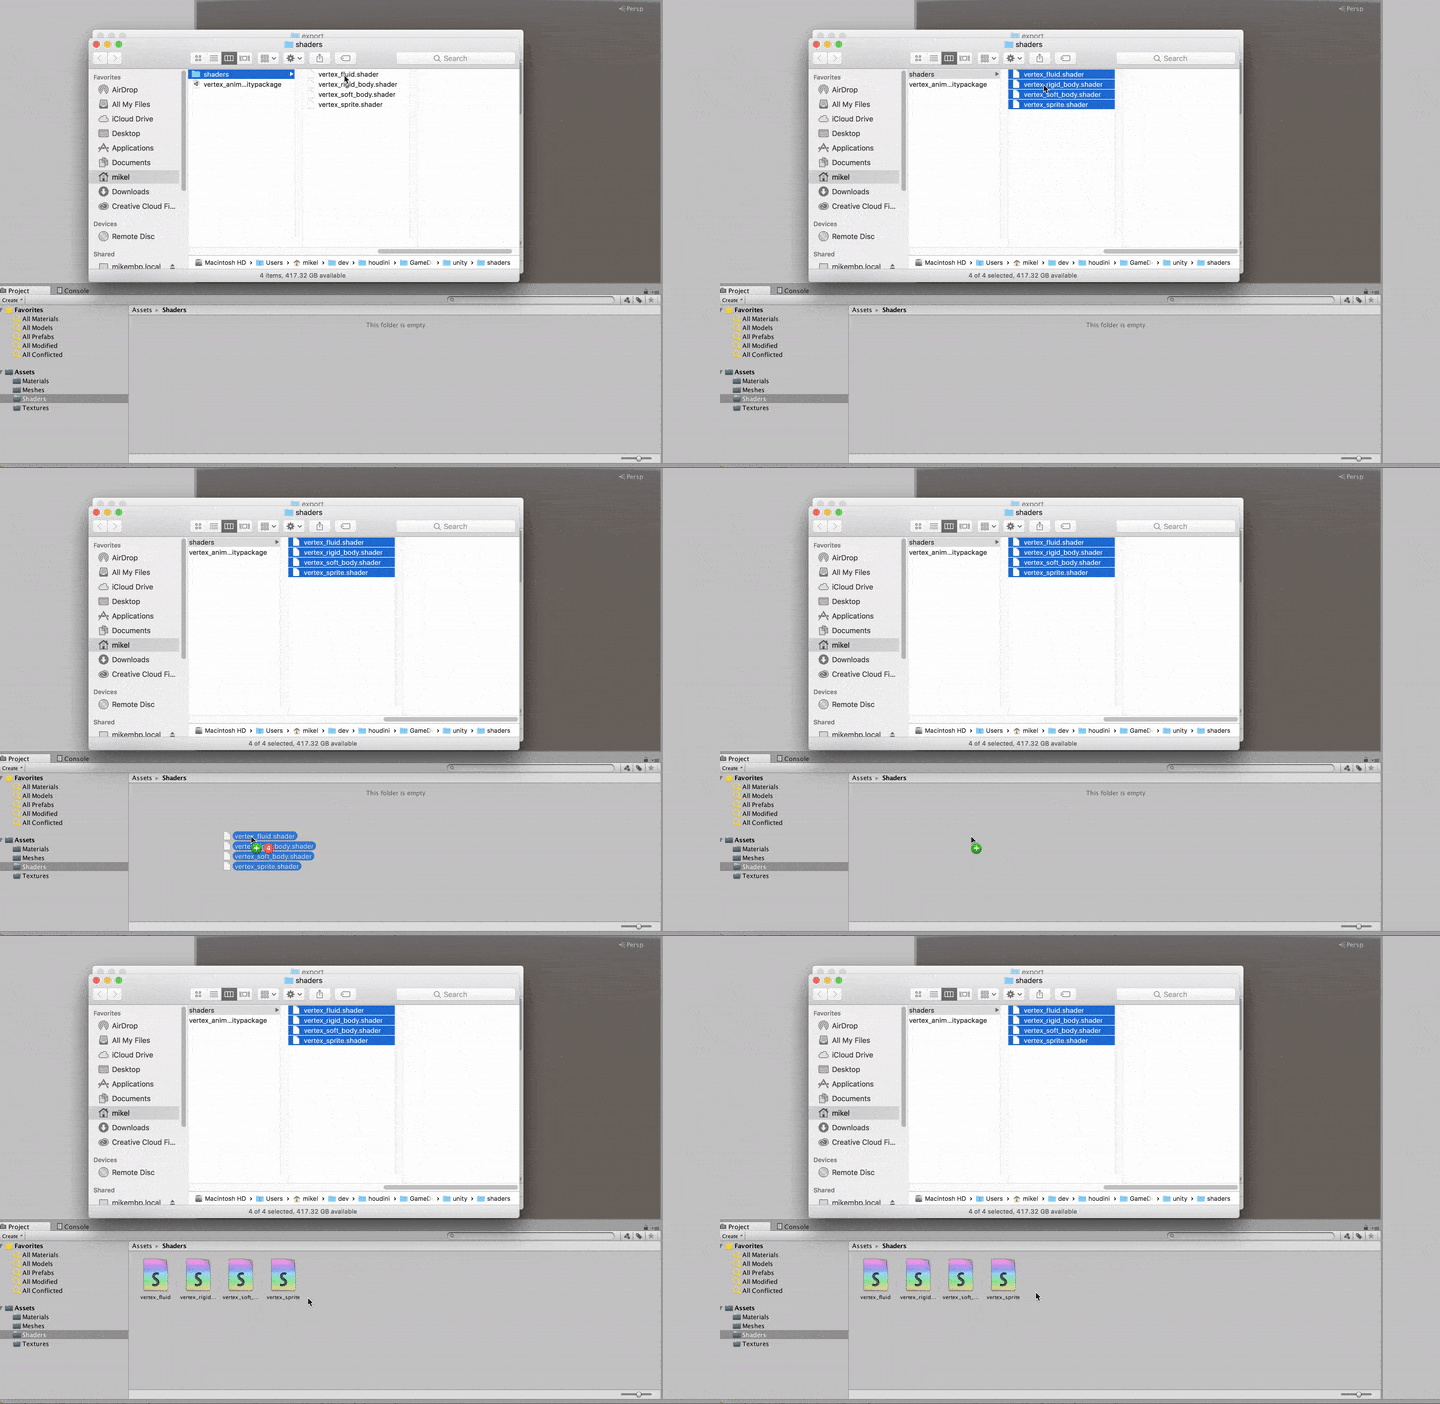
- Drag and Drop the Unity shaders from the downloaded folder into your Unity project.
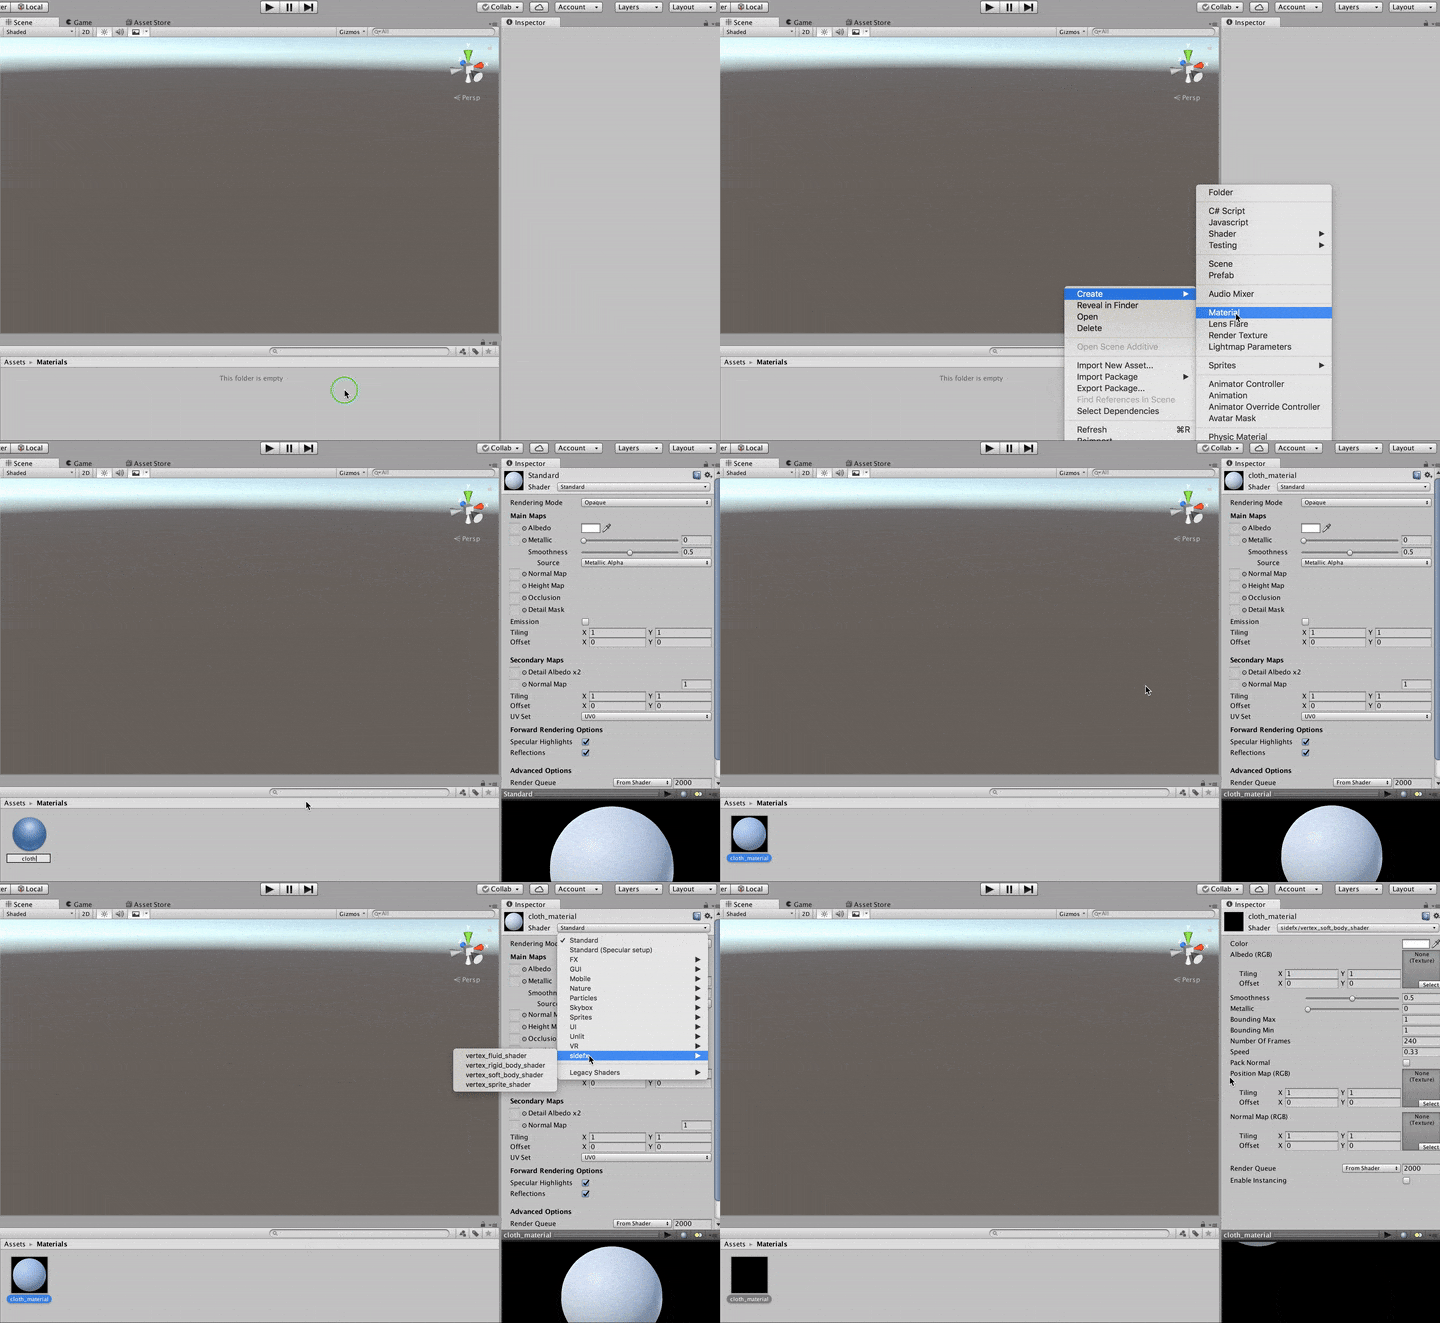
- Create a material and set the shader to the desired vertex animation shader.
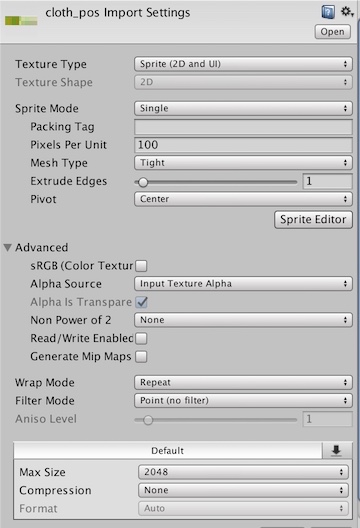
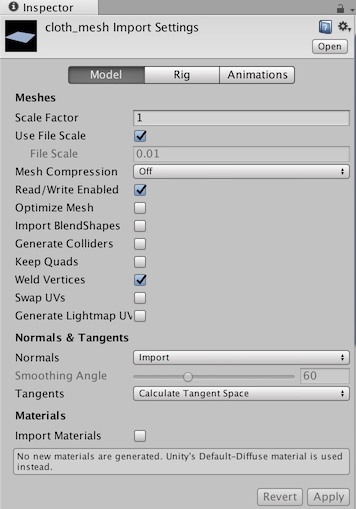
2. Import the Mesh and Textures into your project and match the Import Settings below.
Texture Import Settings
Mesh Import Settings
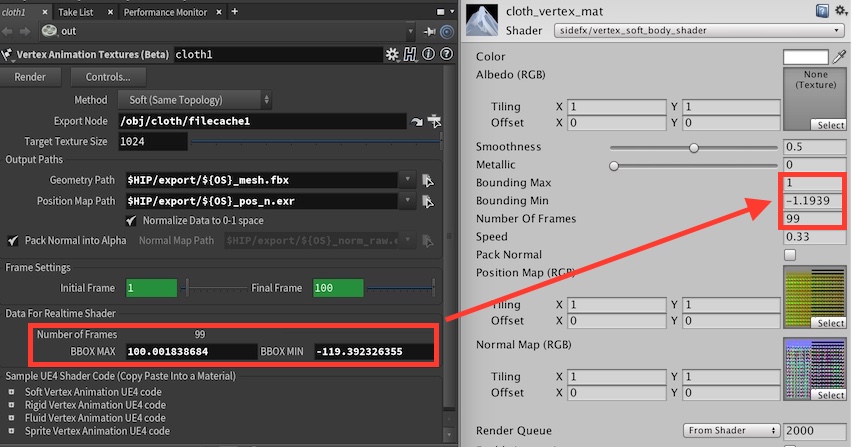
3. Assign the textures to the material and match the values from Houdini.
The BBOX Max and Min values are setup for ue4's unit scale so divide the value by 100 when setting the numbers in Unity.
Issues with the rbd rotation texture
The setup above works for most of the textures except for one little problem - the rbd rotation texture. If you setup an rbd material and set the speed to 0, you will notice that in my simple example we can see the cracks between the chunks before the object has started moving. This is not correct.
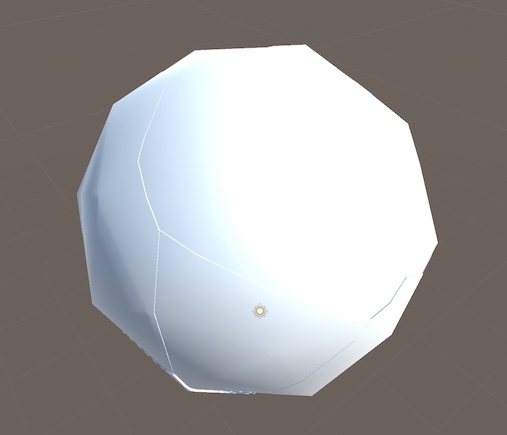
To fix this we have to make a change to the colour space setting of the project. If you're already in the middle of a project and using the gamma color space this is a problem because it will change all of your textures as well as the look of the lighting. If you know a better way of doing this please let me know. Below are the changes you need to make to fix this for now.
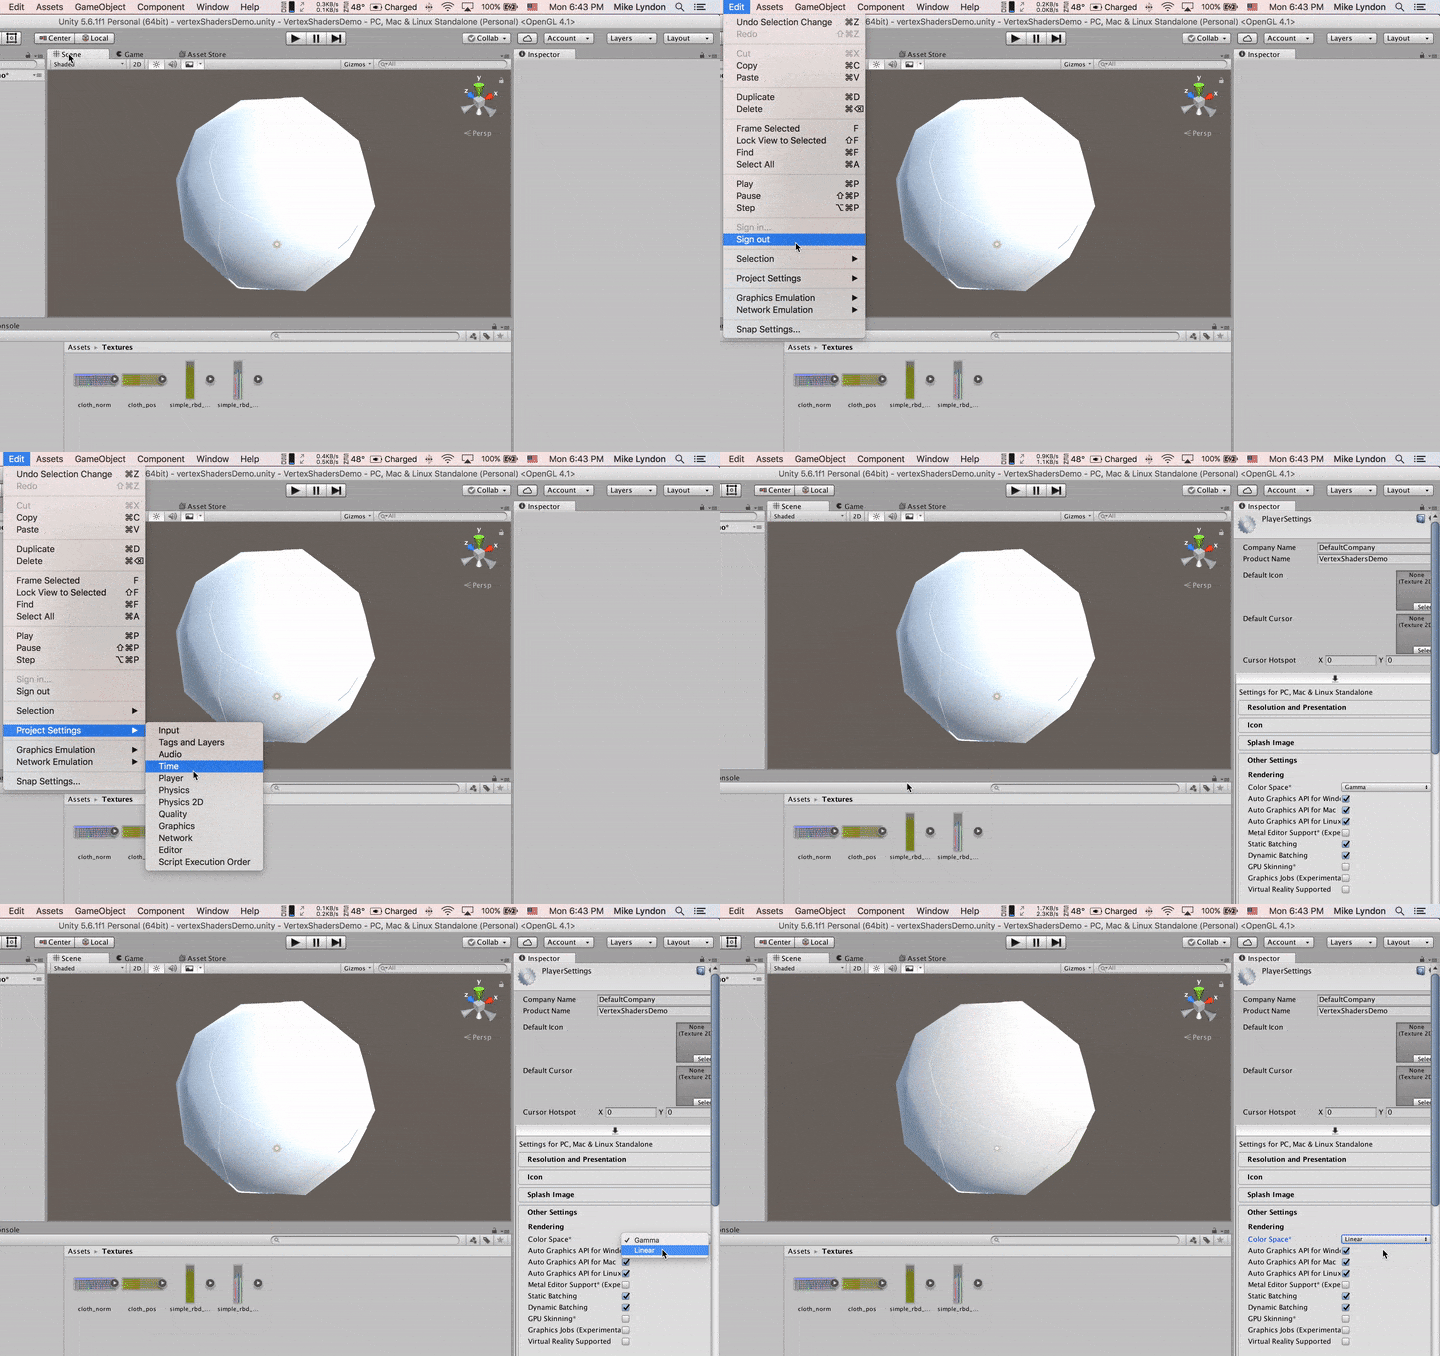
Change Color Space
You can change the colour space by going to the menu Edit > Project Settings > Player. Under "Other Settings" change color space from Gamma to Linear.
Change the Texture Import Settings for the rotation texture
You can read more about how Unity deals with linear textures here - https://docs.unity3d.com/Manual/LinearRendering-LinearTextures.html
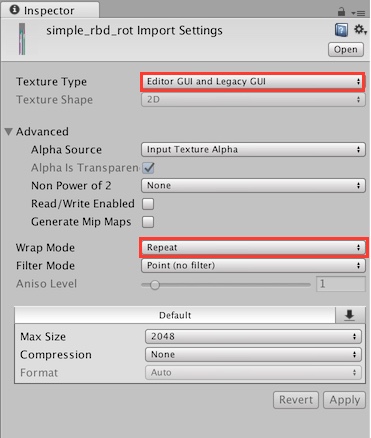
Change the Texture Type to Editor GUI and make sure Wrap Mode is still set to Repeat
I don't think this is the best way to handle this so if you find a better way please let me know!
Mike
COMMENTS
JimInziello 8 years, 10 months ago |
I'm desperately trying to find a detailed version of this same work flow for UE4. I need a step by step overview, especially in what node I'm exporting and just where I'm supposed to "paste" the code for the material in UE4. The main Luiz Webinar just briefly shows the material network, without a walk through of what is going on.
I've got this fractured object that I want to put on my VR game, just sitting in Houdini Indie, waiting to get out.
Always Learning
-Jim
mikelyndon-sesi 8 years, 10 months ago |
Hi Jim. Are we looking at the same webinar? Luiz goes into a lot of detail about the general setup for exporting vertex animation data to ue4. At 36:26 he starts talking specifically about rigid bodies and at 47:20 he shows a step-by-step of how the material in ue4 is setup. Anything that he hasn't covered there can be supplemented with his cloth example.
https://vimeo.com/212982381
What part of it isn't clear with regards to what is going on?
Mike
Anonymous 8 years, 10 months ago |
I took in fluid information made by Houdini into unity
After that
The topology got messed up
In this case
How do I set it on the unity side?
Please create a fluid tutorial from Houdini to unity
art3mis 8 years, 8 months ago |
This is a fantastic workflow! Unfortunately in recent test doesn't work with Vuforia. On build-deploy only get static meshes without animation. If I find a solution will post here...any feedback appreciated!
art3mis 8 years, 8 months ago |
addendum...this seems to be a mobile deploy issue...at least for iOS can't get vertex animation working. On the desktop or in editor...no issues!
art3mis 8 years, 8 months ago |
suggestion to sesi- please allow editing of previous comments. Anyways, the issue was a texture size issue...8192 for some reason simply will not animate although it looks great..4096 is the largest that works for me.
stimulant 8 years, 6 months ago |
Hi Mike,
This seems awesome, but I'm getting some issues when I apply the rotation map. It's best if you see it:
https://streamable.com/mhlf1
Applying the rotation map causes the pieces to scale up over time and generally not do the right thing. I have my number of frames and bounding box information set correctly from Houdini (dividing by 100 in Unity). I'm on the latest Develoment branch of GameDevelopmentToolset, Houdini 16.0.762 Indie, and Unity 2017.3.0b5. Same thing is happening in Unity 5.6.0f3.
Any help is appreciated!
mikelyndon-sesi 8 years, 5 months ago |
It doesn't look like you've set the texture type to "Editor GUI and Legacy GUI". And have you followed the last piece of the tutorial to change your colour space?
rossojr92 8 years, 1 month ago |
Hi,
This article is very nice. I'm trying to use Vertex Animation in Unity but it seems that something has changed in Houdini since this article was writed.
For example, now for rigid body there are 2 bounding box (Bounding Box and Bounding Box 1). Using this steps something does not work correctly in animations.
Can anyone help me to understand what is changed exactly and how to fix? I don't know if Houndini has changed the texture exporter (and so the shader should be updated accordingly) or if Unity 2017 has some new Texture Importer (from Unity 5) that doesn't work fine with Houdini texture format.
Thanks very much!
mikelyndon-sesi 8 years, 1 month ago |
There are 2 bounding box min and max values because one is for the pivot and one is for the position of the vertex. The latest shader in github is correct, and the vertex animation texture sheet ROP also outputs both sets of numbers. I'll update the image above when I get some time.
Everything still works as expected in Unity 2017 and 2018. Can you be more specific about what isn't working with the texture?
rossojr92 8 years, 1 month ago |
We have a wood-wall destruction animation.
Wall is made by two part. The first part of animation brokes the left part of the wall. The second part brokes the right part.
In Houdini we see the correct animation.
When we export to Unity we see that everythings is corrected at the frame number 0. When we render frame 1, we have every points shifted.
I have a question: our model is pretty big. Exported textures have a 24-bit compression. It means that we have 8 bit for red, 8 bit for green and 8 bit for blue. So, we can represent just 255 values in each axis, is it right? Because I was thinking about a precision problem with big models (with a big bounding box).
Thank you very much for your help. It's really important to us.
mikelyndon-sesi 8 years, 1 month ago |
An rbd sim with very large bounds will have precision issues. You are correct that the texture limits the precision.
As for the shift on the second frame, have you set your colour space to linear?
rossojr92 8 years, 1 month ago |
Sure, I'm using linear color.
Can I share with you my exported objects so we can both see the situation I have tried to descript above?
mikelyndon-sesi 8 years, 1 month ago |
Please submit a bug to support@sidefx.com with the necessary files and we can take a look.
rossojr92 8 years, 1 month ago |
Removing some properties on verticies the situation gets better.
Now we've done a try; we have exported the same model with just 1 animated point and everything was ok. We've done the same with 10 animated point and everything was ok. The same with 50 points. When we export an animation with more points the base position of other points was different (shidted).
Is there any limitation on the number of points that we can animate with Vertex Animation?
tanyaojushi 8 years, 1 month ago |
hi mikelyndon,first of all I use this tool to make rigid body very well
but there are only a little question:when I break lot of pieces,some of the pieces will shake
http://note.youdao.com/noteshare?id=6d8087406ed6992a3407917596d5b9b2
you can see it here
I use the latest tool
mikelyndon-sesi 8 years, 1 month ago |
That looks like the colour space issue I mention at the end of the tutorial. Have you set your project to linear?
tanyaojushi 8 years, 1 month ago |
yes,I set to linear,and i try the editer Gui mod
chris rogers2 7 years, 11 months ago |
Hey
I had a really tough time getting fluid to work on android so I thought I would share my recipe. I'm not sure all of these parameters are necessary, but it worked for me. I will update this post if I have better info.
Export out of houdini with:
target poly count: 1024
target texture: 4096
export for mobile unity OFF
normalize data 0-1 ON
pack into alpha OFF
color export ON
in Unity i found on android the texture needed to be a lightmap to get the hdr data, so my import settings for are:
Texture type: lightmap
Non power of 2: none
Read/Write Enabled ON
Generate Mip Map OFF
Wrap Mode: Repeat
Filter Mode: Point (no filter)
Max size: 4096
Compression: None
Mesh:
Mesh Compression: Off
Read/Write enabled: ON
Optimize, blendshapes, colliders, keep quads, visibility, camera,hiearchy,swap,lightmapUVs: off
Index Format: 16bit
My anim is 119 frames of particleFluid sim, I had to wrangle the color back onto the mesh before i could export color per vertex (and it's not the correct color, but it's something)
chris rogers2 7 years, 11 months ago |
And Weld Vertices: ON
i left the normals and tangent space on its default setting.
chris rogers2 7 years, 11 months ago |
i spoke too soon.
Now, it looks correct in the editor while build is set to android, but does not actually display anything on my android device, where as the "broken" imports (the demo is broken the same way, the 3D shape looks like its shaped around a box with some triangles or maybe the 4th vert of a quad are missing when build is set to android) would appear the same way on android....
mikelyndon-sesi 7 years, 11 months ago |
Hi Chris. Can you send me a test scene? I'd like to troubleshoot this with the guys at Unity.
Mike
Tristannn 7 years, 10 months ago |
So, I just spent a bunch of time trying to solve the gamma issue you described in your video... and I failed to solve it. That said, I came out of it with stuff to share:
- For me, switching to the linear color space was absolutely necessary... it wasn't even about something small like cracks in your sphere. Without doing this, my motion simply looked horrible. My guess is that unity's gamma stuff is bugged but they're replacing all that stuff with their new scriptable render pipeline tech that uses the linear color space anyway.
- Once you've accepted your unity fate of being in a linear color space, the whole normalization and bounding min/max becomes totally unnecessary and reduces the quality of the motion. You can replace the bounding min/max stuff in the shader with just a line that says texturePos.xyz *= 0.01; to correct for the houdini-unity scale difference.
- It seems to me like you can also just use the Default texture type? I'm not sure why you were using the Sprite or legacy GUI types?
- The frames property is unnecessary if you use the texture height to derive the frame count. If you add float4 _posTex_TexelSize; to the shader, you can retrieve the pixel height of the texture with _posTex_TexelSize.w.
- _pack_normal is implemented with an if statement. I would just add #pragma shader_feature _pack_normal into the subshader and use #ifdef _pack_normal. I didn't test the performance difference... but if conditionals inside shaders are as bad as people say they are, this is worth changing.
Anyway, thanks Mike! All your tutorials and tools have been extremely helpful =)
Pakal07 7 years, 10 months ago |
Hello,
the Vertex Fluid Shader works very well on Unity, however, it does not respect the Normal Nod of Houdini graph. If I produce a fluid that turns into a Cube, for example, the Normal remains constantly soft while it is specified hard in the Houdini animation.
Does the shader or the export produce by default only a soft normal?... Is there a workaround to avoid this problem?
Thank you.
wabisabidesign 7 years, 10 months ago |
Hello guys! Just started working with the Vertex Animation Tools and it's a wonderful workflow.
Got it working flawlessly, but I just came across a little bit of a problem with it, I'm not sure why but the geometry gets culled by the camera.
I just tried it in an empty scene and if the camera is close to the object, then it gets culled. Here's an example of what is happening.
https://drive.google.com/open?id=18GheB7mrivVjr9xzxGKYlX45kbh8NqT7
Hope someone can shed some light on this issue.
Cheers and thanks a lot Mike!
mikelyndon-sesi 7 years, 10 months ago |
Hey. That looks like an issue with the render bound of the object. Make sure to expand the bounds to encapsulate the entire animation. Unity is probably setting the bounds to the initial static frame geometry.
Mike
ndasilva 7 years, 9 months ago |
Hey Mike.
This is super useful. I found the last step about changing the color space and texture type to solve my latest issue as well. Just a simple particle sim, but for some reason the other texture types were causing a strange "grid" like pattern within the point behavior. This solved it.
Thank you!
HBS-Houdini-User 7 years, 6 months ago |
I have been having a struggle getting rigid body destruction to work using both Houdini 17 and 16.5.
Having gone over the video tutorials and checked everything scores of times, in desperation I imported vertex_animation_examples.unitypackage to see if I was missing something. The cloth and smoke and particle effects all showed up. But there were no textures referenced in the material for the rigid body animation.
So either Unity decided not to import these textures or something else is amiss.
gasanoff 7 years, 3 months ago |
issue report: Vertex Animation Shaders renders pink and do not work in Unity 2018.3.0f
any updates or github repo with new shaders?
any plans for updating those for new 2018.3. HDRP/LWRP?
Thanks!
mikelyndon-sesi 7 years, 3 months ago |
The current shaders are not compatible with the new render pipeline. I'm working on new shaders at the moment. I'll probably release a first pass in the next couple of weeks.
gasanoff 7 years, 3 months ago |
Awesome! Thank you Mike!
wlvl 7 years, 3 months ago |
Hi Mike,
thanks for all this!
I have tried the workflow on Unity 2018.2.20 and worked fine for softBody, rbd and sprites.
I cannot make the alpha work for the sprites in Unity. Am I missing something?
I cannot make the fluid work (in Unity, when I assign the VAT material, the mesh disappears).
here the example project files:
https://drive.google.com/open?id=1f2TR1cur3ydDr9dLXvjJFRD4IxIA7smq
Is it still possible to use the current VAT shaders in Unity 2018.3.0 or Unity 2018.3.1 with a workaround in the meantime?
I tested them:
- SoftBody seems to work regardless,
- Sprites gets the position correctly but not the color/alpha,
- RBD only outside faces move,
- Fluid disappears (same problem I had with previous version of Unity).
I am particularly interested in the sprite VAT. The motion is there. I would just need a trick to make the alpha work.
If somebody has a solution, please let me know!
Thanks in advance
wlvl 7 years, 3 months ago |
fluid is working in both version.
I repeated the procedure a few times and voilà!
Left to solve:
-sprites alpha
-rbd in version 2018.3.1
I will keep testing to see if it's just me.
Thanks!
wlvl 7 years, 3 months ago |
- rbd working in version 2018.3.1 with the linear colour space trick (inside faces weren't moving at all before)
simchunyou 7 years ago |
Hi Mike,
Thank you for all the tools and advice! It has really been helpful.
Would like to ask, are there any plans to make these available as custom nodes in ShaderGraph?
If not, may I ask for some tips?
I've been trying to implement the VAT Soft Simple Lit into a ShaderGraph Custom node for Android. I've gotten positions working but for some reason, when I calculate/sample the normals from the normal map, it creates a kind of stretching look on the geometry surface. Is there any reason why this would happen?
Thank you in advance!
mikelyndon-sesi 7 years ago |
Hey. Unfortunately the ShaderGraph doesn't have the functionality necessary to recreate the Vertex Animation Textures. If you'd like to see that supported, please bug the Unity guys.
simchunyou 7 years ago |
Aww alright. Thank you so much for the clarifications. :)
greengiant83 7 years ago |
Its probably worth noting that this will not work in the Apprentice version of Houdini because of the FBX Exporter restriction.
maximep.digital 7 years ago |
Hello ! I'd like to thank you a lot for those tools and tutorials ! You made my day because I needed to export vertex deforms on a lightning bolt mesh, the result is perfect ! The only problem that I've encountered is about the emission parameter. There's not emission parm, so I had to add it manually in the shader script. Seems to work fine but it would be amazing to get a new parm for emission next time ! :D Thanks again Mike for those awesome tutorials and tools !
Maxime.
mikelyndon-sesi 7 years ago |
Hey Maxime. That seems like a specific parameter for your use case. This is why we provide the ability to write out colour, and you can even change which attribute is picked up at the bottom of the parameter window. Then you can modify the shader for your specific needs.
SebastianKahl 6 years, 9 months ago |
I am using unity 2019 and it was quite tricky to get the rotation map for the ridgid body shader to work correctly. All the mentioned import settings (linear color space/UI legacy/No Npot/No Filtering) did not help. The only way I could get it to work is write a script that sets the texture format to RGBAFloat during the import process.
I hope this little editor script can help others out:
using UnityEngine;
using UnityEditor;
// Automatically convert any texture file with "_rotmap" into a RBGAFloat texture
class MyTexturePostprocessor : AssetPostprocessor
{
void OnPreprocessTexture()
{
if (assetPath.Contains("_rotmap"))
{
TextureImporter textureImporter = (TextureImporter)assetImporter;
textureImporter.textureFormat = TextureImporterFormat.RGBAFloat;
}
}
}
allen747423517 5 years, 2 months ago |
Could you please tell me how to add color map in VAT? I need to make the object solved have texture.
thank you。
kumpa 4 years, 10 months ago |
Hi,
I can't seem to get Sprites to work in Unity, I can se something moving in material preview but all the geometry disappears in the viewer once material i applied. At first I thought it has something to do with scene scale but I exported numerous variants with different scaling to no avail.
Please log in to leave a comment.