| On this page |
Houdini’s Solaris provides several methods for applying textures. There are, for example, the  Material Library LOP, the
  Material Linker LOP, or the
  Vary Material Assignment LOP. But did you know that you can also use attributes/primvars to assign a certain texture? To be precise: an attribute with a texture path will be added to the primitives of one or more objects. Then you create a MaterialX material where you read the attribute and feed an image node.
A typical use case for such an attribute is the creation of material variants. Let’s say you have several identical items and they should have materials with different diffuse, specular, and roughness maps. Instead of creating multiple separate materials, you can set up one material. The material network will then read the attribute and pass the different texture paths to the shader.
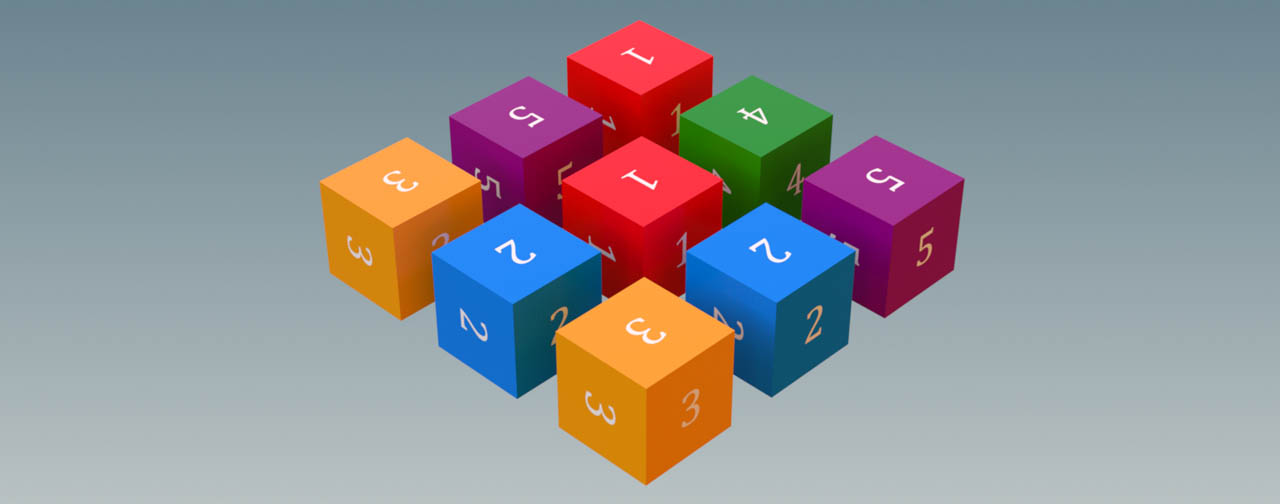
The objects on this image were created on the points of a  Grid SOP and duplicated with a
  Copy to Points SOP. The Point attributes chapter of this guides explains the creation process.
You can also define geometry subsets and apply an attribute that specifies how certain polygons will be textured. The image below shows a cube with three different textures, but just one material. The texture paths are read from an attribute.

Example setup 
The example works with a single object, but can be extended to an arbitrary number of items. For a better understanding, we’ll only focus on the relevant nodes here. UVs, names, and other properties aren’t discussed.
On the Solaris stage level, create a  SOP Create LOP and double-click it to dive inside. There, create a basic primitive, for example a
  Box SOP.
Note that you can use any other available node to bring your geometry to Solaris, for example the  SOP Import LOP. The basic workflow is the same, but the location of your SOP network will differ.
Attribute creation 
There are numerous ways in Houdini to create attributes, and one solution is to use an  Attribute Create SOP. The advantage with this node is that it’s very convenient to specify things like attribute name, class and type. The Attribute Create SOP is also a multi-parm node and you can create all necessary path definitions on the same node - unless you want to use groups.
Add the Attribute Create SOP and connect its input with the output of the box. Then, make the following settings.
-
Name is the name of the attribute, for example
texturepath. -
Class will be Primitive here to make the attribute work in Solaris.
-
Type is always String, because you're defining a file path.
-
String contains the full path of the texture file. You can use the
$HIPvariable and it’ll be replaced by Houdini automatically. A path could look as in this example:$HIP/textures/diffuse.jpg
Solaris 
Leave the SOP network and return to the stage level. You should now see the box in the viewport and you're ready to create a material.
Inside a Material Library LOP, run the Karma Material Builder tool to create a subnet with a basic shader. We’ll only explain the workflow for the base_color input of the  MtlX Standard Surface VOP. The steps for the MtlX Open PBR Surface VOP and other channels are the same.
-
Inside the
karmamaterialsubnet, add aMtlX Image VOP. Connect its outpin with the surface node’sbase_colorinput. Don’t forget to choose the correct Signature. -
Lay down a
MtlX Geometry Property Uniform Value VOP and connect its outpin with the image node’sfileinput. -
On the property node, go to the Geomprop parameter and enter the name of the attribute with the texture, for example
texturepath. Now, Solaris will change the image node’sfilecontent according to the string value from the attribute.

Material assignment 
Assigning an attribute-driven material to an object works as usual and you don’t have to consider anything special. A fast and convenient method is to use the Material Library itself. On the Fill section, click Auto-fill Materials and turn on Assign to Geometry.
Geometry Path points to the primitives you want to use with the material. The path for the box in this example is /World/box/mesh0.
Now you can already start an interactive preview render in the viewport to see the results of your work. From the viewport’s first dropdown menu (set to Persp by default), choose one the Karma delegates, for example Karma XPU.
Point attributes 
The previous example applied a primitive attribute to a single object, but there are situations where you create copies of an object, for example with scatter points. One solution is to create the attribute on the scatter points. However, there’s no straightforward way to randomize strings like file paths and in the end you also need a primitive attribute. Here’s a screenshot of the SOP network you’ll be creating. Again, we’ll only focus on the nodes that are required for the task.

In the following scene you’ll be randomizing an index that resembles texture numbers like diffuse_1, diffuse_2, and so on. A short VEX script will turn the random index values and into a texturepath attribute.
Again, everything happens inside a SOP Create LOP where you copy a Box SOP to the points of a Grid SOP.
Texture index 
Add the Grid SOP and change its Size, Rows, and Columns parameters to 3.
Also, lay down an Attribute Create SOP and connect its input with the output of the grid. You only have to change two parameters:
-
For Name, enter
index -
From the Type dropdown menu, choose Integer
To shuffle the index values, add an  Attribute Randomize SOP and connect its input with the output of the create node. Make the following settings:
-
For Attribute Name, enter
index -
On the Distribution tab, set Dimensions to
1 -
The Min Value and Max Value parameters define the indices of the textures, for example
1and5 -
On the Options tab, you can find a Global Seed parameter that lets you change the random distribution of the
indexnumbers.
VEX script 
The VEX script will live on an  Attribute Wrangle SOP. Connect its first input with the output of the Attribute Randomize SOP. Then, use ⌃ Ctrl + C to copy the script below and paste it with ⌃ Ctrl + V to the wrangle’s VEXpression field.
The script uses two custom parameters where you can enter the texture path (without the index), and a file extension (without the dot). To add the parameters to the UI, press the  Create spare parameters for each unique call of ch() button.
s@texturepath = chs("path")+itoa(i@index)+"."+chs("extension");
A typical example for Path is $HIP/textures/diffuse_, and for Extension you can enter jpg or exr.
The script creates a texturepath attribute from the parameters and the random index. Note that the itoa statement converts the integer into a string to make it usable with the other string components of the path.
Copies 
To create copies of the box, add a Copy to Points SOP. Connect its first input with the output of the Box SOP, and link the second input with the output of the wrangle.
If you want, you can turn on the copy node’s Pack and Instance option. This option helps to save resources and the texturepath attribute will be kept.
To convert texturepath a primitive attribute, add an  Attribute Promote SOP and make it the last node of your SOP network.
-
On the Original Name parameter, enter
texturepath. -
From the New Class dropdown menu, chose Primitive.
Now you can return to the stage and apply your material as described in the Solairs and Material assignment chapters.
