Hi twod, here's a bit more info. The files are all .picnc. COPs used:
Add
Blend
Blur
Border
Color
Composite
Defocus
Depth of Field
Extend
Font
Layer
Shift
Snip
There are 43 nodes total. In any case, I don't believe it's a bug, but an optimization issue. I finished rendering the sequence before I had a chance to test the Cook Cache Size size option. Reduce Cache Size when Inactive was on. I will re-render the whole thing after I've rendered some additional frames.
I'm curious, why doesn't Halo just clear the cache after the frame (or lets say a number of frames) has been rendered to disk? I don't believe the cached data from a cooked frame is useful to subsequent frames (at least not with this network).
I should mention, I get that memory allocation error whenever Houdini goes above ~1,300,000kb of RAM usage, it's not unique to compositing. I have ~1,830,000kb worth of RAM total, so I guess Houdini is just running out of memory that it can tap?
Found 663 posts.
Search results Show results as topic list.
Technical Discussion » Memory allocation errors when rendering from Halo
-

- Siavash Tehrani

- 711 posts
- Offline
Technical Discussion » RFE: Cregion rotate handle
-
- Siavash Tehrani
- 711 posts
- Offline
Hello, while we're on the subject… undo doesn't appear to work for modifications on capture regions unless I deselct a c-region and then reselect it. Goes like this:
-modify a c-region
-hit undo… nothing happens
-deselct the c-region & reselect it, now i can see the change
-if you don't deselect & reselect after the undo, it behaves like the undo never happened.
-modify a c-region
-hit undo… nothing happens
-deselct the c-region & reselect it, now i can see the change
-if you don't deselect & reselect after the undo, it behaves like the undo never happened.
Technical Discussion » Memory allocation errors when rendering from Halo
-
- Siavash Tehrani
- 711 posts
- Offline
Hi, this is on WinXP, build .404
I am rendering out a sequence from Halo that uses about 1300 frames. The frames all have a 32-bit fp plane, so they are quite big. I'm rendering to jpg and it appears that Houdini never relinquishes any memory when it writes the files to disk. After it passes the 1GB mark, after every 90 frames or so, it crashes.
Also, somewhat on topic: the jpg output quality setting is not remembered when you save a file. Doh!
Houdini Lounge » Texturing - Triplanar and Bump
-
- Siavash Tehrani
- 711 posts
- Offline
About the Triplanar Mapping thing. I looked it up on google and from what I've seen UVUnwrap seems to do exactly that.
http://www.newcottage.com/index.php?section=lab&subsection=lab/uv2 [newcottage.com]
http://www.newcottage.com/index.php?section=lab&subsection=lab/uv2 [newcottage.com]
Technical Discussion » Popup warning when browsing docs
-
- Siavash Tehrani
- 711 posts
- Offline

Technical Discussion » Popup warning when browsing docs
-
- Siavash Tehrani
- 711 posts
- Offline
Hi guys.
I keep getting this popup whenever I click a link in the docs.

Checking the “Remember this decision” box only works per link, so right now the docs are pretty much unusable for me.
This is on WinXP (no SPs) and build 404.
I keep getting this popup whenever I click a link in the docs.
Checking the “Remember this decision” box only works per link, so right now the docs are pretty much unusable for me.
This is on WinXP (no SPs) and build 404.
Technical Discussion » bounced light / object lights
-
- Siavash Tehrani
- 711 posts
- Offline
Thanks for the detailed explenation AndrewC, I appreciate it. Now that you mention it, I remember reading about similar difficulties with fitting GI into Renderman because the architecture was not well suited to it.
Knowing the devs are pondering these issues puts my mind at ease.
Knowing the devs are pondering these issues puts my mind at ease.
Technical Discussion » bounced light / object lights
-
- Siavash Tehrani
- 711 posts
- Offline
Deecue's file prompted me to dive into Houdini's global illumination again.
In my humble opinion, there are some limitations in the GI implementation here that puts the quality of renders behind the output of other GI capable renderers, such as Brazil or Vray for example (in terms of realism at least). I'll try to go into more detail.
Take this scenario: A room, with a window or skylight. The only source of illumination can be sunlight and/or hemispheric light (ambient occlusion) from outside. Here is such a scene modeled in Houdini:
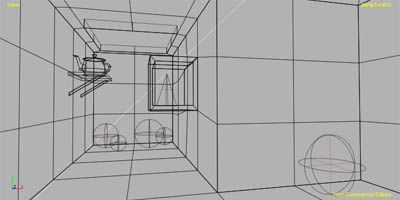
The expectation here is that, in real life, if the sun is shining directly into the room, there ought to be enough light bouncing around to illuminate the entire space. I think most would agree that this is an accurate assumption.
Now, any GI implementation worth its salt should be able to solve this if you ask me. There are going to be various degrees of “accuracy” depending on the renderer used, as they all do things a bit differently (the most physically correct being Maxwell I suppose), but generally they should at least be able to give you a solution that approaches the behavior of real light.
There are two ways of doing GI in HDN at the moment: Irradiance and Photon Mapping.
I first tried Full Irradiance with Background Color (direct light + occlusion). The sunlight hits the wall on the left and bounces the light once.
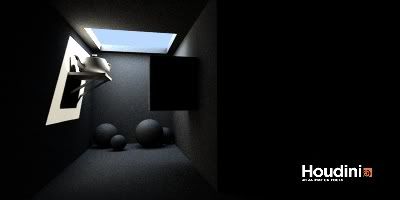
Now right off the bat, we've hit a problem. After our light has bounced once, the Irradiance method has exhausted itself. There is no more light to go around. No amount of adjusting Global Tint or light intensity will make that sphere in the bottom right of the frame visible. Notice that the shadow cast by the shelf is not illuminated by any bounced light.
Here is the same scene in 3ds max, using Brazil. It's set to use 7 bounces.

Say what you want about the artistic merit of the two renders, but there is no doubt that the Brazil version shows more realistic light transport. I wonder why Full Irradiance is limited to one bounce. It seems to me that it's doing the same thing as the quasi monte-carlo algorythms in many other GI renderers, but then again, I don't know the first thing about the nitty-gritty details of GI rendering.
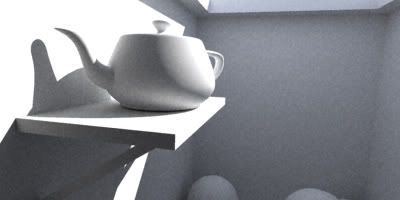
Same scene, different angle:

“But Juice, what about Photon Mapping?”
Ok, where to start…
One problem that pbowmar already pointed out: There is no way to “aim” the photons. We're trying to simulate sunlight here. That means our light is not actually inside our space. As a result, only a fraction of the total number of photons seem to make it into the interior. I think the only thing you can do is to bring the light really close to the point of entry. The problem is, now you have a situation where your solution looks completely different depending on how far/close you've placed your light. How would this integrate into scenes where you need to be able see this interior as well as the outside? I'm not saying it's not workable, but it does create more problems. Not exactly robust or predictable.
Also in my test rendering last night it seemed like changing the number of photons significantly changed the look of the solution, and I don't mean less photons looked crude, while more photons looked refined.
The controls for the photon shader are pretty confounding too, I didn't find them very intuitive. All in all I found it very difficult to get predictable or good looking results with this scene using photon maps, and none of my renders looked remotely “correct”. Something else - using both Irradiance and Photon Mapping combined was much slower than using them seperately.
I've uploaded the file in case anyone wants a shot at it.
http://www.pixelheretic.com/misc/GI_test.zip [pixelheretic.com]
Finally, I'm sorry if my post sounds a bit harsh. Just putting it out there that this is an area where Houdini can be improved.
In my humble opinion, there are some limitations in the GI implementation here that puts the quality of renders behind the output of other GI capable renderers, such as Brazil or Vray for example (in terms of realism at least). I'll try to go into more detail.
Take this scenario: A room, with a window or skylight. The only source of illumination can be sunlight and/or hemispheric light (ambient occlusion) from outside. Here is such a scene modeled in Houdini:
The expectation here is that, in real life, if the sun is shining directly into the room, there ought to be enough light bouncing around to illuminate the entire space. I think most would agree that this is an accurate assumption.
Now, any GI implementation worth its salt should be able to solve this if you ask me. There are going to be various degrees of “accuracy” depending on the renderer used, as they all do things a bit differently (the most physically correct being Maxwell I suppose), but generally they should at least be able to give you a solution that approaches the behavior of real light.
There are two ways of doing GI in HDN at the moment: Irradiance and Photon Mapping.
I first tried Full Irradiance with Background Color (direct light + occlusion). The sunlight hits the wall on the left and bounces the light once.
Now right off the bat, we've hit a problem. After our light has bounced once, the Irradiance method has exhausted itself. There is no more light to go around. No amount of adjusting Global Tint or light intensity will make that sphere in the bottom right of the frame visible. Notice that the shadow cast by the shelf is not illuminated by any bounced light.
Here is the same scene in 3ds max, using Brazil. It's set to use 7 bounces.
Say what you want about the artistic merit of the two renders, but there is no doubt that the Brazil version shows more realistic light transport. I wonder why Full Irradiance is limited to one bounce. It seems to me that it's doing the same thing as the quasi monte-carlo algorythms in many other GI renderers, but then again, I don't know the first thing about the nitty-gritty details of GI rendering.
Same scene, different angle:
“But Juice, what about Photon Mapping?”
Ok, where to start…
One problem that pbowmar already pointed out: There is no way to “aim” the photons. We're trying to simulate sunlight here. That means our light is not actually inside our space. As a result, only a fraction of the total number of photons seem to make it into the interior. I think the only thing you can do is to bring the light really close to the point of entry. The problem is, now you have a situation where your solution looks completely different depending on how far/close you've placed your light. How would this integrate into scenes where you need to be able see this interior as well as the outside? I'm not saying it's not workable, but it does create more problems. Not exactly robust or predictable.
Also in my test rendering last night it seemed like changing the number of photons significantly changed the look of the solution, and I don't mean less photons looked crude, while more photons looked refined.
The controls for the photon shader are pretty confounding too, I didn't find them very intuitive. All in all I found it very difficult to get predictable or good looking results with this scene using photon maps, and none of my renders looked remotely “correct”. Something else - using both Irradiance and Photon Mapping combined was much slower than using them seperately.
I've uploaded the file in case anyone wants a shot at it.
http://www.pixelheretic.com/misc/GI_test.zip [pixelheretic.com]
Finally, I'm sorry if my post sounds a bit harsh. Just putting it out there that this is an area where Houdini can be improved.
Houdini Lounge » Houdini Gems
-
- Siavash Tehrani
- 711 posts
- Offline
Houdini Lounge » Houdini 8..... THANKYOU
-
- Siavash Tehrani
- 711 posts
- Offline
Houdini Lounge » i3d Clouds
-
- Siavash Tehrani
- 711 posts
- Offline
 ops:
ops:
Houdini Lounge » i3d Clouds
-
- Siavash Tehrani
- 711 posts
- Offline
Lisux has posted a couple new shaders that look like a big improvement over the standard i3d stuff. I haven't yet had a chance to try it out myself.
http://odforce.net/forum/index.php?showtopic=3004&hl= [odforce.net]
http://odforce.net/forum/index.php?showtopic=3004&hl= [odforce.net]
Houdini Lounge » Houdini>>Maya
-
- Siavash Tehrani
- 711 posts
- Offline

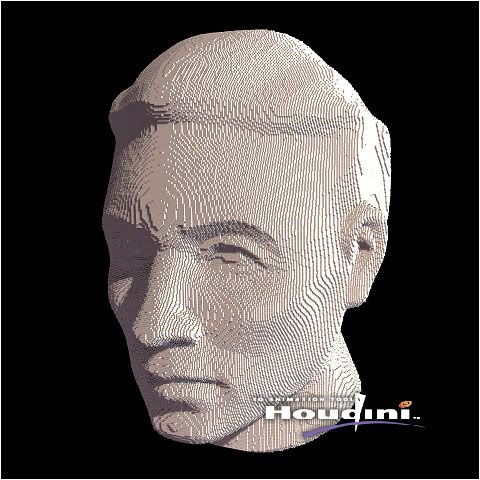
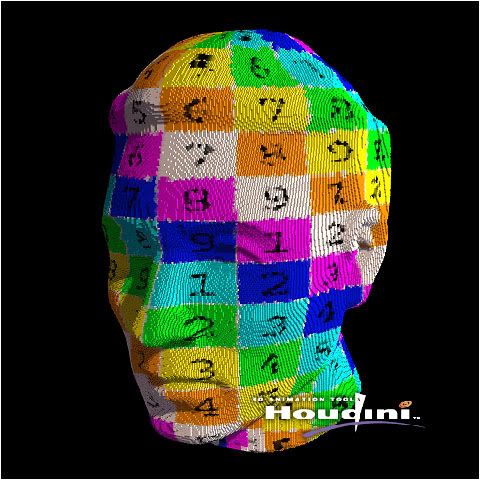
Technical Discussion » 3d pixelation effect
-
- Siavash Tehrani
- 711 posts
- Offline
Hi, a new version of the file. It's more efficient than the last one. Feedback would be nice.
http://www.geocities.com/stehrani3d/3dfiles/3d_pixels_update_june_05.zip [geocities.com]
Thanks for the help and good ideas in the chat Edward.
http://www.geocities.com/stehrani3d/3dfiles/3d_pixels_update_june_05.zip [geocities.com]
Thanks for the help and good ideas in the chat Edward.
Technical Discussion » Cookie trouble??
-
- Siavash Tehrani
- 711 posts
- Offline
That's weird, jitter should work. I'm also using the Cookie SOP right now in an animation, and using the jitter I'm still getting 8 bad frames out of 175, but simply changing the seed on the jitter fixes those. Are your objects dense enough? I think you get better results when your geometry isn't too low-res.
Technical Discussion » baking/freezing a displacement to polys
-
- Siavash Tehrani
- 711 posts
- Offline
One thing I noticed is that you can't use vertex UVs (or any vertex attributes?) in a VEX SOP, which is kind of a problem. You have to use point UVs, and that's no good for the boundries. :?
Technical Discussion » vops - controlling edge falloff vop
-
- Siavash Tehrani
- 711 posts
- Offline
Technical Discussion » Scaling problem
-
- Siavash Tehrani
- 711 posts
- Offline
Idunno, I only hope when we're all using Houdini 10 this won't still be an issue. btw, I just fired up max 3.1 (several years old now) and it doesn't seem to have much of a problem with this.
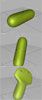 [img.photobucket.com]
 [img.photobucket.com]
Technical Discussion » layered shader queston
-
- Siavash Tehrani
- 711 posts
- Offline
Hehe, I admire your persistence Bruce, but I think you're making your Houdini learning experience a lot harder by insisting on Renderman instead of mantra.
As for your question, I haven't tried the RSL context but you can put down a Parameter VOP, set it to vector, and put “uv” (or uv1, uv2, uv3, etc depending on which layer) in the parameter name field. This will import the uv attributes. Append a Vector to Float and connect the first two components to s and t. That should do it.
As for your question, I haven't tried the RSL context but you can put down a Parameter VOP, set it to vector, and put “uv” (or uv1, uv2, uv3, etc depending on which layer) in the parameter name field. This will import the uv attributes. Append a Vector to Float and connect the first two components to s and t. That should do it.
Technical Discussion » Scaling problem
-
- Siavash Tehrani
- 711 posts
- Offline
Sorry edward, but I couldn't get that to work. I probably misunderstood something 
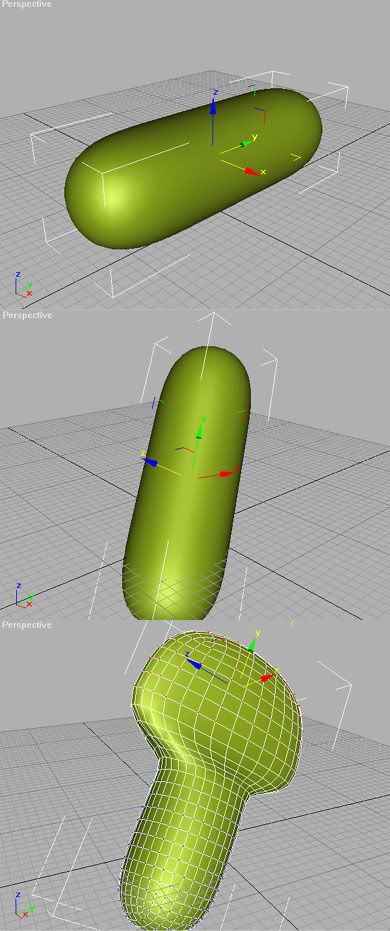
When you click the ‘Commit Transform/Peak Changes’ button the handle reverts to the world axis, which is no use. It won't do this if you uncheck the ‘Reset on Each New Operation’ box, but it's still no gouda. I've also tried different transformation orders but I can't seem to make it work.
Ok, to make sure we're on the same page, here's the scenario:
1. I've got a box.
2. I append an Edit SOP and rotate the box to an arbitrary angle.
3. I Click outside the box then reselect it. The handle is now aligned with the world axis.
4. I detach the handle and use orientation picking to line it up with the box (or eyeball it and do it manually, whatever).
5. At this point no matter what, I can't seem to get non-uniform scaling to perform as expected. Could you maybe do a step-by-step?
-
- Quick Links