
Hello, I've done searches for this but got to a dead end. Does Houdini support Multi UV tiles? I have a model in Mudbox that has 2 Tiles what is the work for for bringing this into houdini?
Thanks.
Houdini and Multi UV Tiles
38788 31 2
-
- hereacoon
- Member

- 47 posts
- Joined: Oct. 2012
- Offline
-
- hereacoon
- Member
- 47 posts
- Joined: Oct. 2012
- Offline
-

- pbowmar
- Member

- 7046 posts
- Joined: July 2005
- Offline
Actually what you have there will result in duplicated geometry (the merge will effectively double the geometry) and likely result in render artifacts from the doubled up polygons.
You can apply multiple materials inside a single Material SOP without needing the merge…
Cheers
Peter B
You can apply multiple materials inside a single Material SOP without needing the merge…
Cheers
Peter B
Cheers,
Peter Bowmar
____________
Houdini 20.5.262 Win 10 Py 3.11
Peter Bowmar
____________
Houdini 20.5.262 Win 10 Py 3.11
-
- hereacoon
- Member
- 47 posts
- Joined: Oct. 2012
- Offline
-
- pbowmar
- Member
- 7046 posts
- Joined: July 2005
- Offline
-
- hereacoon
- Member
- 47 posts
- Joined: Oct. 2012
- Offline
I have a model in mudbox that i sculpted, exported that as a .OBJ and imported into Houdini (when I goto the UV view in Houdini two tiles show up as shown in Mudbox). The I set up the UVs in mudbox to have two UV tiles (http://download.autodesk.com/us/mudbox/help2010/images/MED/Dragnet/English/Painting/comp_uv_multitile.png). [download.autodesk.com] I exported a displacement map out of mudbox, two separate displacement maps were created for each UV tile. My question is how do I set this up in houdini to displace using two separate displacement maps.
I hope that cleared things up, thanks!
I hope that cleared things up, thanks!
-
- pbowmar
- Member
- 7046 posts
- Joined: July 2005
- Offline
Ah, OK. So in Houdini terms, your UVs are 0->1 in U and 0->1 in V for the lower left tile, then the next tile to the right the coordinates are 1->2 in U and 0->1 in V.
Unfortunately, there is nothing that handles this natively that I know of. You'll need to get into VOPs (the shader nodes inside the Mantra Surface material) and modify the default to have several displacements using different UVs.
I think the First Steps tutorials that Ari did take you through that:
http://www.sidefx.com/index.php?option=com_content&task=blogcategory&id=203&Itemid=362 [sidefx.com]
Cheers,
Peter B
Cheers,
Peter Bowmar
____________
Houdini 20.5.262 Win 10 Py 3.11
Peter Bowmar
____________
Houdini 20.5.262 Win 10 Py 3.11
-
- hereacoon
- Member
- 47 posts
- Joined: Oct. 2012
- Offline
-

- rmagee
- Staff
- 1430 posts
- Joined: July 2005
- Offline
Can you send me the geometry file or another file with the same setup? I think I know how to deal with this but I would need to check if this works with the setup you have in your model.
Please include the displacement maps for reference.
Robert
(rmagee@sidefx.com)
Please include the displacement maps for reference.
Robert
(rmagee@sidefx.com)
Robert Magee
Senior Product Marketing Manager
SideFX
Senior Product Marketing Manager
SideFX
-
- hereacoon
- Member
- 47 posts
- Joined: Oct. 2012
- Offline
rmagee
Can you send me the geometry file or another file with the same setup? I think I know how to deal with this but I would need to check if this works with the setup you have in your model.
Please include the displacement maps for reference.
Robert
(rmagee@sidefx.com)
Thanks, just PMed you
-
- phrenzy84
- Member

- 249 posts
- Joined:
- Offline

The most efficient way i have dealt with this is through VOP's.
I use UV transforms and TwoWay's to turn textures on or off. It's kind of a pain but it works. I have tried to get the Multi Parm list working in the parameter editor, so all i need to do is click the “+” icon to add a texture and set the UV space but i failed.
Maybe i should give it another shot because switching over to H12.5 i had to re-edit my skin setup. And bundling this into a VOP asset, would make things a lot easier.
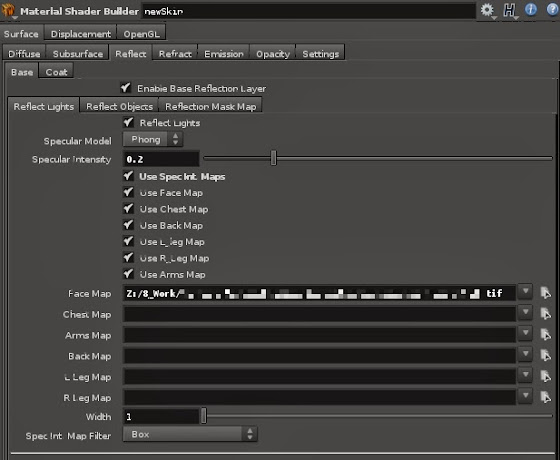
Here is what most of my parameters on my skin shaders look like
edit / I am interested in seeing Robert's method too.
I use UV transforms and TwoWay's to turn textures on or off. It's kind of a pain but it works. I have tried to get the Multi Parm list working in the parameter editor, so all i need to do is click the “+” icon to add a texture and set the UV space but i failed.
Maybe i should give it another shot because switching over to H12.5 i had to re-edit my skin setup. And bundling this into a VOP asset, would make things a lot easier.
Here is what most of my parameters on my skin shaders look like
edit
/ I am interested in seeing Robert's method too.
-
- pbowmar
- Member
- 7046 posts
- Joined: July 2005
- Offline
-
- phrenzy84
- Member
- 249 posts
- Joined:
- Offline
Yep its a pain  .
.
I'm not quite sure i fully understand you when you say named UV sets? You you referring to my naming “face”, “back” “L_Leg” etc? I only do that to make it easy on file referencing usually the naming is just character_diff_u$v$.tif
Is there anything i can do the make this easier/streamlined?
.I'm not quite sure i fully understand you when you say named UV sets? You you referring to my naming “face”, “back” “L_Leg” etc? I only do that to make it easy on file referencing usually the naming is just character_diff_u$v$.tif
Is there anything i can do the make this easier/streamlined?
-
- pbowmar
- Member
- 7046 posts
- Joined: July 2005
- Offline
-

- SreckoM
- Member

- 381 posts
- Joined: Dec. 2006
- Online
-
- rmagee
- Staff
- 1430 posts
- Joined: July 2005
- Offline
Attached is a .hip file I sent earlier to hereacoon which demonstrates a solution to this issue. It is setup for his particular example file (which he has generously allowed me to share here) where the tiles are only going in the U direction. If your tiles go in U and V then you would have to extrapolate the solution.
http://www.sidefx.com/images/stories/transfer/uv_tiles.zip [sidefx.com]
You can find the solution by double clicking on either the Mantra surface or the Surface Model materials. The first shows the displacement when assigned to your geometry while the second would show a black and white representation of the displacement value assigned to Diffuse.
In both cases, the textures are applied using VEX. The U coordinate is turned into an integer then the UV is subtracted from that integer. This way if the U value is bigger than 1 it gets shifted into 0-1 space. Meanwhile the integer value +1 is used to get the appropriate texture map using the print1 node (this is also where the texture maps name and path are assigned). If the integer is 0 then you get texture 1. This also works after we go past 2 or 3 or 4 etc…
I hope this helps. I had developer help with this. I wouldn't have figured it out otherwise. I had tried a solution using UV layers but this turned out much simpler.
Robert
Robert Magee
Senior Product Marketing Manager
SideFX
Senior Product Marketing Manager
SideFX
-

- oslo
- Member

- 22 posts
- Joined:
- Offline
-

- circusmonkey
- Member
- 2624 posts
- Joined: Aug. 2006
- Offline
-
- Mohammed Issa
- Member
- 17 posts
- Joined: Nov. 2013
- Offline

hi guys i dont if you got yours working since this thread is about a year ago.
but really just create texture vops for each tile and feed its “s” and “t” with
a uv transform node
1st tile is translate x = 0
2nd tile is translate x = 1 and so on (moving from screen left to right)
and then add them together, just dont forget to set the texture nodes to decal.
tested it with 4k VDM from zbrush works great
best of luck
kiel
-
- circusmonkey
- Member
- 2624 posts
- Joined: Aug. 2006
- Offline
-
- Quick Links