GAME TOOLS | SKINNING CONVERTER
Skinning Converter is a Houdini Digital Asset (HDA) that can convert any non-changing topology deforming mesh sequence into a bone based animation. The user gets control over a couple of parameters, which allows the user to get their desired result.
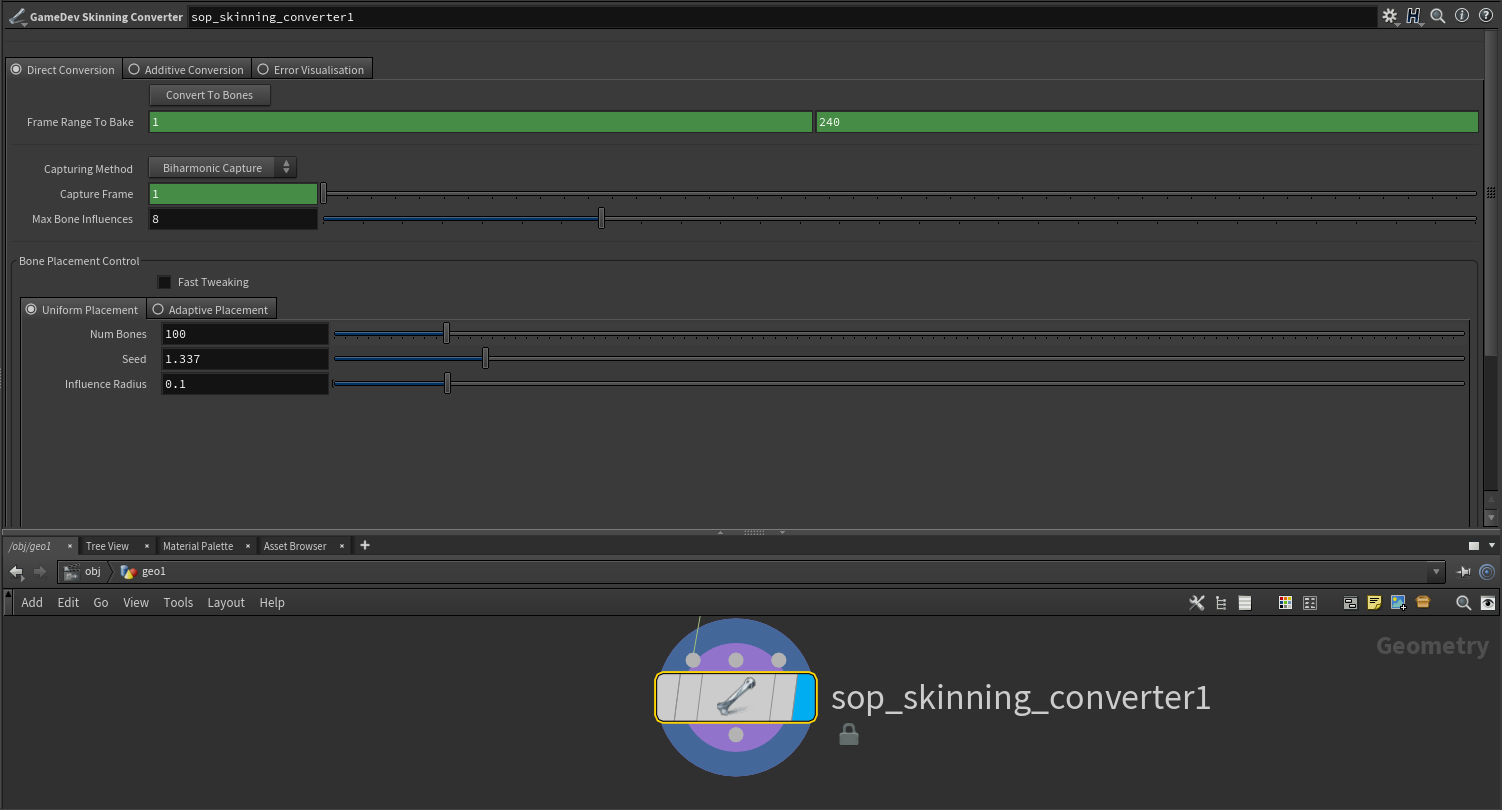
Direct Conversion
If you have a deforming mesh sequence, and would like to convert it to a bone-based animation, simply plug it into the first input of the tool. The interface provides a couple of parameters to tweak in order to achieve the desired result.
Global Settings
The "Convert to Bones" button will convert the input mesh sequence.
The user is able to change the frame range to bake, which by default is set to frame-range start-end.
The capturing method can be configured to either use Biharmonic Capturing, or Proximity Capture. It is recommended to use Biharmonic Capturing over Proximity Capture, due to the higher level of quality capture. You could however use Proximity Capture, to improve the speed of the capturing process.
The capture frame determines what frame will be used to determine the capture pose. It is recommended to use your first frame.
Max Bone Influences controls by how many bones a point can be influenced. Higher values could mean smoother results, but also increases overhead in engine.
Bone Placement Control
The Bone Placement Control tab allows you to choose between two methods of generating bone placements. Uniform and Adaptive.
Uniform will simply distribute the bones uniformly over your mesh. This is useful when quick results are desired. When dealing with sequences that don't have specific regions where you want more detail to be conserved, this is the best way to go.
Adaptive will analyze the motion of your mesh sequence, and focus bone density in the regions it deems most important based on the provided ruleset. (Area Deformation, Curvature , Velocity) The user can then use the "Primary" bones slider to control the number of bones in the focus areas.
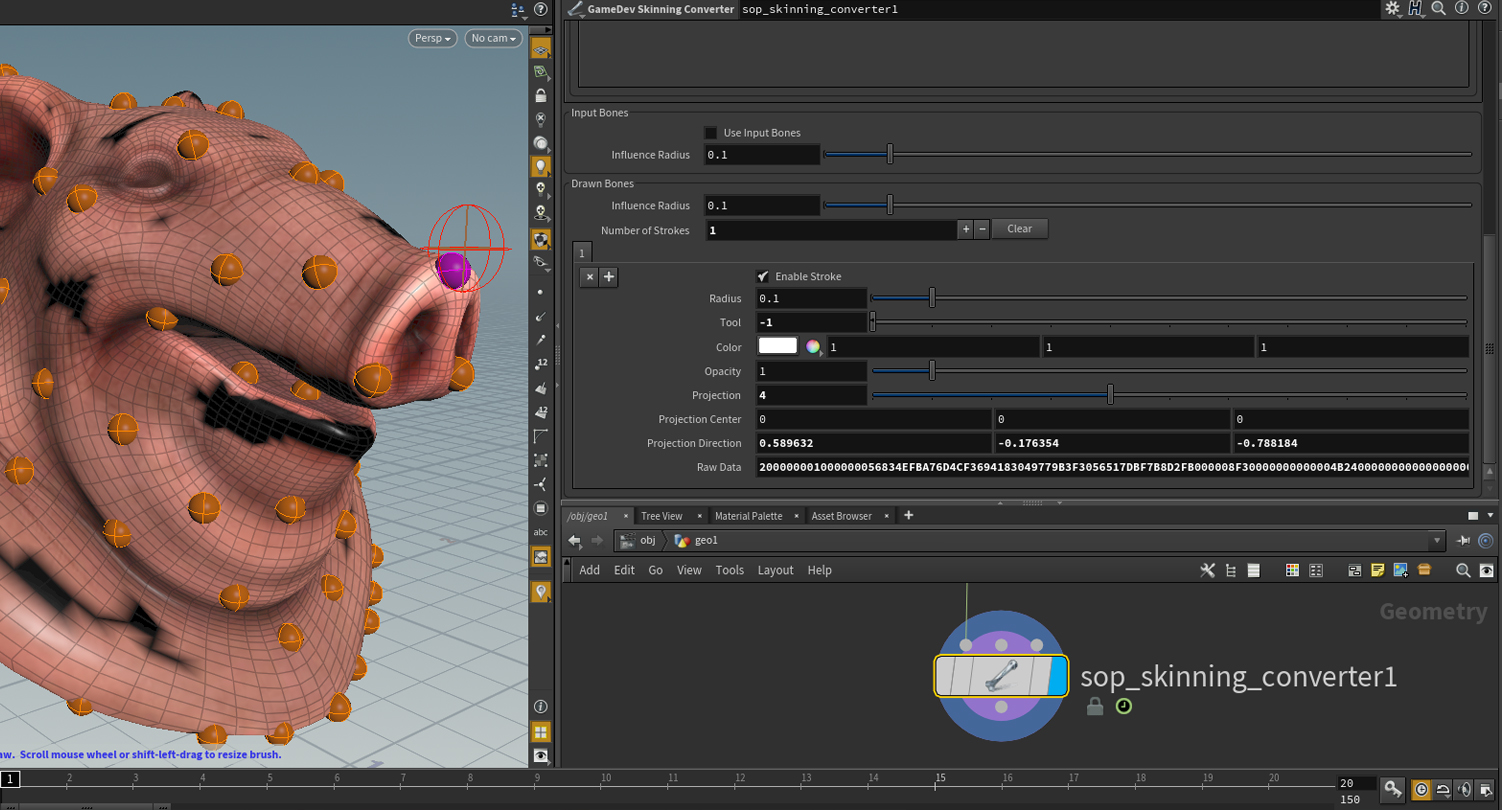
Input Bones
The tool also allows you to feed custom bone positions through the second input. This allows you to build custom methods for determining where bones should be placed. Note that the tool will lock the transforms at the specified capturing frame.
Drawn Bones
The tool also features a really useful feature, where you can hand paint bones on the mesh to get very accurate placements. Simply select the tool in your network, and hit enter to go into painting mode. The tool will then show you strokes at the bottom of the tool, where you can also remove them again. To exit this mode, simply hit escape.
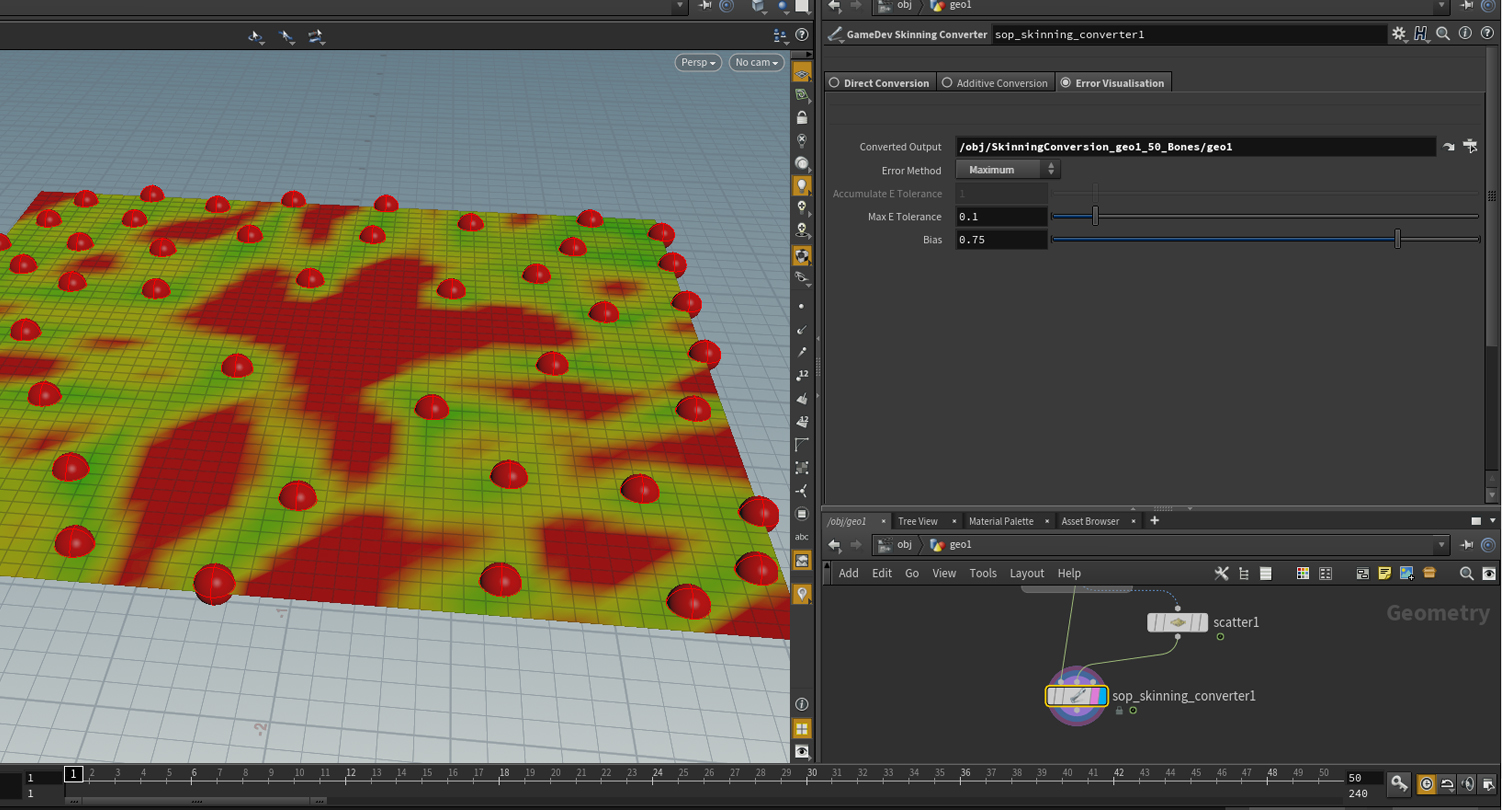
Error Visualisation
The "Error Visualisation" tab allows you to quickly debug regions on your conversion result that do not match the input mesh sequence. Green means it is identical, yellow is near identical, and red is off.
The Converted Output field references the converted output mesh, which will be compared to the source using one of two methods. Maximum Error, and Accumulated Error. Maximum will show you the max error of all frames at any given time. The coloring will happen based on the error tolerance you specify. This allows you to configure how accurate the conversion has to be, and the tool will show you how close you are. The tool does not just color the mesh, but also returns attributes storing these values. This means you could automate the improvement process.
Accumulated error method will accumulate the difference of all points between source and result, also based on the specified error tolerance. Once again in world units.
CREATED BY

COMMENTS
ztyqaz111 8 years, 7 months ago |
Very useful!
Can i create bones from different topology mesh sequence?
ztyqaz111 8 years, 7 months ago |
sop_polydeform&SKINNING CONVERTER i found it!
Ambrosiussen 8 years, 7 months ago |
Hi!
Glad to hear you found a solution!
If you have questions, feel free to send me a DM.
Paul
dedeks2999 8 years, 6 months ago |
Great Video !
Matt Vitalone 8 years, 6 months ago |
This tool looks great. We have an in-house Maya tool that does this, but it seemed like something that Houdini would naturally be better at.
DiegoM 8 years, 5 months ago |
Hello! Is there some way to change the size of the visualization spheres? I have some really dense geometry and I have areas that are being covered up entirely by the spheres. Thank you!
Ambrosiussen 8 years, 5 months ago |
Hey DiegoM,
Unfortunately not without diving into the tool and adding one line of code. I will add it to my to-do list though :)
If you want to quickly make the edit yourself, simply dive into the tool, and just above the "Copy to Points" marked in orange, put an attribute wrangle (set to run over points).. In that wrangle, simply write "@pscale = 0.1;" 0.1 meaning 10% of current size, so change it to whatever you need.
Paul
waltz 8 years, 3 months ago |
How do i export it for a game engine once i am done with the process of converting?
Ambrosiussen 8 years, 3 months ago |
Hi Walter,
You can use the Filmbox ROP to export an FBX file containing all the data you need.
Paul
waltz 8 years, 3 months ago |
Thanks for the prompt response Paul ;)
Alain2131 8 years, 3 months ago |
Hey Paul, awesome tool ! Very usefull and easy to use, thanks a lot !
Is there a possibility to have the same for rigging wires ? I tried to use the tool on a bunch of wires (even separated wires), and the result is bad :(
Ambrosiussen 8 years, 3 months ago |
Hey!
The tool works less successfully on surfaces that have a lot of small motion on them.
What you could try is using the "custom bone input" on the tool, and feed the tool points that lie in the center of the wire. (Like a spine)
Let me know if that works for you!
Paul
Alain2131 8 years, 3 months ago |
Hey Paul,
thanks for the fast reply !
Actually, this is exactly what I did ! Sadly, weird results occured, see https://image.ibb.co/e4zqWc/wire_rigging.jpg.
Ambrosiussen 8 years, 3 months ago |
Hmm yeah that's what I figured. :/
You could either try to increase the number of bones. (Probably dont want to do that)
Or use the VAT tool.
Alain2131 8 years, 3 months ago |
Indeed, can't have too much bones.
Thanks, will look into it !
Awesome tool nonetheless, still a life-saver !
Doomhammer 8 years ago |
Is this compatible with Apprentice, or is it only Indie and above?
I've tried updating the GameDevelopmentToolset to the latest that shows up in dev (currently 1.15) and it doesn't appear in the shelf or the node list even after several attempts / reloads.
Doomhammer 8 years ago |
Solved over on
https://www.sidefx.com/tutorials/game-dev-toolset-installation/#comment-2148
Looks like I didn't drill down far enough - apologies for the double post :c
Yoshiaki Yamaguchi 7 years, 5 months ago |
Hi,Paul
Thank you awesome tool.
When using a vertex cache imported, there is nothing in the result geometry.
I tried to export it using Filmbox ROP.
Yoshiaki Yamaguchi 7 years, 5 months ago |
Sorry, I solved it.
How to make a vertex cache had a problem.
canalesbr1 7 years, 4 months ago |
Paul, awesome tool. Thanks a lot.
I was actually wondering what tool you were mentioning in the beginning of the video that places a bone per each point? Trying to do a tentacle animation and it would be extremely useful to have each joint in my polyline be represented by joint in the bone animation.
Cheers,
-B
Ambrosiussen 7 years, 4 months ago |
Hi,
Sorry for the slow reply. I was attending GDC all last week.
That tool is no longer part of the toolset, since it has been replaced with the GameDev SkinningConverter.
To replicate this behavior you're after, see 13:10 in the video. You can plug in any points into the tool to be used as bones. (Just make sure they are from a static frame, and not animated) This would basically be the points of your polylines. :)
Paul
John Riggs 7 years, 1 month ago |
Hi, i am trying to use bones that are already in a skinned mesh, I cant figure that part out. I brought in a FBX that has bones and skinning already but I cant seem to figure out how to access those bones for skinning converter. It goes, file(the skinned fbx)>BoneCapture>CaptureOverride>BoneDeform>Blendshapes>SkinningConverter, If i try to put the output from any of the nodes in that chain it just gives me a bone per vertex when I enable "Use Input Bones", how do I get the bones from the skinned mesh to input into skinning converter?
Thank you!
aaronc-unity 7 years, 1 month ago |
Looks like this tool requires a single contiguous mesh. I'm trying to use it with an Alembic sequence comprised of about 40 separate meshes, but it only seems to work if I delete all but one of them.
Is there any way to get it working with multiple meshes? For example, my character is comprised of: head, shirt, pants, shoes.
Thanks,
Aaron
Ambrosiussen 7 years, 1 month ago |
Hi,
The skinning converter does not add animation to your pre-existing rig. If you however just want to grab your nulls/joints as points and feed those into the tool you can do this:
Create Object Merge in SOPs, set the [Object1] parameter to [ ../../null* ] The * allows you to grab all nodes that have a name starting with null. So null0, null1 etc) Set the transform parameter to [Into This Object], and then below the Object Merge put an Add node. Tick the [Delete Geometry but keep the points] parameter.
That should give you a pointcloud of your bones.
Paul
John Riggs 7 years, 1 month ago |
Thats basically what I ended up doing, thanks for the quick response!
aaronc-unity 7 years, 1 month ago |
Never mind my question; I dug into the network and figured it out. Turns out the 'bone capture biharmonic' SOP was throwing an error due to the time offset not being linked to the correct frame.
Ambrosiussen 7 years, 1 month ago |
Hi,
Glad you found the issue to your problem! If this is a bug in the tool, please submit it at https://www.sidefx.com/bugs/submit/ with an example so I can take a look :)
Paul
Ambrosiussen 7 years, 1 month ago |
Hi,
The skinning converter does not add animation to your pre-existing rig. If you however just want to grab your nulls/joints as points and feed those into the tool you can do this:
Create Object Merge in SOPs, set the [Object1] parameter to [ ../../null* ] The * allows you to grab all nodes that have a name starting with null. So null0, null1 etc) Set the transform parameter to [Into This Object], and then below the Object Merge put an Add node. Tick the [Delete Geometry but keep the points] parameter.
That should give you a pointcloud of your bones.
Paul
pthuriot 6 years, 11 months ago |
Being *very* new to houdini, I'm wondering does this happen to work with imported Alembic caches? When add the skin converter, I'm only seeing one bone generated (no matter how many I add in the options). Thanks in advance!
Ambrosiussen 6 years, 10 months ago |
Your geometry is probably packed.
Try creating an "Unpack" sop before the skinning converter.
To confirm you're dealing with pure geometry and not packed geometry, middlemouse click on the node that is plugged in to the skinning converter. It should say how many polygons you have, and not list any "packed" data.
Paul
redmanni 6 years, 9 months ago |
Hello,
Really new to houdini. Just wondering is it possible to add this function to already rigged and animated mesh? If animation is baked on joints and then added to existing skeleton?
Sirvoxelot 6 years, 8 months ago |
is it possible to use this to convert several different alembics to the same bone&mesh set
so you could save out the conversions as separate animations for one skeletal mesh rig?
for say unreal or unity?
dickonknowles 6 years, 2 months ago |
Hi!
I'm extremely impressed with the potential for this tool, and have had great success is using it on simulations that are fixed in place (I.E. A flag attached to a pole). But I'm trying to use it on a character's cloths and am finding that when my character turns 90 or 180 degrees the bones don't seem to know which direction the character is facing and I'm getting some really strange results.
Do you have any advise for tackling this kind of problem?
Thanks
Please log in to leave a comment.