
I'm testing out the new hair features in Houdini 22, particularly the "Configure Guide Deform" LOP node, but I'm having issues getting it to work with the capybara following this guide:
https://www.sidefx.com/docs/houdini/fur/guidedeform.html [www.sidefx.com]
Here are the steps I've taken:
1. Create Capybara from the "Capybara Sim and Deform" tool in the "Hair Utils" shelf. This creates the Capybara_Sim_and_Deform node under `/obj`.
2. Create a "SOP Create" node under `/stage`.
3. Copy all of the nodes inside of `/obj/Capybara_Sim_and_Deform` to the inside of `/stage/sopcreate1`.
4. Delete guidedeform_by_skin_and_guides.
5. Create name nodes for the groom, skin, and guides like the guide does.
6. Change "Import Path Prefix" to `/capybara` for the `/stage/sopcreate1` node.
7. Create a "Configure Primitive" node connected to sopcreate1 and set the groom prim's purpose to render.
8. Create a "Configure Guide Deform" node connected to the "Configure Primitive" node, and set its "Groom Prim" to `/capybara/groom`, "Skin Prim" to `/capybara/skin`, and "Deformer / Guides Prim" to `/capybara/guides`.
9. "Configure Guide Deform" shows an error that `/capybara/guides` is missing a `rest` primvar. Create a "Rest Position" node connected between guideutility and guidedeform_by_skin
10. Create an "Attribute Copy" node named attribcopy_rest between vellum_guide_sim and name_guides. Connect the first input of attribcopy_rest to the first output of vellum_guide_sim, and the second input of attribcopy_rest to rest1. Set "Attribute Name" to rest.
11. configureguidedeform1 errors with "/capybara/guides is missing restorient pimvar", so go back in sopcreate1 and check the box for "Copy to Rest Orient" on the guideutily node. Then for attributecopy_rest, add the restorient attribute to "Attribute Name".
12. configureguidedeform1 does not error anymore, so view from that node, then either render or switch the view to "Final Render". This will cause the viewport to freeze up for about a minute while the procedural computes. Then BAM, I see a mess of fur not even remotely correctly attached.
What did I do wrong here?
"Configure Guide Deform" LOP node with character hair
1503 13 3


-
- carlson
- Member

- 8 posts
- Joined: 1月 2022
- オフライン
-

- Liesbeth_Levick
- スタッフ

- 130 posts
- Joined: 6月 2024
- オフライン
Sorry you experienced this problem. The solution is to place a Rest SOP on your skin too, so between the "capy_skin" and "bonedeform" nodes. The attribute copy that you have in your guide stream is unnecessary as those values are being carried through. It would only be necessary if you had cached out your simulation and didn't want to resimulate after adding those attributes upstream.
Not having an error on the LOP for the missing rest attribute is an oversight on our part - we will add that. Once the rest attribute is there though, the slow lagginess goes away and the procedural becomes really fast again.
We will also take a look at the documentation again and see if we can add anything to make this process clearer.
Not having an error on the LOP for the missing rest attribute is an oversight on our part - we will add that. Once the rest attribute is there though, the slow lagginess goes away and the procedural becomes really fast again.
We will also take a look at the documentation again and see if we can add anything to make this process clearer.
Liesbeth Levick
Technical Director: CFX
SideFX
Technical Director: CFX
SideFX
-
- Liesbeth_Levick
- スタッフ
- 130 posts
- Joined: 6月 2024
- オフライン
-
- carlson
- Member
- 8 posts
- Joined: 1月 2022
- オフライン
-
- gregjenings
- Member

- 66 posts
- Joined: 3月 2012
- オフライン

Hi everyone,
I’m currently working on a Vellum-based groom simulation and I’m running into an issue where the scalp starts moving/separating independently from the groom guides as soon as the simulation begins.
The guide groom looks correct before entering the Vellum simulation, but once I start simulating, the scalp appears to move separately while the guides no longer behave as expected.
I’ve attached screenshots of my node network along with additional screenshots showing the Vellum data at frame 0 and at the first simulated frame. From my inspection, the Vellum data appears to change between these two frames, and I suspect this is related to the issue, but I’m not sure exactly what is causing it or what part of my setup is incorrect.
The groom/guides look correct before the Vellum simulation.
At frame 0, the scalp and guide setup appear to be correctly connected.
On the very next frame, the scalp begins to move independently from the guides.
This causes the groom to separate/deform incorrectly during the simulation.
I suspect there may be an issue with the Vellum constraints, pinning, point/primitive attributes, or the way the scalp is being incorporated into the simulation.
I would really appreciate it if someone could take a look at the attached node network and Vellum data and point out what I might be missing.
Is there a specific attribute or constraint setup I should verify to ensure that the scalp remains properly attached to the guides throughout the simulation?
Thanks in advance for any help or suggestions.
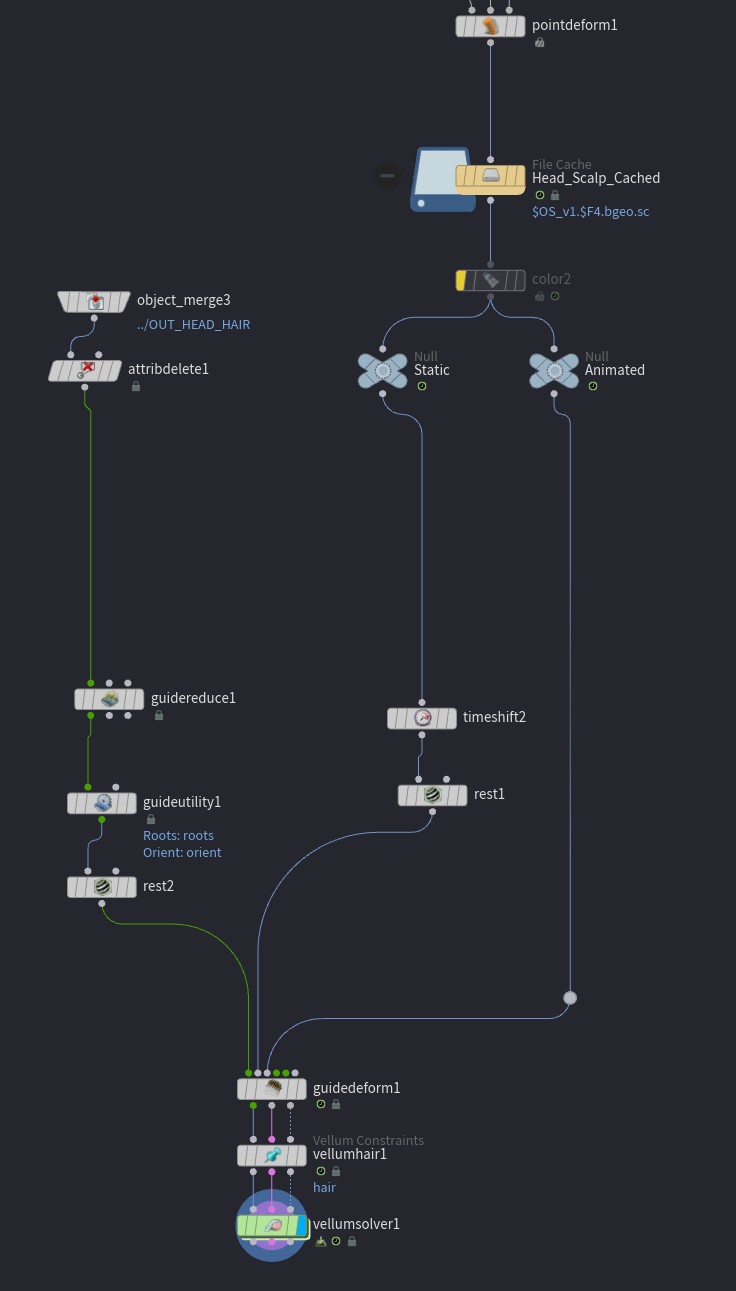


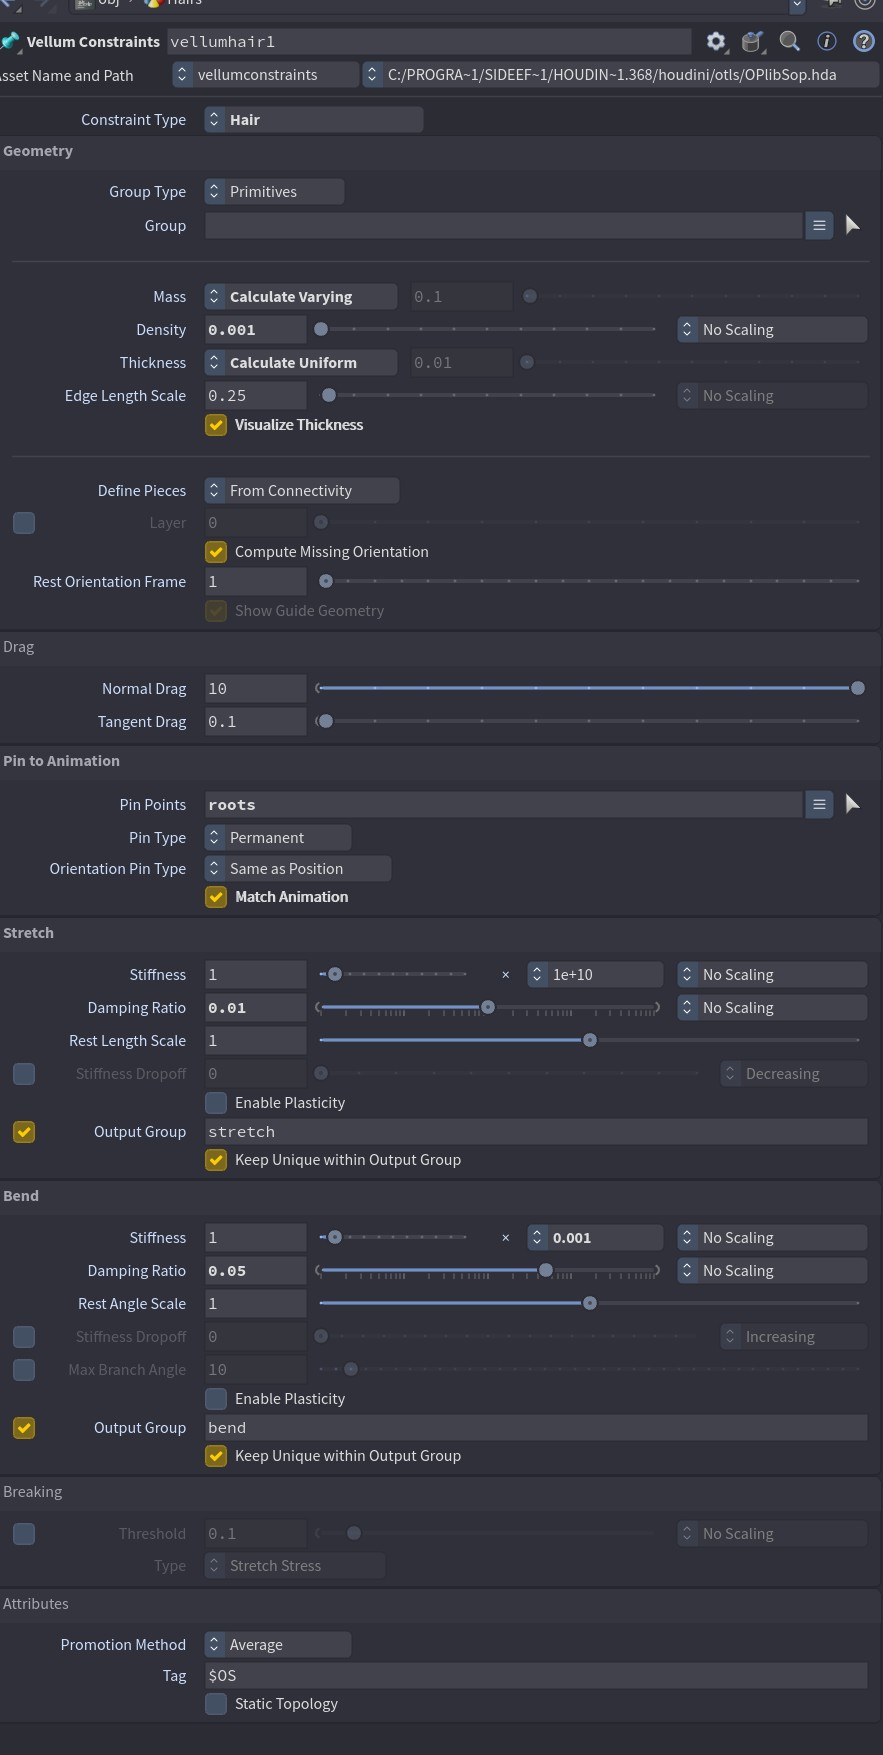
I’m currently working on a Vellum-based groom simulation and I’m running into an issue where the scalp starts moving/separating independently from the groom guides as soon as the simulation begins.
The guide groom looks correct before entering the Vellum simulation, but once I start simulating, the scalp appears to move separately while the guides no longer behave as expected.
I’ve attached screenshots of my node network along with additional screenshots showing the Vellum data at frame 0 and at the first simulated frame. From my inspection, the Vellum data appears to change between these two frames, and I suspect this is related to the issue, but I’m not sure exactly what is causing it or what part of my setup is incorrect.
The groom/guides look correct before the Vellum simulation.
At frame 0, the scalp and guide setup appear to be correctly connected.
On the very next frame, the scalp begins to move independently from the guides.
This causes the groom to separate/deform incorrectly during the simulation.
I suspect there may be an issue with the Vellum constraints, pinning, point/primitive attributes, or the way the scalp is being incorporated into the simulation.
I would really appreciate it if someone could take a look at the attached node network and Vellum data and point out what I might be missing.
Is there a specific attribute or constraint setup I should verify to ensure that the scalp remains properly attached to the guides throughout the simulation?
Thanks in advance for any help or suggestions.
-
- Liesbeth_Levick
- スタッフ
- 130 posts
- Joined: 6月 2024
- オフライン
I can't notice anything obviously wrong from these screenshots. Have you tried toggling on "Snap to Skin" on your Guide Utility node? If that doesn't fix it, please submit a support ticket with a file attached as it is almost impossible to troubleshoot from screenshots alone.
Liesbeth Levick
Technical Director: CFX
SideFX
Technical Director: CFX
SideFX
-
- gregjenings
- Member
- 66 posts
- Joined: 3月 2012
- オフライン
Thanks for the suggestion. I’ll try enabling **“Snap to Skin”** on the Guide Utility node as well.
I’m also sharing the Houdini file so the setup can be inspected directly rather than relying only on the screenshots. Since the issue may be caused by something in the Vellum data, attributes, constraints, or an interaction between nodes that isn’t visible in the screenshots, I’d appreciate it if you could take a look at the file itself.
Could you please check the file and let me know whether the behavior I’m seeing is expected or if there is something incorrect in my setup?
If the setup looks correct and the scalp still separates from the guides under these conditions, I’d like to confirm whether this could potentially be a **Houdini/Vellum bug** before submitting a support ticket to the development team.
In particular, it would be helpful to confirm whether you can reproduce the issue from the attached file and whether the Vellum data/constraints are changing unexpectedly between frame 0 and frame 1.
Thanks again for taking the time to look into it.
I’m also sharing the Houdini file so the setup can be inspected directly rather than relying only on the screenshots. Since the issue may be caused by something in the Vellum data, attributes, constraints, or an interaction between nodes that isn’t visible in the screenshots, I’d appreciate it if you could take a look at the file itself.
Could you please check the file and let me know whether the behavior I’m seeing is expected or if there is something incorrect in my setup?
If the setup looks correct and the scalp still separates from the guides under these conditions, I’d like to confirm whether this could potentially be a **Houdini/Vellum bug** before submitting a support ticket to the development team.
In particular, it would be helpful to confirm whether you can reproduce the issue from the attached file and whether the Vellum data/constraints are changing unexpectedly between frame 0 and frame 1.
Thanks again for taking the time to look into it.
Image Not Found
-
- Liesbeth_Levick
- スタッフ
- 130 posts
- Joined: 6月 2024
- オフライン
So there are a couple of issues with your setup.
The first I guess I could've spotted from the screenshots, but it's much easier to discover in the file, and that is that the second output of your Guide Deform should NOT be connected to the second "constraints" input of the Vellum Constraints.
The next issue relates to how you are importing your scalp geometry. When importing alembic files from third party applications such as Maya, when you unpack, you also have to toggle on "Convert Polygon Soup Primitives to Polygons". Without this it "works", but there is weird jittering in the hair.
The hair on the other hand, is coming in as NURBS Curves, which is not affected by the conversion toggle as it is not a Polygon Soup. However, the Vellum Solver cannot handle NURBS Curves, so only the roots move, while the rest of the curve stays in the rest position. To counteract this you need a Convert SOP with the default settings. However, this will lead to a very high point count on the curves and super stretchy curves when you simulate. To fix that the easiest is to add a Resample SOP and adjust the settings so that you can get the lowest resolution possible for the amount of detail that you need to preserve. The Resample SOP actually converts NURBS curves to polygons automatically, so you could skip the Convert SOP.
Alternatively, if you want to maintain the original point count of your curves, you will want to only use a Convert SOP instead of a Resample SOP, and toggle on "Interpolate Through Hulls" otherwise the conversion will create extra points. You will then need to increase the number of substeps on your solver to account for the extra resolution in order for the solver to converge and not be excessively stretchy. You'll also want to set the Thickness to "Calculate Varying" in the Vellum Constraints, so that points near one another on the same curve don't collide with one another.
Finally, you may find that points near the roots are colliding with the scalp in unwanted ways. You can use a "Group Expand" to create a new group called something like "near_roots", and set the steps to 2. Follow this with a point wrangle with this group specified in the group field and the snippet set to
The first I guess I could've spotted from the screenshots, but it's much easier to discover in the file, and that is that the second output of your Guide Deform should NOT be connected to the second "constraints" input of the Vellum Constraints.
The next issue relates to how you are importing your scalp geometry. When importing alembic files from third party applications such as Maya, when you unpack, you also have to toggle on "Convert Polygon Soup Primitives to Polygons". Without this it "works", but there is weird jittering in the hair.
The hair on the other hand, is coming in as NURBS Curves, which is not affected by the conversion toggle as it is not a Polygon Soup. However, the Vellum Solver cannot handle NURBS Curves, so only the roots move, while the rest of the curve stays in the rest position. To counteract this you need a Convert SOP with the default settings. However, this will lead to a very high point count on the curves and super stretchy curves when you simulate. To fix that the easiest is to add a Resample SOP and adjust the settings so that you can get the lowest resolution possible for the amount of detail that you need to preserve. The Resample SOP actually converts NURBS curves to polygons automatically, so you could skip the Convert SOP.
Alternatively, if you want to maintain the original point count of your curves, you will want to only use a Convert SOP instead of a Resample SOP, and toggle on "Interpolate Through Hulls" otherwise the conversion will create extra points. You will then need to increase the number of substeps on your solver to account for the extra resolution in order for the solver to converge and not be excessively stretchy. You'll also want to set the Thickness to "Calculate Varying" in the Vellum Constraints, so that points near one another on the same curve don't collide with one another.
Finally, you may find that points near the roots are colliding with the scalp in unwanted ways. You can use a "Group Expand" to create a new group called something like "near_roots", and set the steps to 2. Follow this with a point wrangle with this group specified in the group field and the snippet set to
i@disableexternal =1;
Liesbeth Levick
Technical Director: CFX
SideFX
Technical Director: CFX
SideFX
-
- gregjenings
- Member
- 66 posts
- Joined: 3月 2012
- オフライン
First of all, thank you for pointing out the issues in my setup. You were right — I had forgotten to add the **Convert SOP**. After adding the Convert SOP, the simulation is working correctly.
I also created the two setups you suggested: one with a **lower CV count** and another with a **higher CV count**. Both simulations are now working perfectly as you described.
However, I’m now running into another issue during rendering. I’ve attached screenshots showing the error, along with the Houdini file for reference.
The error seems to be related to the **Configure Guide Deform LOP** node. Since this node is relatively new in Houdini, I’m not very familiar with the correct workflow and configuration. I’ve tried both setups — one using the low-point-count curves and another using the original high-point-count curves — but I’m still getting the same error during rendering in both.
Could you please take a look at the attached file and let me know what I might be doing incorrectly?
I would particularly like to understand:
1. **Low-CV to High-CV workflow**
If I simulate the low-CV version of the groom for better performance, what is the recommended workflow for transferring the resulting motion/deformation back onto the original high-CV curves for rendering?
In other words, I would like to use the low-point-count curves for the Vellum simulation, but retain the original high-resolution curves for the final render. What would be the correct Houdini workflow for transferring the simulated motion from the low-CV guides to the high-CV guides?
2. **Configure Guide Deform LOP vs. Hair Procedural**
In earlier Houdini workflows, there was a **Hair Procedural** node available. In Houdini 21, is the **Configure Guide Deform LOP** intended to replace the Hair Procedural workflow, or does the Hair Procedural node still have a valid use case?
If both approaches are still supported, when would you recommend using **Configure Guide Deform LOP** versus **Hair Procedural**?
I’ve attached the HIP file so the complete setup can be inspected rather than relying only on the screenshots. Hopefully the file will make it easier to identify what is causing the rendering error.
Thanks again for your help. I’m trying to understand the intended Houdini 22 groom/Vellum workflow rather than just work around the error, so any explanation of the underlying workflow would be greatly appreciated.

I also created the two setups you suggested: one with a **lower CV count** and another with a **higher CV count**. Both simulations are now working perfectly as you described.
However, I’m now running into another issue during rendering. I’ve attached screenshots showing the error, along with the Houdini file for reference.
The error seems to be related to the **Configure Guide Deform LOP** node. Since this node is relatively new in Houdini, I’m not very familiar with the correct workflow and configuration. I’ve tried both setups — one using the low-point-count curves and another using the original high-point-count curves — but I’m still getting the same error during rendering in both.
Could you please take a look at the attached file and let me know what I might be doing incorrectly?
I would particularly like to understand:
1. **Low-CV to High-CV workflow**
If I simulate the low-CV version of the groom for better performance, what is the recommended workflow for transferring the resulting motion/deformation back onto the original high-CV curves for rendering?
In other words, I would like to use the low-point-count curves for the Vellum simulation, but retain the original high-resolution curves for the final render. What would be the correct Houdini workflow for transferring the simulated motion from the low-CV guides to the high-CV guides?
2. **Configure Guide Deform LOP vs. Hair Procedural**
In earlier Houdini workflows, there was a **Hair Procedural** node available. In Houdini 21, is the **Configure Guide Deform LOP** intended to replace the Hair Procedural workflow, or does the Hair Procedural node still have a valid use case?
If both approaches are still supported, when would you recommend using **Configure Guide Deform LOP** versus **Hair Procedural**?
I’ve attached the HIP file so the complete setup can be inspected rather than relying only on the screenshots. Hopefully the file will make it easier to identify what is causing the rendering error.
Thanks again for your help. I’m trying to understand the intended Houdini 22 groom/Vellum workflow rather than just work around the error, so any explanation of the underlying workflow would be greatly appreciated.
Image Not Found
-
- Liesbeth_Levick
- スタッフ
- 130 posts
- Joined: 6月 2024
- オフライン
gregjenings
The error seems to be related to the **Configure Guide Deform LOP** node. Since this node is relatively new in Houdini, I’m not very familiar with the correct workflow and configuration. I’ve tried both setups — one using the low-point-count curves and another using the original high-point-count curves — but I’m still getting the same error during rendering in both.
Could you please take a look at the attached file and let me know what I might be doing incorrectly?
The problem is that you're saving your animated scalp position as your rest attribute on each frame. If you connect the transform SOP of your static scalp into the second input of the Rest SOP of your animated scalp it fixes the issue.
gregjenings
In other words, I would like to use the low-point-count curves for the Vellum simulation, but retain the original high-resolution curves for the final render. What would be the correct Houdini workflow for transferring the simulated motion from the low-CV guides to the high-CV guides?
What you have done is correct (once the rest issue is fixed). You can use simulated guides with a lower point count per curve than the renderable hairs to deform the hairs either in the Guide Deform SOP or in the Configure Guide Deform LOP. You can also have a smaller number of guide curves than render curves.
gregjenings
If both approaches are still supported, when would you recommend using **Configure Guide Deform LOP** versus **Hair Procedural**?
Both are still supported, but the Configure Guide Deform LOP is recommended to use instead of the Hair Procedural when deforming hair as it is faster, easier to use, and gives much better results. The only time you wouldn't use the Configure Guide Deform is if you want to generate hairs at render time instead of only deforming existing hairs, or if you are using feathers, in which case you would use the Houdini Procedural:Feather. We do plan to support feathers in the Configure Guide Deform LOP in the future though, this is just a current limitation.
Edited by Liesbeth_Levick - 2026年8月20日 10:06:48
Liesbeth Levick
Technical Director: CFX
SideFX
Technical Director: CFX
SideFX
-
- gregjenings
- Member
- 66 posts
- Joined: 3月 2012
- オフライン
Hi Liesbeth,
Thank you for your last reply! It worked perfectly and helped me solve the previous issue.
I have another question regarding the imported hair curves.
I’ve brought render hairs/curves from another hair package, and now I want to apply a Glue Constraint based on Clump ID. However, these imported curves don’t currently have any Clump IDs.
Manually selecting curves by looking at their existing clumps and assigning Clump IDs would be extremely tedious, especially when dealing with a large number of curves.
Is there a procedural way to automatically generate Clump IDs based on the existing hair structure, proximity, or distribution?
More importantly, I would like to have control over the number of clumps. For example, I might want to generate 50, 100, or 500 clumps and have the curves automatically distributed into those clumps.
Ideally, I’m looking for a workflow that can:
Automatically identify/group related or nearby curves into clumps
Generate a Clump ID attribute for each group
Allow me to control the total number of clumps
Use those Clump IDs later for the Glue Constraint
I’m trying to avoid manually selecting and assigning Clump IDs curve by curve.
Is there a recommended procedural workflow, node setup, or approach for achieving this in Houdini?
Thanks again for your help!
Thank you for your last reply! It worked perfectly and helped me solve the previous issue.
I have another question regarding the imported hair curves.
I’ve brought render hairs/curves from another hair package, and now I want to apply a Glue Constraint based on Clump ID. However, these imported curves don’t currently have any Clump IDs.
Manually selecting curves by looking at their existing clumps and assigning Clump IDs would be extremely tedious, especially when dealing with a large number of curves.
Is there a procedural way to automatically generate Clump IDs based on the existing hair structure, proximity, or distribution?
More importantly, I would like to have control over the number of clumps. For example, I might want to generate 50, 100, or 500 clumps and have the curves automatically distributed into those clumps.
Ideally, I’m looking for a workflow that can:
Automatically identify/group related or nearby curves into clumps
Generate a Clump ID attribute for each group
Allow me to control the total number of clumps
Use those Clump IDs later for the Glue Constraint
I’m trying to avoid manually selecting and assigning Clump IDs curve by curve.
Is there a recommended procedural workflow, node setup, or approach for achieving this in Houdini?
Thanks again for your help!
-
- Liesbeth_Levick
- スタッフ
- 130 posts
- Joined: 6月 2024
- オフライン
Glad I could help.
Here is a solution Kai and I came up with to your problem. It does a pretty good job of finding clumps.
I've attached a file with a simple example to demonstrate.
Here is a solution Kai and I came up with to your problem. It does a pretty good job of finding clumps.
- Use a Guide Reduce SOP on your groom. The "Target Guide Count" parm will control the number of clumps it finds.
- Follow this with a (H22) Guide Deform SOP with "Mode" set to Capture, and "Max Guides" set to 1. The first input will be your full groom and the fourth input will be the clump curves from the Guide Reduce.
- To convert the captured guides to clumpid, follow this with a Primitive Wrangle with the expression set to
i@clumpid = i[]@guides[0];
I've attached a file with a simple example to demonstrate.
Liesbeth Levick
Technical Director: CFX
SideFX
Technical Director: CFX
SideFX
-
- gregjenings
- Member
- 66 posts
- Joined: 3月 2012
- オフライン
Thank you both, Liesbeth and Kai, for your suggestions and for sharing your methods. They clarified a lot of things for me. However, there are still a few points that I’m not completely sure how to achieve.
First, if I don’t want the clumps to be distributed equally, how could I create a more random clump distribution? Also, is there a way to control the clump distribution using a mask or a painted attribute? This would give me more control over where the clumps are created.
Second, I tried to generate Glue Constraints using the method you suggested, but unfortunately, I’m either not applying the constraints correctly or the method does not fully support them. The Glue Constraints seem to work quite well when using the standard Houdini grooming workflow, but I’m having trouble getting the same result with this approach.
I’ve attached a file showing my setup and how I’m currently approaching the method you suggested. Hopefully, this makes it easier to understand what I’m trying to achieve.
Finally, I have one more important question. If this method works well, how would you recommend simulating and rendering millions of hairs? Simulating all the hair directly seems to require a lot of memory.
Is there a more efficient or memory-friendly workflow for handling millions of hairs while still getting a good simulation result? For example, should only a smaller number of hairs be simulated and then used to drive the rest?
Any advice or suggestions would be greatly appreciated. Thank you again for your help!
First, if I don’t want the clumps to be distributed equally, how could I create a more random clump distribution? Also, is there a way to control the clump distribution using a mask or a painted attribute? This would give me more control over where the clumps are created.
Second, I tried to generate Glue Constraints using the method you suggested, but unfortunately, I’m either not applying the constraints correctly or the method does not fully support them. The Glue Constraints seem to work quite well when using the standard Houdini grooming workflow, but I’m having trouble getting the same result with this approach.
I’ve attached a file showing my setup and how I’m currently approaching the method you suggested. Hopefully, this makes it easier to understand what I’m trying to achieve.
Finally, I have one more important question. If this method works well, how would you recommend simulating and rendering millions of hairs? Simulating all the hair directly seems to require a lot of memory.
Is there a more efficient or memory-friendly workflow for handling millions of hairs while still getting a good simulation result? For example, should only a smaller number of hairs be simulated and then used to drive the rest?
Any advice or suggestions would be greatly appreciated. Thank you again for your help!
Image Not Found
-
- Liesbeth_Levick
- スタッフ
- 130 posts
- Joined: 6月 2024
- オフライン
It's not working for you because you bypassed the Guide Reduce which is required to find one curve per clump. As soon as I enabled it again, the glue constraints were generated. This is on your main hairs. The result of the Guide Reduce in this case, for the clumpid generation, would only be used as an input to the Guide Deform which finds the weights for each clump curve.
The Guide Reduce should be able to detect a more random clump distribution if it exists in the incoming groom. It tries to find one curve to best describe all the surrounding curves, and it isn't density based - it is just based on the Target Guide Count parameter. However, you can make use of the Density Mask override on the Guide Reduce to force it to pick fewer clumps in one area compared to another.
Yes, you would simulate a smaller number of hairs and drive the full groom with the simulated ones. Take a look at the "Capybara Sim and Deform" recipe on the "Hair Utils" shelf to see how to do it. In it, a Guide Reduce is used to create a subset of guides to simulate. You might find that the Guide Deform using a very sparse set of simulation guides gives good enough results without needing to set up Glue Constraints on a denser set of simulation guides. Turning on "Preserve Clumps" on your final Guide Deform can also help. If you do choose to go the Glue Constraints Route, you will end up with one Guide Reduce to create your simulation guides, plus another Guide Reduce to calculate the clump centres of those simulation guides. You will also use a total of three Guide Deform nodes. One to capture the clumpid, one to deform the simulation guides by the skin, and one to deform the renderable hairs by the simulation guides.
I've added this setup to your file. The yellow nodes are the nodes from the recipe, while the purple ones are from the clumpid detection and glue constraint creation setup.
The Guide Reduce should be able to detect a more random clump distribution if it exists in the incoming groom. It tries to find one curve to best describe all the surrounding curves, and it isn't density based - it is just based on the Target Guide Count parameter. However, you can make use of the Density Mask override on the Guide Reduce to force it to pick fewer clumps in one area compared to another.
gregjenings
Finally, I have one more important question. If this method works well, how would you recommend simulating and rendering millions of hairs? Simulating all the hair directly seems to require a lot of memory.
Is there a more efficient or memory-friendly workflow for handling millions of hairs while still getting a good simulation result? For example, should only a smaller number of hairs be simulated and then used to drive the rest?
Yes, you would simulate a smaller number of hairs and drive the full groom with the simulated ones. Take a look at the "Capybara Sim and Deform" recipe on the "Hair Utils" shelf to see how to do it. In it, a Guide Reduce is used to create a subset of guides to simulate. You might find that the Guide Deform using a very sparse set of simulation guides gives good enough results without needing to set up Glue Constraints on a denser set of simulation guides. Turning on "Preserve Clumps" on your final Guide Deform can also help. If you do choose to go the Glue Constraints Route, you will end up with one Guide Reduce to create your simulation guides, plus another Guide Reduce to calculate the clump centres of those simulation guides. You will also use a total of three Guide Deform nodes. One to capture the clumpid, one to deform the simulation guides by the skin, and one to deform the renderable hairs by the simulation guides.
I've added this setup to your file. The yellow nodes are the nodes from the recipe, while the purple ones are from the clumpid detection and glue constraint creation setup.
Liesbeth Levick
Technical Director: CFX
SideFX
Technical Director: CFX
SideFX
-
- Quick Links