
Is it possible to render an ambient occlusion pass that is mapped to the UV map you have for a piece of geometry? I'm watching a tutorial on hard surface texture mapping and one of the techniques is to use ambient occlusion to help with the texture map for the model. They are using Maya which seems to be able to do render out the results such that they are rendered into the UVs that were set up.
I tried something similar by taking 6 renders (one for each side), and then manually taking each of these images and adding them into a photoshop file, using the UV map image that Houdini generate as a guide to scale and position them. This seems pretty error prone. Is there any other way to accomplish this, using Houdini?
Found 272 posts.
Search results Show results as topic list.
Technical Discussion » Ambient occlusion for texture painting
-
- jimc

- 295 posts
- Offline
Technical Discussion » Houdini crashes with Pen Tablet?
-
- jimc
- 295 posts
- Offline
I'm using Houdini under Vista 64, and when using a Wacom 3 (CTE-640) table it crashes after a minute or so of use. The offending module is always Pen_Tablet.dll, according to Windows. Any idea what might be causing this or how to resolve it?
Technical Discussion » Creating instances of a subnet of geometry
-
- jimc
- 295 posts
- Offline
Wolfwood
Err…. sure you can? Well not with the Copy SOP, but with Mantra you can.
Wow! That's really cool. Thanks alot for doing that! My only question, and maybe I just need to study the file a bit more, but where is the actual connection made between the points that you generate and the instanced geometry? Anyhow, really good, I'll look at this some more.
Technical Discussion » Creating instances of a subnet of geometry
-
- jimc
- 295 posts
- Offline
Is it possible to have a subnet of geometry that you can then copy or instance over some larger geometry container? For example, say your modeling a spaceship, and you have a subnet that represents a gun turret. The subnet has various geo containers, parented up for more convenient animation later on. Now you want to take this master turret and scale it down and copy it around the main ship. The Instance object seems to only want to work with geo containers, NOT subnets.
The other way is to just have a single geo container and have all the pieces inside it. However I was under the impression that this was not the preferred way to model, especially if you might want to animate later on.
The other way is to just have a single geo container and have all the pieces inside it. However I was under the impression that this was not the preferred way to model, especially if you might want to animate later on.
Technical Discussion » strange Edge Divide behaviour
-
- jimc
- 295 posts
- Offline
Fascinating! I had no idea polyknit would work that way! It should have occurred to me to use the blast and an extra edge divide node fill the missing edges and then just merge and fuse it all! Damn! Thanks a bunch!
Anyways Merry Christmas! Wesolych Swiat Bozego Narodzenia!
Anyways Merry Christmas! Wesolych Swiat Bozego Narodzenia!
Technical Discussion » strange Edge Divide behaviour
-
- jimc
- 295 posts
- Offline
I'm trying to use the edge divide tool to break up some edges. I'd like the points to be connected and closed. However when I turn these options on, the points are not completely connected, there's one left over, and I can't figure out what I'm doing wrong. I wanted to divdide the lines 35 times or so, so polysplitting the extra lines in is kind of a drag, which I'm hoping I don't have to do. Any ideas on what might cause this? I'm using Houdini 10.0.465, 64 bit, on Windows Vista 64.
INitial geometry:

Underside after the edge divide, this is OK:

Missing segment

INitial geometry:
Underside after the edge divide, this is OK:
Missing segment
Work in Progress » Sci-fi hi detail space ship
-
- jimc
- 295 posts
- Offline
Is there a case where you want to use UVunwrap? Are there certain shapes that work better than others?
Work in Progress » Sci-fi hi detail space ship
-
- jimc
- 295 posts
- Offline
edwardjimc
As I understood it, it was basically creating uv's for each of the six sides.
Doesn't the UVUnwrap SOP provide this functionality?
Just as an experiment I tried running the dropship through the UVUnwrap, with spacing set to 0.
This is what I got:
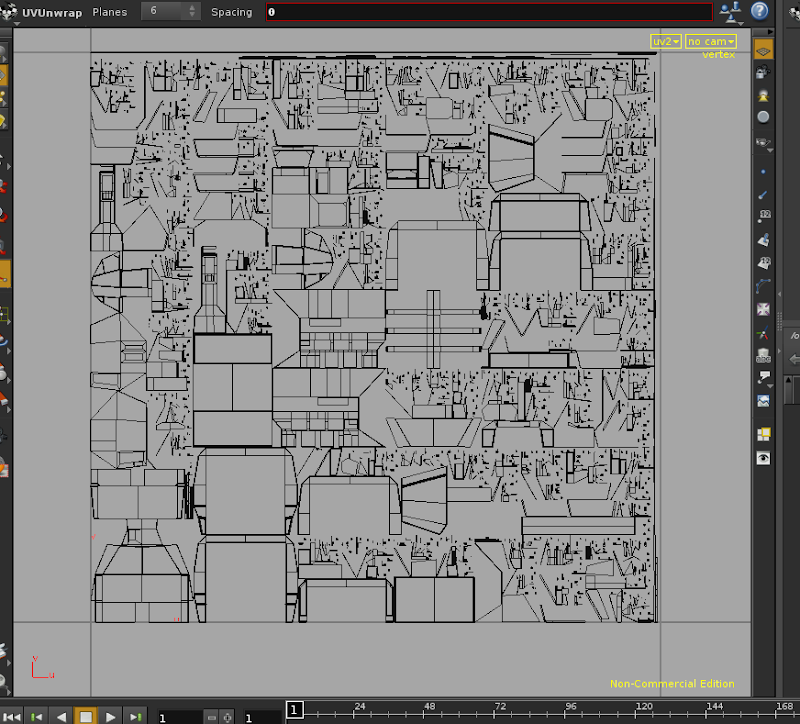
That would seem to me to be rather difficult to paint against, wouldn't it? I can see some of the big pieces are kept together, so maybe this is the way a uv map is supposed to look, I honestly don't know.
Work in Progress » Sci-fi hi detail space ship
-
- jimc
- 295 posts
- Offline
Yes it does (I think), however it doesn't keep stuff together very well, at least in my limited experience with it. It seems like it just randomly spreads the faces all over the place. Maybe there's something I'm missing?
Work in Progress » Area 51's Foo fighter
-
- jimc
- 295 posts
- Offline


Work in Progress » Sci-fi hi detail space ship
-
- jimc
- 295 posts
- Offline
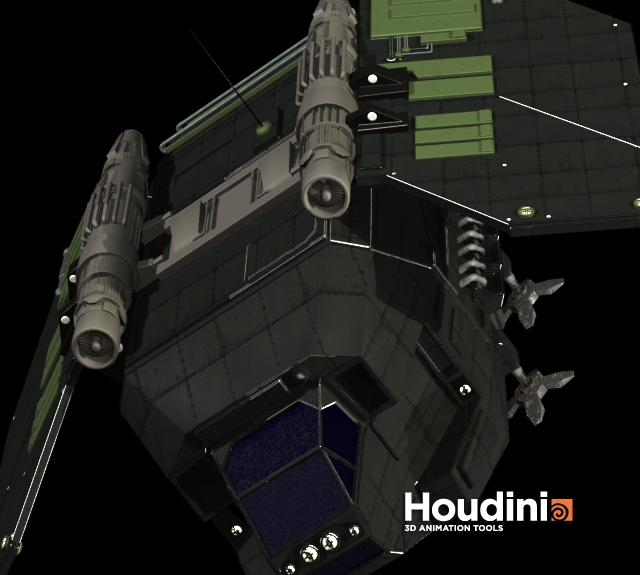
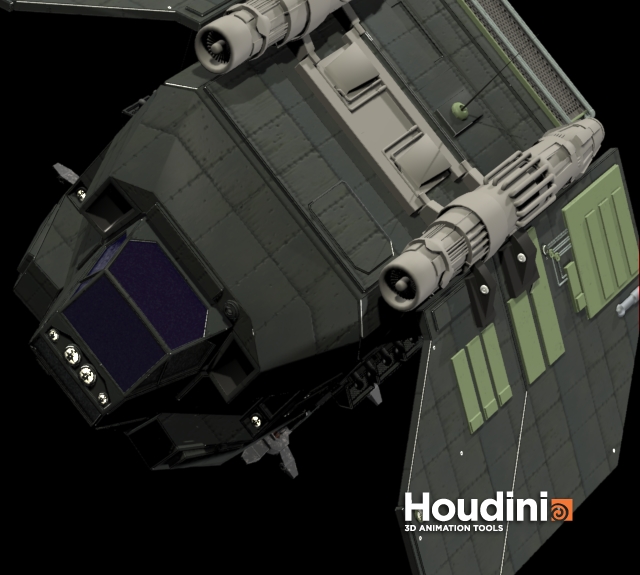
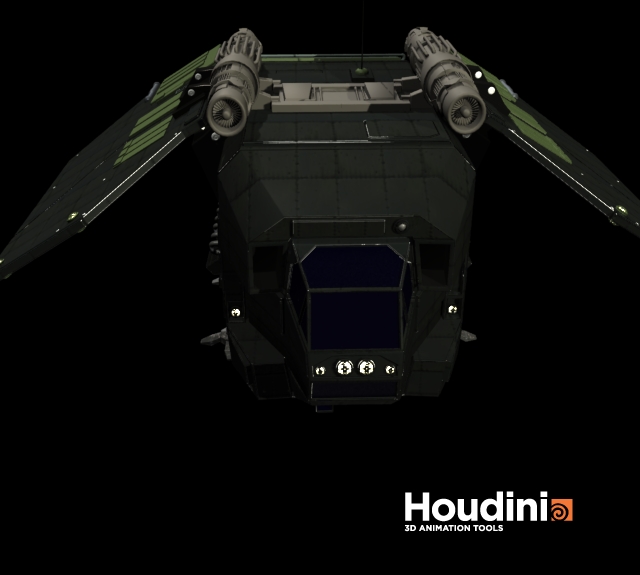
Sure. The idea came from Gnomon's Hard Surface Shading and Texturing DVD by Neil Blevins. As I understood it, it was basically creating uv's for each of the six sides. Neil did this with some custom script for 3D Max, I haven't seen it, so I'm only *guessing* how it works.
For Houdini, I simply create a group, go to the Normals tab and enable them. Then set up a normal depending on the side I want to group (1,0,0 for right, 0,1,0 for top, etc) and set the spread angle to range from 30 -45 degrees, depending on how much I want to trap. I end up with 6 groups, each with a different side, for normals
1,0,0
0,1,0
0,0,1
-1,0,0
0,-1,0
0,0,-1
For each group I create a UV Texture SOP, set to projection, with the appropriate X, Y, or Z axis set. I use a UV Edit SOP to move the preliminary UV's out of the way, and then when all 6 UVs are done, and use a final UVEdit to scale and position them in the 0-1 UV space.
All this stuff generally goes at the end of the SOP network, once you've got all the modeling done.
My final UV (for the dropship) look something like this:

I have no idea if this is the “right” way to do this, or if I have naively come up with a disastrous/cludgy method. It does seem to work, though again, I'm not 100% sure if this is what Mr. Blevins techniques was supposed to work like.
If this *is* correct, the potential for putting this into a user friendly SOP that can do all the grunge work is pretty high, and it's something I intend to investigate.
I do wish there were more high end tutorials explaining how to do this in Houdini. I know people must do this, because I've seen scene breakdowns where Houdini is being used for more than just special effects (i.e. the latest Terminator movie), so clearly at least one individual out there knows how to do this
For Houdini, I simply create a group, go to the Normals tab and enable them. Then set up a normal depending on the side I want to group (1,0,0 for right, 0,1,0 for top, etc) and set the spread angle to range from 30 -45 degrees, depending on how much I want to trap. I end up with 6 groups, each with a different side, for normals
1,0,0
0,1,0
0,0,1
-1,0,0
0,-1,0
0,0,-1
For each group I create a UV Texture SOP, set to projection, with the appropriate X, Y, or Z axis set. I use a UV Edit SOP to move the preliminary UV's out of the way, and then when all 6 UVs are done, and use a final UVEdit to scale and position them in the 0-1 UV space.
All this stuff generally goes at the end of the SOP network, once you've got all the modeling done.
My final UV (for the dropship) look something like this:
I have no idea if this is the “right” way to do this, or if I have naively come up with a disastrous/cludgy method. It does seem to work, though again, I'm not 100% sure if this is what Mr. Blevins techniques was supposed to work like.
If this *is* correct, the potential for putting this into a user friendly SOP that can do all the grunge work is pretty high, and it's something I intend to investigate.
I do wish there were more high end tutorials explaining how to do this in Houdini. I know people must do this, because I've seen scene breakdowns where Houdini is being used for more than just special effects (i.e. the latest Terminator movie), so clearly at least one individual out there knows how to do this
Technical Discussion » simulating Maxs f-edge
-
- jimc
- 295 posts
- Offline
Is there a way in Houdini to simulate the f-edge functionality of 3DS Max? Basically a way to select a series of edges and have a shader render them a specific color. Not a wireframe shader, something a lot more selective.
Houdini Indie and Apprentice » icp not working ?
-
- jimc
- 295 posts
- Offline
I came across after running into the same problem. I'm on Windows Vista 64bit Ultimate. I'm using Houdini Apprentice version 10.0.249.3,
Platform: windows-x86_64-cl14
OpenGL Vendor: NVIDIA Corporation
OpenGL Renderer: GeForce 8800 GT/PCI/SSE2
OpenGL Version: 2.1.2
When I try and convert a jpg to a .rat format I get the same error. iconvert does list RAT as a supported format. The help docs mention something about a ratnc format (I presume for hte Apprentice version, just like the hipnc project files). I tried “icp myfile.jpg myfile.ratnc” and that also failed with the same error.
Work in Progress » Sci-fi hi detail space ship
-
- jimc
- 295 posts
- Offline
Here's an attempt at texturing this thing. Shaders are all out of the Material Palette. UVs were done by setting up 6 groups, one per side, and then pulling in the UV's for each group. I have no idea if this is the “right” way to do this, but it seemed to work out OK.
gamma adjusted
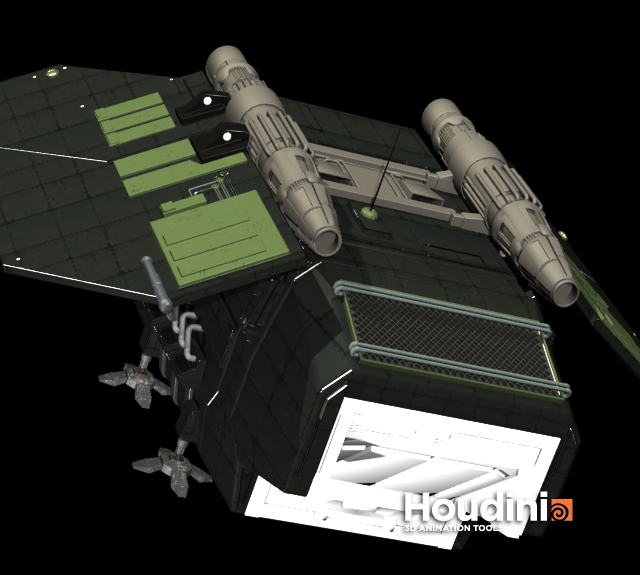

gamma adjusted
Technical Discussion » Create new geometry that's aligned to the construction plane
-
- jimc
- 295 posts
- Offline
According to the video here (assuming it plays for you)
http://forums.odforce.net/index.php?/topic/56-movie-construction-plane-modeling/page__view__findpost__p__64368 [forums.odforce.net]
you used to be able to. I don't know what version of Houdini they're using the video, but they do show aligning the c-plane to a face, then creating a curve, with the CV's aligned to the c-plane. Sure would be nice if you could do this now.
Technical Discussion » painted wall, chipped paint with dirt and dust
-
- jimc
- 295 posts
- Offline
I was playing a bit with this too. I got the “Hard Surface Shading and Texturing” from Gnomon Workshop, and I've tried trying to apply that to Houdini, but it's a bit of a struggle. I find it amazing that no one has really replied to this?
Technical Discussion » Create new geometry that's aligned to the construction plane
-
- jimc
- 295 posts
- Offline
I think the cplane options got moved into the viewport menus in the top-right.
Yeah, I found those. I'm able to re-orient/re-align the c-plane, but new objects, at least within a geometry container, don't seem to be created aligned with the c-plane.
Technical Discussion » Create new geometry that's aligned to the construction plane
-
- jimc
- 295 posts
- Offline
OK thanks, I'll take a look when I get home. In the meantime, assuming the worst, if you can't do this, is there some other way to accomplish the same thing?
Technical Discussion » Create new geometry that's aligned to the construction plane
-
- jimc
- 295 posts
- Offline
Is this still possible? I found an old od video that mentions this. However I can't seem to get this to work in Houdini.
As I understand it, I should be able to re-align/re-orient the construction plane, and then be able to create new geometry, such as a box, so that the geo is in alignment with the c-plane. Is this still possible and if so, is there something special you need to do?
Thanks!
As I understand it, I should be able to re-align/re-orient the construction plane, and then be able to create new geometry, such as a box, so that the geo is in alignment with the c-plane. Is this still possible and if so, is there something special you need to do?
Thanks!
Work in Progress » Area 51's Foo fighter
-
- jimc
- 295 posts
- Offline
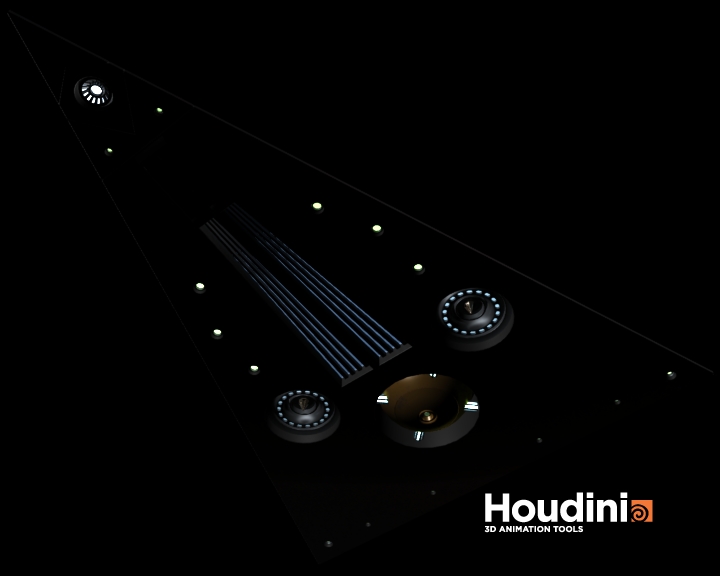
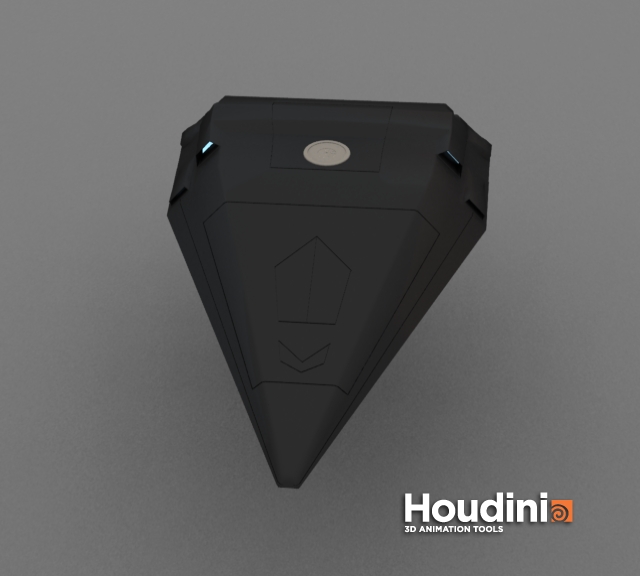
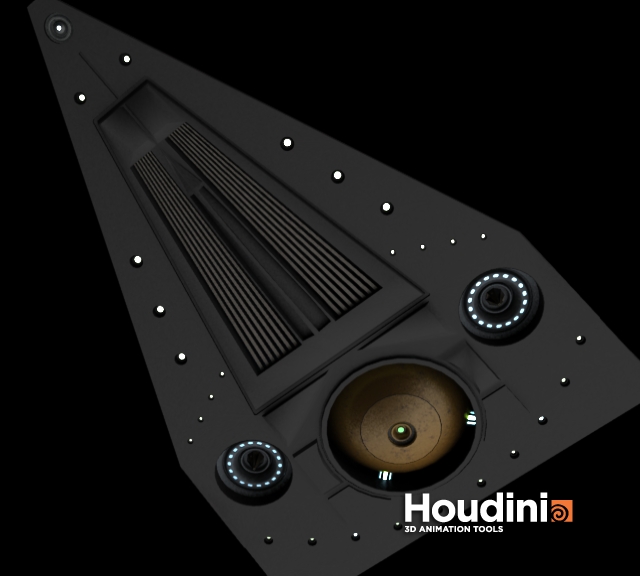
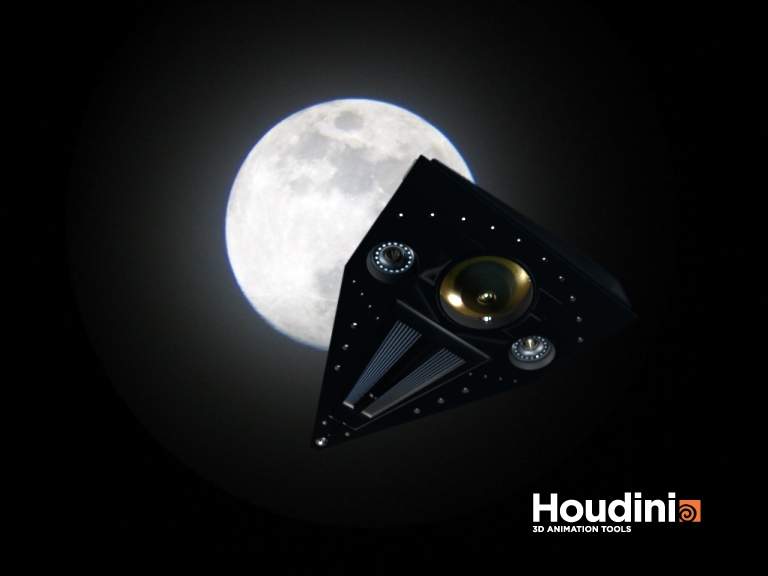
We all know what they have at Area 51, alien space ships! So here's an attempt at a foo fighter with a gravity wave drive. Everything done in Houdini.
Starting point


Detailing

Initial materials/lighting
underside lit up

Composite attempt:
Starting point
Detailing
Initial materials/lighting
underside lit up
Composite attempt:
-
- Quick Links