| Since | 21.0 |
This component uses the ulna and radius joints on a character’s skeleton and sets up an anatomical twist for the character’s forearm.
The following is an example network for setting up the ulna component:
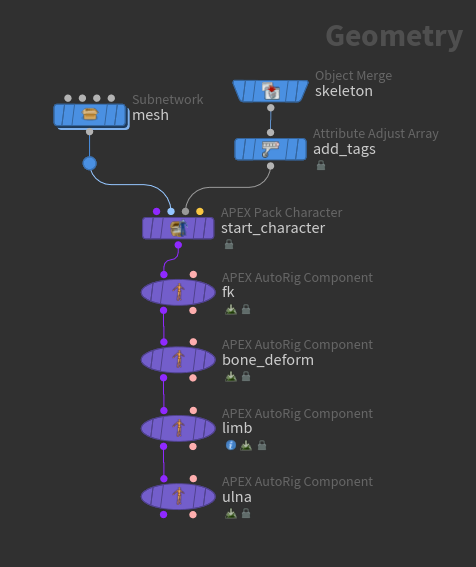
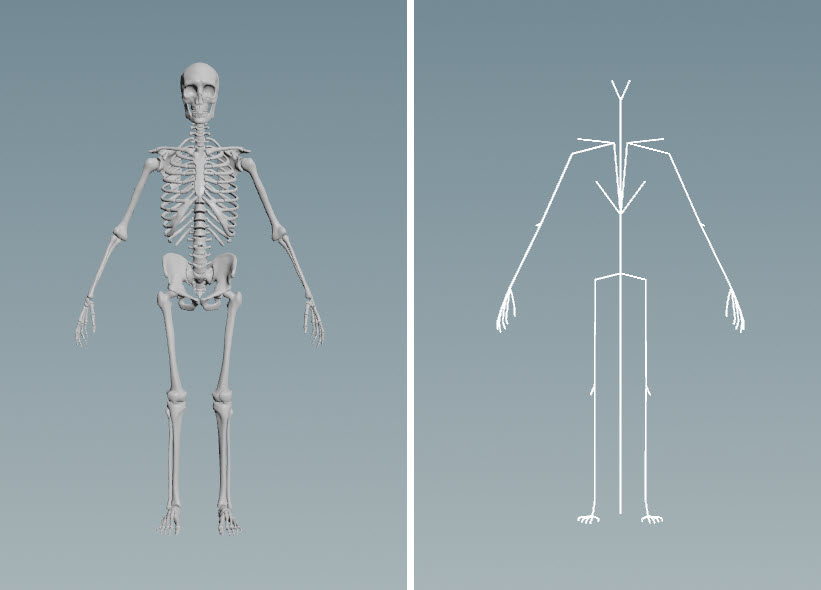
The image below shows the character’s mesh and skeleton:
-
The ulna component requires ulna and radius joints on the skeleton:
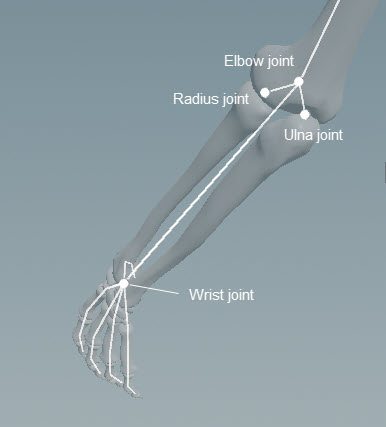
Joints needed for the ulna component The ulna and radius joints are parented to the elbow joint, and the wrist is used as a look at for the ulna and radius. For the twist functionality, the elbow and wrist joints are the root and tip of the look at, and the ulna and radius joints are the twist joints. See the twist component for a description of the parenting hierarchy of twist joints.
-
Add ulna tags to the elbow, radius, ulna, and wrist joints using the
 Attribute Adjust Array SOP (see preparing skeletons for more information on tagging skeleton joints):
Ulna tags -
Add the mesh and skeleton to a character folder structure, and create a starting rig for the character using an
 APEX Pack Character SOP. See rigging a character for how to use this node. On the APEX Pack Character SOP:
-
Turn on Add FK and Bone Deform Components.
-
Remove the entries in the Rotate Group parameter.
-
-
The limb rig component sets up the clavicle controls that are needed by the ulna component. Set the parent of the arm pole vectors to the root of the skeleton - on the
 APEX Autorig Component SOP,
 limb, Parent tab, set Pole Vector to the skeleton’s root joint, in our case,C_root. If you used a root component upstream to create root joints for the character, you can set Pole Vector to#rootsince the root component adds “root” tags to all the controls it creates. -
On the ulna component, Driven tab, set Segments to the ulna tags, in our case,
*_ulnaTwist. If you rotate the wrist control, the character’s forearm twists with the wrist rotation:
Parameters 
Name
The name to add to the subnet nodes that set up the look at functionality for the ulna and radius joints.
Driven 
Segments
Segments are tags that separate each ulna setup. For example, *_ulna loops over tags L_ulna and R_ulna. You can set up tags on skeleton joints using an ![]() Attribute Adjust Array SOP. See preparing skeletons for rigging for more information.
Attribute Adjust Array SOP. See preparing skeletons for rigging for more information.
If Segments is empty, the ulna logic is run once.
Note
The Segments parameter does not take APEX path patterns, for example, the #<tag> function. Instead, specify the tag names directly in this field.
Tags 
| See also |