| On this page |
Overview 
A wedge render generates multiple versions of an image or piece of geometry, with different settings, to help you choose the best looking option from a range of possible settings.
In TOPs, we accomplish this by generating separate work items for each separate variant, with the varied settings stored as attributes.
The Wedge TOP generates these work items. It can generate variations of multiple attributes at once. It can vary settings across a range, choose from a list of values, or pick random values.
Labs Wedge vs Wedge 
This node was mainly created to work inside the Labs File Cache and TOP Labs File Cache nodes while it also trying to improve the functionalities of creating wedged attributes. While you can use this for your own setup, it has not been tested extensively to work outside these nodes. Therefore it only contains a minimal set of parameters for wedging purposes needed on the mentioned nodes.
Wedge Attributes 
The ![]() Wedge node provides options to wedge attributes types such as
Wedge node provides options to wedge attributes types such as Float Vector, Integer Vector, Color. While these options would make sense at first, in practice they do less so. For example, while there are options to set Start and End vectors, there is no control over vector interpolation, or to rotate or spread a vector with certain degree. Or how to blend colors together. All of these operations have dedicated nodes for each attribute type in the form of Attribute Adjust sop nodes.
In addition to this, the interface of this node for wedging attributes have to be exposed to the Labs File Cache node, where it is really important to keep the settings simple and compact as much as possible. Therefore this node only wedges Float type attributes by default, which is the most common type one would use.
To wedge other type of attributes, there is a new feature, Attribute Values, which lets you provide any points or primitive geometry with the desired attribute. This way you can fully customize the wedge values, either with the Attribute Adjust nodes or with your own preferred method.
| To... | Do this |
|---|---|
|
To wedge vector attributes |
|
Nested Wedging 
Nested wedging is important concept that allows you to create all possible variations of multiple wedge attributes. To create nested wedging using the ![]() Wedge nodes, connect two of them together, similar to the following image:
Wedge nodes, connect two of them together, similar to the following image:
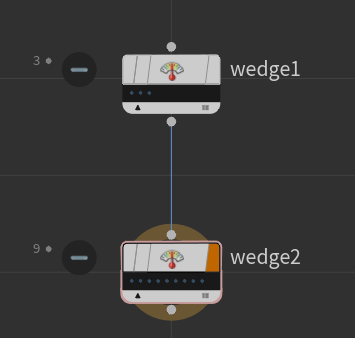
When both of their Wedge Count is set to 3, the first ![]() Wedge will generate 3 work items, while the second node triples that for the total of 9 work items. After setting up some wedge attributes and investigating their values on the second node, you would find that the first node’s wedge attribute is now distributed in the following pattern
Wedge will generate 3 work items, while the second node triples that for the total of 9 work items. After setting up some wedge attributes and investigating their values on the second node, you would find that the first node’s wedge attribute is now distributed in the following pattern
Index 0 |
Index 1 |
Index 2 |
Index 3 |
Index 4 |
Index 5 |
Index 6 |
Index 7 |
Index 8 |
|---|---|---|---|---|---|---|---|---|
0 |
0 |
0 |
1 |
1 |
1 |
2 |
2 |
2 |
While wedge attributes created on the second ![]() Wedge node will be generated in a periodic pattern as follows
Wedge node will be generated in a periodic pattern as follows
Index 0 |
Index 1 |
Index 2 |
Index 3 |
Index 4 |
Index 5 |
Index 6 |
Index 7 |
Index 8 |
|---|---|---|---|---|---|---|---|---|
0 |
1 |
2 |
0 |
1 |
2 |
0 |
1 |
2 |
As a drawback however, to create these nested wedge patterns, you have to chain together multiple of these nodes, which in case of the Labs File Cache node would not be a valid workflow. Therefore this node was designed to be able to create such patterns using a single node, when Wedge Type is set to Batched Sequence or Periodic Sequence.
Note
If wedgeindex attribute is found on the incoming work item, this node will not replicate that incoming work item as the ![]() Wedge would do. In this case the number of generated work items are the same as the number of incoming work items.
Wedge would do. In this case the number of generated work items are the same as the number of incoming work items.
Push, Pull, Wedge Value… 
The ![]() Wedge node has a Push and Pull workflow to help you assign wedge values to parameters. This workflow is not present on this node. Instead, now you can right click on a
Wedge node has a Push and Pull workflow to help you assign wedge values to parameters. This workflow is not present on this node. Instead, now you can right click on a float, float vector or integer type parameter and under Expression, choose Wedge Value…. This will prompt you for a window to select existing Labs File Cache or Labs Karma
nodes, and will setup the wedge attribute for you.
Parameters 
Wedge Count
The total number of copies to create for wedging.
Number of Attributes 
Attribute # 
Attribute Name
The name of the attribute to wedge. Use the @ syntax followed by this name on any parameter in your network to make that parameter change values for each wedge.
Wedge Type
Sets how the wedge values are distributed for all wedges.
Automatic
Distributes values in increasing fashion from 0 to Wedge Count-1. This is the default, as the most common wedge workflow is to change the Select Input parameter of a ![]() Switch node, which needs increasing integer values from
Switch node, which needs increasing integer values from 0.
Custom Range
Evenly distributes values between Min Value and Max Value parameters based on the number of wedges. Use this when you want to see the affect of a parameter value between a start and an end point.
Random Sample
Randomly picks a value for each wedge, between the given range by Min Value and Max Value.
Batched Sequence
Distributes values used for nested wedging. The number of unique values in the sequence depends on the Batch Size, and the values are evenly distributed between Min Value and Max Value. Wedge Count should be some multiple of Batch Size.
Periodic Sequence
Distributes values used for nested wedging. The Period Size sets how many times to cylce the pattern across the sequence, and the values are evenly distributed between Min Value and Max Value. Wedge Count should be some multiple of Period Size.
List of Values
Sets the wedge values by a list of independent range sequences or numbers.
Attribute Values
Sets the wedge values by looking up point or primitive attribute values on a geometry. The geometry attribute has to have the same name as the Attribute Name, and the element number corresponds the wedge number.
Min Value
Sets the minimum possible value when Wedge Type is set to Custom Range, Random Samples, Batched Sequence or Periodic Sequence.
Max Value
Sets the maximum possible value when Wedge Type is set to Custom Range, Random Samples, Batched Sequence or Periodic Sequence.
Seed
All generated values depend randomly on this value. Choose a different value if the current seed produces undesirable samples.
Batch Size
Sets the number of unique values to create in the sequence. Wedge Count should be multiple of this value to evenly distribute the pattern.
Period Size
Sets how many times to cycle the pattern in the sequence. Wedge Count should be multiple of this value to evenly distribute the pattern.
List of Values
Sets the wedge values by a list of independent range sequences or numbers. The listings can be separated by whitespace, commas and semi-colons. Use the syntax min-max:stepsize, which expands to values between min and max, separated by stepsize. When stepsize is not provided, the default value of 1 is used.
Note
Each expanded values will be assigned the same Weight.
Value List |
Expanded Values |
|---|---|
5 |
5.0 |
3;5 7 |
3.0, 5.0, 7.0 |
1-3 |
1.0, 2.0, 3.0 |
0-1:0.25 |
0.0, 0.25, 0.5, 0.75, 1.0 |
0-1:0.25 5; 8-12:2 |
0.0, 0.25, 0.5, 0.75, 1.0, 5.0, 8.0, 10.0, 12.0 |
Geometry Path
The path to the geometry to use for attribute value lookup.
Create Geometry
This will generate a small network to help you setup the geometry for wedging in a procedural way.
Default Value
The value given to the wedge attribute when there is a mismatch between the total number of wedges and the elements found on the geometry (when Wedge Type is set to Attribute Values).
| See also |