| On this page | |
| Since | 19.0 |
Overview 
This node is an extension over the functionalities of the ![]() File Cache node to help you build up complex caching setups with ease:
File Cache node to help you build up complex caching setups with ease:
-
This node has a more extended TOP support. The main aim of this node is to provide tools for creating synchronized SOP and a TOP graphs with each other, that can cache your entire Houdini scene with multiple file caches and wedging options at a click of a button.
-
This file cache has built in wedging capability that can help you generate quick wedge variations while never leaving the SOP context. The Lab tools also provide a way to quickly populate wedge attributes on this node by
 on a parameter in your network (
integer,floatorvectortype) and select Expression/Wedge Value… -
An extended HUD view.
Cache Types 
When the File Path is set to Constructed the node provides a simple way to create all the possible cache types:
-
Time Independent / Static Geometry / Model
This represents a single file on disk, useful to store models, environment, etc… The file name does not contain any reference to a frame number, therefore when it is loaded, the geometry will be Time Independent. To cache a static geometry, set Time Dependent Cache to
offbefore caching. -
Time Dependent / Geometry Sequence
This represents a sequence of files on disk, each individual file containing a reference to a frame number, which decides which file will be read in on a given frame. Therefore the loaded geometry will be Time Dependent. To cache a geometry sequence, make sure the Time Dependent Cache is set to
on.We can further differentiate between two types of geometry sequences, based on how they are cached to disk.
-
Animated Cache (File Sequence without frame dependency)
Each frame of the sequence can be cached parallel and independently from one another, providing a fast way to cache your sequence. Useful to cache animated geometry sequences, or any other Time Dependent caches that are not based on a simulation. For this set Simulation to
off. -
Simulation Cache (File Sequence with frame dependency)
Each frame of the sequence depends on it’s previous frame. Use this for caching out simulations where the simulation advances from one frame to the next. To cache out a simulation set Simulation to
on.
-
SOP to TOP 
Using this node, it is very easy to create a TOP Labs File Cache referencing this node.
| To... | Do this |
|---|---|
|
To create a top network graph of your sop scene |
|
Warning
Do not connect any other top nodes in between the TOP Labs File Cache nodes, such as ![]() Wedge or
Wedge or ![]() ROP Geometry Output to change the work items. TOP Labs File Cache has a built in wedging mechanism on its own.
ROP Geometry Output to change the work items. TOP Labs File Cache has a built in wedging mechanism on its own.
Every node internally contains a TOP Labs File Cache in a similar referenced fashion, to cook its work items when you click the Save in Background button. In an ideal workflow, upon clicking the ![]() icon, a
icon, a ![]() TOP Fetch node should be generated at the given location, referencing the internal TOP Labs File Cache of this node. However the
TOP Fetch node should be generated at the given location, referencing the internal TOP Labs File Cache of this node. However the ![]() TOP Fetch node has limitations that currently not support this workflow:
TOP Fetch node has limitations that currently not support this workflow:
-
 TOP Fetch does not behave like you would expect after using similar nodes, such as
  Object Merge, where you can keep continue working with the merge geometry, like merging never took place. TOP Fetch can not bring in all your work items from a top node as they are, it only generates one work items per fetch, which is not ideal.
 -
TOP Fetch only has one input, while multiple inputs are preferred for ease of use, such as on the ROP Fetch.
Note
For the reasons above, the TOP Labs File Cache was never designed to be used a standalone tool which would replace the ![]() ROP Geometry Output. Therefore you should always generate this node using the
ROP Geometry Output. Therefore you should always generate this node using the ![]() icon of this node.
icon of this node.
Tip
It is recommended to create your top graph under /obj, rather then under /tasks TOP Labs File Cache. The reason being is, if you need to copy paste your work into other scene files you can do that simply by selecting all the nodes inside your /obj context at once, without forgetting anything. Any nodes live under /tasks, /mat, /img, etc… can easily be forgotten and might break the pasted elements in the new scene you are trying to create.
SOP to OBJ 
To render the geometry cache contained by this node, click the ![]() icon on the node, which will create a Labs Render Geometry node inside
icon on the node, which will create a Labs Render Geometry node inside /obj by default. This way, you can easily generate a renderable object for all your caches needed to be rendered. Labs Render Geometry provides some further quality of live improvements, such as offsetting frames, or merging all frames or wedges without affecting the settings on this node, while has a more compact interface with the most needed parameters for rendering.
SOP to LOP 
Currently, there is no straight ![]() File Cache node to LOP workflow, the recommended way now is to generate a Labs Render Geometry and use a
File Cache node to LOP workflow, the recommended way now is to generate a Labs Render Geometry and use a ![]() SOP Import node to bring that into lop context.
SOP Import node to bring that into lop context.
File Cache and Karma 
The Labs Karma was designed to work together with this node. This means that it has similar interface, and provides the same control to setup renders, versioning and wedges. Therefore if you want keep working with these functionalities at the rendering stage of your work, you should be using the Labs Karma node. Similarly, the Labs Karma also has a ![]() icon to help you easily integrate it in into your top graph.
icon to help you easily integrate it in into your top graph.
Wedging 
The other important feature of this node over the ![]() File Cache node is the ability to do wedging using this node. The controls for wedging on this node trying to improve the functionalities of creating wedged attributes from what you would find on the
File Cache node is the ability to do wedging using this node. The controls for wedging on this node trying to improve the functionalities of creating wedged attributes from what you would find on the ![]() Wedge node.
Wedge node.
The node only wedges float type attributes, which is the most common type one would use.
To wedge other type of attributes, there is a new feature, Attribute Values, which lets you provide any points or primitive geometry with the desired attribute. This way you can fully customize the wedge values, either with the Attribute Adjust nodes or with your own preferred method.
| To... | Do this |
|---|---|
|
To wedge vector attributes |
|
Nested Wedging 
Nested wedging is important concept that allows you to create all possible variations of multiple wedge attributes. To create nested wedging using the ![]() Wedge nodes, connect two of them together, similar to the following image:
Wedge nodes, connect two of them together, similar to the following image:
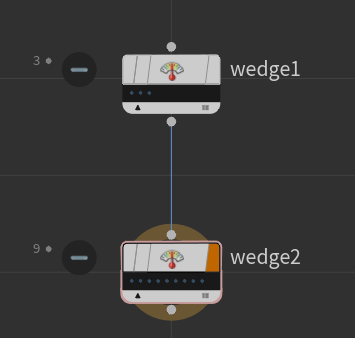
When both of their Wedge Count is set to 3, the first ![]() Wedge will generate 3 work items, while the second node triples that for the total of 9 work items. After setting up some wedge attributes and investigating their values on the second node, you would find that the first node’s wedge attribute is now distributed in the following pattern
Wedge will generate 3 work items, while the second node triples that for the total of 9 work items. After setting up some wedge attributes and investigating their values on the second node, you would find that the first node’s wedge attribute is now distributed in the following pattern
Index 0 |
Index 1 |
Index 2 |
Index 3 |
Index 4 |
Index 5 |
Index 6 |
Index 7 |
Index 8 |
|---|---|---|---|---|---|---|---|---|
0 |
0 |
0 |
1 |
1 |
1 |
2 |
2 |
2 |
While wedge attributes created on the second ![]() Wedge node will be generated in a periodic pattern as follows
Wedge node will be generated in a periodic pattern as follows
Index 0 |
Index 1 |
Index 2 |
Index 3 |
Index 4 |
Index 5 |
Index 6 |
Index 7 |
Index 8 |
|---|---|---|---|---|---|---|---|---|
0 |
1 |
2 |
0 |
1 |
2 |
0 |
1 |
2 |
As a drawback however, to create these nested wedge patterns, you have to chain together multiple of these nodes, which in case of the this node would not be a valid workflow.
Therefore this node was designed to be able to create such patterns using a single node, when Wedge Type is set to Batched Sequence or Periodic Sequence.
Parameters 
Load from Disk
When this is on, the node reads its output from the cached disk files, rather than cooking its input. When you click Save to Disk or Save to Disk in Background (on the Caching tab) to write out the cache files, the node automatically turns this checkbox on.
File Path
When this is Constructed (the default), the node builds up the cache file path(s) from the values of various parameters, allowing features such as versioning and animation options. If you set this to Explicit, you need to manually write a single expression in the Geometry File parameter with all the variables you want in the path (including the frame number when Time dependent cache is on).
Time Dependent Cache
When this is on (the default), the node writes out a separate cache file for every frame (using the global frame start/end/increment from the timeline). If the input geometry is static (doesn’t change based on the frame number), turn this off to avoid writing out multiple identical files.
Base Name
When File Path is Constructed, this is the first part of the cache file name. The default is $HIPNAME.$OS (the name of the current scene file without the .hip extension, then a dot, then the name of this node). This is usually sufficient to prevent filename collisions between files/nodes if you give this node an meaningful, unique name (if you have two networks containing nodes both named filecache1, you will get a collision). The drop down menu to the right of the text field has some more possible expressions.
File Type
The default is .bgeo.sc, which can handle any type of Houdini geometry and uses compression, so it’s always safe to use. If all the primitives in the input are always VDB volumes, you can switch the file type to save the files directly as .vdb. When you set the File type to .vdb, the node converts Houdini’s primitive attributes to VDB grid metadata, and detail attributes to file metadata.
Base Folder
When File Path is Constructed, this is the folder to save the cache files into. The default is $HIP/geo (a folder named geo in the same directory as the current scene file). (When Version is on it adds another directory level inside the base folder.)
Open Directory
Click to show the contents of the Base Folder in the file manager. This can be useful when you want to clean up old cache files.
Version
When File Path is Constructed and the checkbox to the left is on, the node adds a directory level (and filename part) to the cache file path(s) indicating the version. This lets you cache multiple variations of the input network.
Geometry File
When File Path is Explicit, the node uses this file path expression to generate the cache file path(s). This expression should include all the variables you want in the path (including the frame number when Time dependent cache is on)
Caching 
Overwrite Existing Cache
When this is enabled, caches are always overwritten on disk, when running Save in Background. Disable this to not to write to any existing files to disk.
Save to Disk
Saves the geometry to disk with the last control settings.
Save to Disk in Background
Use a TOP network to cook and save the cache files to disk in a separate background process. This allows you to keep working on other parts of Houdini. The cached frames will show up as they are completed by the other process.
Cancel Cook
Stops all background caching processes, if any exist.
Tip
You can collapse the box around these buttons as a “safety latch”, to prevent yourself from clicking them and rebuilding the cache accidentally.
Evaluate As
When this is Frame Range the node writes a cache file for every frame (see Start/End/Inc below). If you don’t want pre-generate all frames at once, or if you know you only need to regenerate a single changed frame, you can set this to Single Frame. This makes the node write out a cache file only for the current frame (or the frame you set in Override frame). If you need to provide a specific list of frames use Specific Frames.
Single Frame
Saves the cache on a single frame.
Frame Range
Writes the cache for every frame in the frame range (see Start/End/Inc below).
Specific Frames
Sets the frames to write based on a list of independent range sequences or numbers.
Simulation
Use this when you are caching a sequence that is generated using a simulation, that makes each frame dependent on its previous frame.
Override Frame
When Evaluate as is Single Frame and the checkbox to the left is on, cache this explicit frame number instead of the current frame from the timeline.
Start/End/Inc
Specifies the range of frames to render (start frame, end frame, and increment). All values may be floating point values. The range is inclusive.
These parameters determine the values of the local variables for the output driver.
$NRENDER
The number of frames to be rendered by the output driver.
$N
The current frame being rendered (starting at 1 and going to $NRENDER).
Substeps
When Evaluate as is Frame range, this is the number of fractional sub-frames to divide each frame into. Caching sub-frames increases the quality of motion blur rendering for cached animated geometry. If you set Substeps greater than 1 and you've set File Path to Explicit, make sure your explicit path expression can handle fractional frames, by using $T (floating point time in seconds) or $FF (fractional frame number) instead of $F (whole frame number).
List of Frames
Sets the frame values by a list of independent range sequences or numbers. The listings can be separated by whitespace, commas and semi-colons. Use the syntax min-max:stepsize, which expands to values between min and max, separated by stepsize. When stepsize is not provided, the default value of 1 is used. Currently this functionality is under development, and in case when Simulation is set to 1, this might not work as expected.
Value List |
Expanded Values |
|---|---|
5 |
5.0 |
3;5 7 |
3.0, 5.0, 7.0 |
1-3 |
1.0, 2.0, 3.0 |
0-1:0.25 |
0.0, 0.25, 0.5, 0.75, 1.0 |
0-1:0.25 5; 8-12:2 |
0.0, 0.25, 0.5, 0.75, 1.0, 5.0, 8.0, 10.0, 12.0 |
Enable Wedging
Enabled wedging for this cache to create different variations of the same cache with different attribute values.
Evaluate As
When Save in Background is used, it sets the amount of work items to be cached by this node.
All Wedges
Write all wedges to disk.
Single Wedge
Write only a single given wedge.
Custom Range
Write wedges contained in the given range.
Specific Wedges
Write wedges by a list of independent range values or numbers.
Single Wedge
Sets the wedge number to write to disk. Use this one you only want to correct a single wedge out of many.
List of Wedges
Sets the wedge values by a list of independent range sequences or numbers. The listings can be separated by whitespace, commas and semi-colons. Use the syntax min-max:stepsize, which expands to values between min and max, separated by stepsize. When stepsize is not provided, the default value of 1 is used.
Value List |
Expanded Values |
|---|---|
5 |
5.0 |
3;5 7 |
3.0, 5.0, 7.0 |
1-3 |
1.0, 2.0, 3.0 |
0-1:0.25 |
0.0, 0.25, 0.5, 0.75, 1.0 |
0-1:0.25 5; 8-12:2 |
0.0, 0.25, 0.5, 0.75, 1.0, 5.0, 8.0, 10.0, 12.0 |
Wedge Range
All wedges in this range will be written to disk.
Wedge Count
The total number of copies to create for wedging.
Clean Wedges
Lists the available wedges of the current version in a window for deletion.
Attribute Name
The name of the attribute to wedge. Use the @ syntax followed by this name on any parameter in your network to make that parameter change values for each wedge.
Wedge Type
Sets how the wedge values are distributed for all wedges.
Automatic
Distributes values in increasing fashion from 0 to Wedge Count-1. This is the default, as the most common wedge workflow is to change the Select Input parameter of a ![]() Switch node, which needs increasing integer values from
Switch node, which needs increasing integer values from 0.
Custom Range
Evenly distributes values between Min Value and Max Value parameters based on the number of wedges. Use this when you want to see the affect of a parameter value between a start and an end point.
Random Sample
Randomly picks a value for each wedge, between the given range by Min Value and Max Value.
Batched Sequence
Distributes values used for nested wedging. The number of unique values in the sequence depends on the Batch Size, and the values are evenly distributed between Min Value and Max Value. Wedge Count should be some multiple of Batch Size.
Periodic Sequence
Distributes values used for nested wedging. The Period Size sets how many times to cycle the pattern across the sequence, and the values are evenly distributed between Min Value and Max Value. Wedge Count should be some multiple of Period Size.
List of Values
Sets the wedge values by a list of independent range sequences or numbers.
Attribute Values
Sets the wedge values by looking up point or primitive attribute values on a geometry. The geometry attribute has to have the same name as the Attribute Name, and the element number corresponds the the wedge number.
Min Value
Sets the minimum possible value when Wedge Type is set to Custom Range, Random Samples, Batched Sequence or Periodic Sequence.
Max Value
Sets the maximum possible value when Wedge Type is set to Custom Range, Random Samples, Batched Sequence or Periodic Sequence.
Seed
All generated values depend randomly on this value. Choose a different value if the current seed produces undesirable samples.
Batch Size
Sets the number of unique values to create in the sequence. Wedge Count should be multiple of this value to evenly distribute the pattern.
Period Size
Sets how many times to cycle the pattern in the sequence. Wedge Count should be multiple of this value to evenly distribute the pattern.
List of Values
Sets the wedge values by a list of independent range sequences or numbers. The listings can be separated by whitespace, commas and semi-colons. Use the syntax min-max:stepsize, which expands to values between min and max, separated by stepsize. When stepsize is not provided, the default value of 1 is used.
Value List |
Expanded Values |
|---|---|
5 |
5.0 |
3;5 7 |
3.0, 5.0, 7.0 |
1-3 |
1.0, 2.0, 3.0 |
0-1:0.25 |
0.0, 0.25, 0.5, 0.75, 1.0 |
0-1:0.25 5; 8-12:2 |
0.0, 0.25, 0.5, 0.75, 1.0, 5.0, 8.0, 10.0, 12.0 |
Geometry Path
The path to the geometry to use for attribute value lookup.
Create Geometry
This will generate a small network to help you setup the geometry for wedging in a procedural way.
Default Value
The value given to the wedge attribute when there is a mismatch between the total number of wedges and the elements found on the geometry (when Wedge Type is set to Attribute Values).
Clamp First Frame
Optional clamping of the first frame of the cached sequence. Use this if you want your sequence cache to exists before the start frame (by default given by Start/End/Inc).
Clamp Last Frame
Optional clamping of the last frame of the cached sequence. Use this if you want your sequence cache to exists after the end frame (by default given by Start/End/Inc).
Merge Frames
Merges all the frames of a Time Dependent cache to a single Time Independent cache for the output.
Frames to Merge
Sets which frames to merge together.
All Frames
Merge all frames together in the range (by default given by Start/End/Inc).
Custom Range
Provide a custom range to merge.
Specific Frames
Sets the frame values by a list of independent range sequences or numbers.
Frame Range
The custom range to use for merging frames together.
Substeps
The substeps to use for the range. Usually this should be the same as Substeps.
List of Frames
Sets the frame values by a list of independent range sequences or numbers. The listings can be separated by whitespace, commas and semi-colons. Use the syntax min-max:stepsize, which expands to values between min and max, separated by stepsize. When stepsize is not provided, the default value of 1 is used.
Value List |
Expanded Values |
|---|---|
5 |
5.0 |
3;5 7 |
3.0, 5.0, 7.0 |
1-3 |
1.0, 2.0, 3.0 |
0-1:0.25 |
0.0, 0.25, 0.5, 0.75, 1.0 |
0-1:0.25 5; 8-12:2 |
0.0, 0.25, 0.5, 0.75, 1.0, 5.0, 8.0, 10.0, 12.0 |
Merge Wedges
Wedges to Merge
Sets which wedges to merge together.
All Wedges
Merge all wedges together.
Custom Range
Provide a custom range to merge.
Specific Wedges
Sets the wedge values by a list of independent range sequences or numbers.
Wedge Range
The custom range to use for the merge.
List of Wedges
Sets the wedge values by a list of independent range sequences or numbers. The listings can be separated by whitespace, commas and semi-colons. Use the syntax min-max:stepsize, which expands to values between min and max, separated by stepsize. When stepsize is not provided, the default value of 1 is used.
Value List |
Expanded Values |
|---|---|
5 |
5.0 |
3;5 7 |
3.0, 5.0, 7.0 |
1-3 |
1.0, 2.0, 3.0 |
0-1:0.25 |
0.0, 0.25, 0.5, 0.75, 1.0 |
0-1:0.25 5; 8-12:2 |
0.0, 0.25, 0.5, 0.75, 1.0, 5.0, 8.0, 10.0, 12.0 |
Scheduling 
TOP Scheduler Override
This parameter overrides the TOP scheduler for this node.
Frames per Batch
When Time Dependent Cache is enabled, and Simulation is off, it sets how many frames to schedule as one unit. For every batch a new Houdini process will run in the background, each opening the scene file for the period of time to cook all the frames in the batch (by default 10). When the scene file’s loading time is longer then the actual caching process, it is recommended to increase this number to even 50 or a higher number for overall faster caching. When caching time independent cache or running it as a simulation, the frames per batch value always considered as 1, therefore this parameter is disabled.
One Batch at a Time
This will ensure to only run one Houdini process in the background to cook all the batches. When caching time independent cache or running it as a simulation, the frames per batch value always considered as 1, therefore this parameter is disabled.
CPUs per Batch
The number of logical cores to use for cooking a single batch. This will ensure to open the Houdini process in the background with the given amount of logical cores. The total amount of logical cores the batches can use all combined is limited by the CPU Count to Use option.
CPU Count
Sets the amount of logical cores to set as the limit for the cooking process.
Memory
Sets the minimum amount of memory required.
No Minimum
Do not set any memory limit.
MB Available
Sets the memory limit in unit of MB.
Percent Available
Sets the memory limit as percentage.
MB
This amount of memory in MB has to be available for a batch to start the cooking process.
Percent
The precent of memory has to be free for a batch to start the cooking process.
Save Filters 
Filter Geometry by
Deletes geometry based on the current frame number or the current wedge index compared against an existing attribute on the incoming geometry.
None
Keep the incoming geometry
Frame Number
Compares the incoming attribute value against the current frame number.
Wedge Index
Compares the incoming attribute value against the current wedge index.
Attribute Type
The type of the attribute to use for comparison.
Piece Attribute
The attribute to use for comparison. The attribute can be an integer type or a string type which ends on a numeric value for comparison.
Delete Attributes
A space separated list of attributes to delete from the geometry before saving it. If you know there are attributes on the input geometry you don’t need in the rest of the network, you can decrease the cache file size and make cache loading faster by preventing the attributes from being included in the cache. The names will match at any level (vertex, point, primitive, or detail). The node will never delete the P (position) point attribute. You can use patterns, for example * ^v to delete all attributes except P and v.
Delete Groups
A space separated list of groups to delete from the geometry before saving it. This can be useful with simulation data, where there can be groups in the output you will never use. You can decrease the cache file size and make cache loading faster by preventing these groups from being included in the cache.
Number of Casts
If you know you don’t need full precision for certain attributes in the input, this multi-parm lets you convert the attributes to lower-precision types before saving the geometry. This can make the cache files smaller and faster to load (depending on how many uses of the attribute there are). Set the number or click the plus or minus buttons to set the number of conversions to do.
See the ![]() Attribute Cast SOP help for more information.
Attribute Cast SOP help for more information.
Class
In a “cast” multiparm instance, the level (vertex, point, primitive, or detail) of the attribute(s) you want to convert to lower precision to save space.
Attributes
In a “cast” multiparm instance, a space-separated list of attributes at the given level (set by the Class parameter above) you want to convert to lower precision to save space.
Precision
In a “cast” multiparm instance, the precision to convert the matching attributes down to, to save space.
Create Load Attributes 
File Name Attribute
Writes the name of the file into to given primitive attribute on loading.
File Path Attribute
Writes the path of the file into to given primitive attribute on loading.
File Index Attribute
Writes the wedge index of the file into to given primitive attribute on loading.
Advanced 
Enable Load from Disk on Save
Whether the node will automatically turn on Load from disk when you click Save to disk or Save to disk in background.
Harden Base Name on Save
When File Path is Constructed and this is on, when you click Save to disk or Save to disk in background the node automatically converts the expression in Base name to a literal string. This prevents the cache from breaking if you duplicate or rename the scene file or node.
Create Intermediate Directories
When writing out cache files, automatically create any intermediate directories in the file path that don’t exist.
Initialize Simulation OPs
Forces all simulation OPs to be reset. This includes DOP Networks, POP SOPs, and other OPs that cache their results.
This is the safest way to render out a simulation, because it starts the simulation from scratch and discards any partial simulations you might have done with different parameters.
Alfred Style Progress
A percentage complete value is printed out as files are written. This is in the style expected by Pixar’s Alfred render queue.
Save in Background
When saving more than one frame, save in a background thread. This can make saving faster for large file sizes, but may use more memory since it will retain the output geometry until the save completes.
Save Retries
If saving the geometry to disk fails due to a disk writing error, Houdini will usually error the output node immediately. This is desirable for most cases where a failure to save means an illegal path, which is not recoverable. However, sometimes files fail to save due to network issues. If the number of save retries is non-zero, Houdini will re-attempt to save this number of times. Each time will be accompanied with an output to the console of the failure to save and a five second wait in the hopes that the network will clear up.
Render with Take
Uses the settings in a particular take while rendering. Choose Current to use the current take when rendering.
Missing Frame
This is what the node should do (in Load from disk mode) when the node can’t find (or cleanly load) a cache file. Report error sets an error on the node, preventing the rest of the network from cooking. This makes it obvious when a problem happens. No geometry (the default) sets a warning on the node rather than an error, and outputs empty geometry. This can be useful if your network has a way of dealing with missing cache frames, or if they're not important.
Scripts 
A script command can be specified for execution at various execution points. The expression language selected for the script parameter determines whether the command is in hscript or python.
Prior to execution, this node is automatically set as the global current node.
To run statements from a file, specify the path to the file with
either a .cmd extension (when the language is set to Hscript) or a .py
extension (when the language is set to Python). Additional arguments to the
script can also be supplied. They will be parsed in a shell-like manner.
Pre-Render Script
Run this script before any rendering.
Pre-Frame Script
Run this script before each frame.
Post-Frame Script
Run this script after each frame.
Post-Write Script
Run this script after each frame’s data finishes writing to disk.
Post-Render Script
Run this script after all rendering.
Post-Write Script
Run this script after each frame’s data finishes writing to disk.
This section duplicates the pre/post scripts available on the ![]() Geometry render node.
Geometry render node.
Render Geometry In
Creates a Labs Render Geometry inside this path, when the ![]() icon is clicking on the top right corner of this node.
icon is clicking on the top right corner of this node.
Top File Cache In
Creates a TOP Labs File Cache inside this path, when the ![]() icon is clicking on the top right corner of this node.
icon is clicking on the top right corner of this node.
Top Mantra In
Currently not supported.
Enable Performance Monitor Logging
Saves a performance file along with the cache to investigate the cooking performance. Currently this is a work in progress feature.
Open Current Profile
Saves a performance file along with the cache to investigate the cooking performance. Currently this is a work in progress feature.
The expressions in these parameters allow an expert user to customize exactly how the node generates a cache file path. However, editing the expressions can easily break the operation of the node. The basic parameters include a lot of room for customization, so we recommend that you do not try to customize these expressions. However, they are available if, for example, they are necessary to conform with studio-wide conventions.
Frame
Contains the expression that computes the current frame number to cache. Do not edit this expression.
Frame String
Contains the expression that generates the frame number as a padded string, including a dot prefix. Do not edit this expression.
Version String
Contains an expression that generates the “version” part of the path, including a v prefix. Do not edit this expression.
Cache Folder
Contains an expression that generates the parent directory path for cache files. Do not edit this expression.
Cache Name
Contains an expression that generates the filename for cache files. Do not edit this expression.
Descriptive Label
Contains an expression that generates the descriptive text displayed next to this node (below the name and badges) in the network editor. This is set to output the cache filename pattern. Do not edit this expression.
Output File
Contains an expression that generates the resolved, full path of the cache file for the current frame. Do not edit this expression.
| See also |