| On this page | |
| Since | 19.0 |
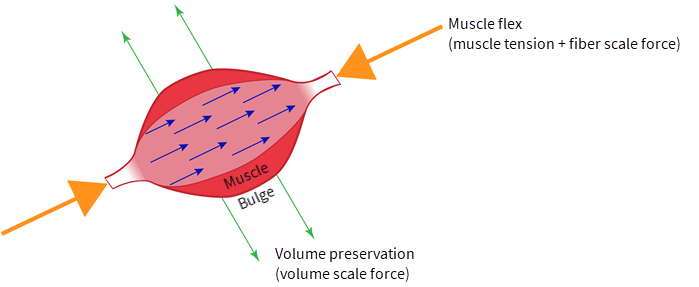
このノードは、入力のソリッドMuscleジオメトリ上にmuscletensionPointアトリビュートをセットアップしてアニメーションさせて、シミュレーション中の筋肉の屈曲アクションを駆動させます。
このmuscletensionPointアトリビュートは、![]() Otis Solverまたは
Otis Solverまたは![]() Muscle Solver Vellumで使用され、入力の四面体メッシュに異方性スケールを適用したり、 押しつぶし ます。
この異方性スケールは、
Muscle Solver Vellumで使用され、入力の四面体メッシュに異方性スケールを適用したり、 押しつぶし ます。
この異方性スケールは、![]()
![]() Fiber Groom SOPノードで生成される
Fiber Groom SOPノードで生成されるmaterialWPointベクトルアトリビュートで定義された 筋繊維方向 に沿って適用されます。
筋肉を押しつぶす時のその筋肉の屈曲の 度合い またはその収縮の強さは、![]()
![]() Muscles Properties Otis SOPまたは
Muscles Properties Otis SOPまたは![]()
![]() Muscles Properties Vellum SOPのFiber Strengthパラメータで設定された
Muscles Properties Vellum SOPのFiber Strengthパラメータで設定されたfiberstiffnessPointアトリビュートで決まります。
muscletensionPointアトリビュートは、fiberstiffnessPointアトリビュートの乗数のように機能します。
このノードは、筋肉アクティベーションを手動でアニメーションさせたい場合を除き、3番目の入力に接続された![]()
![]() Muscle Tension Line Activate SOPと併用するように設計されています。
Muscle Tension Line Activate SOPと併用するように設計されています。
How to
| To... | Do this |
|---|---|
|
必要な入力を Muscle Flex SOP に接続する。 |
Warning Muscle Flex SOP ノードの 3番目の入力 にアクティブなMuscle Tension Linesを接続しなかった場合、Muscleの |
|
自動でMuscleをMuscle Tension Lineにリンクする |
|
|
手動でMuscleをMuscle Tension Lineにリンクする |
|
|
手動で筋張力をアニメーションさせる |
重要事項 Muscleをシミュレーションすることで、キーフレームからの変形結果のみを表示することができます。 |
ステート 
ビューポート内での Muscle Flex SOP ステートは、本質的に 選択 ステートです。 1個以上のMuscleを選択してからEnterを押すと、それらのMuscleが現行選択になります。 プレイバーのタイムラインを任意のフレームまでスクラブさせてから、現行選択に対してアクションを実行します。
ホットキーまたは操作 |
アクション |
|---|---|
1を押す |
現在選択されているMuscle(s)の |
0を押す |
現在選択されているMuscle(s)の |
|
現在選択されているMuscle(s)の |
Kを押す |
現在の時間で選択したMuscle(s)の |
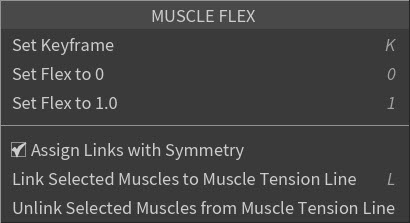
Set Keyframe
現在選択されているMuscleの Muscle ID パラメータ(Flexコントロール)にキーを設定します。 Kホットキーでも可能。
Set Flex to 0
現在選択されているMuscleの Muscle ID パラメータ値を0に設定します。 0ホットキーでも可能。
Set Flex to 1.0
現在選択されているMuscleの Muscle ID パラメータ値を1.0に設定します。 1ホットキーでも可能。
Assign Links with Symmetry
有効にすると、Activation Linksパラメータを使用してMuscle Tension LineをMuscleに割り当てて、そのMuscleが対称モデルの一部だった場合、そのモデルの反対側の呼応するMuscleが正しいMuscle Tension Lineに自動的にリンクされます。
Link Selected Muscles to Muscle Tension Line
現在選択されているMuscleを現在選択されているMuscle Tension Lineにリンクします。 Lホットキーでも可能。
Unlink Selected Muscles from Muscle Tension Line
現在選択されているMuscleと現在選択されているMuscle Tension Lineをリンク解除します。
ビジュアライゼーション |
ビューポートステート |
|---|---|
Muscle選択 |
ビューポートステートでは、Muscleを直接選択することができます。 これは、ホットキーを使用してビューポートステートで筋肉の屈曲をアニメーションさせる時に役立ちます。 |
Muscleアクティベーション |
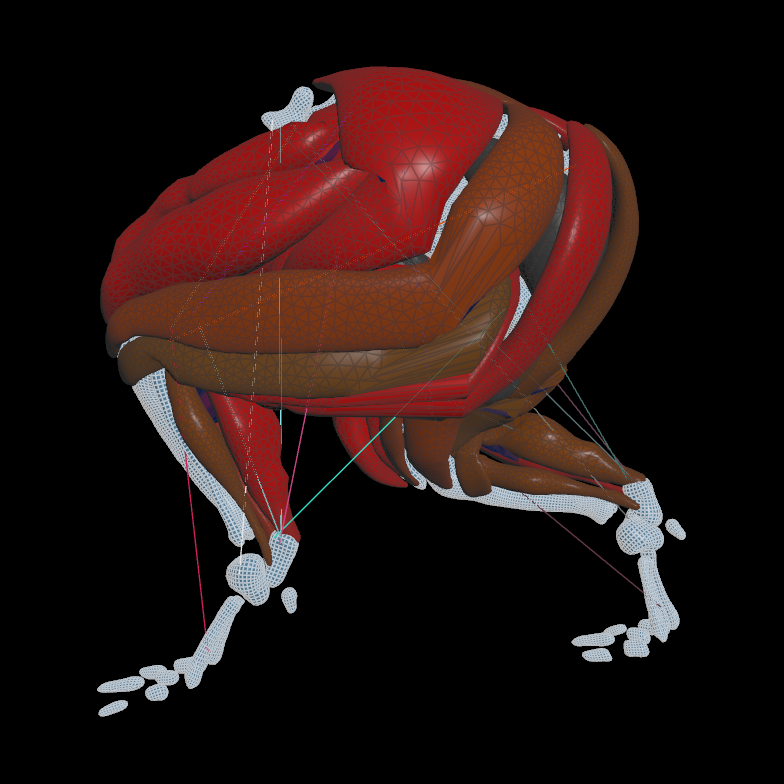
Display > Muscle Tension Visualizer パラメータを使うと、キャラクタのショットアニメーションを再生しながら筋肉とその筋張力レベルの有効性を確認することができます。アニメーション中に筋肉の色が変化して
|
アトリビュート 
|
|
point |
時間の経過と共に可変するMuscle Flex値をPointトランスフォームとして格納します。 |
パラメータ 
Attribute
すべてのMuscle Flex設定が格納されるアトリビュートの名前を指定します。
Blend
すべてのMuscleが完全に弛緩した状態からソルバを開始できるように徐々にアクティベーションをキーインします。 値が0の場合、すべての張力値は0に設定されます。 値が1の場合、張力値はMuscle Tension Lineアクティベーション値/手動でアニメーションされたFlexパラメータによって決定されます。
Include Fiber Scale Range in Blend
有効にすると、 Blend 値が0の場合、 Fiber Scale Range の最小値が0、最大値が1に設定されます。
Blend の値が1の場合、 Fiber Scale Range の最小値と最大値は、![]()
![]() Muscles Properties Otis SOPまたは
Muscles Properties Otis SOPまたは![]()
![]() Muscles Properties Vellum SOPで設定された値に設定されます。
Muscles Properties Vellum SOPで設定された値に設定されます。
Match Tension Lines by Name
有効にすると、Muscle Tension Lineは、 Attribute to Match アトリビュートに格納されている名前と同じ名前のMuscleに自動でリンクされます。
Muscle Tension Lineの名前は、autoflex_idに格納されています。
Attribute to Match
通常では、これはmuscle_idですが、![]()
![]() Muscles Auto Tension Lines SOPでカスタムアトリビュートを指定している場合は、自動マッチングが機能するように、ここでもそれと同じアトリビュートを使用する必要があります。
Muscles Auto Tension Lines SOPでカスタムアトリビュートを指定している場合は、自動マッチングが機能するように、ここでもそれと同じアトリビュートを使用する必要があります。
このノードは、アニメーションとパラメータ設定を維持できるように、入力のMuscleジオメトリ(1番目の入力)で見つかったmuscle_id名をキャッシュ化します。
以下のボタンは、ジオメトリ系ノードが既に Muscle Flex SOP ノードに接続された 後 にMuscleを追加または削除するイベントで、このキャッシュを更新/リセットすることができます。
Detect New
入力Muscleジオメトリ上で見つかった新しいmuscle_idを追加し、それらをパラメータリストに追加します。
Remove Unused
このタブにリストされている Muscle Flex パラメータに該当するmuslce_idが入力Muscleジオメトリ上に存在しなかった場合、その Muscle Flex パラメータを削除します。
Reset All
現在のすべての Muscle Flex パラメータと Activation Links パラメータをデフォルト値にリセットし、内部キャッシュリストを再構築します。
Warning
Reset All のクリックでも、既存の Muscle Flex チャンネルアニメーションが削除され、さらに手動のMuscle to Tension Lineリンクも削除されます。
Clear All
パラメータリストからすべての Muscle Flex パラメータおよび Activation Links パラメータを削除します。
Muscle Flex 
筋肉の屈曲を手動でアニメーションさせたい場合、このタブに Muscle Flex 系パラメータを表示することができます。
このタブで表示されるパラメータは、Detect Newボタンをクリックすることで生成されます。
Muscle Flex SOPノードの 1番目の入力 で見つかったmuscle_id毎に1個の浮動小数点パラメータが作成されます。
識別しやすくするために、それらのパラメータのラベルはmuscle_idの名前と同じになっています。
ビューポートでは、張力や 筋肉の屈曲 の加減を示すようにMuscleの色が変化します。 Muscle Flex 系パラメータの値に キーフレームを打つ ことで、Muscleをアクティブ/非アクティブにするタイミングを指定することができます。
Muscleをシミュレーションに取り込むと、その収縮は、muscletension( Muscle Flex パラメータ)と四面体に適用されている筋線維スケールフォース(![]()
![]() Muscles Properties SOPノードの
Muscles Properties SOPノードのfiberstiffnessアトリビュート)の組み合わせによって駆動されます。
Muscleは、筋線維の方向(![]() Fiber Groom SOPノードの
Fiber Groom SOPノードのmaterialWベクトルPointアトリビュート)に沿ってスケールされます。
Muscleの屈曲アニメーションは、以下の3つの方法のいずれかで制御することができます:
-
マッチしたMuscle Tension Line上の呼応する
muscletensionアトリビュートを使用してmuscletensionMuscleアトリビュートを駆動させる。 -
このタブ内の個々の Muscle Flex 系パラメータに直接キーフレームを打つ。
-
1と2を組み合わせて使用する。
MuscleセットアップでMuscle Tension Lineが使用されている場合、( Muscle Flex 系パラメータを介して)ショットのアニメーション全体にわたってMuscle毎にmuscletensionにキーフレームを打つ必要はありません。
Muscle Tension Lineが自動でmuscletension値を変更してくれます。
Muscle Tension Lineによって筋肉の収縮の多くが自動化されますが、
必要に応じて Muscle Flex 系パラメータにいくつかのキーフレームを追加することで、そのMuscle Tension Lineが生成するプログラム的なmuscletension値を微調整することができます。
Muscleのmuscletensionがキーフレーム値とそれを駆動しているMuscle Tension Lineの両方によって制御されている場合、優先されるのはより強い/高い値となります。例えば、Muscle Tension Lineから検出されたmuscletensionが0.5で、 Muscle Flex のキーフレーム値が0.75だった場合、そのキーフレーム値が優先されます。
常に最大値が適用されることになります。
Manually Animate Flexing
有効にすると、Muscle単位で手動でMuscleアクティベーションをアニメーションさせることができます。 Detect New ボタンを押すと、Muscleのパラメータリストが表示されます。
Muscle Flex 系パラメータがリストされます。
パラメータ名は、入力のMuscleジオメトリ(1番目の入力)に応じて適宜変更されます。
ここにリストされた各パラメータは、同じ名前の入力muscle_idから派生したものです。
Muscle Flex 値が0の場合、筋肉は弛緩したソフトボディとしてシミュレーションされ、 値が1.0の場合、筋肉の張力が最大となり、筋肉が収縮して硬くなります。
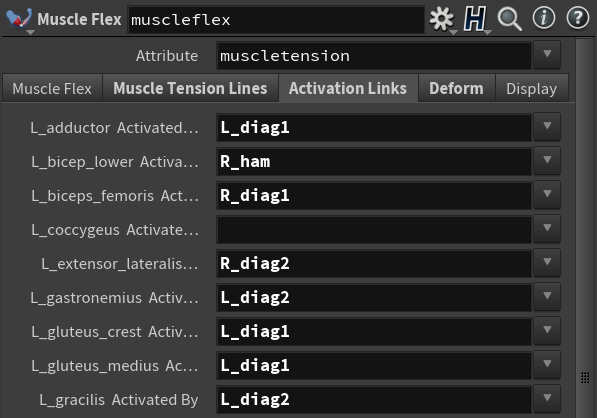
Activation Links 
MuscleとMuscle Tension Lineのリンクを手動で制御したい場合、このタブには、(muscle_idによる)個々のMuscleをショットのアニメーション全体にわたってmuscletension値の変動を駆動するMuscle Tension Line(autoflex_ids)にリンクさせることができるパラメータがリストされます。
このパラメータリストは、![]()
![]() Muscle Tension Lines Activate SOPノードを Muscle Flex SOP ノードの 3番目の入力 に接続して、 Detect New ボタンをクリックすることで生成することができます。
Muscle Tension Lines Activate SOPノードを Muscle Flex SOP ノードの 3番目の入力 に接続して、 Detect New ボタンをクリックすることで生成することができます。
Manually Link Lines to Muscles
有効にすると、Muscle単位でMuscle Tension Line自動リンキングを上書きすることができます。 Detect New ボタンを押すと、Muscleパラメータリストが表示されます。
Deform 
これらのパラメータは、入力アニメーションソース(通常はアニメーションボーンジオメトリ)を使用して、入力のMuscleに ポイント変形 を適用します。
これは、単にmuscletensionアニメーションを確認しやすくするためのものです。
Muscleソルバは静的なTポーズの位置のみを考慮するため、この変形されたアニメーションはあくまで参考用です。
Deform Displayed Muscles
ノード表示状態にあるMuscleのみを変形させますが、出力Muscleは変形させません。 Muscle Ends Mode がデフォルト値の Constrain to Nearest Bone に設定されている場合、シミュレーションにおいてMuscleのアニメーションは必要ありません。 この変形結果は見た目の品質を目的としたものではなく、Muscleアクティベーションが発生するタイミングを確認するためのものです。
Deform Output Muscles
出力Muscleを変形させます。 これによってシミュレーションの速度が低下する可能性がありますが、シミュレーションの Muscle Ends Mode で Constrain to Input Animation を使用する場合にのみ必要です。
Output Integrity
Point DeformやDelta Mushは、なにかしら非常に品質の悪い四面体や反転した四面体を生成してしまう可能性があります。 Output Integrity パラメータオプションは、そのような低品質な変形結果を解消するのに役立ちます。
Simple Deformation
Muscle四面体メッシュの内側にある不正な四面体の修正を試みません。
Compute Quasistatic Corrections
内部で準静的なシミュレーションを実行して、Muscle四面体メッシュの内側にある不正な四面体を修正します。
ほとんどのMuscleシミュレーションでは、このオプションは、結局のところ![]() Muscle Solverで 使用されない モーションに対して余計に計算時間を増やすため、不要です。
しかし、 Muscle Flxe SOP の出力に高品質な変形が必要な場合では、余計に整合性を合わせるメリットがある場合があります。
Muscle Solverで 使用されない モーションに対して余計に計算時間を増やすため、不要です。
しかし、 Muscle Flxe SOP の出力に高品質な変形が必要な場合では、余計に整合性を合わせるメリットがある場合があります。
Deformation Style
Muscle変形の実行方法を決めます。
Point Deform
変形ラティス(ポイントクラウド)を使用して、そのラティスの各ポイントがMuscle四面体メッシュの隣接ポイントを キャプチャ して影響を与える領域でMuscle変形を駆動させます。 そのポイントが近いほど、影響が大きいです(Elendtメタボール方程式から計算されます)。
Use BoneCapture Weights
Muscleジオメトリのスキンウェイト(boneCapture Pointアトリビュート)と KineFX Skeleton パラメータで指定されたスケルトンを使用して、Muscle変形を駆動させます。
KineFX Skeleton
Muscle変形を駆動させたいKineFXスケルトンのパスを指定します。
このパラメータは、 Deformation Style が Use BoneCapture Weights に設定されている場合にのみ利用可能です。
KineFX Rest Skeleton
静止トランスフォームを用意できるようにKineFX Restスケルトンのパスを指定します。
このパラメータは、 Deformation Style が Use BoneCapture Weights に設定されている場合にのみ利用可能です。
Deform タブ > Point Deformセクション内のパラメータを使用することで、ポイント変形パラメータを調整することができます。 (Muscle Endが最も近いボーンではなく入力アニメーションに拘束されている時の)Muscle Solverの用途では、Muscle End領域として指定されたMuscle上の領域のみが重要です。 これらの領域がターゲットの拘束領域として作用します。
このノードでは、Muscleの動きをプロキシアニメーションを使って“その場で”確認できるようにするために、MuscleがPoint Deform SOPによって変形されます。 そうしないと、このノードのアニメーション出力は、ソルバで無視されます。 ただし、この考えには例外が1つあります。 Muscle Solver Vellum SOPのMuscle Ends拘束には、Muscleをアニメーションソースに取り付けるモードが2つあります。 Muscleを一番近くにあるボーンジオメトリに取り付けたり(Muscle Constraint Properties SOP > Muscle to Boneタブを参照)、アニメーションポジションをターゲットとして扱うことでMuscleの両端を“Pin To Animation”拘束のように動作させることができます。 後者の場合では、このノードから出力されるプロキシアニメーションをアニメーションソースとして使用することができます。
Radius
ポイント影響力の最大検索半径。![]()
![]() Point Deformを参照してください。
Point Deformを参照してください。
Minimum Points
ポイント影響力の検索するポイントの最小数。![]()
![]() Point Deformを参照してください。
Point Deformを参照してください。
Maximum Points
ポイント影響力の検索するポイントの最大数。![]()
![]() Point Deformを参照してください。
Point Deformを参照してください。
Rigid Projection
有効にすると、計算されたローカルトランスフォームに含まれているシアーを取り除き、リジッドトランスフォームのみを残します。
![]()
![]() Point Deformを参照してください。
Point Deformを参照してください。
Recompute Affected Normals
有効にすると、変形ポイントと未変形ポイントの両方を含んだ四面体から影響を受ける法線が自動的に再計算されます。
![]()
![]() Point Deformを参照してください。
Point Deformを参照してください。
Bypass Tension Lines Deformation
有効にすると、ラインの位置をそのまま使用します。 MuscleTension Linesを外部でアニメーションまたは変形させる場合は、これを使用します。
Enable Delta Mush
有効にすると、このノードは、ポイント変形を適用する時にMuscleの形状の維持を試みます。
![]()
![]() Delta Mushを参照してください。
Delta Mushを参照してください。
Delta Mush Iterations
Muscleに適用する平滑化の反復回数を指定します。 この反復回数が多いほど、滑らかな結果が得られます。
このパラメータは、 Enable Delta Mush が有効な場合にのみ利用可能です。
![]()
![]() Delta Mushを参照してください。
Delta Mushを参照してください。
T-Pose Source
ポイント変形に使用されるRestポーズの派生元を指定します。
Use Initialization Frame
アニメーションソースの時間を Initialization Frame までずらして、そのフレームでフリーズされたジオメトリをキャプチャポジションのRestポーズとして使用します。
From Attribute
T-Pose Attribute をキャプチャポジションのRestポーズとして使用します。 この設定は、フレーム1のTポーズになっているのにも関わらず、ボーンが原点に配置されていないことが原因で、それらのボーンがMuscleからオフセットされているように見える時に役立ちます。
Initialization Frame
アニメーションソースジオメトリを維持またはフリーズしてからそれをRestポーズとして使用するフレーム(時間)を指定します。
このパラメータは、 T-Pose が Use Initialization Frame に設定されている場合にのみ利用可能です。
T-Pose Attribute
キャプチャポジションのRestポーズが指定された(このノードの2番目の入力の)Pointアトリビュートの名前。
このパラメータは、 T-Pose が From Attribute に設定されている場合にのみ利用可能です。
Display 
以下のパラメータは、このノードのビューポートステートでMuscle Flex変形をどのように表示するのかを決めます。
Muscle Tension Visualizer
有効にすると、Muscle Flexパラメータによってアニメーションされるmuscletensionアトリビュートにカラービジュアライザが適用されます。
灰色は、筋張力が弱く、赤色は筋張力が強いことを示します。
Bone Geometry
有効にすると、ビューポートステートでアニメーションソースジオメトリ(このノードの2番目の入力)が表示されます。 これは、ほとんどの場合がアニメーションボーンジオメトリです。
Bone Color
ビューポートステートでの Bone Geometry のRGBカラーを設定します。
Muscle Tension Lines
有効にすると、ビューポートステートでMuscle Tension Lines(このノードの3番目の入力)が表示されます。
入力 
Input 1
ソリッドMuscleジオメトリ。
Input 2
アニメーションソースジオメトリ(たいていの場合はアニメーションボーンジオメトリ)とプリロール。
Input 3
Muscle Tension Lines(autoflex_id、muscletension)。
出力 
Output 1
アニメーションするmuscletensionが含まれたソリッドMuscleジオメトリ。
| See also |